Page 913 of 4133

109 Controls in detail
Lighting
Daytime running lamp mode
Canada only:�
Turn combination switch to
positionM orU.
When the engine is running, the low beam
headlamps are automatically switched on.
In low ambient light conditions, the parking
lamps will also switch on.
When you shift from a driving position to
positionN orP, the low beam switches off
(three minutes delay).
For nighttime driving you should turn the
combination switch to positionõ to
permit activation of the high beam head-
lamps.Night security illumination
When you turn off the engine and the last
door has been closed, the following lamps
will remain lit:
�
Parking lamps
�
Tail lamps
�
License plate lamps
�
Front fog lamps
The combination switch must be set to
positionU (
�page 107).Deactivating night security illumination
temporarily
�
Before leaving the vehicle, turn the key
in the steering lock to position0
(�page 33) then turn it to position2
and back to0.
The night security illumination is deac-
tivated. It will reactivate as soon as you
start the engine.
Setting illumination time
1Switch for fog lamps
iThe high beam flasher is always avail-
able.
iYou can reactivate this function within
ten minutes by opening a door or the
liftgate.
If you do not open a door or the liftgate
after turning off the engine, the lamps
will automatically switch off after
60 seconds.
Page 914 of 4133

110 Controls in detailLighting�
Stop the vehicle.
�
Make sure the ignition is switched on.
All the lamps in the instrument cluster
light up.
�
Turn combination switch to
positionM.
�
Press upper part1 of switch until the
clock, located in the instrument clus-
ter, displays the actual illumination
time.
�
Press upper part1 of switch again.
Each time the switch is pressed, the
illumination time increases by
15 seconds. You can set the illumina-
tion time between 0 (off) and
60 seconds.
Approximately five seconds after pressing
the switch, the illumination time is set and
the clock is displayed again.Locator lighting
During darkness, the following lamps will
come on when the vehicle is unlocked by
remote control:
�
Parking lamps
�
Tail lamps
�
License plate lamps
�
Front fog lamps
The combination switch must be set to
positionU (
�page 107).
The locator lighting switches off when the
driver’s door is opened. It switches off au-
tomatically after a period of approximately
40 seconds.Switching on high beams
�
Turn the combination switch
toõ(
�page 107).
�
Push the combination switch forward.
The high beam indicatorA in the
instrument cluster comes on.
High beam flasher
�
Pull the combination switch briefly in
direction2.
Page 915 of 4133

111 Controls in detail
Lighting
Fog lamps
The switch is located on the upper center
console.1Front fog lamps
2Indicator lamp
3Front fog lamps and rear fog lamp
Switching front fog lamps on and off
�
Make sure the low beam headlamps
are switched on.
�
Press upper part1 of switch.
The green indicator lamp‡ in the
instrument cluster comes on.
�
Press upper part1 of switch again.
The green indicator lamp‡ in the
instrument cluster goes out.Switching front fog lamps and rear fog
lamps on and off
�
Make sure the low beam headlamps
are switched on.
�
Press lower part3 of switch.
The green indicator lamp‡ in the
instrument cluster comes on in addi-
tion to the yellow indicator lamp2 in
the switch.
�
Press lower part3 of switch again.
The green indicator lamp‡ in the
instrument cluster and the yellow indi-
cator lamp2 in the switch go out.
Switching rear fog lamp on and off
�
Press upper part1 of switch.
The yellow indicator lamp2 in the
switch goes out.
�
Press upper part1 of switch.
The green indicator lamp‡ in the
instrument cluster goes out.
Warning!
G
In low ambient lighting or foggy conditions,
only switch from positionU toB with
the vehicle at a standstill. Switching
fromU toB will briefly switch off the
headlamps. Doing so while driving in low
ambient lighting conditions may result in an
accident.iThe fog lamps can be switched on with
combination switch in positionõ
orU. Consult your state Motor Reg-
ulations regarding allowable lamp oper-
ation.
Page 940 of 4133

136 Controls in detailAutomatic climate controlThe automatic climate control is operatio-
nal whenever the engine is running. You
can operate the climate control system in
either the automatic or manual mode. The
system cools or heats the interior depend-
ing on the selected interior temperature
and the current outside temperature.
Nearly all dust particles, pollutants and
odors are filtered out before outside air en-
ters the passenger compartment through
the air distribution system.Warning!
G
When operating the automatic climate con-
trol, the air that enters the passenger com-
partment through the air vents in the
footwell can be very hot or very cold (de-
pending on the set temperature). This may
cause burns or frostbite on unprotected skin
in the immediate area of the air vents.
Always keep sufficient distance between un-
protected parts of the body and the footwell
air vents. If necessary, change the air flow
using the air distribution controls to direct
the air away from the footwell air vents
(�page 138).
Warning!
G
Follow the recommended settings for heat-
ing and cooling given on the following pag-
es. Otherwise the windows could fog up,
impairing visibility and endangering you and
others.
iSevere conditions (e.g. strong air pollu-
tion) may require replacement of the fil-
ter before its scheduled interval. A
clogged filter will reduce the air volume
to the interior.
If the vehicle interior is hot, ventilate
the interior before driving off.
Keep the air intake grille in front of the
windshield free of snow and debris.
Do not touch the interior temperature
sensor to maintain a precise tempera-
ture.
The set value is indicated by a lighted
segment on the control wheels.
Page 1057 of 4133

253 Practical hints
What to do if …
Problem
Possible cause
Suggested solution
:
The yellow warning lamp flashes
after starting the engine or while
driving.
The engine oil level has sunk to the minimum
level. If the engine oil level continues to sink,
the warning lamp will light up.
�
Add approved oil at the next gas
station (
�page 302).
�
If oil loss is visible on the engine, have
the malfunction corrected as soon as
possible at a Mercedes-Benz Light
Truck Center.
_
The red indicator lamp does not
go out after starting the engine.
The adjustable telescoping steering column
is not properly locked.
�
Lock the adjustable steering column
(�page 39).
‡
The green front fog lamp indica-
tor lamp lights up when ignition
is turned on.
The front fog lamps are switched on.
�
Fog lamps (
�page 111).
<
The red seat belt warning lamp
illuminates for a brief period
after starting the engine.
The warning lamp reminds you to fasten seat
belts.
�
Fasten your seat belt (
�page 64).
W
The yellow low washer system
fluid level lamp comes on after
starting the engine or while driv-
ing.
There is approximately 1.3 US qt. (1.25 l) of
washer fluid remaining in the reservoir.
�
Add washer fluid (
�page 224).
The washer fluid may have frozen.
�
Move the vehicle to a warmer environ-
ment so that the washer fluid will
thaw.
�
Correct the concentration level after
the washer fluid in the reservoir
thaws.
Page 1070 of 4133
266 Practical hintsReplacing bulbs
�Replacing bulbsSafe vehicle operation depends on proper
exterior lighting and signaling. It is there-
fore essential that all bulbs and lamp as-
semblies are in good working order at all
times.
Correct headlamp adjustment is extremely
important. Have headlamps checked and
readjusted at regular intervals and when a
bulb has been replaced. See your autho-
rized Mercedes-Benz Light Truck Center
for headlamp adjustment.
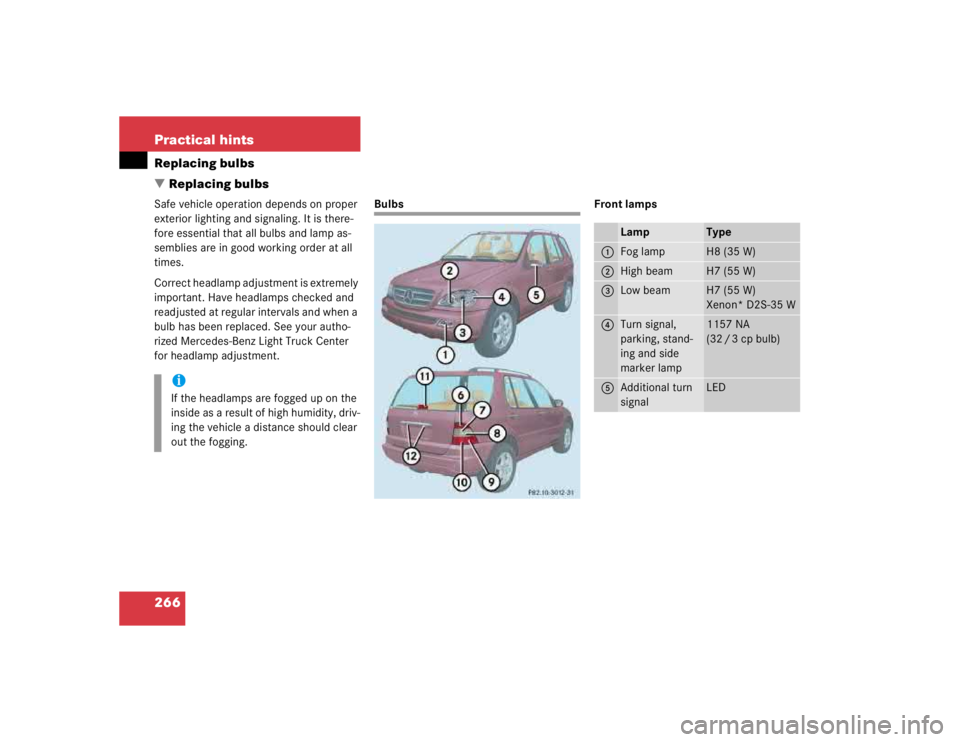
Bulbs Front lamps
iIf the headlamps are fogged up on the
inside as a result of high humidity, driv-
ing the vehicle a distance should clear
out the fogging.
Lamp
Type
1
Fog lamp
H8 (35 W)
2
High beam
H7 (55 W)
3
Low beam
H7 (55 W)
Xenon* D2S-35 W
4
Turn signal,
parking, stand-
ing and side
marker lamp
1157 NA
(32 / 3 cp bulb)
5
Additional turn
signal
LED
Page 1071 of 4133

267 Practical hints
Replacing bulbs
Rear lamps Notes on bulb replacement
�
Use only 12-volt bulbs of the same type
and with the specified watt rating.
�
Switch lights off before changing a bulb
to prevent short circuits.
�
Always use a clean lint-free cloth when
handling bulbs.
�
Your hands should be dry and free of oil
and grease.
�
If the newly installed bulb does not light
up, visit an authorized Mercedes-Benz
Light Truck Center.
�
Have the LEDs and bulbs for the follow-
ing lamps replaced by an authorized
Mercedes-Benz Light Truck Center:�
Additional turn signals in the exteri-
or rear view mirrors
�
Bi-Xenon lamps*
�
Front fog lamps (vehicles with sport
package)*
Lamp
Type
6
Brake lamp
1073
(32 cp bulb)
7
Backup lamp
1073
(32 cp bulb)
8
Turn signal lamp
PY 21 W
9
Tail, parking and
standing lamp
Rear fog lamp, driv-
er’s side
P 21 / 4 W
a
Side marker lamp
W5W
b
High mounted brake
lamp
1073
(32 cp bulb)
c
License plate lamps
C 5 W
Warning!
G
Keep bulbs out of reach of children.
Bulbs and bulb sockets can be very hot. Al-
low the lamp to cool down before changing
a bulb.
Halogen lamps contain pressurized gas. A
bulb can explode if you:�
touch or move it when hot
�
drop the bulb
�
scratch the bulb
Wear eye and hand protection.
Because of high voltage in xenon lamps, it is
dangerous to replace the bulb or repair the
lamp and its components. We recommend
that you have such work done by a qualified
technician.
Page 1074 of 4133
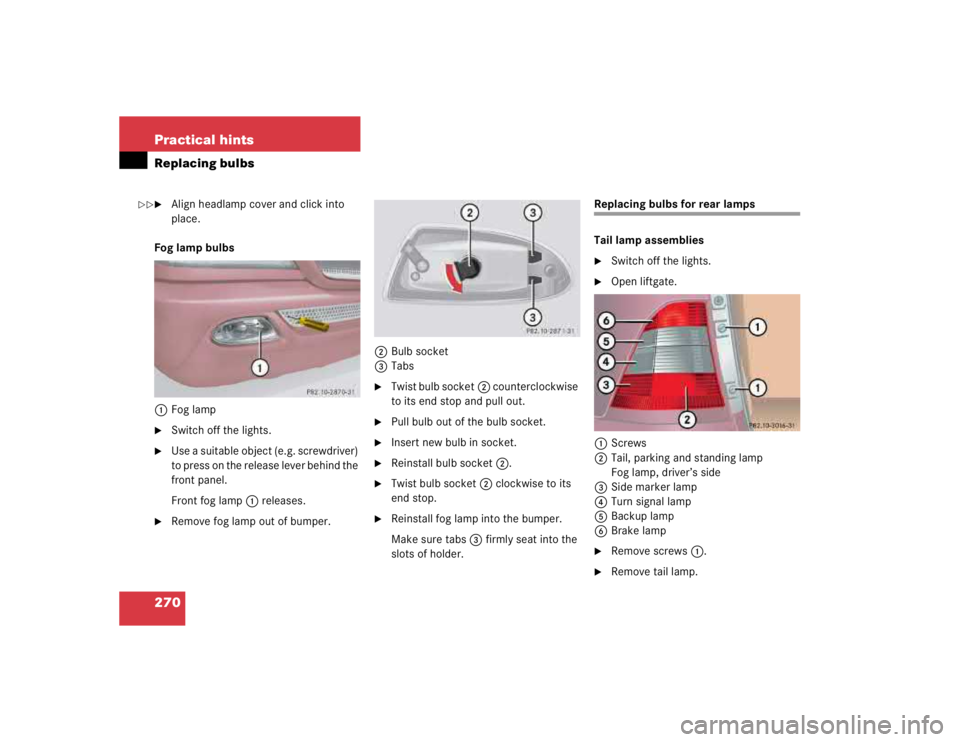
270 Practical hintsReplacing bulbs�
Align headlamp cover and click into
place.
Fog lamp bulbs
1Fog lamp
�
Switch off the lights.
�
Use a suitable object (e.g. screwdriver)
to press on the release lever behind the
front panel.
Front fog lamp1 releases.
�
Remove fog lamp out of bumper.2Bulb socket
3Tabs
�
Twist bulb socket2 counterclockwise
to its end stop and pull out.
�
Pull bulb out of the bulb socket.
�
Insert new bulb in socket.
�
Reinstall bulb socket2.
�
Twist bulb socket2 clockwise to its
end stop.
�
Reinstall fog lamp into the bumper.
Make sure tabs3 firmly seat into the
slots of holder.
Replacing bulbs for rear lamps
Tail lamp assemblies�
Switch off the lights.
�
Open liftgate.
1Screws
2Tail, parking and standing lamp
Fog lamp, driver’s side
3Side marker lamp
4Turn signal lamp
5Backup lamp
6Brake lamp
�
Remove screws1.
�
Remove tail lamp.
��