1997 MERCEDES-BENZ ML430 AUX
[x] Cancel search: AUXPage 3413 of 4133
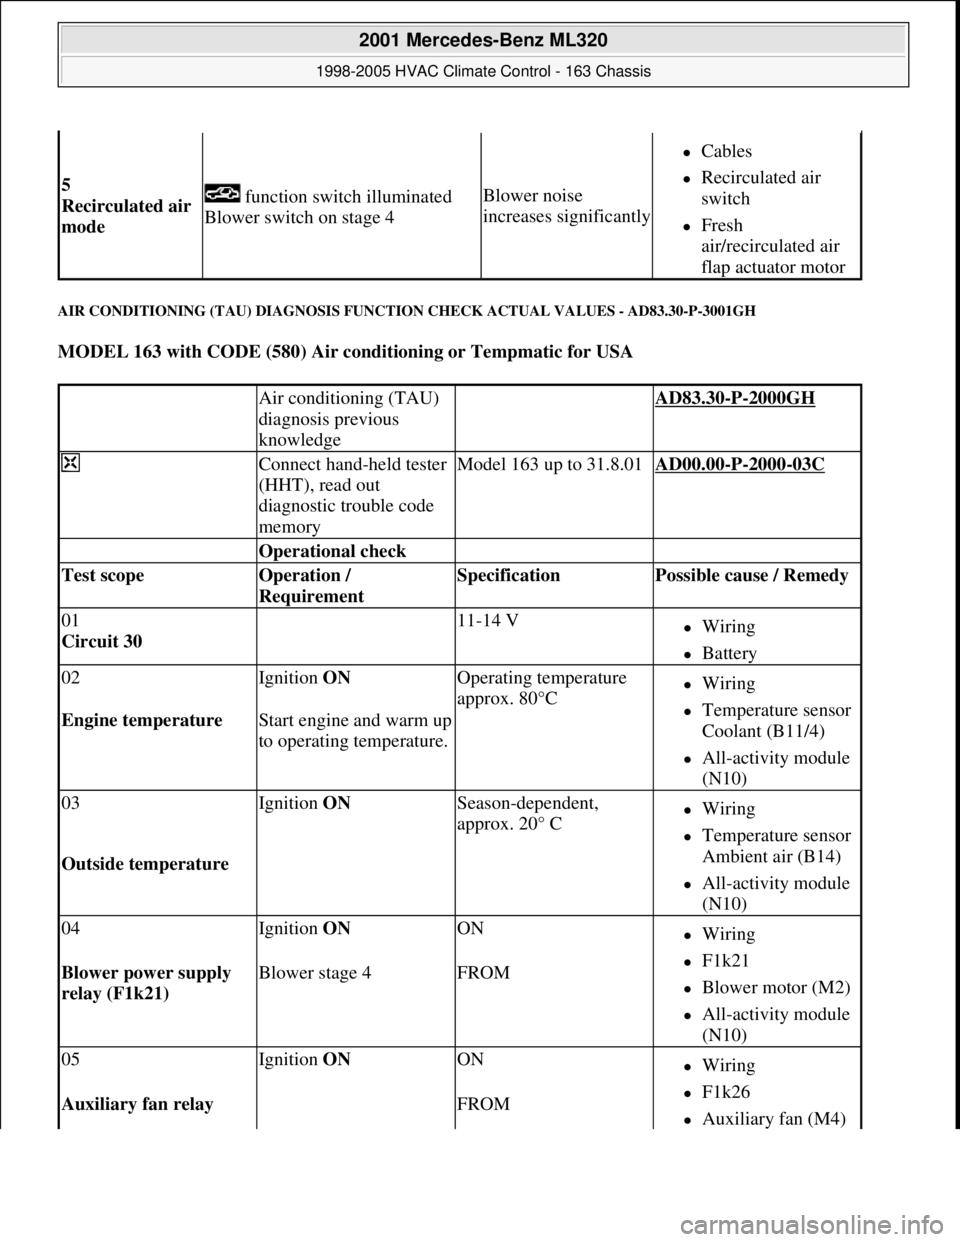
AIR CONDITIONING (TAU) DIAGNOSIS FUNCTION CHECK ACTUAL VALUES - AD83.30-P-3001GH
MODEL 163 with CODE (580) Air conditioning or Tempmatic for USA
5
Recirculated air
mode function switch illuminated
Blower switch on stage 4Blower noise
increases significantly
Cables
Recirculated air
switch
Fresh
air/recirculated air
flap actuator motor
Air conditioning (TAU)
diagnosis previous
knowledge AD83.30-P-2000GH
Connect hand-held tester
(HHT), read out
diagnostic trouble code
memoryModel 163 up to 31.8.01AD00.00-P-2000-03C
Operational check
Test scope Operation /
Requirement Specification Possible cause / Remedy
01
Circuit 30 11-14 VWiring
Battery
02Ignition ON Operating temperature
approx. 80°CWiring
Temperature sensor
Coolant (B11/4)
All-activity module
(N10)
Engine temperature Start engine and warm up
to operating temperature.
03Ignition ON Season-dependent,
approx. 20° CWiring
Temperature sensor
Ambient air (B14)
All-activity module
(N10)
Outside temperature
04Ignition ON ONWiring
F1k21
Blower motor (M2)
All-activity module
(N10)
Blower power supply
relay (F1k21) Blower stage 4FROM
05Ignition ON ONWiring
F1k26
Auxiliary fan (M4) Auxiliary fan relay FROM
2001 Mercedes-Benz ML320
1998-2005 HVAC Climate Control - 163 Chassis
me
Saturday, October 02, 2010 3:23:17 PMPage 169 © 2006 Mitchell Repair Information Company, LLC.
Page 3420 of 4133
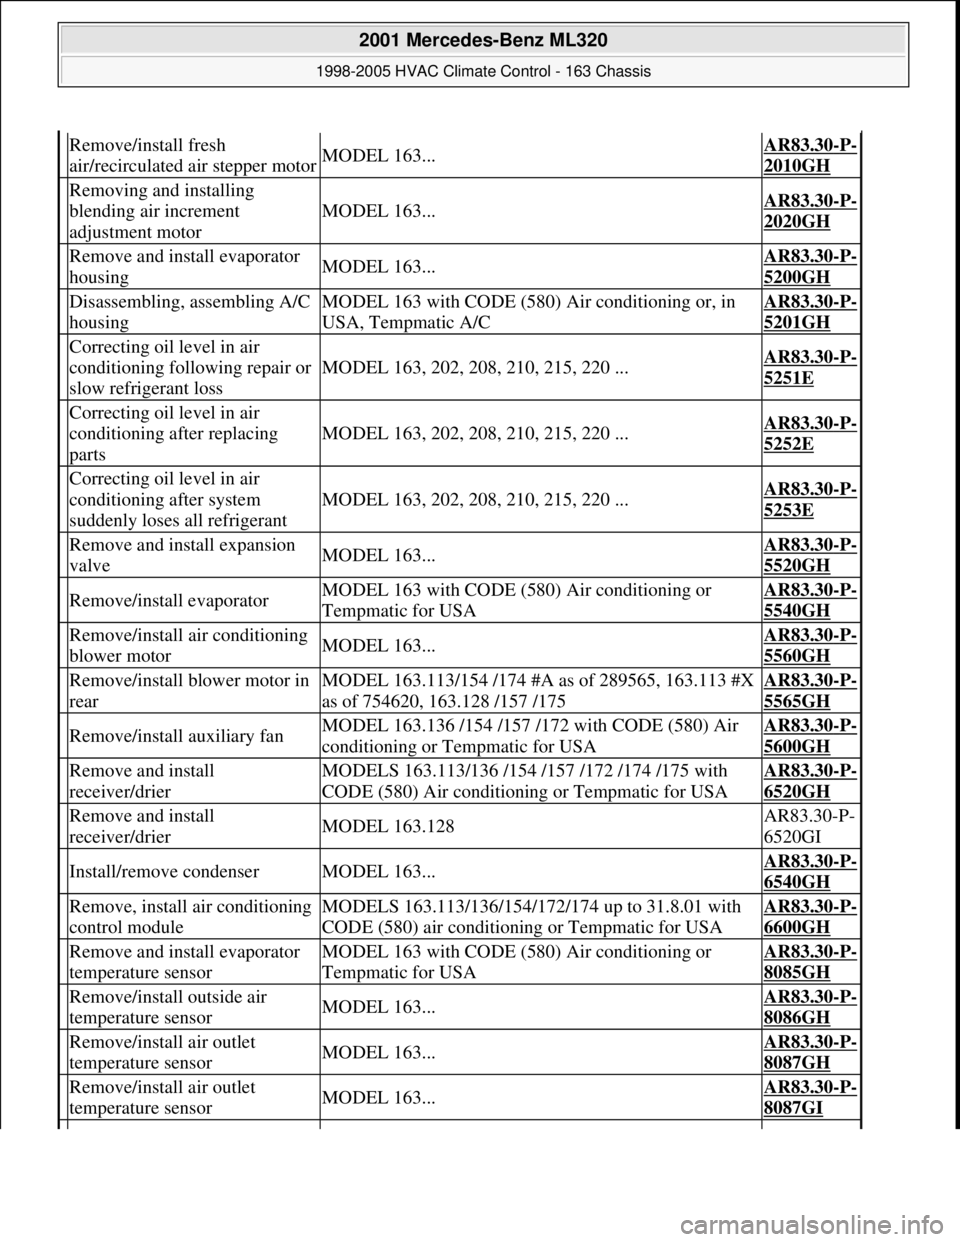
Remove/install fresh
air/recirculated air stepper motorMODEL 163...AR83.30-P-
2010GH
Removing and installing
blending air increment
adjustment motor
MODEL 163...AR83.30-P-
2020GH
Remove and install evaporator
housingMODEL 163...AR83.30-P-
5200GH
Disassembling, assembling A/C
housingMODEL 163 with CODE (580) Air conditioning or, in
USA, Tempmatic A/CAR83.30-P-
5201GH
Correcting oil level in air
conditioning following repair or
slow refrigerant loss
MODEL 163, 202, 208, 210, 215, 220 ...AR83.30-P-
5251E
Correcting oil level in air
conditioning after replacing
parts
MODEL 163, 202, 208, 210, 215, 220 ...AR83.30-P-
5252E
Correcting oil level in air
conditioning after system
suddenly loses all refrigerant
MODEL 163, 202, 208, 210, 215, 220 ...AR83.30-P-
5253E
Remove and install expansion
valveMODEL 163...AR83.30-P-
5520GH
Remove/install evaporatorMODEL 163 with CODE (580) Air conditioning or
Tempmatic for USAAR83.30-P-
5540GH
Remove/install air conditioning
blower motorMODEL 163...AR83.30-P-
5560GH
Remove/install blower motor in
rearMODEL 163.113/154 /174 #A as of 289565, 163.113 #X
as of 754620, 163.128 /157 /175AR83.30-P-
5565GH
Remove/install auxiliary fanMODEL 163.136 /154 /157 /172 with CODE (580) Air
conditioning or Tempmatic for USAAR83.30-P-
5600GH
Remove and install
receiver/drierMODELS 163.113/136 /154 /157 /172 /174 /175 with
CODE (580) Air conditioning or Tempmatic for USAAR83.30-P-
6520GH
Remove and install
receiver/drierMODEL 163.128AR83.30-P-
6520GI
Install/remove condenserMODEL 163...AR83.30-P-
6540GH
Remove, install air conditioning
control moduleMODELS 163.113/136/154/172/174 up to 31.8.01 with
CODE (580) air conditioning or Tempmatic for USAAR83.30-P-
6600GH
Remove and install evaporator
temperature sensorMODEL 163 with CODE (580) Air conditioning or
Tempmatic for USAAR83.30-P-
8085GH
Remove/install outside air
temperature sensorMODEL 163...AR83.30-P-
8086GH
Remove/install air outlet
temperature sensorMODEL 163...AR83.30-P-
8087GH
Remove/install air outlet
temperature sensorMODEL 163...AR83.30-P-
8087GI
2001 Mercedes-Benz ML320
1998-2005 HVAC Climate Control - 163 Chassis
me
Saturday, October 02, 2010 3:23:17 PMPage 176 © 2006 Mitchell Repair Information Company, LLC.
Page 3454 of 4133
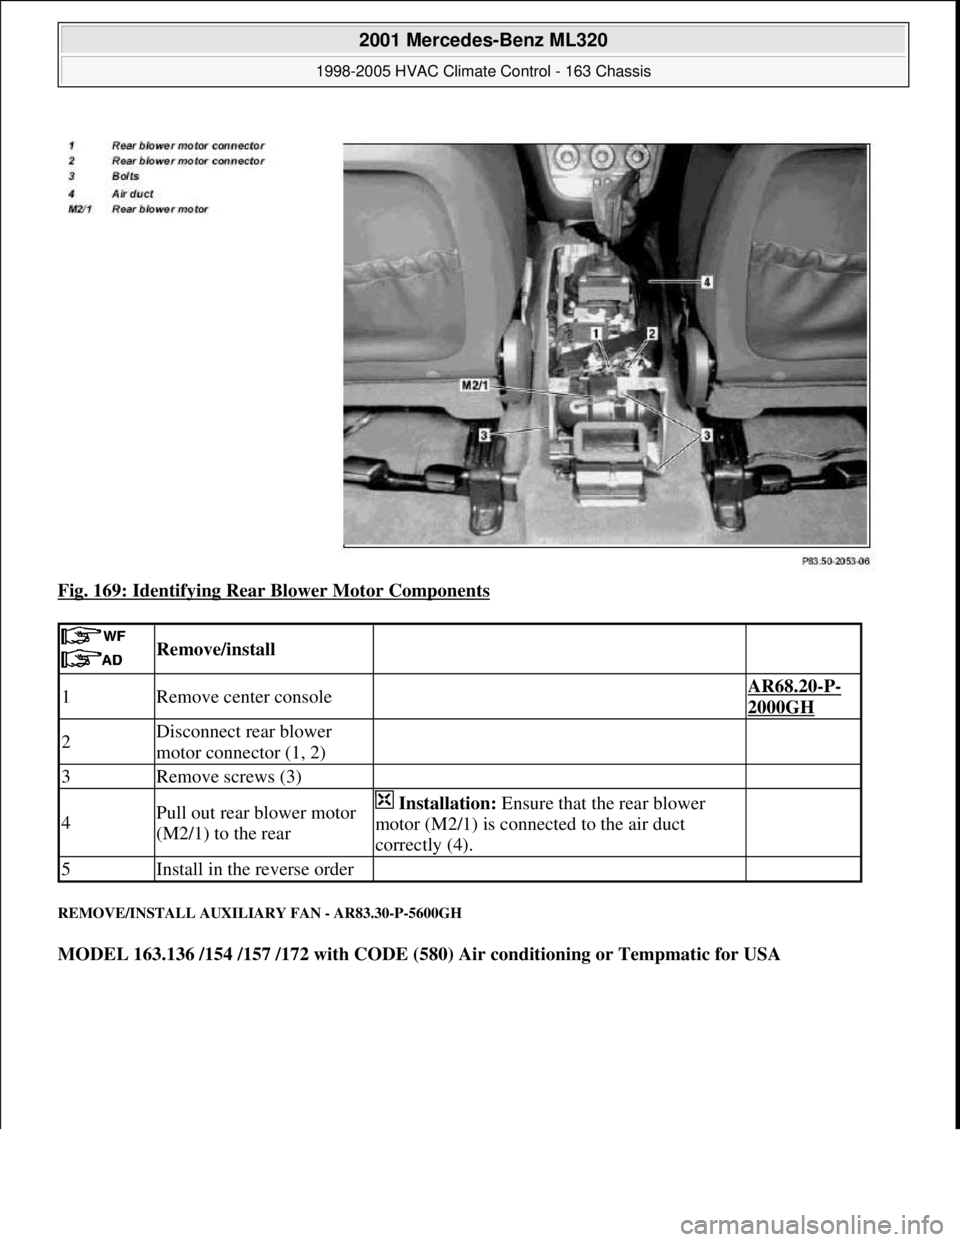
Fig. 169: Identifying Rear Blower Motor Components
REMOVE/INSTALL AUXILIARY FAN - AR83.30-P-5600GH
MODEL 163.136 /154 /157 /172 with CODE (580) Air conditioning or Tempmatic for USA
Remove/install
1Remove center console AR68.20-P-
2000GH
2Disconnect rear blower
motor connector (1, 2)
3Remove screws (3)
4Pull out rear blower motor
(M2/1) to the rear Installation: Ensure that the rear blower
motor (M2/1) is connected to the air duct
correctly (4).
5Install in the reverse order
2001 Mercedes-Benz ML320
1998-2005 HVAC Climate Control - 163 Chassis
me
Saturday, October 02, 2010 3:23:18 PMPage 210 © 2006 Mitchell Repair Information Company, LLC.
Page 3455 of 4133
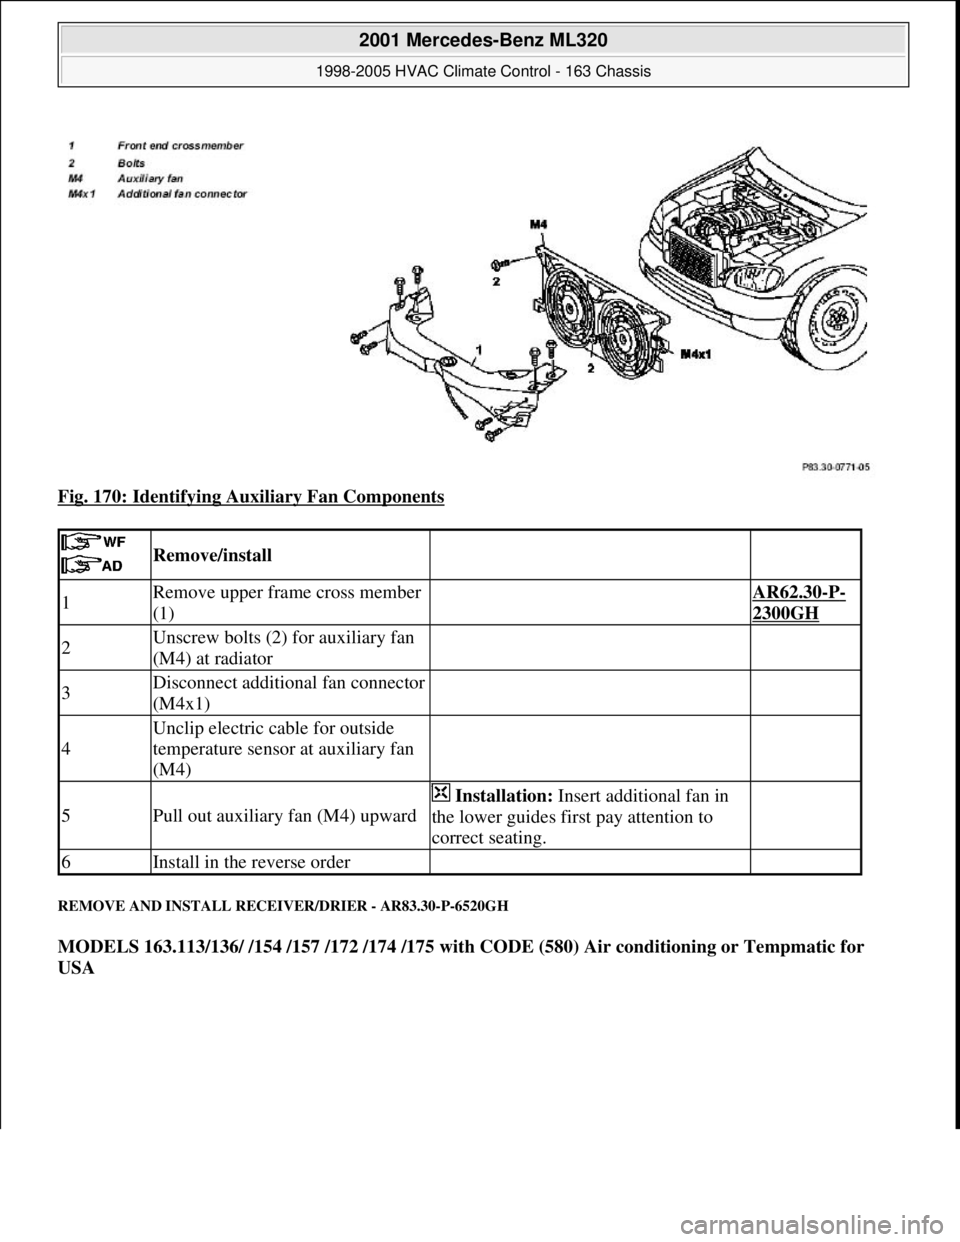
Fig. 170: Identifying Auxiliary Fan Components
REMOVE AND INSTALL RECEIVER/DRIER - AR83.30-P-6520GH
MODELS 163.113/136/ /154 /157 /172 /174 /175 with CODE (580) Air conditioning or Tempmatic for
USA
Remove/install
1Remove upper frame cross member
(1) AR62.30-P-
2300GH
2Unscrew bolts (2) for auxiliary fan
(M4) at radiator
3Disconnect additional fan connector
(M4x1)
4
Unclip electric cable for outside
temperature sensor at auxiliary fan
(M4)
5Pull out auxiliary fan (M4) upward
Installation: Insert additional fan in
the lower guides first pay attention to
correct seating.
6Install in the reverse order
2001 Mercedes-Benz ML320
1998-2005 HVAC Climate Control - 163 Chassis
me
Saturday, October 02, 2010 3:23:18 PMPage 211 © 2006 Mitchell Repair Information Company, LLC.
Page 3475 of 4133
REMOVAL & INSTALLATION
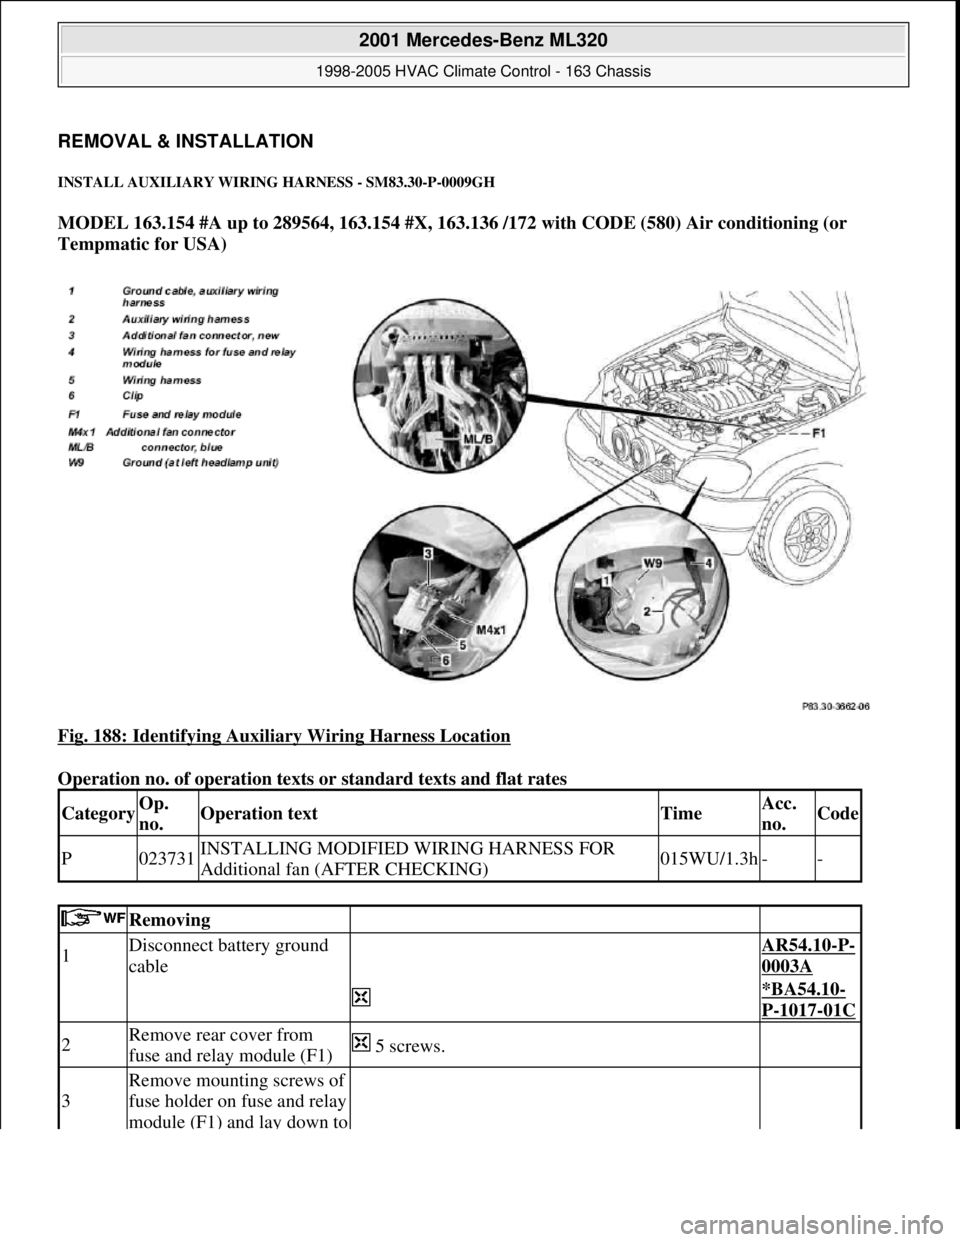
INSTALL AUXILIARY WIRING HARNESS - SM83.30-P-0009GH
MODEL 163.154 #A up to 289564, 163.154 #X, 163.136 /172 with CODE (580) Air conditioning (or
Tempmatic for USA)
Fig. 188: Identifying Auxiliary Wiring Harness Location
Operation no. of operation texts or standard texts and flat rates
CategoryOp.
no.Operation textTimeAcc.
no.Code
P023731INSTALLING MODIFIED WIRING HARNESS FOR
Additional fan (AFTER CHECKING)015WU/1.3h--
Removing
1Disconnect battery ground
cable AR54.10-P-
0003A
*BA54.10-
P-1017-01C
2Remove rear cover from
fuse and relay module (F1) 5 screws.
3
Remove mounting screws of
fuse holder on fuse and relay
module (F1) and lay down to
2001 Mercedes-Benz ML320
1998-2005 HVAC Climate Control - 163 Chassis
me
Saturday, October 02, 2010 3:23:19 PMPage 231 © 2006 Mitchell Repair Information Company, LLC.
Page 3476 of 4133
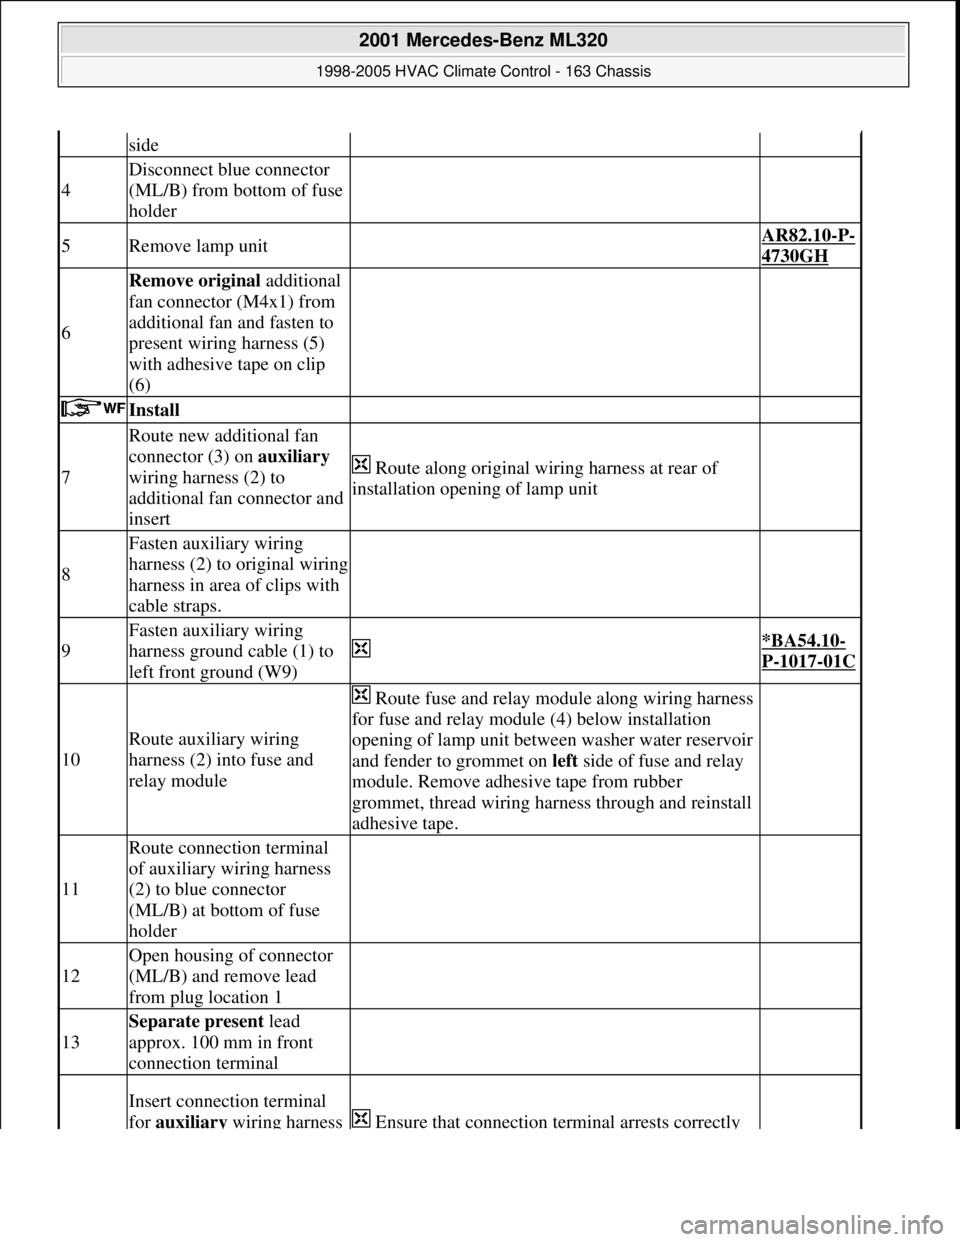
side
4
Disconnect blue connector
(ML/B) from bottom of fuse
holder
5Remove lamp unit AR82.10-P-
4730GH
6
Remove original additional
fan connector (M4x1) from
additional fan and fasten to
present wiring harness (5)
with adhesive tape on clip
(6)
Install
7
Route new additional fan
connector (3) on auxiliary
wiring harness (2) to
additional fan connector and
insert
Route along original wiring harness at rear of
installation opening of lamp unit
8
Fasten auxiliary wiring
harness (2) to original wiring
harness in area of clips with
cable straps.
9
Fasten auxiliary wiring
harness ground cable (1) to
left front ground (W9)
*BA54.10-
P-1017-01C
10
Route auxiliary wiring
harness (2) into fuse and
relay module
Route fuse and relay module along wiring harness
for fuse and relay module (4) below installation
opening of lamp unit between washer water reservoir
and fender to grommet on left side of fuse and relay
module. Remove adhesive tape from rubber
grommet, thread wiring harness through and reinstall
adhesive tape.
11
Route connection terminal
of auxiliary wiring harness
(2) to blue connector
(ML/B) at bottom of fuse
holder
12
Open housing of connector
(ML/B) and remove lead
from plug location 1
13
Separate present lead
approx. 100 mm in front
connection terminal
Insert connection terminal
for auxiliary wiring harness
Ensure that connection terminal arrests correctly
2001 Mercedes-Benz ML320
1998-2005 HVAC Climate Control - 163 Chassis
me
Saturday, October 02, 2010 3:23:19 PMPage 232 © 2006 Mitchell Repair Information Company, LLC.
Page 3477 of 4133
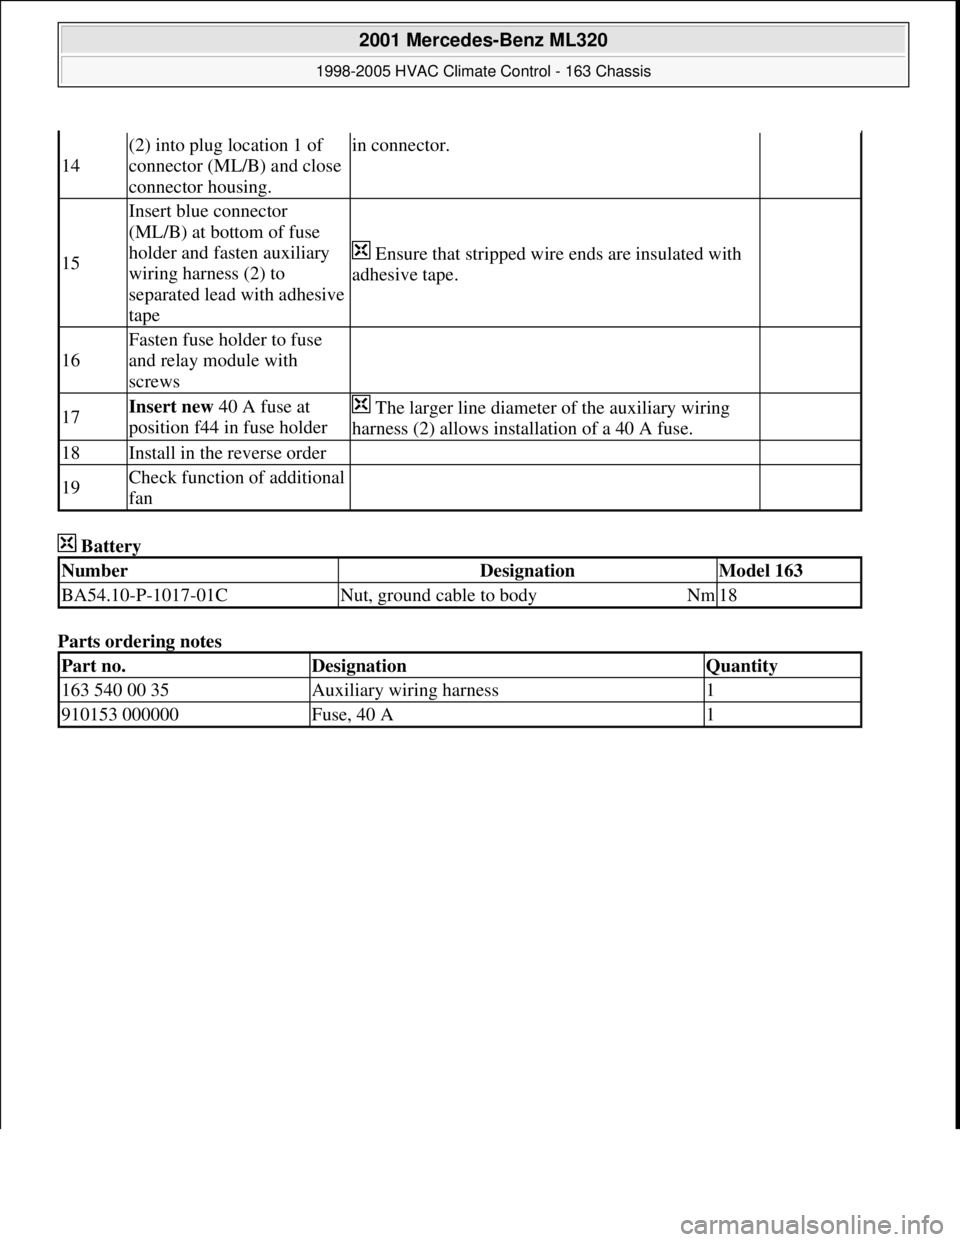
Battery
Parts ordering notes
14
(2) into plug location 1 of
connector (ML/B) and close
connector housing.in connector.
15
Insert blue connector
(ML/B) at bottom of fuse
holder and fasten auxiliary
wiring harness (2) to
separated lead with adhesive
tape
Ensure that stripped wire ends are insulated with
adhesive tape.
16
Fasten fuse holder to fuse
and relay module with
screws
17Insert new 40 A fuse at
position f44 in fuse holder The larger line diameter of the auxiliary wiring
harness (2) allows installation of a 40 A fuse.
18Install in the reverse order
19Check function of additional
fan
NumberDesignationModel 163
BA54.10-P-1017-01CNut, ground cable to bodyNm18
Part no.DesignationQuantity
163 540 00 35Auxiliary wiring harness1
910153 000000Fuse, 40 A1
2001 Mercedes-Benz ML320
1998-2005 HVAC Climate Control - 163 Chassis
me
Saturday, October 02, 2010 3:23:19 PMPage 233 © 2006 Mitchell Repair Information Company, LLC.
Page 3696 of 4133
T W34 SCHIEBEFENSTER HINTEN LINKS
T W35 SCHIEBEFENSTER HINTEN RECHTS
T W39 AUSSTELLFENSTER FAHRGASTRAUM MECHANISCH
P W40 ZIERTEILE CARBON DESIGNO
T W41 RUECKWANDTUER EINFLUEGELIG MIT FENSTER
P W42 ZIERTEILE CARBON DESIGNO-SCHWARZ
P W43 ZIERTEILE CARBON DESIGNO-GRUEN
P W44 ZIERTEILE CARBON DESIGNO-ROT
P W45 ZIERTEILE CARBON DESIGNO-BLAU
P W47 AUSSTELLFENSTER FAHRGASTRAUM HINTEN ELEKTR.LI U.RE
T W47 AUSSTELLFENSTER FAHRGASTRAUM HINTEN ELEKTR.LI U.RE
T W48 AUSSTELLFENSTER FAHRGASTRAUM MITTE MECHANISCH
T W49 AUSSTELLFENSTER FAHRGASTRAUM HINTEN MECHANISCH
P W50 ZIERTEILE CINNAMORRA DESIGNO
T W50 RUECKWANDTUER ZWEIFLUEGELIG 180 OHNE VERGLASUNG
T W51 RUECKWANDTUER ZWEIFLUEGELIG 180 GRAD M.VERGLASUNG
P W51 ZIERTEILE CINNAMORRA DESIGNO-NATUR
T W52 RUECKWANDTUER ZWEIFLUEGELIG 180 GRAD M.SCHIEBEFENS
P W52 ZIERTEILE CINNAMORRA DESIGNO-ANTHRAZIT
T W54 RUECKWANDTUER ZWEIFLUEGELIG 270 GRAD
T W55 RUECKWANDTUER ZWEIFLUEGELIG 270 GRAD MIT FENSTER
T W56 RUECKWANDTUER ZWEIFLUEGELIG 270 GRAD M.SCHIEBEFENS
T W57 HECKDREHTUEREN ASYM. 170 GRAD MIT FENSTER
P W57 RUECKWANDTUER ASYM. ZWEIFL. 170 GRAD MIT FENSTER
T W58 HECKDREHTUEREN ASYM. 170 GR. UNDURCHS. FENSTER
T W59 HECKKLAPPE MIT UNDURCHSICHTIGEM FENSTER
T W60 EINBAU LADELIFT
P W61 ZIERTEILE PAPPEL DESIGNO-NATUR
T W61 FENSTER IN HECKKLAPPE/HECKDREHTUEREN
T W62 RUECKWANDKLAPPE MIT FENSTER/HECKKLAPPE MIT FENSTER
P W62 ZIERTEILE PAPPEL DESIGNO-ANTHRAZIT
P W63 ZIERTEILE PAPPEL DESIGNO-BORDEAUX
P W64 ZIERTEILE AHORN MASER DESIGNO NATUR
T W64 RUECKWANDTUER ZWEIFLUEGELIG 95 GRAD
T W65 HECKKLAPPE
P W65 RUECKWANDKLAPPE OHNE FENSTER
P W66 ZIERTEILE AHORN MASER DESIGNO UMBRA
T W66 ELEKTR. ZUZIEHHILFE HECKKLAPPE
P W67 HOLZAUSFUEHRUNG CINNAMORA DESIGNO ROTBRAUN MATT
P W68 HOLZAUSFUEHRUNG PAPPEL DESINGO BRAUN
P W69 ZIERTEILE KLAVIERLACK DESIGNO SCHWARZ
T W70 COLORVERGLASUNG IN FOND, SCHWARZGLAS
P W71 ZIERTEILE STEIN DESIGNO VIKING GREEN
P W72 ZIERTEILE STEIN DESIGNO LABRADOR BLUE PEARL
T W73 AUFTRITT RUECKWANDTUER
T W75 AUFTRITT BREIT AM HECK
T W78 FENSTER IN HECKKL./HECKDREHT. M. WISCH/WASCHANL.
T W79 AUFTRITT BREIT AM HECK, HOEHER GESETZT
T W81 TUERHALTER FUER RUECKWANDTUER
T W90 WEGFALL RUECKWANDTUEREN
T W92 WEGFALL AUFTRITT SCHMAL AM HECK
T WA0 STEUERCODE WERK 157
T WA1 STEUERCODE WERK 157
T WA2 STEUERCODE WERK 157
T WA3 STEUERCODE WERK 157
T WA4 STEUERCODE WERK 157
T WA5 STEUERCODE WERK 157
T WA6 STEUERCODE WERK 157
T WA7 STEUERCODE WERK 157
T WA8 STEUERCODE WERK 157
T WA9 STEUERCODE WERK 157
T WB0 STEUERCODE WERK 157
T WB1 STEUERCODE WERK 157
T WB2 STEUERCODE WERK 157
T WB3 STEUERCODE WERK 157