Page 980 of 4133
176 Controls in detailUseful featuresWhen the connection is established, the
message
ROADSIDE ASSISTANCE –
CALL CONNECTED
appears in the MCS dis-
play. The Tele Aid system will transmit data
generating the vehicle identification num-
ber, model, color and location (subject to
availability of cellular and GPS signals).
A voice connection between the Roadside
Assistance dispatcher and the occupants
of the vehicle will be established. When a
voice connection is established the audio
system mutes and the message
TELE AID
– ROADSIDE ASSISTANCE CALL ACTIVE
ap-
pears in the MCS display.
�
Describe the nature of the need for as-
sistance.The Mercedes-Benz Roadside assistance
dispatcher will either dispatch a qualified
Mercedes-Benz technician or arrange to
tow your vehicle to the nearest
Mercedes-Benz Light Truck Center. For
services such as labor and / or towing,
charges may apply. Refer to the Roadside
Assistance manual for more information.
These programs are only available in the
USA:
�
Sign and Drive services: Services such
as jump start, a few gallons of fuel or
the replacement of a flat tire with the
vehicle spare tire are obtainable,
�
Remote Vehicle Diagnostics: This func-
tion permits the Mercedes-Benz Road-
side Assistance dispatcher to
download malfunction codes and actu-
al vehicle data.
iWhile the call is connected you can
change to navigation menu by pressing
NAVI button on the MCS unit.
iThe indicator lamp in the Roadside As-
sistance button• remains illumi-
nated in red for approx. ten seconds
during the system self-check after turn-
ing the key in the steering lock to
position2 (together with the SOS but-
ton and the Information button¡).
See system self-check (
�page 172)
when the indicator lamp does not light
up in red or stays on longer than ap-
proximately ten seconds.
Page 1001 of 4133
197 Operation
Driving instructions
The tread wear indicator appears as a solid
band across the tread.
Specified tire pressures must be main-
tained. This applies particularly if the tires
are subjected to high loads (e.g. high
speeds, heavy loads, high ambient temper-
atures).
Hydroplaning
Depending on the depth of the water on
the road, hydroplaning may occur even at
low speeds and with new tires. Reduce ve-
hicle speed, avoid track grooves in the
road and apply brakes cautiously in the
rain.Tire traction
The safe speed on a wet, snow covered or
icy road is always lower than on a dry road.You should pay particular attention to the
condition of the road whenever the outside
temperatures are close to the freezing
point.
Mercedes-Benz recommends M+S rated
radial-ply tires with a minimum tread depth
of approximately
1/6in (4 mm) on all four
wheels for the winter season to ensure
normal balanced handling characteristics.
On packed snow, they can reduce your
stopping distance as compared with sum-
mer tires.
Stopping distance, however, is still consid-
erably greater than when the road is not
covered with snow or ice. Exercise appro-
priate caution.
Warning!
G
Although the applicable federal motor vehi-
cle safety laws consider a tire to be worn
when the tread wear indicators (TWI) be-
come visible at approximately
1/16in
(1 .6 mm ), w e re c om men d th a t y o u do n o t a l-
low your tires to wear down to that level. As
tread depth approaches
1/8in (3 mm), the
adhesion properties on a wet road are
sharply reduced.
Depending upon the weather and / or road
surface (conditions), the tire traction varies
widely.
Warning!
G
Do not drive with a flat tire. A flat tire affects
the ability to steer or brake the vehicle. You
may lose control of the vehicle. Continued
driving with a flat tire or driving at high
speed with a flat tire will cause excessive
heat build-up and possibly a fire.
Warning!
G
If ice has formed on the road, tire traction
will be substantially reduced. Under such
weather conditions, drive, steer and brake
with extreme caution.
Page 1020 of 4133
216 OperationAt the gas stationEngine oil level
More information on engine oil see “Engine
oil” (
�page 218).Vehicle lighting
Check function and cleanliness. More in-
formation on replacing light bulbs can be
found in the “Practical hints” section
(
�page 266).
Tire inflation pressure
More information on tire inflation pressure
can be found in the “Operation” section
(�page 227).
!If you find that the brake fluid in the
brake fluid reservoir has fallen to the
minimum mark or below, have the
brake system checked for brake pad
thickness and leaks immediately. Noti-
fy an authorized Mercedes-Benz Light
Truck Center immediately. Do not add
brake fluid as this will not solve the
problem. For more information, see
“Practical Hints” (
�page 245).
Page 1031 of 4133
227 Operation
Tires and wheels
Life of tire
The service life of a tire is dependent upon
varying factors including but not limited to:�
Driving style
�
Tire pressure
�
Distance driven
Direction of rotation
Unidirectional tires offer added advantag-
es, such as better hydroplaning perfor-
mance. To benefit, however, you must
ensure that the tires rotate in the direction
specified.
An arrow on the sidewall indicates the in-
tended direction of rotation of the tire.
Checking tire inflation pressure
Correct the tire pressure only when tires
are cold.
Regularly check your tire pressure at inter-
vals of no more than 14 days.
If the tires are warm, you should only cor-
rect the tire pressure if it is too low for cur-
rent operating conditions.
A table on the fuel filler flap lists the spec-
ified tire inflation pressures for warm and
cold tires as well as for various operating
conditions.
!When the wheels are heavily soiled,
e.g. after driving through mud, clean
the inside of the wheels with a jet of
water.Warning!
G
Tires and spare tire should be replaced after
six years, regardless of the remaining tread.
!Keep unmounted tires in a cool, dry
place with as little exposure to light as
possible. Protect tires from contact
with oil, grease and gasoline.
Warning!
G
If the tire pressure drops repeatedly:�
Check the tires for punctures from for-
eign objects.
�
Check to see whether air is leaking from
the valves or from around the rim.
Page 1032 of 4133
228 OperationTires and wheelsTire pressure changes by approximately
1.5 psi (0.1 bar) per 18°F (10°C) of air
temperature change. Keep this in mind
when checking tire pressure where the
temperature is different from the outside
temperature.
Tire temperature and tire pressure are also
increased while driving, depending on the
driving speed and the tire load.Check the spare tire periodically for condi-
tion and inflation. Spare tire will age and
b e c o m e w o r n o v e r t i m e e v e n i f n e v e r u s e d ,
and thus should be inspected and replaced
when necessary.
Rotating wheels
The wheels can be rotated every 3000 to
6000 miles (5 000 to 10 000 km) or soon-
er if necessary, according to the degree of
tire wear. The same direction of tire rota-
tion must be retained.
Rotate the wheels before the characteris-
tic tire wear pattern becomes visible
(shoulder wear on front wheels and tread
center wear on rear wheels).
Thoroughly clean the inner side of the
wheels after each rotation. Check and en-
sure proper tire inflation pressure.
iThe pressures listed for light loads are
minimum values offering high driving
comfort.
Increased inflation pressures listed for
heavier loads may also be used for light
loads. These higher pressures produce
favorable handling characteristics. The
ride of the vehicle, however, will be
somewhat harder. Never exceed the
max. values or inflate tires below the
min. values listed in the fuel filler flap.
Warning!
G
Follow recommended inflation pressures.
Do not overinflate tires. Overinflated tires
can result in sudden deflation (blowout) be-
cause they are more likely to become punc-
tured or damaged by road debris, potholes,
etc.
Do not underinflate tires. Underinflated tires
wear unevenly, adversely affect handling
and fuel economy, and are more likely to fail
from being overheated.
Do not overload the tires by exceeding the
Gross Vehicle Weight Rating (GVWR) and
the Gross Axle Weight Rating (GAWR) as
indicated on the certification label on the
driver’s door pillar. Overloading the tires can
overheat them, possibly causing a blowout.
Warning!
G
Rotate front and rear wheels only if they are
of the same size,
Page 1045 of 4133
241 Practical hints
What to do if …
Where will I find ...?
Unlocking / locking in an emergency
Opening / closing in an emergency
Replacing bulbs
Replacing wiper blades
Flat tire
Battery
Jump starting
Towing the vehicle
Fuses
Page 1062 of 4133
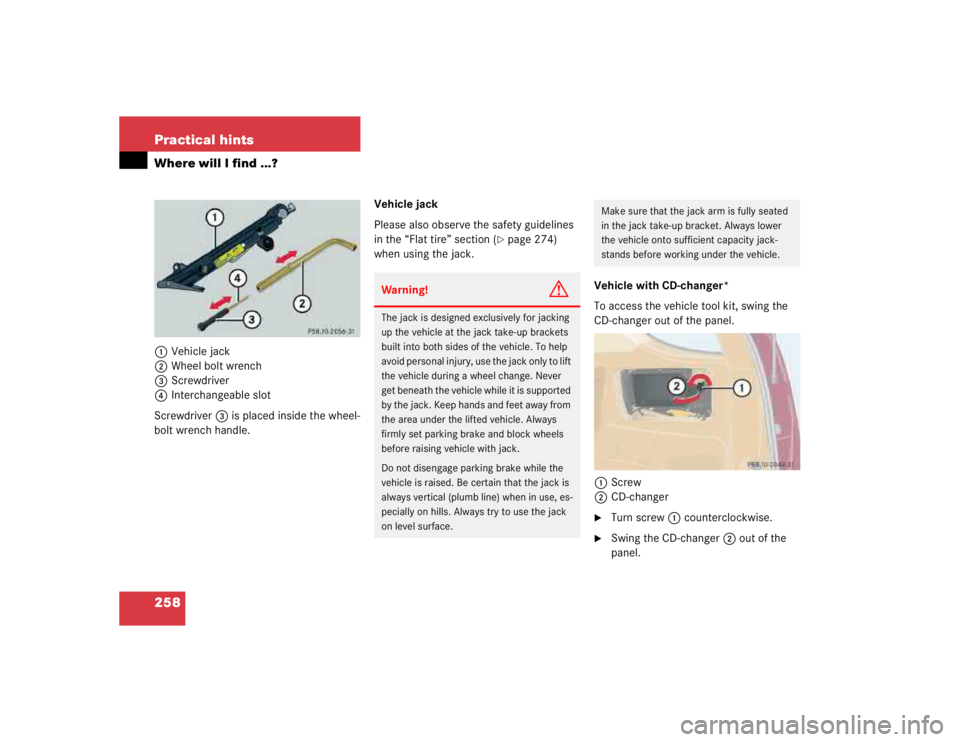
258 Practical hintsWhere will I find ...?1Vehicle jack
2Wheel bolt wrench
3Screwdriver
4Interchangeable slot
Screwdriver3 is placed inside the wheel-
bolt wrench handle.Vehicle jack
Please also observe the safety guidelines
in the “Flat tire” section (
�page 274)
when using the jack.
Vehicle with CD-changer*
To access the vehicle tool kit, swing the
CD-changer out of the panel.
1Screw
2CD-changer
�
Turn screw1 counterclockwise.
�
Swing the CD-changer2 out of the
panel.
Warning!
G
The jack is designed exclusively for jacking
up the vehicle at the jack take-up brackets
built into both sides of the vehicle. To help
avoid personal injury, use the jack only to lift
the vehicle during a wheel change. Never
get beneath the vehicle while it is supported
by the jack. Keep hands and feet away from
the area under the lifted vehicle. Always
firmly set parking brake and block wheels
before raising vehicle with jack.
Do not disengage parking brake while the
vehicle is raised. Be certain that the jack is
always vertical (plumb line) when in use, es-
pecially on hills. Always try to use the jack
on level surface.
Make sure that the jack arm is fully seated
in the jack take-up bracket. Always lower
the vehicle onto sufficient capacity jack-
stands before working under the vehicle.
Page 1063 of 4133
259 Practical hints
Where will I find ...?
Spare wheel (space-saver tire)
Use the spare wheel only temporarily,
while observing the following restrictions:�
Do not exceed vehicle speed of
50 mph (80 km / h).
�
Drive to the nearest repair facility to
have the flat tire repaired or replaced
as appropriate.
�
Do not operate vehicle with more than
one spare wheel mounted.Removing spare wheel
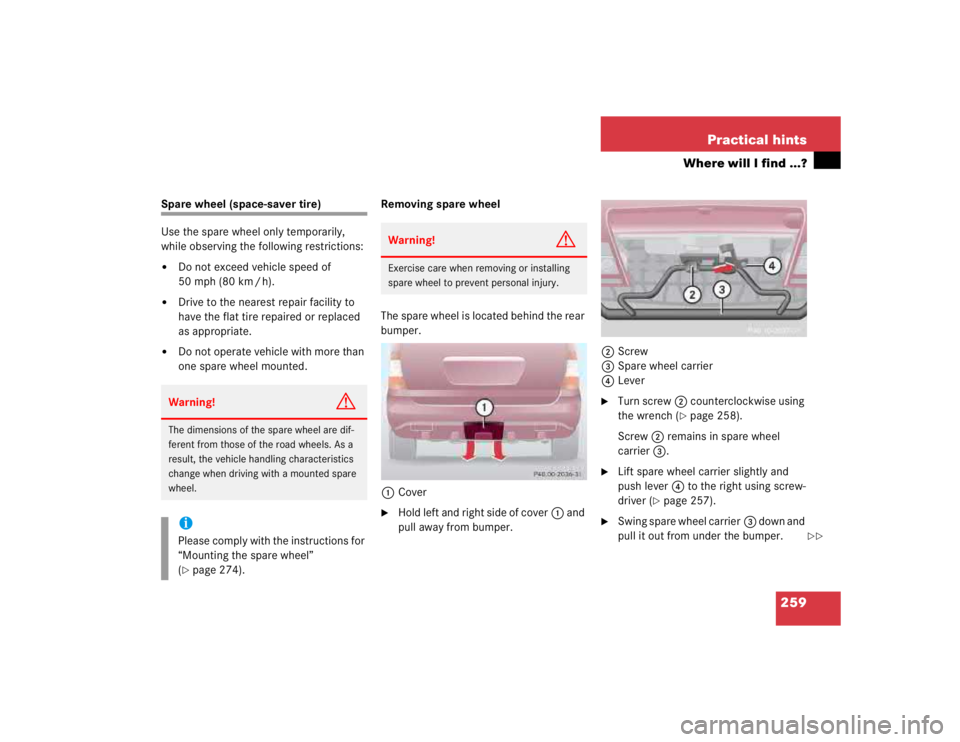
The spare wheel is located behind the rear
bumper.
1Cover
�
Hold left and right side of cover1 and
pull away from bumper.2Screw
3Spare wheel carrier
4Lever
�
Turn screw2 counterclockwise using
the wrench (
�page 258).
Screw2 remains in spare wheel
carrier3.
�
Lift spare wheel carrier slightly and
push lever4 to the right using screw-
driver (
�page 257).
�
Swing spare wheel carrier3 down and
pull it out from under the bumper.
Warning!
G
The dimensions of the spare wheel are dif-
ferent from those of the road wheels. As a
result, the vehicle handling characteristics
change when driving with a mounted spare
wheel.iPlease comply with the instructions for
“Mounting the spare wheel”
(�page 274).
Warning!
G
Exercise care when removing or installing
spare wheel to prevent personal injury.
��