Page 166 of 514

Installation (Miata)
1. Lightly coat input shaft splines, release bearing, and fork contact areas with molybdenum disulfide
grease. Align clutch cover dowel holes with flywheel dowels. Tighten clutch cover bolts evenly in a
crisscross pattern to specification. See TORQUE SPECIFICATIONS
.
2. Place a wooden block on jack, and position jack under front of oil pan. Raise front of engine to ease
transmission installation. Install transmission. Tighten transmission-to-engine block bolts to specification.
See TORQUE SPECIFICATIONS
. Place jack (from front of engine) under transmission.
3. Raise transmission until level with engine. Position Power Plant Frame (PPF) in place. Install
PPF/differential mounting spacer, and tighten bolts to 27-38 ft. lbs. (37-51 N.m). Install and tighten PPF
side mounting bolts.
4. Install sleeve into PPF housing block. Install spacer and bolts. Install reamer bolt into front hole, and
tighten bolt. See Fig. 5
.
5. Install transmission-to-PPF bracket. Install remaining PPF bolts, and tighten to specification. See
TORQUE SPECIFICATIONS
. To complete installation, reverse removal procedure.
RELEASE BEARING & FORK
Removal (B2300, B2500, B3000 & B4000)
With transmission removed, twist release bearing and carrier assembly until preload spring pushes bearing
assembly from slave cylinder. See Fig. 8
.
Installation
Lubricate bearing bore and bearing carrier with NIGI No. 2 (lithium base) grease. Push release bearing
assembl
y onto clutch slave cylinder. NOTE: Front PPF-to-differential side mounting bolt is the reamer bolt, used to
align frame.
NOTE: Use only lithium base grease on release bearing. DO NOT use petroleum base
lubricants.
1997 Mazda MX-5 Miata
CLUTCH 1997-98 CLUTCHES Mazda - RWD
Microsoft
Sunday, July 05, 2009 1:36:47 PMPage 10 © 2005 Mitchell Repair Information Company, LLC.
Page 167 of 514
Fig. 8: Servicing Clutch Release Bearing (B2300, B2500, B3000 & B4000)
Courtesy of FORD MOTOR CO.
Removal & Installation (Miata)
1. Remove transmission. See CLUTCH ASSEMBLY . Remove release bearing and fork. Turn release
bearing in both directions. Replace bearing if rough or noisy.
2. Inspect release fork for wear and damage. Replace if necessary. Apply molybdenum disulfide grease to
release bearin
g contact and sliding surfaces. To complete installation, reverse removal procedure.
1997 Mazda MX-5 Miata
CLUTCH 1997-98 CLUTCHES Mazda - RWD
Microsoft
Sunday, July 05, 2009 1:36:47 PMPage 11 © 2005 Mitchell Repair Information Company, LLC.
Page 168 of 514
CLUTCH MASTER CYLINDER
Removal (B2300, B2500, B3000 & B4000)
1. Disengage master cylinder push rod from clutch pedal. Disconnect clutch/starter interlock switch
connector. See Fig. 9
.
2. Using Clutch Disconnect Tool (T88T-70522-A), disconnect hydraulic line. See Fig. 2
. Pull hydraulic
line to disconnect line from clutch slave cylinder. Remove master cylinder, reservoir, and hydraulic line.
Plug lines.
Fig. 9: Removing Clutch/Starter Interlock Switch (B2300, B2500, B3000 & B4000)
Courtesy of FORD MOTOR CO.
CAUTION: Disconnect master cylinder push rod if slave cylinder is to be
disconnected from release lever or bearing. Permanent damage to master
cylinder will occur if master cylinder is activated with slave cylinder
1997 Mazda MX-5 Miata
CLUTCH 1997-98 CLUTCHES Mazda - RWD
Microsoft
Sunday, July 05, 2009 1:36:47 PMPage 12 © 2005 Mitchell Repair Information Company, LLC.
Page 169 of 514

Installation
Insert master cylinder push rod through opening in bulkhead. Install master cylinder. Connect hydraulic lines.
Install fluid reservoir. Install push rod on clutch pedal. Bleed hydraulic system. See HYDRAULIC SYSTEM
BLEEDING .
Removal & Installation (Miata)
Disconnect hydraulic line and master cylinder mounting nuts. Disengage push rod from clutch pedal. Remove
master cylinder. To install, reverse removal procedure and bleed hydraulic system. See HYDRAULIC
SYSTEM BLEEDING .
CLUTCH RELEASE CYLINDER
Removal & Installation (B2300, B2500, B3000 & B4000)
Release cylinder is removed with clutch. See CLUTCH ASSEMBLY.
Removal & Installation (Miata)
Raise and support vehicle. Disconnect and plug hydraulic line. Remove clutch release cylinder. To install,
reverse removal procedure. Bleed hydraulic system. See HYDRAULIC SYSTEM BLEEDING
.
OVERHAUL
CLUTCH MASTER CYLINDER disconnected.
NOTE: Overhaul procedures for B2300, B2500, B3000 and B4000 are not available.
NOTE: Use exploded view of clutch master cylinder for overhaul procedure. See Fig.
10 .
1997 Mazda MX-5 Miata
CLUTCH 1997-98 CLUTCHES Mazda - RWD
Microsoft
Sunday, July 05, 2009 1:36:47 PMPage 13 © 2005 Mitchell Repair Information Company, LLC.
Page 170 of 514
Fig. 10: Exploded View Of Clutch Master Cylinder (Miata)
Courtesy of MAZDA MOTORS CORP.
CLUTCH RELEASE CYLINDER
1997 Mazda MX-5 Miata
CLUTCH 1997-98 CLUTCHES Mazda - RWD
Microsoft
Sunday, July 05, 2009 1:36:47 PMPage 14 © 2005 Mitchell Repair Information Company, LLC.
Page 171 of 514

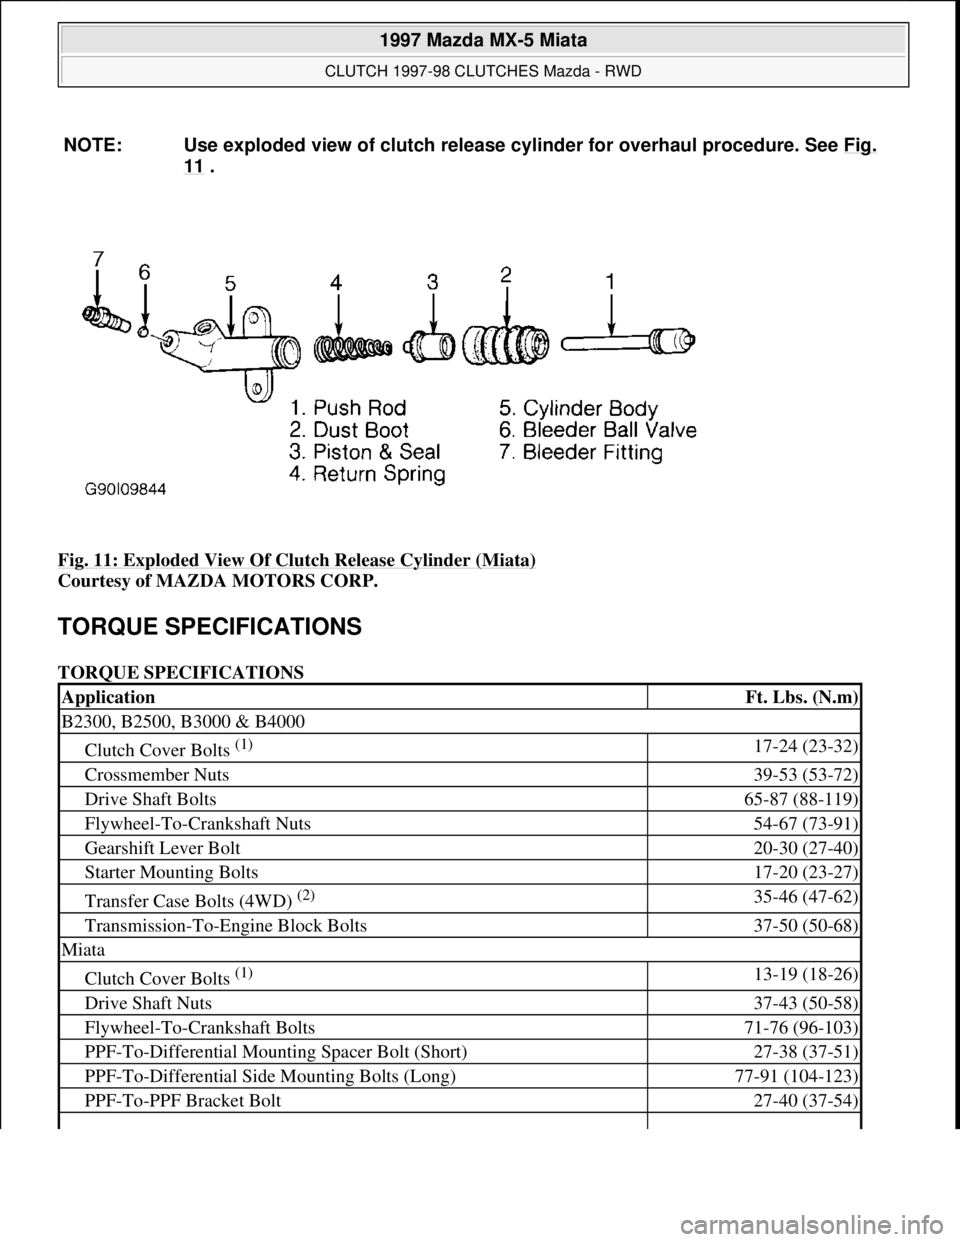
Fig. 11: Exploded View Of Clutch Release Cylinder (Miata)
Courtesy of MAZDA MOTORS CORP.
TORQUE SPECIFICATIONS
TORQUE SPECIFICATIONS NOTE: Use exploded view of clutch release cylinder for overhaul procedure. See Fig.
11 .
ApplicationFt. Lbs. (N.m)
B2300, B2500, B3000 & B4000
Clutch Cover Bolts (1) 17-24 (23-32)
Crossmember Nuts39-53 (53-72)
Drive Shaft Bolts65-87 (88-119)
Flywheel-To-Crankshaft Nuts54-67 (73-91)
Gearshift Lever Bolt20-30 (27-40)
Starter Mounting Bolts17-20 (23-27)
Transfer Case Bolts (4WD) (2) 35-46 (47-62)
Transmission-To-Engine Block Bolts37-50 (50-68)
Miata
Clutch Cover Bolts (1) 13-19 (18-26)
Drive Shaft Nuts37-43 (50-58)
Flywheel-To-Crankshaft Bolts71-76 (96-103)
PPF-To-Differential Mounting Spacer Bolt (Short)27-38 (37-51)
PPF-To-Differential Side Mounting Bolts (Long)77-91 (104-123)
PPF-To-PPF Bracket Bolt27-40 (37-54)
1997 Mazda MX-5 Miata
CLUTCH 1997-98 CLUTCHES Mazda - RWD
Microsoft
Sunday, July 05, 2009 1:36:47 PMPage 15 © 2005 Mitchell Repair Information Company, LLC.
Page 172 of 514
PPF-To-Transmission Side Mounting Bolts (Long)77-91 (104-123)
Starter Mounting Bolts28-38 (38-51)
Transmission-To-Engine Block Bolts48-65 (64-89)
Transmission-To-PPF Bracket Bolts27-40 (37-54)
(1)Tighten in a crisscross pattern.
(2)Tighten in sequence. See Fig. 3 .
1997 Mazda MX-5 Miata
CLUTCH 1997-98 CLUTCHES Mazda - RWD
Microsoft
Sunday, July 05, 2009 1:36:47 PMPage 16 © 2005 Mitchell Repair Information Company, LLC.
Page 200 of 514

SOLENOIDS & SOLENOID VALVES
SOLENOIDS & SOLENOID VALVES
SWITCHES
SWITCHES
MISCELLANEOUS
MISCELLANEOUS
Vehicle Speed Sensor (VSS)On speedometer assembly.
Water Temperature Sender UnitOn center of engine. See Fig. 1 .
Washer Fluid Level SensorOn washer fluid reservoir. See Fig. 1 .
ComponentComponent Location
AT Interlock SolenoidIn steering column, near ignition switch. See Fig. 2 .
EC-AT Solenoid ValveOn left side of transmission.
EGR Solenoid Valve (Vacuum)On right side of engine compartment. See Fig. 1 .
EGR Solenoid Valve (Vent)On right side of engine compartment. See Fig. 1 .
Fourth Gear Solenoid ValveOn left side of transmission.
Idle Air Control ValveOn right side, front of engine compartment. See Fig. 1 .
PRC Solenoid ValveOn right side, front of engine. See Fig. 1 .
Purge Solenoid ValveOn right strut tower. See Fig. 1 .
ComponentComponent Location
Back-Up Lamp Switch (M/T)On right side of transmission. See Fig. 1 .
Brake SwitchOn bracket, above brake pedal. See Fig. 2 .
Buckle SwitchOn driver side seat belt buckle. See Fig. 3 .
Clutch Switch (M/T)On bracket, above clutch pedal. See Fig. 2 .
Hold SwitchUnder right side of center console.
Key Reminder SwitchIn steering column, near ignition switch.
Neutral Switch (M/T)On right side of transmission. See Fig. 1 .
Oil Pressure SwitchOn right side of engine. See Fig. 1 .
"P" Range SwitchUnder center console, on base of gear selector.
Parking Brake SwitchOn base of parking brake lever. See Fig. 4 .
Power Steering Pressure SwitchOn power steering pump assembly.
Refrigerant Pressure SwitchIn front of engine compartment, near radiator support. See Fig. 1 .
Starter Interlock Switch (M/T)On bracket, above clutch pedal. See Fig. 2 .
ThermoswitchUnder right side of dash.
Transmission Range SwitchOn left side of transmission.
ComponentComponent Location
1997 Mazda MX-5 Miata
1997 MAZDA MX-5 Miata
Microsoft
Sunday, July 05, 2009 1:54:00 PMPage 3 © 2005 Mitchell Repair Information Company, LLC.