1997 MAZDA MIATA clutch
[x] Cancel search: clutchPage 209 of 514
ENGINE
Removal (Miata)
1. Release residual pressure from fuel system. See FUEL PRESSURE RELEASE & PRIMING .
Disconnect negative battery cable from trunk-mounted battery. Reference mark and remove hood. Raise
vehicle and remove engine undercover. See Fig. 2
. Drain engine, transmission and cooling system fluids.
2. Remove transmission. For automatic transmission removal procedure, see REMOVAL &
INSTALLATION article in TRANSMISSION SERVICING. For manual transmission removal
procedure, see appropriate article in CLUTCHES. NOTE: On Miata with audio anti-theft system, radio will not operate if power to radio is
cut. Obtain code from customer to reactivate radio. To reactivate radio after
reconnecting power supply, turn ignition switch to ACC position. Press and
hold FF and REW buttons until CODE is displayed. Again press and hold FF and
REW buttons until bars (----) are displayed. Use preset button No. 1 to enter first
number. Use preset buttons No. 2 to enter second number, 3 for third number,
etc. Press FF and REW buttons for about 1.5 seconds until a beep is heard.
After 5 seconds, flashing CODE will disappear and radio will operate.
1997 Mazda MX-5 Miata
1997-98 ENGINES 1.8L 4-Cylinder
Microsoft
Sunday, July 05, 2009 1:55:15 PMPage 3 © 2005 Mitchell Repair Information Company, LLC.
Page 214 of 514

Fig. 5: Removing Engine Components (Protege)
Courtesy of MAZDA MOTORS CORP.
2. Lower vehicle. Remove air cleaner assembly. Remove battery/carrier assembly. Remove throttle cable
and air intake duct across radiator (if equipped).
3. Remove all drive belts. DO NOT disconnect power steering hoses or A/C compressor hoses. Unbolt
power steering pump and A/C compressor from engine, and wire aside.
4. Note locations and disconnect all necessary electrical connectors, ground wires, vacuum hoses, fuel
hoses, coolant hoses and control cables for engine removal.
5. Plug all fuel hoses to avoid leakage. Attach engine support bar or engine hoist to secure engine. Raise
vehicle. Disconnect exhaust manifold down pipe and exhaust brackets from engine. On A/T models,
remove shift control cable.
6. On M/T models, remove shift control linkage and extension bar. Remove clutch release cylinder and fluid
line bracket from transaxle housing, leaving fluid line connected to cylinder. Secure cylinder away from
transaxle.
7. On all models, remove transmission wiring harness connectors and speedometer cable. Remove axle shaft
nuts from hubs. Disconnect stabilizer bar from lower control arms. Separate lower ball joints and steering
tie-rod ends from steering knuckles.
8. Pry axle shafts out of transaxle. Remove and discard circlip from axle shafts. For further information on
axle shafts, see appropriate article in DRIVE AXLES.
9. Remove transaxle mount nuts from crossmember and loosen crossmember bolts. See Fig. 6
. Lower
vehicle and attach engine hoist for engine removal. Remove engine front mount and transaxle top mount
from inner fender panels. Remove transaxle crossmember. Remove engine and transaxle assembly from
top of vehicle.
10. To install, reverse removal procedure. Tighten bolts and nuts to specifications. See TORQUE
SPECIFICATIONS . Fill all fluids to correct level. Prime fuel system before attempting to start engine.
See FUEL PRESSURE RELEASE & PRIMING
. Bleed cooling system. See COOLING SYSTEM
BLEEDING.
1997 Mazda MX-5 Miata
1997-98 ENGINES 1.8L 4-Cylinder
Microsoft
Sunday, July 05, 2009 1:55:15 PMPage 8 © 2005 Mitchell Repair Information Company, LLC.
Page 226 of 514
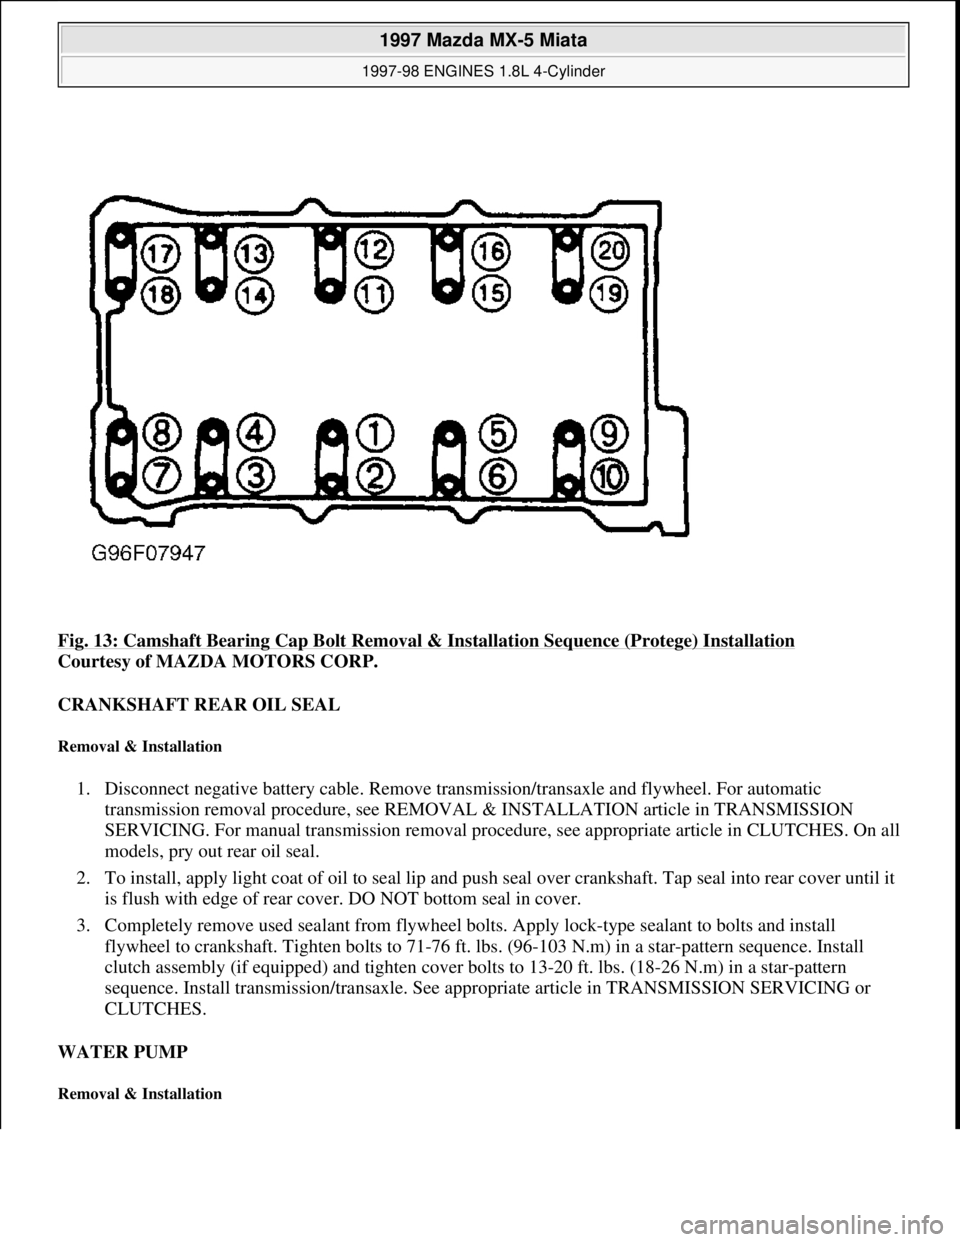
Fig. 13: Camshaft Bearing Cap Bolt Removal & Installation Sequence (Protege) Installation
Courtesy of MAZDA MOTORS CORP.
CRANKSHAFT REAR OIL SEAL
Removal & Installation
1. Disconnect negative battery cable. Remove transmission/transaxle and flywheel. For automatic
transmission removal procedure, see REMOVAL & INSTALLATION article in TRANSMISSION
SERVICING. For manual transmission removal procedure, see appropriate article in CLUTCHES. On all
models, pry out rear oil seal.
2. To install, apply light coat of oil to seal lip and push seal over crankshaft. Tap seal into rear cover until it
is flush with edge of rear cover. DO NOT bottom seal in cover.
3. Completely remove used sealant from flywheel bolts. Apply lock-type sealant to bolts and install
flywheel to crankshaft. Tighten bolts to 71-76 ft. lbs. (96-103 N.m) in a star-pattern sequence. Install
clutch assembly (if equipped) and tighten cover bolts to 13-20 ft. lbs. (18-26 N.m) in a star-pattern
sequence. Install transmission/transaxle. See appropriate article in TRANSMISSION SERVICING or
CLUTCHES.
WATER PUMP
Removal & Installation
1997 Mazda MX-5 Miata
1997-98 ENGINES 1.8L 4-Cylinder
Microsoft
Sunday, July 05, 2009 1:55:15 PMPage 20 © 2005 Mitchell Repair Information Company, LLC.
Page 311 of 514

ELECTRICAL COMPONENT LOCATIONS
OPERATION
All air control doors are controlled manually by cable from control panel. Blower resistor determines blower
speed. With blower switch in high position, blower motor is grounded directly through blower switch. With
blower switch in all other positions, blower motor is grounded through blower resistor and blower switch.
A/C compressor clutch circuit is completed when A/C relay is energized and pressure switch is closed. A/C
relay is energized when Powertrain Control Module (PCM) grounds the solenoid circuit of the relay. The PCM
energizes A/C relay if evaporator thermoswitch is closed and A/C and blower switches are on. The PCM also
controls A/C relay operation according to engine load.
ADJUSTMENTS
TESTING
A/C SYSTEM PERFORMANCE
1. Connect manifold gauge set. Operate engine at 1500 RPM. Operate A/C at maximum cooling, recirculate,
fan on high, vent mode. Close all doors and windows. Place thermometer at center vent outlet.
2. Allow A/C to stabilize. Ensure high pressure is 200-227 psi (14.0-16.0 kg/cm
2 ). Read temperature at
center vent outlet. Ensure temperature is within 39-43°F (3-6°C)
A/C COMPRESSOR CLUTCH CIRCUIT
ComponentLocation
A/C RelayRight Front Corner Of Engine Compartment
Condenser FanRight Front Corner Of Engine Compartment
Blower ResistorBottom Of Blower Case
Evaporator ThermoswitchOn Evaporator Upper Case
Pressure SwitchIn High-Pressure Line, Between Receiver-Drier &
Evaporator
NOTE: For door control cable adjustments, see ADJUSTMENTS in HEATER SYSTEM
article.
WARNING:To avoid injury from accidental air bag deployment, read and follow all
SERVICE PRECAUTIONS and DISABLING & ACTIVATING AIR BAG
SYSTEM procedures in AIR BAG RESTRAINT SYSTEM article in the
ACCESSORIES/SAFETY EQUIPMENT section.
NOTE: For test procedures not covered in this article, see TESTING in HEATER
SYSTEM article.
1997 Mazda MX-5 Miata
A/C-HEATER SYSTEM - MANUAL 1997 Manual A/C-Heater System
Microsoft
Sunday, July 05, 2009 1:41:48 PMPage 2 © 2005 Mitchell Repair Information Company, LLC.
Page 312 of 514

1. Check WIPER fuse (20-amp) in passenger compartment fuse block. Check AD FAN (additional fan) fuse
(20-amp) in engine compartment fuse block. If fuses are okay, go to next step. If either fuse is blown,
check for shorted wiring harness before replacing fuse.
2. Operate engine at idle. Turn A/C and blower on. Using voltmeter, backprobe Black/Red wire terminal of
compressor clutch connector. If battery voltage exists, replace compressor clutch. If battery voltage is not
present, go to next step.
3. Ensure engine is running. Ensure A/C and blower are on. Using a voltmeter, backprobe Blue/Yellow wire
terminal of the A/C relay connector. If battery voltage exists, go to next step. If battery voltage does not
exist, repair open Blue/Yellow wire between AD FAN fuse and A/C relay.
4. Backprobe Blue wire terminal of A/C relay connector. If battery voltage exists, go to next step. If battery
voltage is not present, repair open Blue wire between WIPER fuse and A/C relay.
5. Backprobe Black/Red wire terminal of A/C relay connector. If battery voltage exists, repair open
Black/Red wire between A/C relay and compressor clutch. If battery voltage is not present, go to next
step.
6. Backprobe Blue/Black wire terminal of A/C relay connector. If voltage is Zero volts, replace A/C relay. I
f
voltage is not Zero volts, repair open Blue/Black wire between A/C relay and PCM. If wire is okay, check
PCM operation.
CONDENSER (ADDITIONAL) FAN CIRCUIT
1. Check ENGINE fuse (30-amp) in passenger compartment fuse block. Check AD FAN fuse (20-amp) in
engine compartment fuse block. If fuses are okay, go to next step. If either fuse is blown, check for
shorted wiring harness before replacing fuse.
2. Start engine. Turn A/C and blower switches on. Using voltmeter, backprobe Black/Yellow wire terminal
of condenser fan motor. If battery voltage exists, go to next step. If battery voltage is not present, go to
step 4).
3. Turn ignition switch off. Disconnect condenser fan connector. Using ohmmeter, check continuity
between Black wire of condenser fan connector and ground. If continuity exists, replace condenser fan. If
continuity is not present, repair open Black wire between condenser fan and ground.
4. Turn ignition on. Ensure A/C and blower switches are on. Using voltmeter, backprobe Black/White wire
terminal of condenser fan relay connector. If battery voltage exists, go to next step. If battery voltage is
not present, repair open Black/White wire between ENGINE fuse and condenser fan relay.
5. Backprobe Blue/Yellow wire terminal of condenser fan relay connector. If battery voltage exists, go to
next step. If battery voltage is not present, repair open Blue/Yellow wire between AD FAN fuse and
condenser fan relay.
6. Backprobe Black/Yellow wire terminal of condenser fan relay connector. If battery voltage exists, repair
open Black/Yellow wire between condenser fan relay and condenser fan. If battery voltage is not present,
go to next step.
7. Backprobe Blue/White wire terminal of condenser fan relay connector. If battery voltage exists, repair
Blue/White wire between condenser fan relay and PCM. If wire is okay, check PCM operation. If battery
voltage is not present, replace condenser fan relay.
A/C SWITCH
1997 Mazda MX-5 Miata
A/C-HEATER SYSTEM - MANUAL 1997 Manual A/C-Heater System
Microsoft
Sunday, July 05, 2009 1:41:48 PMPage 3 © 2005 Mitchell Repair Information Company, LLC.
Page 316 of 514
COMPRESSOR
Removal & Installation
1. Before disconnecting negative battery cable, obtain radio anti-theft code from vehicle owner. Disconnect
negative battery cable.
2. Raise and support front of vehicle with safety stands. Discharge A/C system using approved refrigerant
recovery/recycling equipment. Remove splash shield and air guide.
3. Disconnect compressor clutch connector. Disconnect refrigerant lines from compressor, and plug open
fittings. Remove compressor drive belt. Remove compressor bolts and compressor. To install, reverse
removal procedure. Adjust drive belt deflection. Apply clean compressor oil to "O" ring before
connecting fittings. DO NOT apply compressor oil to fitting nuts. Evacuate and charge A/C system.
Check for leaks.
CONDENSER & RECEIVER-DRIER
Removal
Raise and support front of vehicle with safety stands. Discharge A/C system using approved refrigerant
recovery/recycling equipment. Remove splash shield and air guide. Remove condenser. Remove receiver-drier.
Plug open fittings.
Installation
To install, reverse removal procedure. Apply clean compressor oil to "O" rings before connecting fittings. DO
NOT apply compressor oil to fitting nuts. If installing new condenser, add 1.0 ounce of compressor oil to A/C
compressor. If installing new receiver-drier, add .3 ounce of compressor oil to A/C compressor. Evacuate and
charge A/C system. Check for leaks.
EVAPORATOR UNIT
Removal
1. Discharge A/C system using approved refrigerant recovery/recycling equipment. Disconnect refrigerant
pipes from evaporator tubes at engine compartment firewall and plug open fittings. Remove passenger-
side instrument panel undercover. Remove glove box.
2. Disconnect electrical connectors. Loosen seal plates between evaporator unit, heater unit and blower unit.
Remove evaporator unit. Disassemble evaporator unit to remove evaporator core and thermo-switch. See WARNING:To avoid injury from accidental air bag deployment, read and follow all
SERVICE PRECAUTIONS and DISABLING & ACTIVATING AIR BAG
SYSTEM procedures in AIR BAG RESTRAINT SYSTEM article in the
ACCESSORIES/SAFETY EQUIPMENT section.
NOTE: For removal and installation procedures not covered in this article, see HEATER
SYSTEM article.
1997 Mazda MX-5 Miata
A/C-HEATER SYSTEM - MANUAL 1997 Manual A/C-Heater System
Microsoft
Sunday, July 05, 2009 1:41:48 PMPage 7 © 2005 Mitchell Repair Information Company, LLC.
Page 376 of 514
STARTER - DIRECT DRIVE
1997 STARTING & CHARGING SYSTEMS Mazda - Starters - Direct Drive
DESCRIPTION & OPERATION
Direct drive starter is a conventional 12-volt, 4-pole, brush-type starter. The integral solenoid is attached to the
drive housing. The overrunning clutch pinion drive is mounted directly on end of armature shaft drive.
TROUBLE SHOOTING
ON-VEHICLE TESTING
* PLEASE READ FIRST *
CIRCUIT TESTING
If starter does not operate, check voltage at starter "S" terminal with ignition switch in START position (and
clutch depressed on M/T). See Fig. 1
. If voltage is greater than 8 volts, repair or replace starter as required. If
volta
ge is 8 volts or less, check ignition switch, park/neutral switch (A/T), interlock switch (M/T) and wiring. NOTE: See TROUBLE SHOOTING article in GENERAL INFORMATION.
NOTE: On all models with anti-theft system, obtain code number and deactivate audio
anti-theft system before disconnecting battery.
NOTE: Before testing, ensure battery is fully charged, battery cables and terminals are
clean and tight, and engine grounds are good.
1997 Mazda MX-5 Miata
STARTER - DIRECT DRIVE 1997 STARTING & CHARGING SYSTEMS Mazda - Starters - Direct Drive
1997 Mazda MX-5 Miata
STARTER - DIRECT DRIVE 1997 STARTING & CHARGING SYSTEMS Mazda - Starters - Direct Drive
Microsoft
Sunday, July 05, 2009 1:56:15 PMPage 1 © 2005 Mitchell Repair Information Company, LLC.
Microsoft
Sunday, July 05, 2009 1:56:20 PMPage 1 © 2005 Mitchell Repair Information Company, LLC.
Page 377 of 514
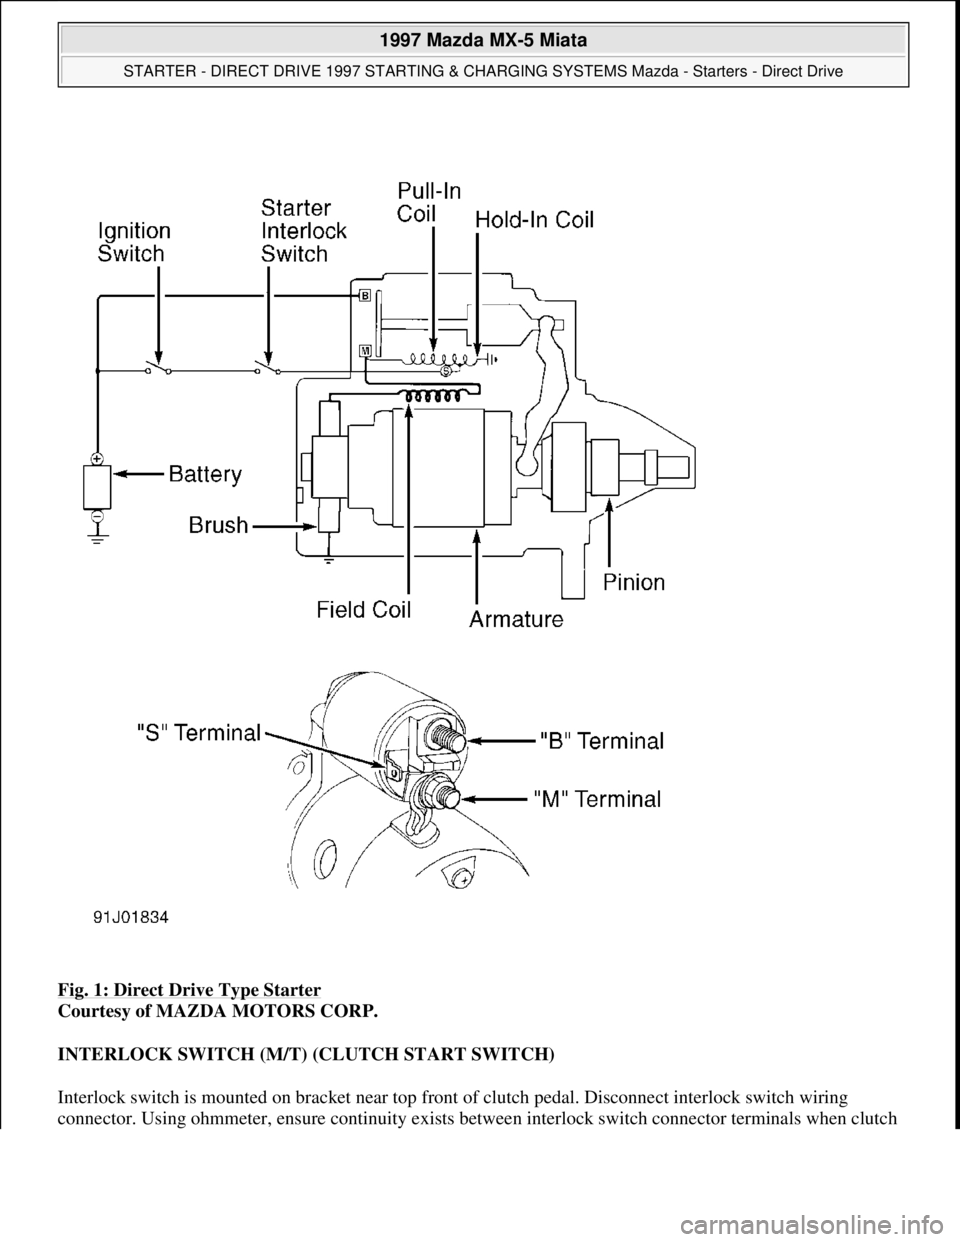
Fig. 1: Direct Drive Type Starter
Courtesy of MAZDA MOTORS CORP.
INTERLOCK SWITCH (M/T) (CLUTCH START SWITCH)
Interlock switch is mounted on bracket near top front of clutch pedal. Disconnect interlock switch wiring
connector. Using ohmmeter, ensure continuity exists between interlock switch connector terminals when clutch
1997 Mazda MX-5 Miata
STARTER - DIRECT DRIVE 1997 STARTING & CHARGING SYSTEMS Mazda - Starters - Direct Drive
Microsoft
Sunday, July 05, 2009 1:56:15 PMPage 2 © 2005 Mitchell Repair Information Company, LLC.