1997 MAZDA MIATA Fluid
[x] Cancel search: FluidPage 64 of 514

1. Inspect ATF level and condition. Correct as needed. If fluid level and condition is okay, check line
pressure. See LINE PRESSURE TEST under TESTING in MAZDA NC4A-EL OVERHAUL article.
Follow repair recommendations if line pressure is not within specifications. If line pressure is okay, go to
next step.
2. Inspect lock-up solenoid. See SOLENOID VALVES
under COMPONENT TESTING. Repair as
needed. If solenoid valve is okay, go to next step.
3. Inspect lock-up control valve in valve body. If valve is okay, go to next step.
4. Using an EC-AT tester connected to TCM, ensure that engine speed and turbine speed during TCC lock-
up in 4th gear are the same. If speeds are different, replace torque converter. If speeds are the same, go to
next step.
5. Clear DTC. See CLEARING CODES
. Retrieve DTC. If DTC P0740 is still present, replace TCM. If
code is no longer present and symptom still exists, problem may be caused by intermittent TCC slippage.
Further investigation may be required. See MAZDA NC4A-EL OVERHAUL article.
DTC P0750: 1-2 SHIFT SOLENOID MALFUNCTION
Possible Causes:
Short or open circuit between TCM and solenoid.
TCM malfunction.
Shift solenoid malfunction.
Diagnosis & Repair Procedure
1. Ensure all connections are clean and tight. Repair as needed. Turn ignition on. Access TCM connectors.
Using voltmeter, backprobe harness connectors. DO NOT disconnect connectors. Go to next step.
2. Measure voltage between ground and terminal No. 2E (Blue/Yellow wire) on TCM connector. During
test drive, voltage should be less than one volt when solenoid is off and battery voltage when solenoid is
on. See SOLENOID OPERATION
table under TCM OUTPUT DEVICES. If voltage is within
specification, go to step 5 . If voltage is not within specification, go to next step.
3. Turn ignition off. Disconnect TCM harness connector. Measure resistance between ground and terminal
No. 2E. If resistance is 13-27 ohms at 68°F (20°C), go to step 5 . If resistance is not 13-27 ohms at 68°F
(20°C), go to next step.
4. Inspect 1-2 shift solenoid and related circuits. See SOLENOID VALVES
under COMPONENT
TESTING. Repair as needed. If solenoid valve and related circuits are okay, go to next step.
5. Clear DTC and road test vehicle. Retrieve DTC. If DTC P0750 is still present, replace TCM. If code is no
longer present, system is okay.
DTC P0755: 2-3 SHIFT SOLENOID MALFUNCTION
Possible Causes:
Short or open circuit between TCM and solenoid.
TCM malfunction.
1997 Mazda MX-5 Miata
1997 AUTOMATIC TRANSMISSIONS NC4A-EL Electronic Controls
Microsoft
Sunday, July 05, 2009 1:35:04 PMPage 16 © 2005 Mitchell Repair Information Company, LLC.
Page 71 of 514

between connector terminals and ground. Resistance should be 13-25 ohms. Replace solenoids as necessary.
Ensure transmission case is grounded.
VEHICLE SPEED SENSOR (VSS)
Disconnect negative battery cable. Remove combination meter. Disconnect harness connectors and speedometer
cable. Connect analog voltmeter leads to meter terminals "A" and "B". See Fig. 8
. Using appropriate
screwdriver, rotate speedometer cable shaft. If voltmeter needle does not fluctuate, replace sensor.
Fig. 8: Testing Vehicle Speed Sensor
Courtesy of MAZDA MOTORS CORP.
TRANSMISSION FLUID TEMPERATURE (TFT) SENSOR
Disconnect TFT sensor harness connector. Sensor is threaded into cooler line banjo mounting on side of
transmission case. Measure resistance between connector terminals. See TFT SENSOR SPECIFICATIONS
table.
TFT SENSOR SPECIFICATIONS NOTE: Vehicle speed sensor signal is input to TCM from combination meter driven by
speedometer cable.
Fluid Temperaturek/ohms
68°F (20°C)2.5
140°F (60°C).6
1997 Mazda MX-5 Miata
1997 AUTOMATIC TRANSMISSIONS NC4A-EL Electronic Controls
Microsoft
Sunday, July 05, 2009 1:35:04 PMPage 23 © 2005 Mitchell Repair Information Company, LLC.
Page 104 of 514

POWER BRAKE UNIT
1. With engine off, depress brake pedal several times. Press and hold brake pedal and start engine. If brake
pedal moves down slightly immediately after engine starts, power brake unit is operating. If brake pedal
does not move as specified, go to next step.
2. Run engine for 1-2 minutes. Stop engine. Press brake pedal several times and note if first pedal stroke is
longer than subsequent strokes. If first pedal stroke is longer than subsequent strokes, power brake unit is
operating. If length of strokes is equal, check valve and vacuum hose between vacuum source and power
brake unit. Repair as necessary, and go to next step.
3. Start engine. Press and hold brake pedal. Stop engine. Hold pedal down for about 30 seconds. If pedal
height remains at same height, power brake unit is operating. If pedal height recedes, check valve and
vacuum hose between vacuum source and power brake unit. Repair as necessary.
REMOVAL & INSTALLATION
FRONT DISC BRAKE PADS
Removal & Installation (B2300, B3000 & B4000)
1. To prevent master cylinder overflow when caliper piston is depressed, remove and discard some brake
fluid from master cylinder reservoir. Raise and support vehicle. Remove front wheel assemblies. Place a
large "C" clamp on caliper.
2. Tighten clamp to bottom piston in cylinder bore. Remove clamp. Remove 2 caliper pin bolts. Remove
caliper from rotor and wire aside. Slide brake pads off caliper anchor plate. Remove anchor plate (if
necessary). Replace pad if lining thickness is less than specified. See MINIMUM PAD LINING
SPECIFICATIONS (FRONT) .
3. To install, reverse removal procedure. Use "C" clamp and old pad to push caliper piston into piston bore
until piston bottoms out. Bleed air from brake system (if necessary).
Removal & Installation (Miata, Millenia, MPV, MX-6, 626 & 929)
1. Raise and support front of vehicle. Remove front wheel assemblies. Remove lower lock pin/guide bolt.
See Fig. 4
, Fig. 5 or Fig. 6 . Pivot caliper upward and support using rope.
2. Remove pads, shims, guide plates or pad guides and "V" springs (if equipped). Replace pad if lining
thickness is less than specified. See MINIMUM PAD LINING SPECIFICATIONS (FRONT)
.
3. To install, reverse removal procedure. Use Disc Brake Expander (49-0221-600C) and an old pad to push
piston full
y inward to install disc pads.
(38-46)
1997 Mazda MX-5 Miata
BRAKE SYSTEM 1995-97 BRAKES Mazda - Disc & Drum
Microsoft
Sunday, July 05, 2009 1:51:03 PMPage 10 © 2005 Mitchell Repair Information Company, LLC.
Page 113 of 514

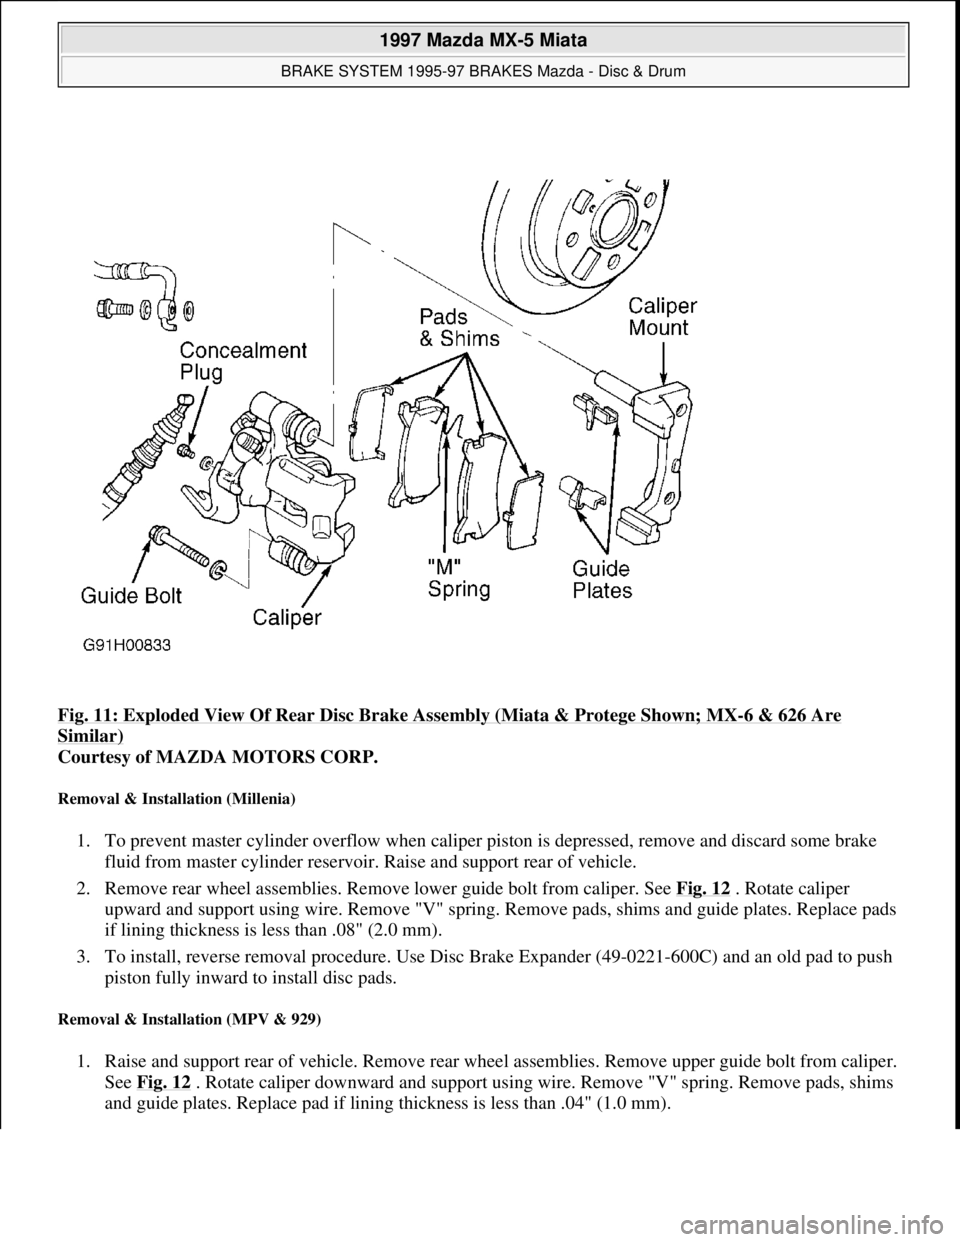
Fig. 11: Exploded View Of Rear Disc Brake Assembly (Miata & Protege Shown; MX-6 & 626 Are
Similar)
Courtesy of MAZDA MOTORS CORP.
Removal & Installation (Millenia)
1. To prevent master cylinder overflow when caliper piston is depressed, remove and discard some brake
fluid from master cylinder reservoir. Raise and support rear of vehicle.
2. Remove rear wheel assemblies. Remove lower guide bolt from caliper. See Fig. 12
. Rotate caliper
upward and support using wire. Remove "V" spring. Remove pads, shims and guide plates. Replace pads
if lining thickness is less than .08" (2.0 mm).
3. To install, reverse removal procedure. Use Disc Brake Expander (49-0221-600C) and an old pad to push
piston fully inward to install disc pads.
Removal & Installation (MPV & 929)
1. Raise and support rear of vehicle. Remove rear wheel assemblies. Remove upper guide bolt from caliper.
See Fig. 12
. Rotate caliper downward and support using wire. Remove "V" spring. Remove pads, shims
and
guide plates. Replace pad if lining thickness is less than .04" (1.0 mm).
1997 Mazda MX-5 Miata
BRAKE SYSTEM 1995-97 BRAKES Mazda - Disc & Drum
Microsoft
Sunday, July 05, 2009 1:51:03 PMPage 19 © 2005 Mitchell Repair Information Company, LLC.
Page 122 of 514

MASTER CYLINDER
Removal & Installation
Disconnect fluid level sensor electrical connector at fluid reservoir. Disconnect and plug brake lines at master
cylinder to prevent entry of dirt and loss of fluid. Remove nuts attaching master cylinder to power brake unit.
Remove master cylinder from vehicle. To install master cylinder, reverse removal procedure. Bleed air from
system.
POWER BRAKE UNIT
Removal & Installation
Remove master cylinder from power brake unit. See MASTER CYLINDER . Disconnect vacuum line at
power brake unit. See Fig. 19 . From inside vehicle, remove cotter pin and clevis pin. Separate push rod from
brake pedal. Remove power brake unit-to-firewall nuts. Remove power brake unit. To install, reverse removal
procedure. Bleed air from system.
Fig. 19: Removing Power Brake Unit (Typical)
Courtesy of MAZDA MOTORS CORP.
OVERHAUL
in SUSPENSION.
1997 Mazda MX-5 Miata
BRAKE SYSTEM 1995-97 BRAKES Mazda - Disc & Drum
Microsoft
Sunday, July 05, 2009 1:51:03 PMPage 28 © 2005 Mitchell Repair Information Company, LLC.
Page 159 of 514

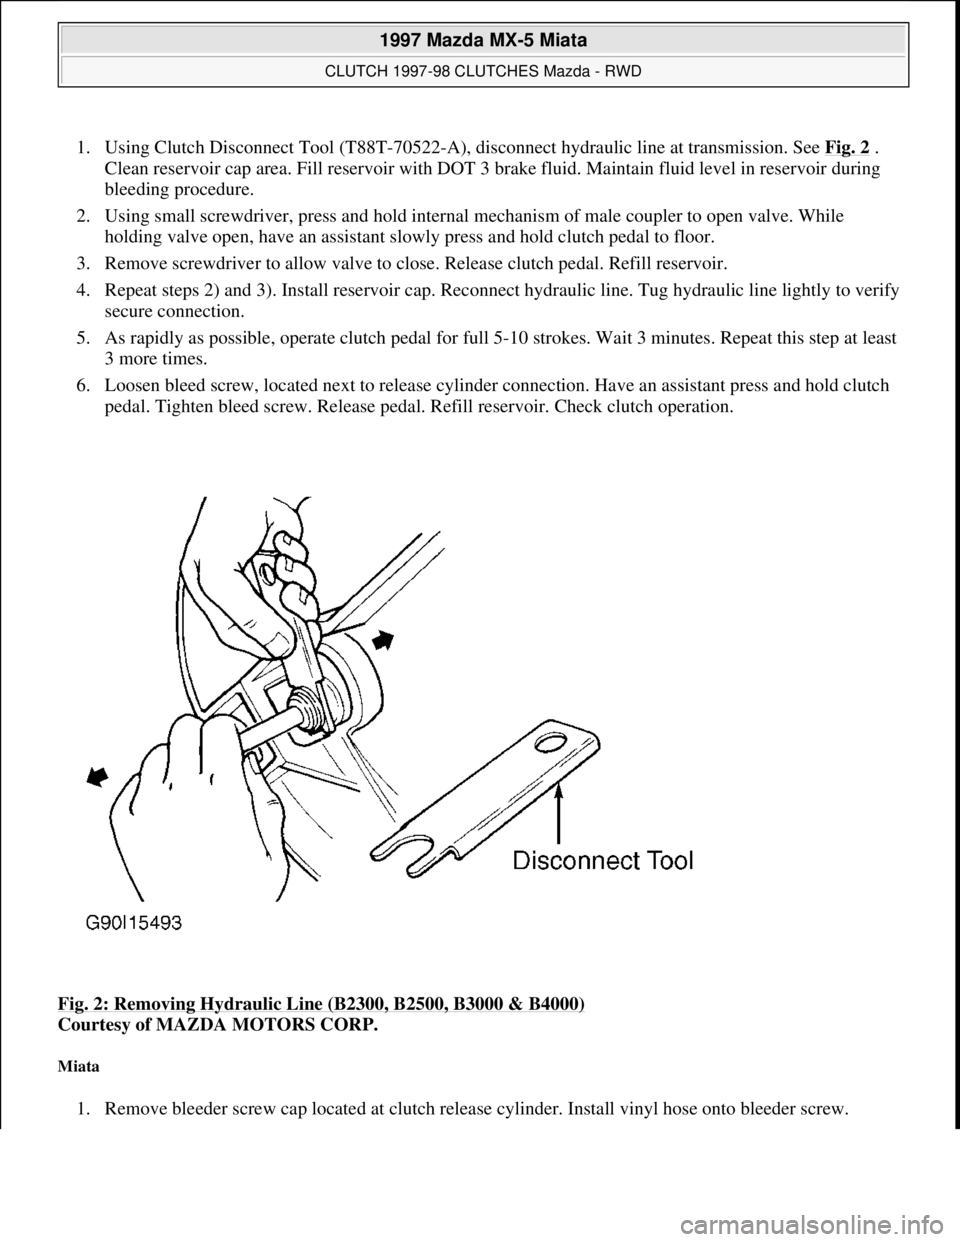
1. Using Clutch Disconnect Tool (T88T-70522-A), disconnect hydraulic line at transmission. See Fig. 2 .
Clean reservoir cap area. Fill reservoir with DOT 3 brake fluid. Maintain fluid level in reservoir during
bleeding procedure.
2. Using small screwdriver, press and hold internal mechanism of male coupler to open valve. While
holding valve open, have an assistant slowly press and hold clutch pedal to floor.
3. Remove screwdriver to allow valve to close. Release clutch pedal. Refill reservoir.
4. Repeat steps 2) and 3). Install reservoir cap. Reconnect hydraulic line. Tug hydraulic line lightly to verify
secure connection.
5. As rapidly as possible, operate clutch pedal for full 5-10 strokes. Wait 3 minutes. Repeat this step at least
3 more times.
6. Loosen bleed screw, located next to release cylinder connection. Have an assistant press and hold clutch
pedal. Tighten bleed screw. Release pedal. Refill reservoir. Check clutch operation.
Fig. 2: Removing Hydraulic Line (B2300, B2500, B3000 & B4000)
Courtesy of MAZDA MOTORS CORP.
Miata
1. Remove bleeder screw cap located at clutch release cylinder. Install vinyl hose onto bleeder screw.
1997 Mazda MX-5 Miata
CLUTCH 1997-98 CLUTCHES Mazda - RWD
Microsoft
Sunday, July 05, 2009 1:36:47 PMPage 3 © 2005 Mitchell Repair Information Company, LLC.
Page 160 of 514

Submerge other end of hose in container of brake fluid.
2. Fill reservoir with DOT 3 brake fluid. Have an assistant press and release clutch pedal several times, then
hold pedal down. With pedal pressed, loosen bleeder screw to let air and fluid escape.
3. Repeat step 2) until no more air bubbles emerge from hose. Tighten bleeder screw. Fill reservoir. Operate
clutch while inspecting for leaks. Check clutch and brake operation.
REMOVAL & INSTALLATION
CLUTCH ASSEMBLY
Removal (B2300, B2500, B3000 & B4000)
1. Disconnect negative battery cable. Shift transmission into Neutral. Remove gearshift lever. Raise and
support vehicle. Mark drive shaft flanges for installation reference. Remove drive shaft. Using Clutch
Disconnect Tool (T88T-70522-A), disconnect hydraulic line at transmission. See Fig. 2
. Plug hydraulic
line to prevent contamination. Disconnect wiring at transmission.
2. Remove starter. Remove exhaust components as necessary for clearance. On 4WD models, remove skid
plate and transfer case. On all models, secure transmission jack under transmission. Remove transmission
mount-to-crossmember nuts and bolts.
3. Remove nuts securing crossmember to frame side rails, and remove crossmember. Lower transmission
enough to gain access to transmission-to-engine block bolts. Remove transmission-to-engine block bolts.
Remove transmission.
4. If clutch parts are going to be reused, mark clutch cover and flywheel for reassembly reference. Loosen
pressure plate bolts evenly in crisscross pattern until springs are not under tension. Remove clutch cover
and clutch disc.
Inspection (B2300, B2500, B3000 & B4000)
1. Inspect disc for loose rivets, worn or defective springs, excessive wear, or oil contamination. Inspect
flywheel and clutch cover for burns, scoring, or grooves.
2. Measure flywheel and clutch cover runout. Resurface or replace flywheel and clutch cover if beyond
specification. See CLUTCH RUNOUT (MAXIMUM)
table.
3. Measure clutch disc runout. Replace disc if it is not to specification. See CLUTCH RUNOUT
(MAXIMUM) table. Inspect disc hub and input shaft splines for excessive wear. Hub must slide
smoothly on input shaft splines.
4. Inspect pilot bearing for wear. Apply inward pressure while rotating pilot bearing. If bearing sticks or has
excessive resistance, replace bearing. Check for tight fit in crankshaft. Replace as necessary. Inspect
release bearing for smooth operation, wear, damage, or looseness. Replace bearing as necessary.
CLUTCH RUNOUT (MAXIMUM)
ApplicationIn. (mm)
Disc0.028 (0.7)
Flywheel0.008 (0.20)
1997 Mazda MX-5 Miata
CLUTCH 1997-98 CLUTCHES Mazda - RWD
Microsoft
Sunday, July 05, 2009 1:36:47 PMPage 4 © 2005 Mitchell Repair Information Company, LLC.
Page 169 of 514

Installation
Insert master cylinder push rod through opening in bulkhead. Install master cylinder. Connect hydraulic lines.
Install fluid reservoir. Install push rod on clutch pedal. Bleed hydraulic system. See HYDRAULIC SYSTEM
BLEEDING .
Removal & Installation (Miata)
Disconnect hydraulic line and master cylinder mounting nuts. Disengage push rod from clutch pedal. Remove
master cylinder. To install, reverse removal procedure and bleed hydraulic system. See HYDRAULIC
SYSTEM BLEEDING .
CLUTCH RELEASE CYLINDER
Removal & Installation (B2300, B2500, B3000 & B4000)
Release cylinder is removed with clutch. See CLUTCH ASSEMBLY.
Removal & Installation (Miata)
Raise and support vehicle. Disconnect and plug hydraulic line. Remove clutch release cylinder. To install,
reverse removal procedure. Bleed hydraulic system. See HYDRAULIC SYSTEM BLEEDING
.
OVERHAUL
CLUTCH MASTER CYLINDER disconnected.
NOTE: Overhaul procedures for B2300, B2500, B3000 and B4000 are not available.
NOTE: Use exploded view of clutch master cylinder for overhaul procedure. See Fig.
10 .
1997 Mazda MX-5 Miata
CLUTCH 1997-98 CLUTCHES Mazda - RWD
Microsoft
Sunday, July 05, 2009 1:36:47 PMPage 13 © 2005 Mitchell Repair Information Company, LLC.