1997 MAZDA MIATA Fluid
[x] Cancel search: FluidPage 175 of 514
1997-98 DRIVE AXLES
Differentials & Drive Axles - MPV & MX-5 Miata
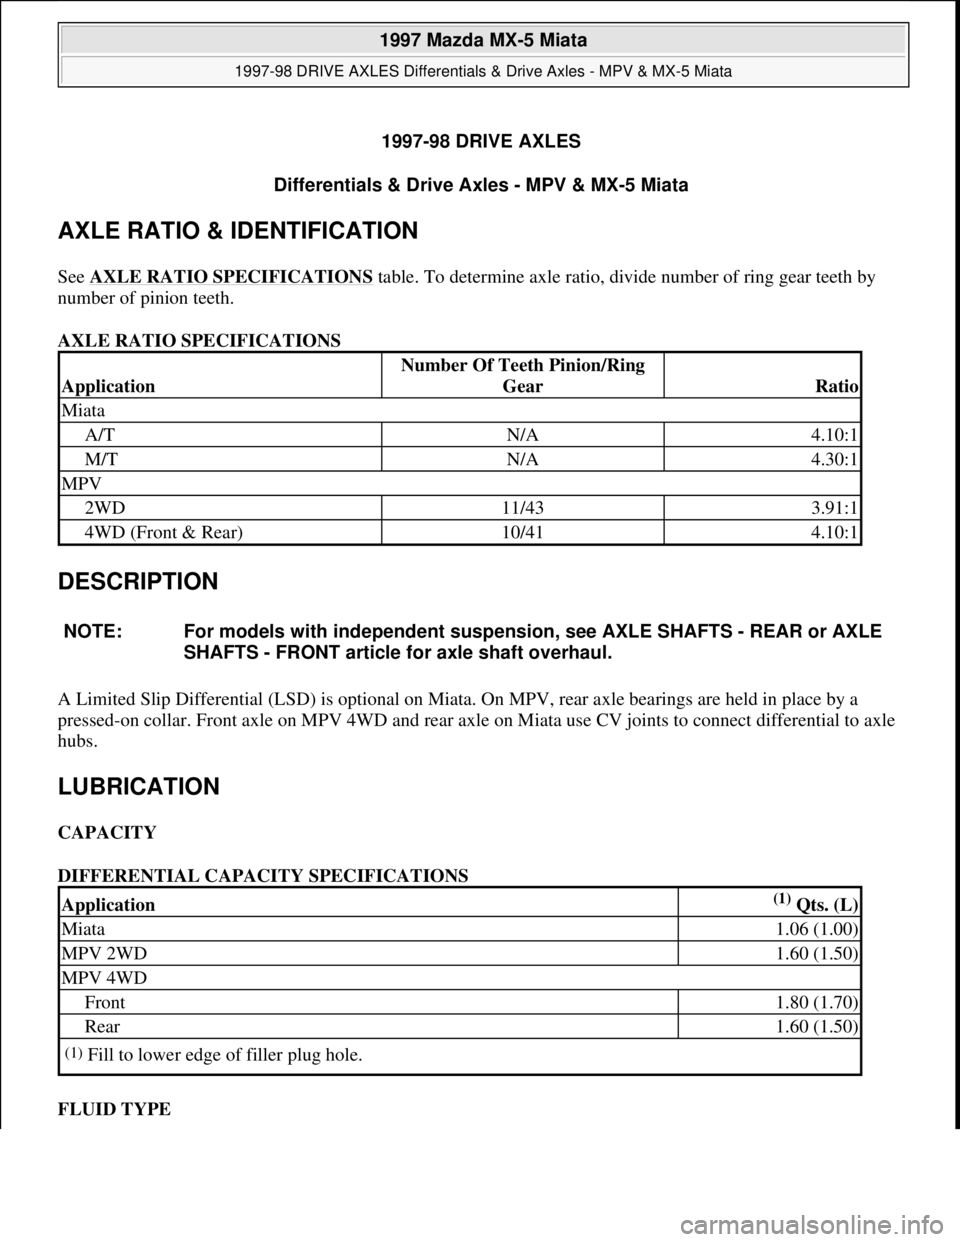
AXLE RATIO & IDENTIFICATION
See AXLE RATIO SPECIFICATIONS table. To determine axle ratio, divide number of ring gear teeth by
number of pinion teeth.
AXLE RATIO SPECIFICATIONS
DESCRIPTION
A Limited Slip Differential (LSD) is optional on Miata. On MPV, rear axle bearings are held in place by a
pressed-on collar. Front axle on MPV 4WD and rear axle on Miata use CV joints to connect differential to axle
hubs.
LUBRICATION
CAPACITY
DIFFERENTIAL CAPACITY SPECIFICATIONS
FLUID TYPE
Application
Number Of Teeth Pinion/Ring
Gear
Ratio
Miata
A/TN/A4.10:1
M/TN/A4.30:1
MPV
2WD11/433.91:1
4WD (Front & Rear)10/414.10:1
NOTE: For models with independent suspension, see AXLE SHAFTS - REAR or AXLE
SHAFTS - FRONT article for axle shaft overhaul.
Application(1) Qts. (L)
Miata1.06 (1.00)
MPV 2WD1.60 (1.50)
MPV 4WD
Front1.80 (1.70)
Rear1.60 (1.50)
(1)Fill to lower edge of filler plug hole.
1997 Mazda MX-5 Miata
1997-98 DRIVE AXLES Differentials & Drive Axles - MPV & MX-5 Miata
1997 Mazda MX-5 Miata
1997-98 DRIVE AXLES Differentials & Drive Axles - MPV & MX-5 Miata
Microsoft
Sunday, July 05, 2009 1:52:42 PMPage 1 © 2005 Mitchell Repair Information Company, LLC.
Microsoft
Sunday, July 05, 2009 1:52:46 PMPage 1 © 2005 Mitchell Repair Information Company, LLC.
Page 180 of 514
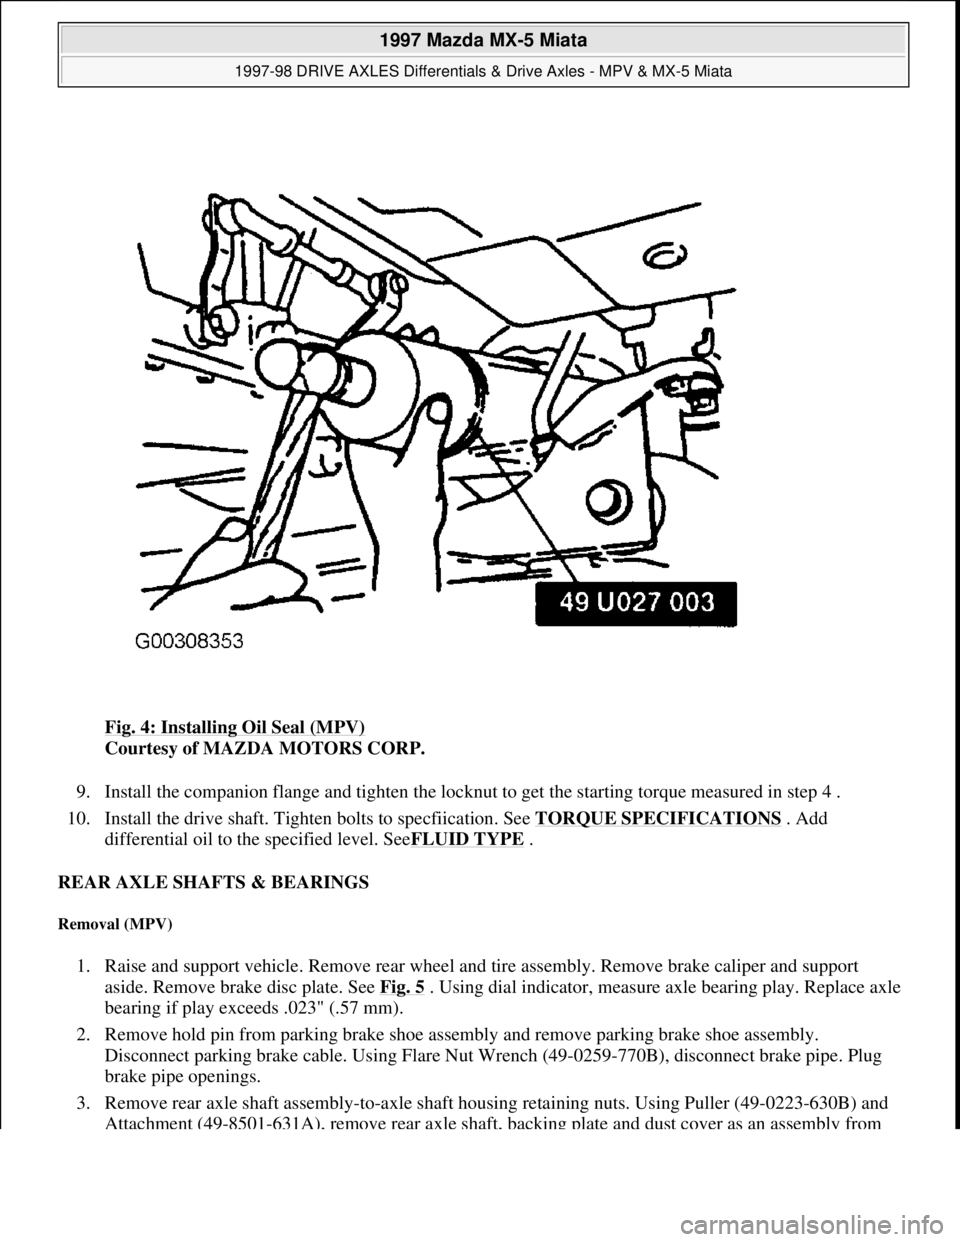
Fig. 4: Installing Oil Seal (MPV)
Courtesy of MAZDA MOTORS CORP.
9. Install the companion flange and tighten the locknut to get the starting torque measured in step 4 .
10. Install the drive shaft. Tighten bolts to specfiication. See TORQUE SPECIFICATIONS
. Add
differential oil to the specified level. SeeFLUID TYPE
.
REAR AXLE SHAFTS & BEARINGS
Removal (MPV)
1. Raise and support vehicle. Remove rear wheel and tire assembly. Remove brake caliper and support
aside. Remove brake disc plate. See Fig. 5
. Using dial indicator, measure axle bearing play. Replace axle
bearing if play exceeds .023" (.57 mm).
2. Remove hold pin from parking brake shoe assembly and remove parking brake shoe assembly.
Disconnect parking brake cable. Using Flare Nut Wrench (49-0259-770B), disconnect brake pipe. Plug
brake pipe openings.
3. Remove rear axle shaft assembly-to-axle shaft housing retaining nuts. Using Puller (49-0223-630B) and
Attachment (49-8501-631A), remove rear axle shaft, backin
g plate and dust cover as an assembly from
1997 Mazda MX-5 Miata
1997-98 DRIVE AXLES Differentials & Drive Axles - MPV & MX-5 Miata
Microsoft
Sunday, July 05, 2009 1:52:42 PMPage 6 © 2005 Mitchell Repair Information Company, LLC.
Page 183 of 514
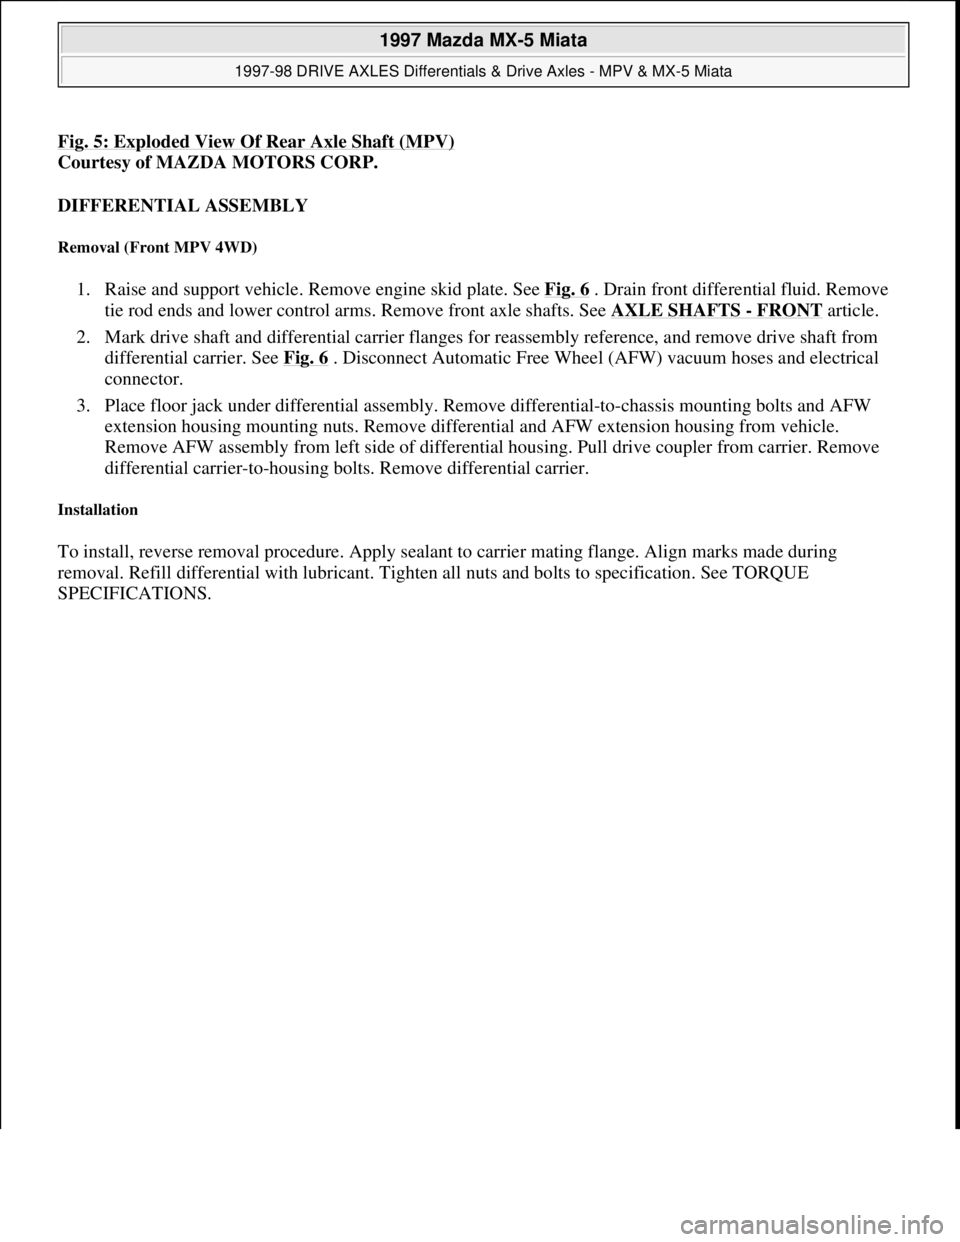
Fig. 5: Exploded View Of Rear Axle Shaft (MPV)
Courtesy of MAZDA MOTORS CORP.
DIFFERENTIAL ASSEMBLY
Removal (Front MPV 4WD)
1. Raise and support vehicle. Remove engine skid plate. See Fig. 6 . Drain front differential fluid. Remove
tie rod ends and lower control arms. Remove front axle shafts. See AXLE SHAFTS
- FRONT article.
2. Mark drive shaft and differential carrier flanges for reassembly reference, and remove drive shaft from
differential carrier. See Fig. 6
. Disconnect Automatic Free Wheel (AFW) vacuum hoses and electrical
connector.
3. Place floor jack under differential assembly. Remove differential-to-chassis mounting bolts and AFW
extension housing mounting nuts. Remove differential and AFW extension housing from vehicle.
Remove AFW assembly from left side of differential housing. Pull drive coupler from carrier. Remove
differential carrier-to-housing bolts. Remove differential carrier.
Installation
To install, reverse removal procedure. Apply sealant to carrier mating flange. Align marks made during
removal. Refill differential with lubricant. Tighten all nuts and bolts to specification. See TORQUE
SPECIFICATIONS.
1997 Mazda MX-5 Miata
1997-98 DRIVE AXLES Differentials & Drive Axles - MPV & MX-5 Miata
Microsoft
Sunday, July 05, 2009 1:52:42 PMPage 9 © 2005 Mitchell Repair Information Company, LLC.
Page 184 of 514
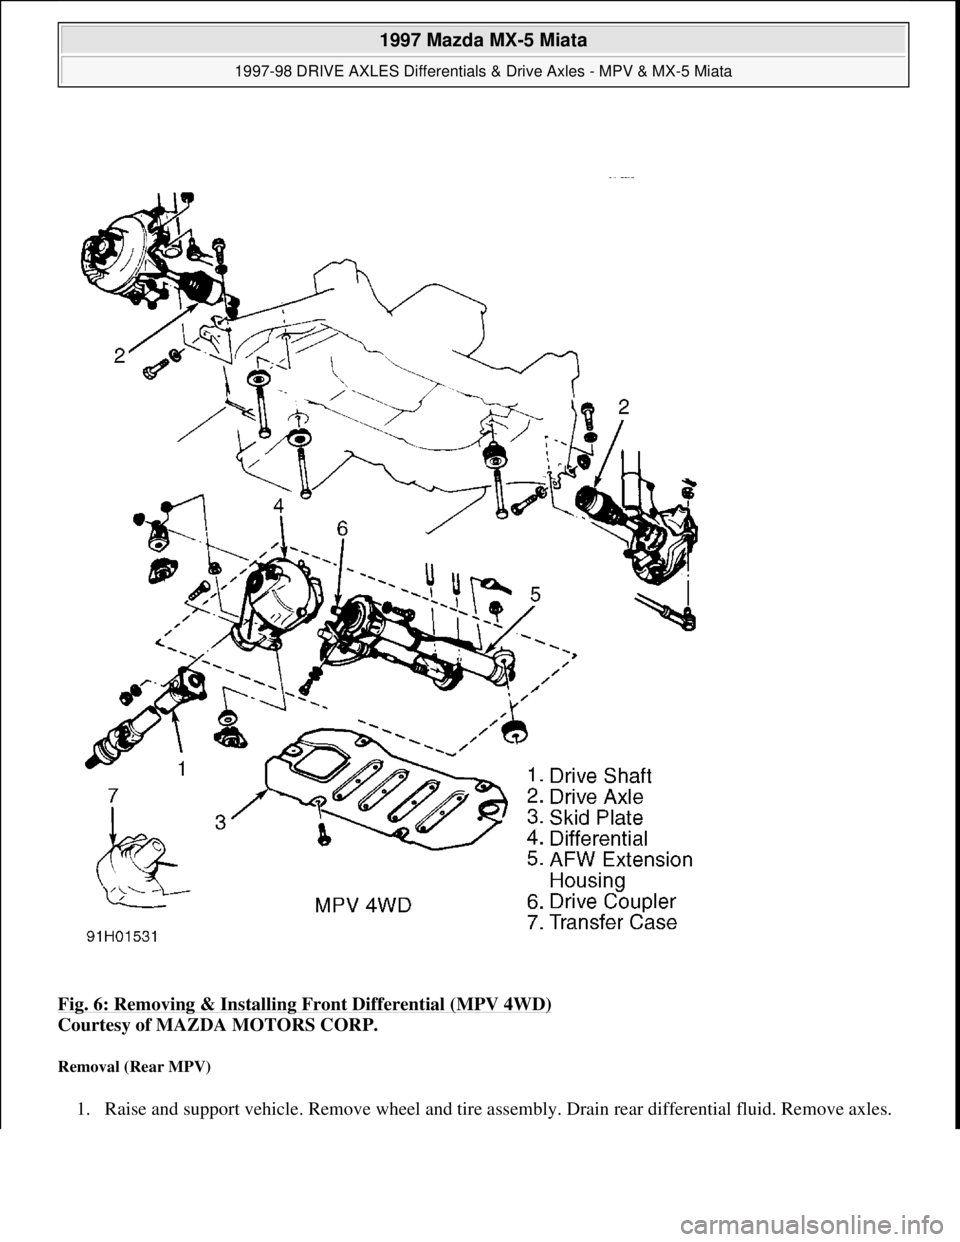
Fig. 6: Removing & Installing Front Differential (MPV 4WD)
Courtesy of MAZDA MOTORS CORP.
Removal (Rear MPV)
1. Raise and support vehicle. Remove wheel and tire assembly. Drain rear differential fluid. Remove axles.
1997 Mazda MX-5 Miata
1997-98 DRIVE AXLES Differentials & Drive Axles - MPV & MX-5 Miata
Microsoft
Sunday, July 05, 2009 1:52:42 PMPage 10 © 2005 Mitchell Repair Information Company, LLC.
Page 199 of 514

MOTORS
MOTORS
SENDING UNITS & SENSORS
SENDING UNITS & SENSORS
Key Interlock UnitBehind left side of dash. See Fig. 2 .
SAS UnitBehind center of dash. See Fig. 2 .
Transmission Control Module (TCM)Under left side of dash, near fuse block. See Fig. 2 .
ComponentComponent Location
Blower MotorUnder right side of dash. See Fig. 2 .
Condenser Fan MotorIn front of engine compartment.
Cooling Fan MotorIn front of engine compartment.
Cruise Control ActuatorOn left side of engine compartment.
Fuel PumpIn fuel tank.
Power Antenna MotorIn right front of trunk.
Retractable Headlamp ActuatorsBehind respective headlamp.
Shift Lock ActuatorUnder center console, on base of gear selector.
Windshield Washer MotorOn bottom of washer fluid reservoir.
Windshield Wiper MotorOn right side of firewall.
ComponentComponent Location
ABS Wheel Speed Sensor (Left Front)On back of left front wheel spindle assembly. See Fig. 1 .
ABS Wheel Speed Sensor (Left Rear)On back of left rear wheel hub assembly. See Fig. 3 .
ABS Wheel Speed Sensor (Right Front)On back of right front wheel spindle assembly. See Fig. 1 .
ABS Wheel Speed Sensor (Right Rear)On back of right rear wheel hub assembly. See Fig. 3 .
Brake Fluid Level SensorIn brake fluid reservoir. See Fig. 1 .
Camshaft Position SensorIn center rear of engine compartment. See Fig. 1 .
Crankshaft Position SensorOn front of engine.
EGR Boost SensorOn right side of engine compartment.
EGR Valve Position SensorOn right side center, rear of engine compartment.
EGR Valve Position SensorOn right side center, rear of engine compartment. See Fig. 1 .
Engine Coolant Temperature SensorOn rear of engine. See Fig. 1 .
Fuel Gauge Sender UnitIn fuel tank.
Heated Oxygen Sensor (Front)In rear of engine compartment. See Fig. 1 .
Heated Oxygen Sensor (Rear)On underside of vehicle, on exhaust pipe.
Input/Turbine Speed SensorOn left side of transmission.
Mass Air Flow SensorOn top of air filter housing. See Fig. 1 .
Throttle Position (TP) SensorOn side of throttle body. See Fig. 1 .
Transmission Fluid Temperature SensorOn left side of transmission.
1997 Mazda MX-5 Miata
1997 MAZDA MX-5 Miata
Microsoft
Sunday, July 05, 2009 1:54:00 PMPage 2 © 2005 Mitchell Repair Information Company, LLC.
Page 200 of 514

SOLENOIDS & SOLENOID VALVES
SOLENOIDS & SOLENOID VALVES
SWITCHES
SWITCHES
MISCELLANEOUS
MISCELLANEOUS
Vehicle Speed Sensor (VSS)On speedometer assembly.
Water Temperature Sender UnitOn center of engine. See Fig. 1 .
Washer Fluid Level SensorOn washer fluid reservoir. See Fig. 1 .
ComponentComponent Location
AT Interlock SolenoidIn steering column, near ignition switch. See Fig. 2 .
EC-AT Solenoid ValveOn left side of transmission.
EGR Solenoid Valve (Vacuum)On right side of engine compartment. See Fig. 1 .
EGR Solenoid Valve (Vent)On right side of engine compartment. See Fig. 1 .
Fourth Gear Solenoid ValveOn left side of transmission.
Idle Air Control ValveOn right side, front of engine compartment. See Fig. 1 .
PRC Solenoid ValveOn right side, front of engine. See Fig. 1 .
Purge Solenoid ValveOn right strut tower. See Fig. 1 .
ComponentComponent Location
Back-Up Lamp Switch (M/T)On right side of transmission. See Fig. 1 .
Brake SwitchOn bracket, above brake pedal. See Fig. 2 .
Buckle SwitchOn driver side seat belt buckle. See Fig. 3 .
Clutch Switch (M/T)On bracket, above clutch pedal. See Fig. 2 .
Hold SwitchUnder right side of center console.
Key Reminder SwitchIn steering column, near ignition switch.
Neutral Switch (M/T)On right side of transmission. See Fig. 1 .
Oil Pressure SwitchOn right side of engine. See Fig. 1 .
"P" Range SwitchUnder center console, on base of gear selector.
Parking Brake SwitchOn base of parking brake lever. See Fig. 4 .
Power Steering Pressure SwitchOn power steering pump assembly.
Refrigerant Pressure SwitchIn front of engine compartment, near radiator support. See Fig. 1 .
Starter Interlock Switch (M/T)On bracket, above clutch pedal. See Fig. 2 .
ThermoswitchUnder right side of dash.
Transmission Range SwitchOn left side of transmission.
ComponentComponent Location
1997 Mazda MX-5 Miata
1997 MAZDA MX-5 Miata
Microsoft
Sunday, July 05, 2009 1:54:00 PMPage 3 © 2005 Mitchell Repair Information Company, LLC.
Page 209 of 514
ENGINE
Removal (Miata)
1. Release residual pressure from fuel system. See FUEL PRESSURE RELEASE & PRIMING .
Disconnect negative battery cable from trunk-mounted battery. Reference mark and remove hood. Raise
vehicle and remove engine undercover. See Fig. 2
. Drain engine, transmission and cooling system fluids.
2. Remove transmission. For automatic transmission removal procedure, see REMOVAL &
INSTALLATION article in TRANSMISSION SERVICING. For manual transmission removal
procedure, see appropriate article in CLUTCHES. NOTE: On Miata with audio anti-theft system, radio will not operate if power to radio is
cut. Obtain code from customer to reactivate radio. To reactivate radio after
reconnecting power supply, turn ignition switch to ACC position. Press and
hold FF and REW buttons until CODE is displayed. Again press and hold FF and
REW buttons until bars (----) are displayed. Use preset button No. 1 to enter first
number. Use preset buttons No. 2 to enter second number, 3 for third number,
etc. Press FF and REW buttons for about 1.5 seconds until a beep is heard.
After 5 seconds, flashing CODE will disappear and radio will operate.
1997 Mazda MX-5 Miata
1997-98 ENGINES 1.8L 4-Cylinder
Microsoft
Sunday, July 05, 2009 1:55:15 PMPage 3 © 2005 Mitchell Repair Information Company, LLC.
Page 212 of 514
differential housing block.
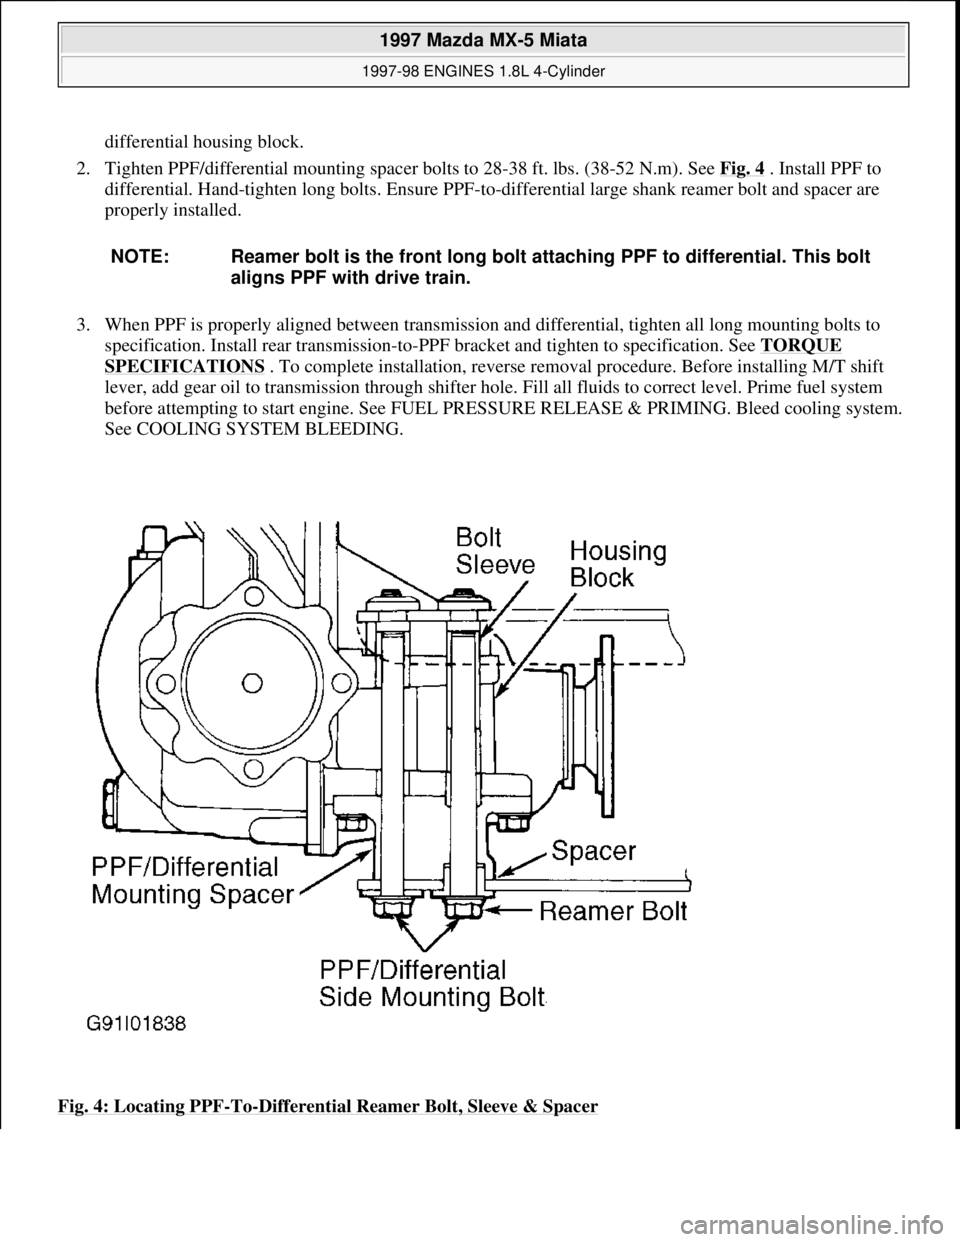
2. Tighten PPF/differential mounting spacer bolts to 28-38 ft. lbs. (38-52 N.m). See Fig. 4
. Install PPF to
differential. Hand-tighten long bolts. Ensure PPF-to-differential large shank reamer bolt and spacer are
properly installed.
3. When PPF is properly aligned between transmission and differential, tighten all long mounting bolts to
specification. Install rear transmission-to-PPF bracket and tighten to specification. See TORQUE
SPECIFICATIONS . To complete installation, reverse removal procedure. Before installing M/T shift
lever, add gear oil to transmission through shifter hole. Fill all fluids to correct level. Prime fuel system
before attempting to start engine. See FUEL PRESSURE RELEASE & PRIMING. Bleed cooling system.
See COOLING SYSTEM BLEEDING.
Fig. 4: Locating PPF
-To-Differential Reamer Bolt, Sleeve & Spacer
NOTE: Reamer bolt is the front long bolt attaching PPF to differential. This bolt
aligns PPF with drive train.
1997 Mazda MX-5 Miata
1997-98 ENGINES 1.8L 4-Cylinder
Microsoft
Sunday, July 05, 2009 1:55:15 PMPage 6 © 2005 Mitchell Repair Information Company, LLC.