Page 191 of 315

186Do not use hitches that clamp onto your vehicle's
bumper. The bumper is not designed to bear the
load.
Always check the pressure in all your vehicle's tires
when preparing to tow (see inflation
recommendation on the tire label).Using the hitchYour vehicle uses aload carryinghitch. Because
this type of hitch places the tongue load of a trailer
on the rear wheels of your vehicle, you must
distribute the load in your trailer so that only 10 to
15% of the total weight of the trailer is on the
tongue.
Tie down the load so that it does not shift and
change the weight on the hitch. This will prevent
damage to your vehicle and make your vehicle
easier to handle.
Connecting the safety chainsAlways attach the trailer's safety chains to your
vehicle. They help protect your trailer if the hitch
breaks.
To connect the trailer's safety chains:
1. Cross the chains under the trailer tongue and
attach them to your vehicle's frame or hook
retainers. Never attach the safety chains to your
vehicle's bumper. The bumper is not designed
to bear the weight of a trailer.
2. Make sure that you leave enough slack in the
chains to allow you to turn corners.
If you use a rental trailer, follow the instructions
that the rental agency gives you.
File:09fngf8.ex
Update:Wed Jun 19 10:45:23 1996
Page 212 of 315
207
NOTE:Never use the differential housing as a lift
point.
The slot for the jack
2. Turn the jack handle clockwise until the wheel
clears the ground. Remove the wheel lug nuts.
3. Replace the flat tire with the spare tire, making
sure that the air valve stem is facing outward.
4. Reinstall the lug nuts, tightening until the
wheel is snug against the hub. The beveled
edges on the lug nuts face inward. Do not fully
tighten the lug nuts until you lower the
vehicle. If you do, you could force the vehicle
off the jack.
5. Lower the vehicle by turning the jack handle
counterclockwise.
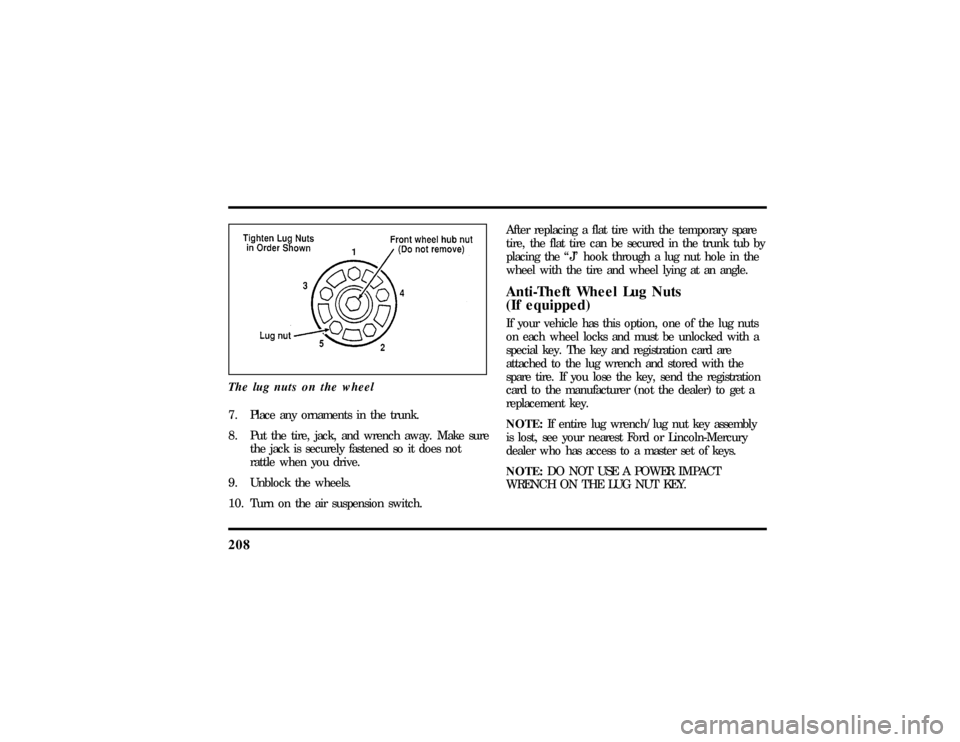
6. Remove the jack and fully tighten the lug nuts
in the order shown in the following illustration.
As soon as possible, have your dealer or a
qualified service technician check the lug nuts
for proper torque specifications.
File:10fner8.ex
Update:Thu Jun 20 14:27:22 1996
Page 213 of 315

208The lug nuts on the wheel7. Place any ornaments in the trunk.
8. Put the tire, jack, and wrench away. Make sure
the jack is securely fastened so it does not
rattle when you drive.
9. Unblock the wheels.
10. Turn on the air suspension switch.After replacing a flat tire with the temporary spare
tire, the flat tire can be secured in the trunk tub by
placing the ªJº hook through a lug nut hole in the
wheel with the tire and wheel lying at an angle.
Anti-Theft Wheel Lug Nuts
(If equipped)If your vehicle has this option, one of the lug nuts
on each wheel locks and must be unlocked with a
special key. The key and registration card are
attached to the lug wrench and stored with the
spare tire. If you lose the key, send the registration
card to the manufacturer (not the dealer) to get a
replacement key.
NOTE:If entire lug wrench/lug nut key assembly
is lost, see your nearest Ford or Lincoln-Mercury
dealer who has access to a master set of keys.
NOTE:DO NOT USE A POWER IMPACT
WRENCH ON THE LUG NUT KEY.
File:10fner8.ex
Update:Thu Jun 20 14:27:22 1996
Page 243 of 315
238
Rinsethoroughl ywit hclea rwater .D o no tus efuel,
WARNING
Improperl yinflate dtire sca n affect
Page 302 of 315

301
proper solution........... 235
recovery reservoir.......... 228
refill capacities............ 264
specifications............ 265
temperature gauge.......... 17
Engine coolant temperature gauge..... 17
Engine fan............... 217
Engine knocking............ 246
Engine oil............... 222
ªbreak-inº oils............. 5
changing oil and oil filter....... 224
checking and adding......... 223
check oil warning light........ 11
dipstick............... 223
disposal............... 216engine oil pressure warning light.... 11
filter, specifications.......... 263
refill capacities............ 264
specifications.........222, 265
synthetic oil............. 222
viscosity.............. 222
Exhaust fumes............. 169
Extended Service Plan, Ford........ 4
F
Fan.................. 217
engine fan, avoiding injury...... 217
Flashers, hazard............ 89
Flashing the lights........... 86
Flat tire................ 201
Fluid refill capacities.......... 264
Ford Dispute Settlement Board...... 272
Ford Extended Service Plan........ 4
Ford Motor Company of Canada..... 276
File:fnix8.ex
Update:Thu Jun 27 10:02:38 1996
Page 311 of 315

310Sliding moon roof (see Moon roof).... 97
Snow tires and chains.......... 242
Spare tire............... 201
changing the tire........... 201
finding the spare........... 202
removing the spare tire........ 203
storing the flat tire.......... 205
temporary spare........... 201
Spark plugs, specifications........ 263
Specification chart, lubricants...... 265
Speed control
turning off............. 94
when towing a trailer......... 187
Speedometer.............. 16
Starting your vehicle
preparing to start your vehicle..... 165
starting after a collision........ 189
starting your vehicle if the battery
is disabled............. 209Steering, power............ 177
Steering wheel
horn................ 90
locking............... 83
Storage compartments, center console . . . 115
Storing your vehicle........... 266
Sunroof (moon roof)........... 97
Sun visor............... 101
Supplemental air bag readiness light.... 45
Supplemental Restraint System (SRS) . . . 145
T
Tachometer.............. 17
Tail lamps
bulb replacement........... 253
cleaning............... 261
Temperature control (see Climate control) . 69
Tether anchor installation
(see Child restraints)......... 162
Tilt/Telescope steering column...... 91
File:fnix8.ex
Update:Thu Jun 27 10:02:38 1996