Page 65 of 241
Mirrors
TAB
Keep the inside and outside mirrors
clean and adjusted for best visibility.
Be sure to adjust the mirrors before
you start driving.
The inside mirror has day and night positions. The night position reduces
glare from headlights behind you. Flip the tab on the bottom edge of
the mirror to select the day or night
position.
Adjusting the Power Mirrors
Adjust the outside mirrors with the
adjustment switch on the driver'sdoor armrest:
1. Turn the ignition switch ON (II).
2. Move the selector switch to L (driver's side) or R (passenger's
side).
3. Push the appropriate edge of the
adjustment switch to move the
mirror right, left, up or down.
4. When you finish, move the
selector switch to the center (off)
position. This turns off the
adjustment switch so you can't
move a mirror out of position by
accidentally bumping the switch.
Instruments and Controls SELECTOR SWITCH
ADJUSTMENT SWITCHProCarManuals.comMain Menu Table of Contents s t
Page 67 of 241
Digital Clock, Beverage Holder
Digital Clock
The digital clock displays the time with the ignition switch ON (II).
To set the clock:
1. Turn the ignition switch ON (II) to display the time. 2. Press and hold the HOUR button
until the hour advances to thedesired time.
3. Press and hold the MIN. button until the numbers advance to thedesired time.
You can use the RESET button to quickly set the time to the nearest
hour. If the displayed time is before
the half hour, pressing RESET sets
the clock back to the previous hour.
If the displayed time is after the half
hour, pressing RESET sets the clock
forward to the beginning of the next
hour.
For example: 1:06 would RESET to 1:00.
1:52 would RESET to 2:00.
Beverage Holder
To use the front beverage holder, pull on the front. Push the holder all
the way in to close it.
Instruments and Controls
HOUR
MIN
RESETProCarManuals.comMain Menu Table of Contents s t
Page 70 of 241
Cigarette Lighter, Ashtrays
Cigarette Lighter
The ignition switch must be in
ACCESSORY (I) or ON (II) for the cigarette lighter to work. To heat up
the lighter, push it in. It will pop out
when it is ready for use. Do not hold
the lighter in while it is heating up,
you could cause it to overheat. Ashtrays
ASHTRAY
Open the front ashtray by pulling on
the bottom edge. Push it in to close it.
To remove the ashtray for emptying, push down on the metal plate inside,
then pull the ashtray out completely. The rear ashtray is in the armrest on
the left rear door. To use the rearashtray, swing the lid open.
To remove the rear ashtray, open the lid and pull it straight up.
CONTINUED
Instruments and Controls
CIGARETTE LIGHTER
ASHTRAYProCarManuals.comMain Menu Table of Contents s t
Page 72 of 241
Interior Lights
Tailgate Light
The tailgate light has a two position switch. In the OFF (down) position,
the light does not come on. In the ON (up) position, the light comes on
when you open the tailgate. Courtesy Lights
Each door has a courtesy light. This
light comes on when you open the
door.
Your car also has a courtesy light in the ignition switch. This light comes
on when you open the driver's door.
It remains on for several seconds
after the door is closed.
Instruments and ControlsProCarManuals.comMain Menu Table of Contents s t
Page 84 of 241
Audio System
Operating the Radio
The ignition switch must be in
ACCESSORY (I) or ON (II) to operate the audio system. Turn the
system on by pushing the PWR/
VOL knob.
Adjust the volume by turning the PWR/VOL knob.
The band and frequency that the radio was last tuned to is displayed.
To change bands, press the AM/FM button. On the FM band, ST will bedisplayed if the station is broadcast-
ing in stereo. Stereo reproduction on
AM is not available.
Comfort and Convenience Features PWR/VOL KNOB
TUNE/SEEK
BUTTONS STEREO INDICATOR
AM/FM
BUTTON
PRESET
BUTTONSProCarManuals.comMain Menu Table of Contents s t
Page 90 of 241

Audio System
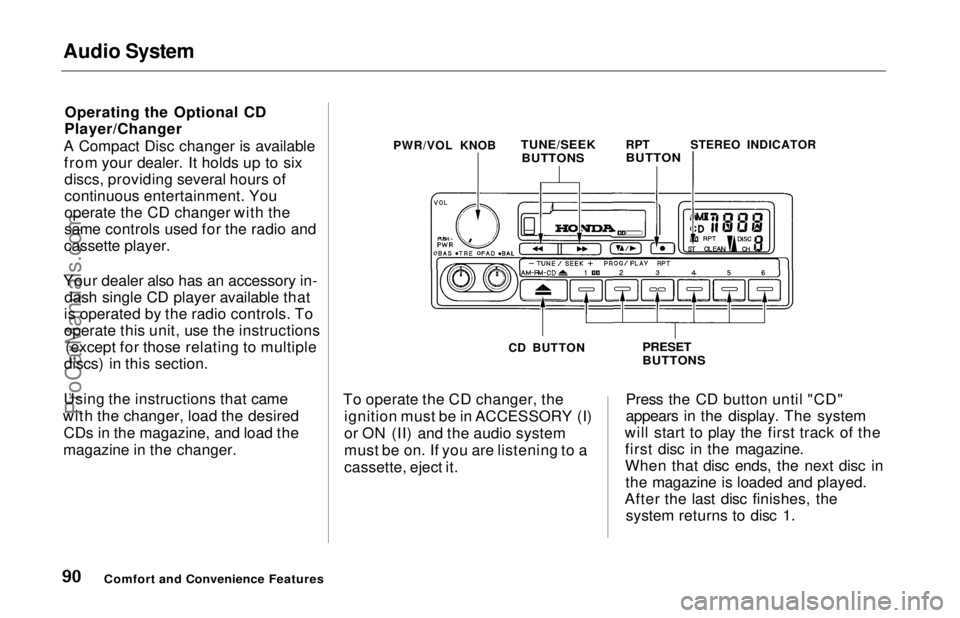
Operating the Optional CD
Player/Changer
A Compact Disc changer is available from your dealer. It holds up to sixdiscs, providing several hours of
continuous entertainment. You
operate the CD changer with the
same controls used for the radio and
cassette player.
Your dealer also has an accessory in- dash single CD player available that
is operated by the radio controls. To
operate this unit, use the instructions (except for those relating to multiple
discs) in this section.
Using the instructions that came
with the changer, load the desired CDs in the magazine, and load the
magazine in the changer. To operate the CD changer, the
ignition must be in ACCESSORY (I)
or ON (II) and the audio system
must be on. If you are listening to a
cassette, eject it. Press the CD button until "CD"
appears in the display. The system
will start to play the first track of the first disc in the magazine.
When that disc ends, the next disc inthe magazine is loaded and played.
After the last disc finishes, the system returns to disc 1.
Comfort and Convenience Features
PWR/VOL KNOB
TUNE/SEEK
BUTTONS
RPT
BUTTON
STEREO INDICATOR
CD BUTTON
PRESET
BUTTONSProCarManuals.comMain Menu Table of Contents s t
Page 91 of 241

Audio System
To select a different disc, press the appropriate preset button (1 — 6). If
you select an empty slot in the magazine, the changer will, after
finding that slot empty, try to load
the CD in the next slot. This continues until it finds a CD to load
and play.
You can use the TUNE/SEEK buttons to select tracks within a disc.Push and release the appropriate
TUNE/SEEK button, the system will move to the beginning of a track. Press the button to move to the
beginning of the next track, and press the button to move to the
beginning of the current track.
If you press and hold the TUNE/
SEEK button, you will hear a beep
and the system will continue to move
across tracks. Release the button
when you think it has reached the desired place on the disc. REPEAT — When you activate the
Repeat feature by pressing the RPT
button, the system continuously
replays the current track. You will see RPT in the display as a reminder.
Press the RPT button again to turn it
off.
To take the system out of CD mode, press the AM or FM button, or inserta cassette in the player. When you
return to CD mode, play will contin-
ue at the same disc and track.
If you turn the system off while a CD
is playing, either with the PWR/VOL
knob or the ignition switch, play will
continue at the same disc and track
when you turn it back on.
Protecting Compact Discs
For information on how to handle
and protect compact discs, see page
104.
CD Changer Error Indications
For information on the meaning of
the CD Error Indications and what to do when you see those indications,
refer to page 105 .
Comfort and Convenience FeaturesProCarManuals.comMain Menu Table of Contents s t
Page 93 of 241

Audio System
Operating the Radio
The ignition switch must be in
ACCESSORY (I) or ON (II). Turn the system on by pushing the PWR/
VOL knob.
Adjust the volume by turning the PWR/VOL knob.
The band and frequency that the radio was last tuned to is displayed.
To change bands, press the AM/FM 1-2 button. On the FM band, ST will
be displayed if the station is broad- casting in stereo. Stereo reproduc-
tion on AM is not available.
You can use any of three methods to find radio stations on the selectedband: TUNE, SEEK, or the Preset
buttons. TUNE — Use the TUNE/SEEK
switch to tune the radio to a desired
frequency. Push the switch up to
tune to a higher frequency, and push
the switch down to tune to a lower
frequency. The frequency numbers
will start to change rapidly. Release
the switch when the display reaches
the desired frequency. To change
the frequency in small increments, push and release the TUNE/SEEKswitch quickly. SEEK — The SEEK function
searches the band for a station with
a strong signal. To activate it, push
the TUNE/SEEK switch until you
hear a beep, then release it. Depending on which way you pushed
the switch, the system scans upward
or downward from the current
frequency. It stops when it finds a station with a strong signal.
Preset — You can store the fre- quencies of your favorite radio
stations in the six preset buttons.
Each button will store one frequency
on the AM band, and two on the FM
band.
CONTINUED
Comfort and Convenience FeaturesProCarManuals.comMain Menu Table of Contents s t