Page 211 of 402
Downloaded from www.Manualslib.com manuals search engine Driving with a Trailer
If you have a rear-most window open and you
pull a trailer with your vehicle, carbon monoxide
(CO) could come into your vehicle. You can’t see
or smell
CO. It can cause unconsciousness or
death. (See “Engine Exhaust” in the Index.)
To
maximize your safety when towing a trailer:
Have your exhaust system inspected for
leaks, and make necessary repairs before
starting on your trip.
0 Keep the rear-most windows closed.
If exhaust does come into your vehicle
through
a window in the rear or another
opening, drive with your front, main heating or cooling system on and
with the
fan on
any speed. This will bring fresh,
outside
air into your vehicle. Do not use
MAX A/C because it only recirculates the
air inside your vehicle. (See b‘ Comfort
Controls”
in the Index.) Towing
a trailer requires a certain
amount of experience.
Before setting out for the open road. you‘ll want
to get
to know your rig. Acquaint yourself with the feel of
handling and braking with the added weight of the
trailer. And always keep in mind that the vehicle you are
driving
is now a good deal longer and not nearly as
responsive as your vehicle is by itself.
Before
you start, check the trailer hitch and platform
(and attachments). safety chains. electrical connector,
lamps, tires and mirror adjustment. If the trailer has
electric brakes. start your vehicle and trailer moving and
then apply the trailer brake controller by hand to be sure
the brakes are working. This lets
you check your
electrical connection at the same time.
During your trip. check occasionally to be sure that the
load is secure. and that the lamps and any trailer brakes
are still working.
4-50
Page 216 of 402
Downloaded from www.Manualslib.com manuals search engine Trailer Wiring Harness
The light duty trailer wiring is a six-wire harness
assembly. The optional heavy-duty trailer wiring is an
eight-wire harness assembly. The harnesses are stored
under the vehicle, along the passenger-side frame
crossmember on two-door vehicles or on the driver’s
side corner frame crossmember on four-door vehicles.
The heavy-duty trailer wiring has
a 30-amp feed wire
with an inline
fuse located by the junction block. See
“Fuses and Circuit Breakers”
in the Index. Both
harnesses have no connector and should be wired by a
qualified electrical technician. The technician can
use
the following color code chart when connecting the
wiring harness
to your trailer.
Dark Blue: Use for electric trailer brakes or
auxiliary wiring.
0 Red: Use for battery charging; it connects to the
starter solenoid (eight-wire harness only).
0 Light Green: Back-up lamps (eight-wire
harness only).
Brown: Taillamps and parking lamps.
0 Yellow: Left stoplamp and turn signal.
0 Dark Green: Right stoplamp and turn signal.
0 White (Heavy Gage): Ground wire.
0 White (Light Gage): Auxiliary stoplamp.
Securely attach the harness
to the trailer, then tape or
strap
it to your vehicle’s frame rail. Be sure you leave it
loose enough so the wiring doesn‘t bend or break, but
not so loose that it drags on the ground. Store the
harness in its original place. Wrap the harness together
and tie
it neatly so it won’t be damaged.
4-55
Page 225 of 402
Downloaded from www.Manualslib.com manuals search engine A CAUTION:
To help avoid injury to you or others:
Never let passengers ride in a vehicle that is
Never tow faster than safe or posted speeds.
Never tow with damaged parts not
Never get under your vehicle after it has
Always use separate safety chains on each
Never use J-hooks. Use T-hooks instead.
being
towed.
fully secured.
been lifted by the tow truck.
side when towing a vehicle.
A CAUTION:
A vehicle can fall from a car carrier if it isn’t
adequately secured. This can cause a collision,
serious personal injury and vehicle damage. The
vehicle should be tightly secured with chains or
steel cables before it is transported.
Don’t use substitutes (ropes, leather straps,
canvas webbing, etc.) that can be cut
by sharp
edges underneath the towed vehicle. Always use
T-hooks inserted
in the T-hook slots. Never use
,J-hooks. They will damage drivetrain and
suspension components.
5-8
Page 250 of 402
Downloaded from www.Manualslib.com manuals search engine Follow this diagram to store the underbody-mounted spare.
Y; BJ
A. Retainer
B. Valve Stem
(Pointed Down)
C. Spare or Flat Tire
D. Spring
E. Wheel Wrench
E Lower
G. Raise
H. Hoist Arm
1. Put the tire on the ground at the rear of the vehicle,
with the valve stem pointed down and to the rear.
2. Pull the retainer through the wheel.
3. Put the chisel end of the wheel wrench, on an angle,
through the hole
in the rear bumper and into the hoist
shaft. Turn the wheel wrench clockwise
until the tire
is raised against the underside of the vehicle.
You
will hear two “clicks“ when the tire is secure,
but pull on the tire to make sure.
5-33
Page 251 of 402
Downloaded from www.Manualslib.com manuals search engine Follow this diagram for the inside-mounted spare. Follow this diagram for the rear-mounted spare.
C
D i
C7
- i,
A. Spare or Flat Tire
B. Retainer (Two-Wheel Drive)
C. Nut
D. Retainer (Four-wheel Drive)
E. Wheel Carrier
E Hook
A. Wheel Carrier
B. Spare Tire
C. Wheel Nut and Locking Nut Cylinder
Reinstall the locking wheel
nut using the wheel wrench.
Then push the lock case onto
the lug nut until it stops.
The key does not have to be inserted into the lock. Push
the lock case to be sure
it is secured. The special lug nut
and lock case is not intended to be used on any road
wheel.
only on the spare wheel carrier. Tighten the nuts
on the wheel carrier to 22 to 32 Ib-ft (30 to 40 N-m).
Page 252 of 402
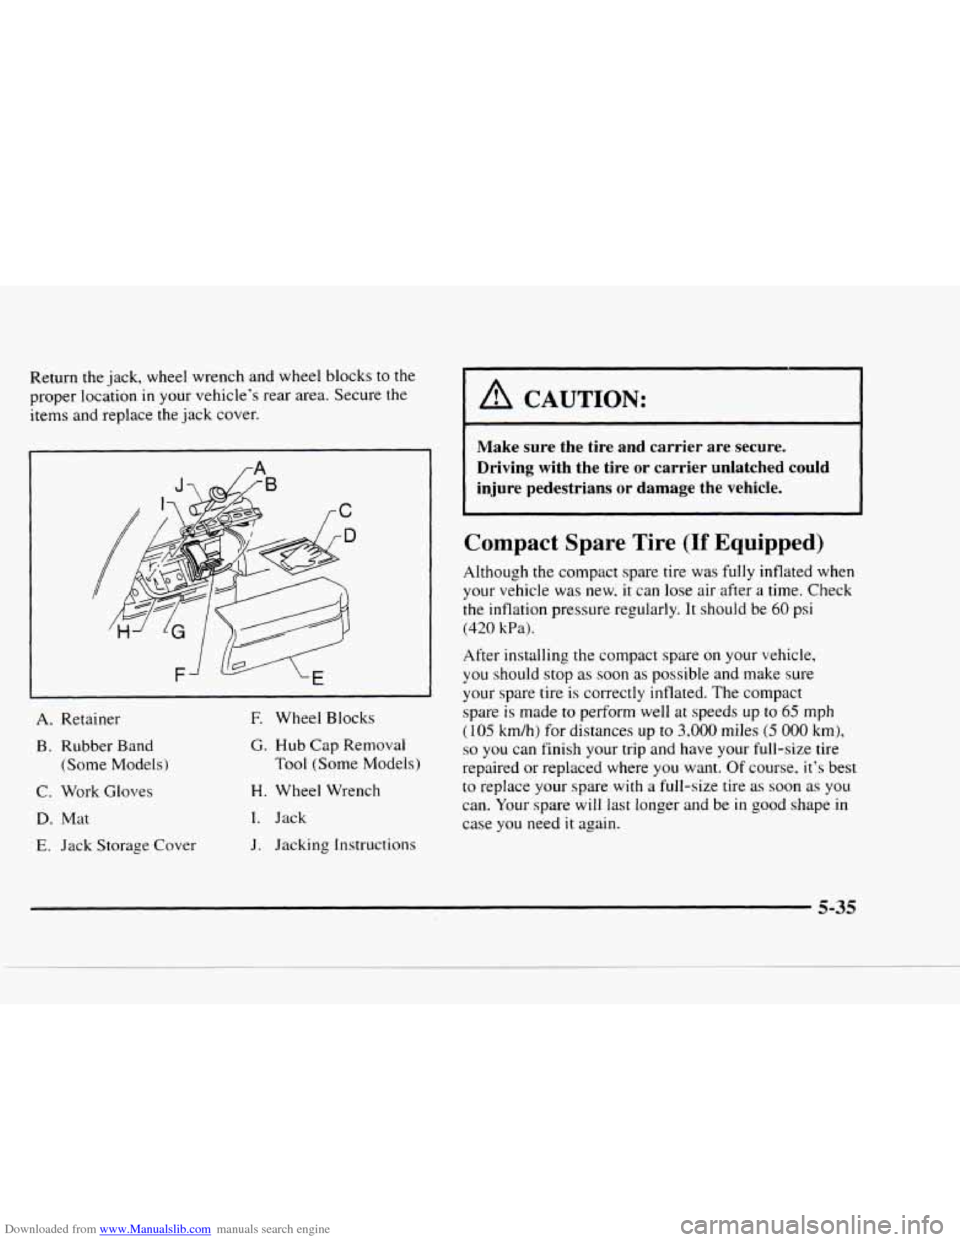
Downloaded from www.Manualslib.com manuals search engine Return the jack, wheel wrench and wheel blocks to the
proper location
in your vehicle’s rear area. Secure the
items and replace
the jack cover.
I
-
A. Retainer E Wheel Blocks
B. Rubber Band
(Some Models
j
C. Work Gloves
D. Mat
E. Jack Storage Cover
G. Hub Cap Removal
Tool (‘Some Models)
H. Wheel Wrench
I. Jack
J. Jacking Instructions
I A CAUTION:
I
Make sure the tire and carrier are secure.
Driving with the tire or carrier unlatched could
injure pedestrians
or damage the vehicle.
Compact Spare Tire (If Equipped)
Although the compact spare tire was fully inflated when
your vehicle was new,
it can lose air after a time. Check
the inflation pressure regularly. It should be 60 psi
(420 kPa).
After installing the compact spare on your vehicle,
you should stop as
soon as possible and make sure
your spare tire
is correctly inflated. The compact
spare
is made to perform well at speeds up to 65 mph
(105 km/h) for distances up to 3,000 miles (5 000 km),
so you can finish your trip and have your full-size tire
repaired or replaced where
you want. Of course, it’s best
to replace your spare with a full-size tire as soon as you
can. Your spare will last longer and be in good shape in
case you need
it again.
5-35
Page 267 of 402
Downloaded from www.Manualslib.com manuals search engine Engine Oil Additives
Don't add anything to your oil. Your GM dealer is ready
to advise if you think something should be added.
When to Change Engine Oil
If any one of these is true for you. use the short tripkity
. maintenance schedule:
a
a
a
0
a
Most trips are less than 5 to 10 miles (8 to 16 km).
This is particularly important when outside
temperatures are below freezing.
Most trips include extensive idling (such
as frequent
driving in stop-and-go traffic).
You operate
your vehicle in dusty areas or
off-road frequently.
You frequently tow
a trailer or use a currier on top of
your vehicle.
The vehicle is used for delivery service. police, taxi
or other commercial application. Driving under
these conditions causes engine oil
to
break down sooner. If any one of these is true for your
vehicle, then you need
to change your oil and filter
every
3.000 miles (5 000 km) or 3 months -- whichever
occllrs first.
If none of them is true, use the long trip/highway
maintenance schedule. Change the oil and filter every
7,500 miles ( 12 500 km) or 12 months -- whichever
occurs first. Driving
a vehicle with a fully warmed
engine under highway conditions causes engine oil
to
break down slower.
Remote Oil Filter (Four-wheel Drive)
The access door for the remote oil filter is in the steering
linkage shield assembly located under the radiator
support.
Twist the screw to unlock or lock the door.
Make sure
if you open the door. it is securely closed
when
~OLI are finished.
6-12
Page 303 of 402
Downloaded from www.Manualslib.com manuals search engine Tire Chains
NOTICE:
If your vehicle has P235/75R15, P235/70R15 or
31x10.50Rl5LT/C size tires, don’t use tire chains.
They can damage your vehicle because there’s
not enough clearance.
Use another type of traction device only if its
manufacturer recommends
it for use on your
vehicle and tire size combination and road
conditions. Follow that manufacturer’s
instructions.
To help avoid damage to your
vehicle, drive slowly, readjust or remove the
device
if it’s contacting your vehicle, and don’t
spin your wheels.
NOTICE: (Continued) NOTICE:
(Continued)
If you do find a traction device that will fit, install
them on the rear tires.
If you have other size tires, use tire chains only
where legal and
only when you must. Use only
SAE Class “S”’type chains that are the proper
size for your tires. Install them
on the drive axle
tires (four-wheel-drive vehicles can use chains on
both axles) and tighten them
as tightly as possible
with the ends securely fastened. Drive slowly and
follow the chain manufacturer’s instructions..
If
you can .hear the chains contacting your vehicle,
, stop and retighten them. If the contact continues,
slow down until it stops. Driving too fast or
spinning the wheels with chains
on will damage
your vehicle.
6-48
I