1997 CHEVROLET ASTRO service
[x] Cancel search: servicePage 175 of 404

Downloaded from www.Manualslib.com manuals search engine Care of Your Cassette Tape Player
A tape player that is not cleaned regularly can cause
reduced sound quality, ruined cassettes or a damaged
mechanism. Cassette tapes should be stored
in their
cases away from contaminants, direct sunlight and
extreme heat. If
they aren’t, they may not operate
properly or may cause failure
of the tape player.
Your tape player should be cleaned regularly after every
50 hours of use. Your radio may display CLN to indicate
that
you have used your tape player for 50 hours without
resetting the tape clean timer.
If this message appears on
the display,
your cassette tape player needs to be
cleaned.
It will still play tapes, but you should clean it as
soon
as possible to prevent damage to your tapes and
player. If
you notice a reduction in sound quality, try a
known good cassette
to see if it is the tape or the tape
player at fault. If this other cassette has no improvement
in sound quality, clean the tape player. Cleaning
may be done with a scrubbing action,
non-abrasive cleaning cassette with pads which scrub
the tape head as the hubs
of the cleaner cassette turn. It
is normal for the cassette to eject while cleaning. Insert
the cassette at least three times to ensure thorough
cleaning.
A scrubbing action cleaning cassette is
available through your
GM dealership.
You may also choose a non-scrubbing action, wet-type
cleaner which uses
a cassette with a fabric belt to clean
the tape head. This type
of cleaning cassette will not
eject and,
it may not clean as thoroughly as the
scrubbing type cleaner.
After
you clean the player, press and hold EJECT for
five seconds
to reset the CLN indicator. The radio will
display
--- to show the indicator was re: . .
Cassettes are subject to wear and the SOL.L~ quality
may degrade over time. Always make sure the cassette
tape
is in good condition before you have your tape
player serviced.
Page 197 of 404

Downloaded from www.Manualslib.com manuals search engine Before Leaving on a Long Trip
Make sure you’re ready. Try to be well rested. If you
must start when you’re not fresh -- such as after a day’s
work
-- don’t plan to make too many miles that first part
of the journey. Wear comfortable clothing and shoes you
can easily drive in.
Is your vehicle ready for a long trip? If you keep it
serviced and maintained, it’s ready to go. If it needs
service, have it done before starting
out. Of course,
you’ll find experienced and able service experts
in GM
dealerships all across North America. They’ll be ready
and willing
to help if you need it.
Here are some things
you can check before a trip:
Windshield Washer Fluid: Is the reservoir full? Are
all windows clean inside and outside?
0 Wiper Blades: Are they in good shape?
Fuel, Engine Oil, Other Fluids: Have you checked
all levels?
Lamps: Are they all working? Are the lenses clean?
Tires: They are vitally important to a safe,
trouble-free trip.
Is the tread good enough for
long-distance driving? Are the tires all inflated
to the
recommended pressure?
Weather Forecasts: What’s the wei----er outlook
along your route? Should
you delay your trip a short
time to avoid
a major storm system?
0 Maps: Do you have up-to-date maps?
Highway Hypnosis
Is there actually such a condition as “highway hypnosis”?
Or is it just
plain falling asleep at the wheel? Call it
highway hypnosis, lack of awareness, or whatever.
There is something about an easy stretch of road with the
same scenery, along
with the hum of the tires on the road,
the
drone of the engine, and the rush of the wind against
the vehicle that can make you sleepy. Don’t
let it happen
to you! If it does, your vehicle can leave the road in
less
than a second, and you could crash and be injured.
4-21
Page 198 of 404

Downloaded from www.Manualslib.com manuals search engine What can you do about highway hypnosis? First, be
aware that it can happen.
Then here
are some tips:
Make sure your vehicle is well ventilated, with a
0 Keep your eyes moving. Scan the road ahead and
comfortably cool
interior.
to the sides. Check your mirrors and your
instruments frequently.
0 If you get sleepy, pull off the road into a rest, service
or parking area and take
a nap, get some exercise, or
both. For safety, treat drowsiness on the highway as
an emergency.
Hill and Mountain Roads
Driving on steep hills or mountains is different from
driving in flat
or rolling terrain.
4-22
Page 214 of 404

Downloaded from www.Manualslib.com manuals search engine Parking on Hills
You really should not park your vehicle, with a trailer
attached, on a hill.
If something goes wrong, your rig
could start to move. People can be injured, and both
your vehicle and the trailer can be damaged.
But if you ever have
to park your rig on a hill, here’s
how
to do it:
1. Apply your regular brakes, but don’t shift into
2. Have someone place chocks under the trailer wheels.
3. When the wheel chocks are in place, release the
regular brakes until the chocks absorb the load.
PARK (P) yet.
4. Reapply the regular brakes. Then apply your parking
5. Release the regular brakes.
brake,
and shift to
PARK (P).
When You Are Ready to Leave After
Parking on a Hill
1. Apply your regular brakes and hold the pedal down
while you:
0 Start your engine;
Shift into a gear; and
Release the parking brake.
2. Let up on the brake pedal.
3. Drive slowly until the trailer is clear of the chocks.
4. Stop and have someone pick up and store the chocks.
Maintenance When Trailer Towing
Your vehicle will need service more often when you’re
pulling a trailer. See the Maintenance Schedule for more
on this. Things that are especially important in trailer
operation are automatic transmission fluid (don’t
overfill), engine oil, axle lubricant, belt, cooling system
and brake adjustment. Each of these is covered in this
manual, and the Index will help you
find them quickly.
If you’re trailering, it’s a
good idea to review these
sections before you start your trip.
Check periodically to see that all hitch nuts and bolts
are tight.
4-38
Page 224 of 404

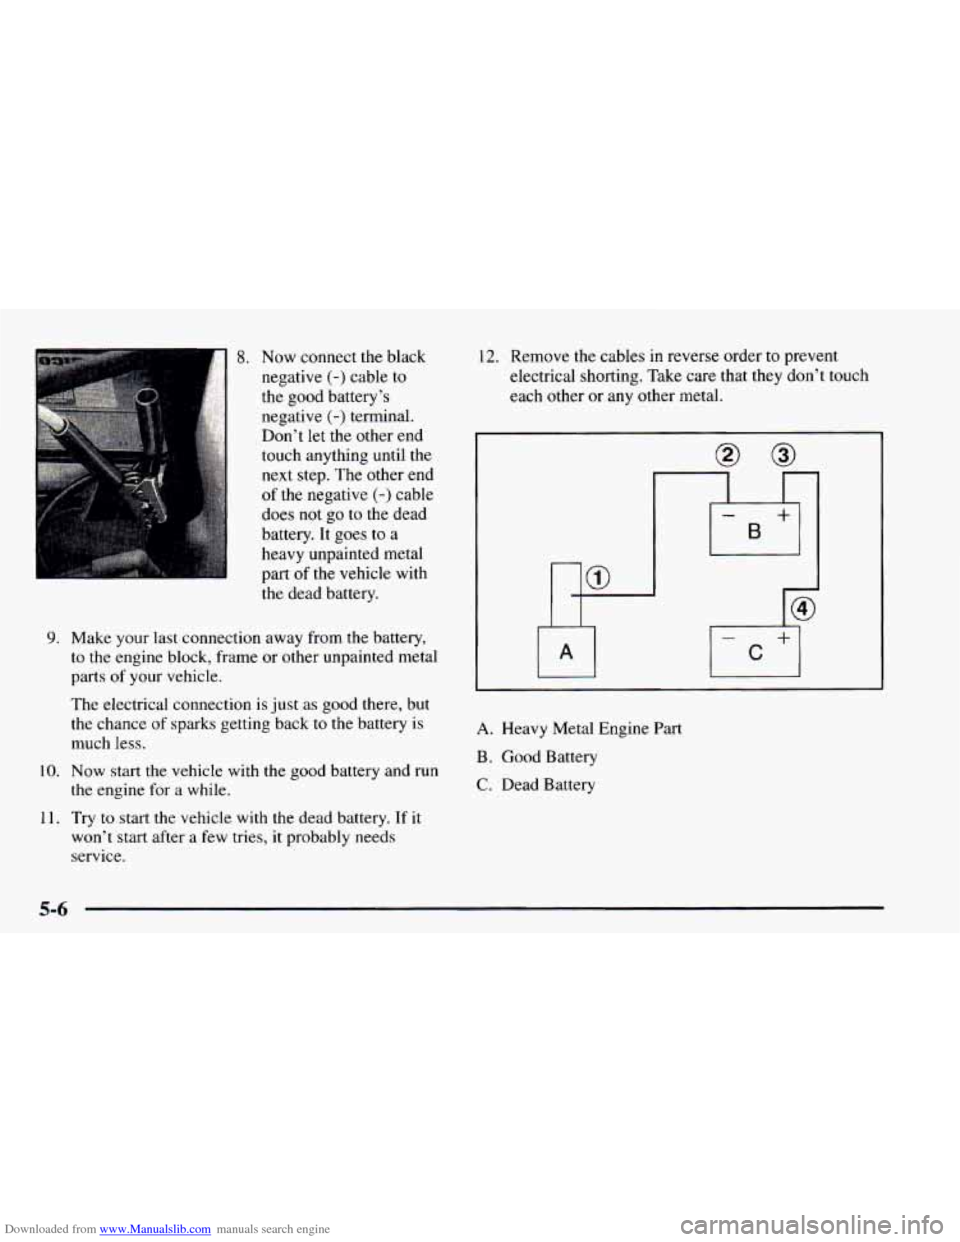
Downloaded from www.Manualslib.com manuals search engine 1 8. Now connect the black
negative
(-) cable to
the good battery’s
negative
(-) terminal.
Don’t
let the other end
touch anything until the
next step. The other end
of the negative
(-) cable
does not
go to the dead
battery. It goes to a
heavy unpainted metal
part of the vehicle with
the dead battery.
9. Make your last connection away from the battery,
to the engine block, frame or other unpainted metal
parts
of your vehicle.
The electrical connection is just as good there, but
the chance of sparks getting back to
the battery is
much less.
10. Now start the vehicle with the good battery and run
the engine for a while.
11.
Try to start the vehicle with the dead battery. If it
won’t start after a few tries, it probably needs
service.
12. Remove the cables in reverse order to prevent
electrical shorting. Take care that they don’t touch
each other or any other metal.
A. Heavy Metal Engine Part
B. Good Battery
C. Dead Battery
5-6
Page 225 of 404

Downloaded from www.Manualslib.com manuals search engine Towing Your Vehicle
Try to have a GM dealer or a professional towing
service tow your vehicle. They can provide the right
equipment and know how to tow
it without damage. See
“Roadside Assistance”
in the Index.
If your vehicle has been changed or modified since it
was factory-new by adding aftermarket items like fog
lamps, aero skirting, or special tires and wheels, these
things can be damaged during towing.
Before
you do anything, turn on the hazard
warning flashers.
When
you call, tell the towing service:
Whether your vehicle has rear-wheel drive or the
all-wheel-drive option.
That your vehicle cannot be towed from the front or
The make, model and year of your vehicle.
Whether you can still move the shift lever.
If there was an accident, what was damaged.
rear
with sling-type equipment.
I A CAUTION:
To help avoid injury to you or others:
Never let passengers ride in a vehicle that is
Never tow faster than safe or posted speeds.
Never tow with damaged parts not
Never get under your vehicle after it has
Always use separate safety chains on each
Use T-hooks on front or rear of vehicle.
being towed.
fully
secured.
been lifted by the tow truck.
side when towing
a vehicle.
5-7
Page 226 of 404

Downloaded from www.Manualslib.com manuals search engine A vehicle can fall from a car carrier if it isn’t
adequately secured. This can cause a collision,
serious personal injury and vehicle damage. The
vehicle should be tightly secured with chains
or
steel cables before it is transported.
Don’t use substitutes (ropes, leather straps,
canvas webbing, etc.) that can be cut by sharp
edges underneath the towed vehicle.
When your vehicle is being towed, have the ignition key
in the
OFF position. The steering wheel should be
clamped in a straight-ahead position, with a clamping
device designed for towing service.
Do not use the
vehicle’s steering column lock for this. The transmission
should be in
NEUTRAL (N) and the parking
brake released.
If your vehicle has the all-wheel-drive option, it can
only be towed with all four wheels off the ground.
A
dolly must be used under the un-raised wheels when
towing
or the vehicle must be transported on a flat
bed carrier.
Don’t have your vehicle towed with the wheels in
contact with the ground if it has all-wheel drive. If a
vehicle with all-wheel drive must be towed with
sling-type or wheel-lift equipment, then either
the front
or rear wheels must be supported
on a dolly.
I NOTICE:
If your vehicle has all-wheel drive, do not have it
towed with the wheels in contact with the ground
or vehicle damage may occur. A dolly must be
used under the un-raised wheels when towing or
the vehicle must be transported on a flat
bed carrier.
Page 232 of 404

Downloaded from www.Manualslib.com manuals search engine If No Steam Is Coming From Your Engine
If you get the overheat warning but see or hear no
steam, the problem may not be too serious. Sometimes
the engine
can get a little too hot when you:
0 Climb a long hill on a hot day.
0 Stop after high-speed driving.
0 Idle for long periods in traffic.
Tow a trailer, See “Driving on Grades” in the Index.
If you get the overheat warning with no sign of steam,
try this for
a minute or so:
1. Turn off your air conditioner.
2. Turn on your heater to full hot at the highest fan
speed and open the window as necessary.
3. If you’re in a traffic jam, shift to NEUTRAL (N);
otherwise, shift to the highest gear while
driving
-- DRIVE (D). If you no longer have the overheat warning, you can drive.
Just to
be safe, drive slower for about 10 minutes. If the
warning doesn’t come back
on, you can drive normally.
If the warning continues, pull over, stop, and park your
vehicle right away.
If there’s still no sign of steam, push the accelerator until
the engine speed is about twice as fast as normal idle
speed. Bring the engine speed back to normal idle speed
after two or three minutes. Now see if the warning stops.
But then, if you still have the warning,
turn ofthe
engine
and get everyone out of the vehicle until it
cools down.
You may decide not to lift the hood but to get service
help right away.
5-14