1997 CADILLAC ELDORADO tow
[x] Cancel search: towPage 279 of 361
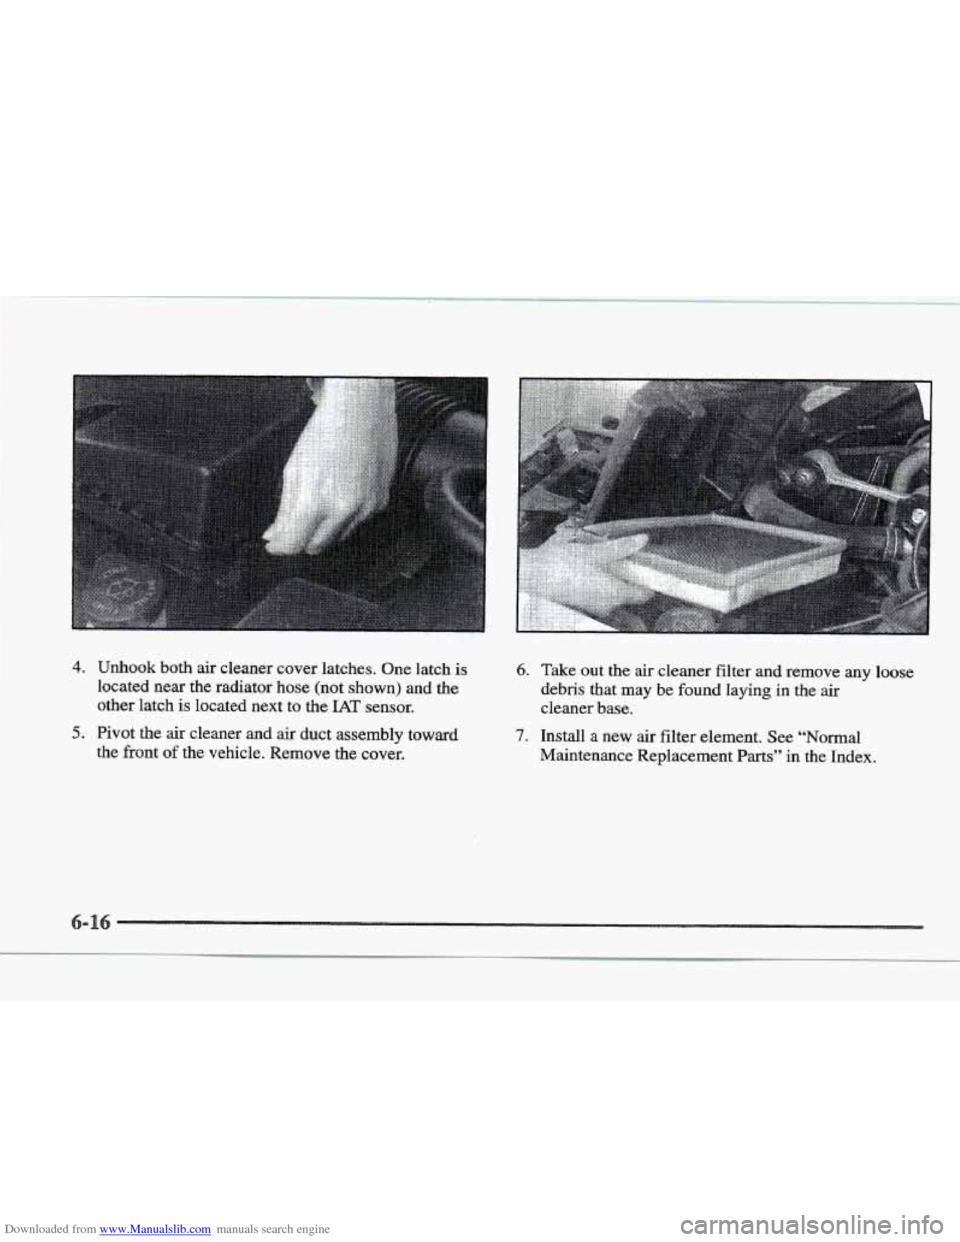
Downloaded from www.Manualslib.com manuals search engine 4. Unhook both air cleaner cover latches. One latch is
located near the radiator hose (not shown) and, the
other latch
is located next to the IAT sensor.
6.
5. Pivot the air cleaner and air duct assembly toward
the front
of the vehicle. Remove the cover.
7.
Take out the air cleaner filter and remove any loose
debris that may be found laying
in the air
cleaner base.
Install a new
air filter element. See “Normal
Maintenance Replacement
Parts” in the Index.
Page 281 of 361
Downloaded from www.Manualslib.com manuals search engine ic
ange
A good time to check your automatic transaxle fluid
level
is when the engine oil is changed.
Change both
the fluid and filter every 50,000 miles
(83
000 km) if the vehicle is mainly driven under one or
more
of these conditions:
In heavy city traffic where the outside temperature
regularly reaches
90°F (32 O C) or higher.
In hilly or mountainous terrain.
When doing frequent trailer towing.
Uses such
as found in taxi, police or delivery service.
If you do not use your vehicle under any of these
conditions, the fluid and filter do not require changing.
See “Scheduled Maintenance Services”
in the
Maintenance Schedule booklet. Because this
operation can be
a little difficult, you may
choose
to have this done at your Cadillac dealership
service department.
If’ you do it yourself, be sure to follow all the instructions
here, or you could get
a false reading on the dipstick.
ICE:
Page 282 of 361
Downloaded from www.Manualslib.com manuals search engine Wait at least 30 minutes before checking the transaxle
fluid Bevel
if you have been driving:
When outside temperatures are above
90" F (32 " C).
At high speed for quite a while.
In heavy traffic
-- especially in hot weather.
While pulling
a trailer.
To get the right reading, the fluid should be at normal
operating temperature, which
is 180°F to 200" F
(82°C to 93°C).
Get the vehicle warmed up by driving about 15 miles
(24 km) when outside temperatures are above 50°F
(10°C). If it's colder than 50°F ( 10°C), YSU may
have to drive longer.
Park your vehicle on a level place. Keep the
engine running.
With the parhng brake applied, place the shift
lever
in PARK (P).
With your foot on the brake pedal, move the shift
lever through each gear range, pausing for about
three seconds
in each range. Then, position the shift
lever in
PARK (P).
Let the engine run at idle for three to five minutes. Then, without shutting
off the engine, follow these steps:
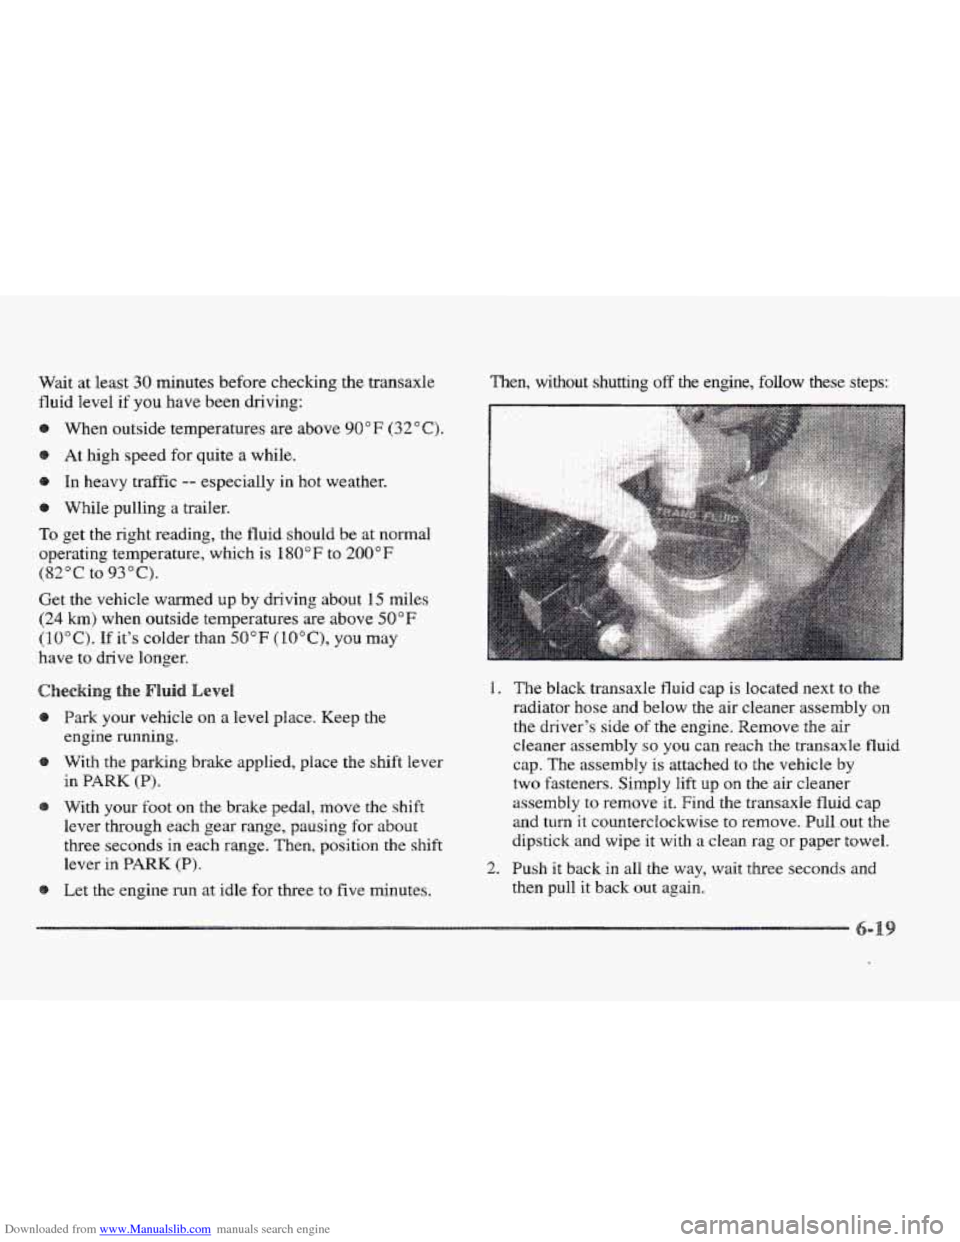
1.
2.
The
black transaxle fluid cap is located next to the
radiator hose and
below the air cleaner assembly on
the driver's side of the engine. Remove the air
cleaner assembly
so you can reach the transaxle fluid
cap. The assembly
is attached to the vehicle by
two fasteners. Simply lift up on the air cleaner
assembly to remove it.
Find the transaxle fluid cap
and
turn it counterclockwise to remove. Pull out the
dipstick and wipe it with
a clean rag or paper towel.
Push it back in all the way, wait three seconds and
then pull it back out again.
Page 310 of 361
Downloaded from www.Manualslib.com manuals search engine si ric
1.
2.
3.
4.
5.
6.
7.
8.
9.
Vacuum and brush the area to remove any loose dirt.
Always clean a whole trim panel or section. Mask surrounding trim along stitch or welt lines.
Mix Multi-Purpose Powdered Cleaner following the directions on the container label.
Use suds only and apply with a clean sponge. Don’t
saturate the material and don’t rub
it roughly.
As soon as you’ve cleaned the section, use a sponge
to remove the suds.
Rinse the section with
a clean, wet sponge.
Wipe
off what’s left with a slightly damp paper towel
or cloth.
Dry it immediately with a blow dryer.
Wipe with a clean cloth.
si vent-
First, see if you have to use solvent-type cleaner at all.
Some spots and stains will clean
off better with just
water and mild soap.
If you need to use a solvent:
1. Gently scrape excess soil from the trim material with
a clean, dull knife
or scraper.
2. Use very little cleaner, light pressure and clean cloths
(preferably cheesecloth). Cleaning should start at the
outside of the stain, “feathering” toward the center.
3. Keep changing to a clean section of the cloth.
4. When you clean a stain from fabric, immediately dry the
area with a blow dryer to help prevent a cleaning ring.
Stains caused by grease, oil, butter, margarine, shoe
polish, coffee with cream, chewing gum, cosmetic
creams, vegetable oils, wax crayon, tar and asphalt can
be removed
as follows:
1. Carefully scrape off excess stain.
2. Follow the solvent-type instructions described earlier.
Shoe polish, wax crayon, tar and asphalt will stain if left
on a vehicle’s seat fabric. They should
be removed as
soon as possible. Be careful, because the cleaner will
dissolve them and may cause
them to spread.
Page 312 of 361
Downloaded from www.Manualslib.com manuals search engine Use a clean cloth moistened in warm, soapy water (use
mild dish washing soap). Dry the wood immediately
with a clean cloth.
Vacuum around
a speaker cover gently, so that the
speaker won’t be damaged. Some spots and stains
will clean
off better with just water and mild soap. If
something gets on one of them and you need to use
a solvent, follow these steps:
I. Gently scrape excess soil from the trim material with
2. Use very little cleaner, light pressure and clean cloths
(preferably cheesecloth). Cleaning should start at the
outside of the stain, “feathering” toward the center.
a
clean, dull knife or scraper.
3. Keep changing to a clean section of the cloth.
4. When you clean a stain from fabric, immediately
dry the area with a blow dryer
to help prevent a
cleaning ring.
a
Keep belts clean and dry.
U
CAUTION:
Do not bleach or dye safety belts. H you
may severely weaken them. In a crashg they
might not be able to provide adequate protection.
Clean safety belts only with mild soap and
lukewarm watere
ss
Glass should be cleaned often. GM Glass Cleaner (GM
Part No. 1050427) or a Liquid household glass cleaner
will remove normal tobacco smoke and dust films on
interior glass.
Don’t use abrasive cleaners
on glass, Decause they may
cause scratches. Avoid placing decals on the inside rear
window, since they
may have to be scraped off later.
If abrasive cleaners are used on the inside of the rear
window, an electric defogger element
may be damaged.
Any temporary license should not
be attached across the
defogger grid.
Page 313 of 361
Downloaded from www.Manualslib.com manuals search engine es
If the windshield is not clear after using the windshield
washer, or
if the wiper blade chatters when running,
wax, sap or other material may be on the blade
or windshield.
Clean the outside of the windshield with
GM
Windshield Cleaner, Bon Ami@ Powder (non-scratching
glass cleaning powder),
CM Bart No. 105001 1. The
windshield is clean if beads do not form
when you rinse
it with water.
Grime from the windshield will stick to the wiper blades
and affect their performance. Clean the blade by wiping
vigorously with a cloth soaked in full-strength
windshield washer solvent. Then rinse the blade
with water.
Check the wiper blades and clean them as necessary;
replace blades that look worn.
s
Silicone grease on weatherstrips will make them last
longer, seal better, and not stick or squeak. Apply silicone
grease with a clean cloth at least every
six months. During
very cold, damp weather more frequent application may be
required. (See “Recommended Fluids and Lubricants” in
the Maintenance Schedule booklet.)
e e e
The paint finish on your vehicle provides beauty, depth
of color, gloss retention and durability.
The best way to preserve your vehicle’s finish
is to keep it
clean by washing it often with lukewarm or cold water.
Don’t wash your vehicle in the direct rays
of the sun.
Don’t use strong soaps
or chemical detergents. Use
liquid hand, dish or car washing (mild detergent) soaps.
Don’t use cleaning agents that are petroleum based,
or that contain acid
or abrasives. All cleaning agents
should be flushed promptly and not allowed to dry
on
the surface, or they could stain. Dry the finish with a
soft, clean chamois or an all-cotton towel to avoid
surface scratches and water spotting.
High pressure
car washes may cause water to enter
your vehicle.
ea enses
Use lukewarm or cold water, a soft cloth and a liquid
hand,
dish or car washing (mild detergent) soap to clean
exterior lamps
and lenses. Follow instructions under
“Washing Your Vehicle.”
Page 314 of 361
Downloaded from www.Manualslib.com manuals search engine Occasional waxing or mild polishing of your Cadillac
by hand may be necessary to remove residue from the
paint finish.
You can get GM-approved cleaning
products from your dealer.
(See “Appearance Care and
Materials”
in the Index.)
Your Cadillac has a “basecoatklearcoat” paint finish.
The clearcoat gives more depth and gloss to the colored
basecoat. Always use waxes and polishes that are
non-abrasive and made for a basecoatklearcoat
paint finish.
e e
Foreign materials such as calcium chloride and other
salts, ice melting agents, road oil and tar, tree sap, bird
droppings. chemicals
from industrial chimneys? etc., can
damage your vehicle’s finish if they remain
on painted
surfaces. Wash the vehicle as
soon as possible. If
necessary, use non-abrasive cleaners that are marked
safe
for painted surfaces to remove foreign matter. Exterior painted surfaces are subject
to aging, weather
and chemical fallout that can take their toll over a period
of years. You can help to keep the paint finish looking
new by keeping your Cadillac garaged or covered
whenever possible.
Keep your wheels clean using a soft clean cloth with
mild soap and water. Rinse
with clean water. After
rinsing thoroughly, dry with
a soft clean towel. A wax
may then be applied.
The surface
of these wheels is similar to the painted
surface
of your vehicle. Don’t use strong soaps,
chemicals, abrasive polishes, abrasive cleaners or abrasive cleaning brushes on them because you could
damage the surface.
You may use chrome polish on
chrome wheels, but avoid any painted surface of the
wheel, and buff
off immediately after application.
Don’t take your vehicle through an automatic car wash
that has silicon carbide tire cleaning brushes. These
brushes can also damage the surface of these wheels.
Page 334 of 361
Downloaded from www.Manualslib.com manuals search engine Cadillac's exceptional Roadside Service is more than an
auto club or towing service. It provides every Cadillac
owner with the advantage
of contacting a Cadillac
advisor and, when appropriate, a Cadillac trained dealer
technician who can provide on-site service. Each technician travels
with a
specially equipped
service vehicle complete with the necessary Cadillac
parts and tools required to handle most roadside repairs.
Cadillac Roadside Service can be reached by dialing
1-800-882-11
12,24 hours a day, 365 days a year.
This service is provided at no charge for any
warranty-covered situation and for a nominal charge
if the Cadillac is no longer under warranty. Roadside
Service is available only
in the United States
and Canada.
Roadside Service provides several Cadillac
Owner Privileges
TM at "no charge," throughout
your
1997 Cadillac Warranty Period -- 48 Months/
50,000 miles (80 000 km).