1997 BUICK PARK AVENUE tire pressure reset
[x] Cancel search: tire pressure resetPage 144 of 420

To clean the HUD lens, spray household glass cleaner
on a soft, clean cloth. Gently wipe
and dry the HUD
lens. Do not spray cleaner directly on the lens to avoid
cleaner leaking inside the unit.
If the ignition is on and you can’t see the HUD image,
check to see
if
The headlamps are on.
Something is covering the HUD unit.
The HUD dimmer control is adjusted properly.
The HUD image is adjusted to the proper height.
A fuse is blown. See “Fuses and Circuit Breakers” in
the Index.
Keep in mind that your windshield is part of the HUD
system. If you ever have to have your windshield
replaced, be sure to get one that is designed for HUD or
your HUD image may look blurred or out of focus.
Driver Information Center (DIC)
(If Equipped)
Your Park Avenue may be equipped with a Driver
Information Center (DIC). The DIC will display
information about how your vehicle is functioning,
as well as warning messages if a system problem
is detected. The
following buttons
are
on the DIC control panel
which
is located to the left
of the steering column:
ODOKRIP: Use this button to display your total and
trip miles.
FUEL INFO: Press this button to display fuel
information such as, fuel used, fuel range and fuel
economy.
GAGE INFO: Use this button to display oil pressure,
oil life, coolant temperature, tire pressure and battery
information.
RESET: This button, used along with other buttons,
will reset system functions.
ENGMET: Use this button to change the display
between English and metric units.
ProCarManuals.com
Page 147 of 420

Coolant Temperature: Press the GAGES button until
COOLANT TEMP appears in the display. If there are no
problems detected with the temperature, COOLANT
TEMP NORMAL will appear
in the display. If the
temperature is too high, COOLANT TEMP HOT will
appear in the display. If you see the COOLANT TEMP
HOT message, your engine is overheated. You should
pull off the road, stop your vehicle and turn off your
engine as soon as possible. This manual explains what to
do. See “Engine Overheating” in the Index.
Battery Volts: Press the GAGES button until the
display shows BATTERY STATE.
If the voltage is
normal the display will show BATTERY STATE
NORMAL.
If the voltage drops below 10.5 volts, the
display will show BATTERY STATE LOW. If the
voltage is above
16 volts, the display will show
BATTERY STATE HIGH. If the display shows the high
or low message, you need to have your battery checked.
Oil Life Index: Press the GAGES button until OIL
LIFE INDEX appears in the display. The OIL LIFE
INDEX NORMAL display will show an estimate of
the oil’s remaining useful life. When the oil life index
is less than
lo%, the display will show OIL LIFE INDEX CHANGE
OIL. When you have the oil
changed according to the maintenance schedule (see
“Maintenance Schedule” in the Index), you will have
to reset the oil life index. To do this, press and hold the
RESET button for more than five seconds while the oil
life index is being displayed on the DIC. The oil life
will change to
100%.
Tire Pressure Status: Press the GAGES button
until TIRE PRESSURE appears in the display.
TIRE
PRESSURE NORMAL is displayed when the Check
Tire Pressure System believes your vehicle’s tire
pressures are normal. If a potential tire pressure
problem is detected, the display will show TIRE
PRESSURE LOW: CHECK TIRES.
If you see the
TIRE PRESSURE LOW: CHECK TIRES message, you
should stop as soon as you can and check all your tires
for damage. (If a tire is flat, see “If a Tire Goes Flat”
in
the Index.) Also check the tire pressure in all four tires
as soon as you can. See “Inflation
- Tire Pressure” and
“Check Tire Pressure System”
in the Index.
There are times when you will have to reset (calibrate)
the Check Tire Pressure System. See “Check Tire
Pressure System” in the Index.
2-87
ProCarManuals.com
Page 313 of 420
Check Tire Pressure System (If Equipped)
The check tire pressure system can alert you to a large
change
in the pressure of one tire. The system won’t alert
you before you drive that a tire is low or flat. You must
begin driving before the system will work properly.
The CHECK
TIRE PRESSURES message will appear
on the Driver Information Center (DIC) if pressure in
one tire becomes at least
€0 psi (69 kPa) lower or higher
than the other three tires. The warning message can be
removed from the display by pressing any DIC button.
Removing the message does not reset the system. The
check tire pressure system won’t alert you if more than
one tire is low or high, or if the system
is not calibrated
properly. It also won’t tell you which tire is low or high.
If
the anti-lock brake system warning light comes on,
the check tire pressure system may not be working
properly. See your dealer for service. (Also, see
“Anti-Lock Brake System Warning Light” in the Index.)
The check tire pressure system detects differences in tire
rotation speeds that
are caused by changes in tire
pressure. The system can alert you about a low
tire
-- but it doesn’t replace normal tire maintenance.
See “Tires” in the Index. When
the CHECK TIRE PRESSURES message appears
on the Driver Information Center, you should stop as
soon as you can and check all your tires for damage. (If
a tire is flat, see “If a Tire Goes Flat” in the Index.) Also
check the tire pressure in all four tires as soon as you
can. See “Inflation-Tire Pressure” in the Index.
Any time
you adjust a tire’s pressure or have one or
more tires repaired or replaced, you’ll need to reset
(calibrate) the check tire pressure system. You’ll also
need to reset the system whenever you rotate the tires,
buy new tires, install or remove the compact spare, and
whenever the vehicle’s battery has been disconnected.
Don’t reset the check tire pressure system without first
correcting the cause of the problem and checking and
adjusting the pressure in all four tires. If you reset the
system when the tire pressures are incorrect, the check
tire pressure system will not work properly and may not
alert you when a tire is low or high.
6-49
ProCarManuals.com
Page 314 of 420
To reset (calibrate) the system:
1. Turn the ignition switch to RUN.
2. Press the GAGES button on the DIC until TIRE
PRESSURE appears on the display.
3. Press and hold the DIC RESET button for about
five seconds. After five seconds, the display will
show TIRE PRESSURE RESET. If
TIRE
PRESSURE RESET does not appear on the display
after about five seconds, see your dealer for service.
After you release the DIC RESET button, TIRE
PRESSURE NORMAL will appear on the display.
The system completes the calibration process during
driving. During the first
10 to 20 miles (15 to 30 km) of
driving, the system will not alert you if
a tire is high or
low. After
20 to 80 miles (30 to 125 km), the system
will only alert you about pressure differences of
12 psi
(85 kPa) or more. After about 80 miles (125 km) of
driving, the system will alert you if one tire is
10 psi
(69 kPa) different from the other three tires.
Tire Inspection and Rotation
Tires should be rotated every 6,000 to 8,000 miles
(10 000 to 13 000 km). Any time you notice unusual wear,
rotate your tires
as soon as possible and check wheel
alignment. Also check for damaged tires or wheels. See
“When It’s Time for New Tires” and “Wheel
Replacement’’ later in
this section for more information.
The purpose of regular rotation is to achieve more uniform
wear for
all tires on the vehicle. The fist rotation is the
most important. See “Scheduled Maintenance Services” in
the Index for scheduled rotation intervals.
I
7
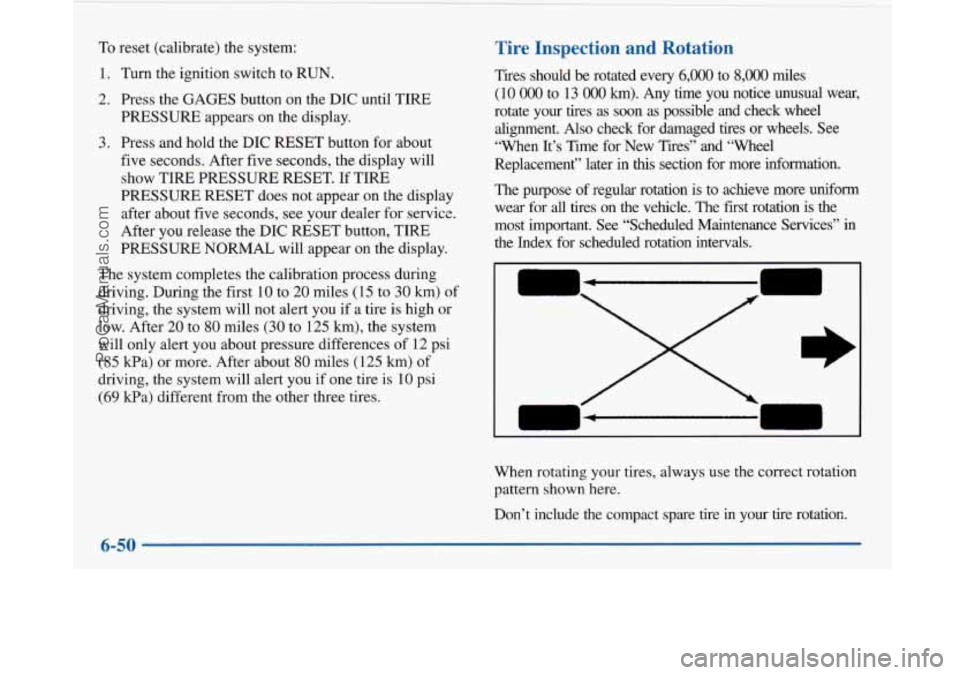
When rotating your tires, always use the correct rotation
pattern shown here.
Don’t include the compact spare tire
in your tire rotation
6-50
ProCarManuals.com