Page 17 of 34
87-133
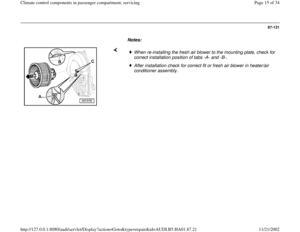
Sensor for outlet temperature, center -
G192-, removing and installing (1997 )
Remove driver side under-dash panel
Repair Manual, Body Interior, Repair Group
70
- Disconnect electrical connector -A-.
-
Turn sensor -B- 90 and remove.
Pa
ge 17 of 34 Climate control com
ponents in
passen
ger com
partment, servicin
g
11/21/2002 htt
p://127.0.0.1:8080/audi/servlet/Dis
play?action=Goto&t
yp
e=re
pair&id=AUDI.B5.HA01.87.21
Page 18 of 34
87-134
Footwell air outlets, removing and
installing
Remove glovebox, lower shelf on driver side and
center section of instrument panel complete (trim
and supports)
Repair Manual, Body Interior, Repair Group
70
- Remove connection ducts between footwell and
rear passenger compartment air outlets.
Remove airbag control module -A- Repair
Manual, "Body Interior, Repair Group 69
Remove fixture for instrument panel -B- at center
tunnel Repair Manual, Body Interior, Repair
Group 70
- Remove screws -C-.
- Carefully remove footwell air outlet toward the
passenger compartment.
- Install in reverse order of removal.
Pa
ge 18 of 34 Climate control com
ponents in
passen
ger com
partment, servicin
g
11/21/2002 htt
p://127.0.0.1:8080/audi/servlet/Dis
play?action=Goto&t
yp
e=re
pair&id=AUDI.B5.HA01.87.21
Page 19 of 34
87-135
Footwell/defroster flap motor -V85-,
removing and installing (1996)
- Remove footwell air outlet page 87
-134
.
Notes: - Remove 3 screws -A-.
- Separate electrical connection -B- ("red" connector housing).
- Release relay lever -C- and remove flap motor.
- Install in reverse order of removal.
After installing, always check DTC memory page 01
-18
.
When installing flap motor, ensure that relay lever -C- is correctly
positioned. Testing -V85-, output Diagnostic Test Mode (DTM) page 01
-42
.
Electrical test page 01
-115
.
Pa
ge 19 of 34 Climate control com
ponents in
passen
ger com
partment, servicin
g
11/21/2002 htt
p://127.0.0.1:8080/audi/servlet/Dis
play?action=Goto&t
yp
e=re
pair&id=AUDI.B5.HA01.87.21
Page 20 of 34
87-136
Footwell/defroster flap motor -V85-,
removing and installing (1997 )
Remove driver side under dash panel
Repair Manual, Body Interior, Repair Group
70
- Remove bolts -A- and -B- (for left instrument panel support).
- Remove floor outlet page 87
-134
.
- Disconnect electrical connector from motor.
- Remove bolt -A-.
- Unhook lower strap -B- of bracket with screw driver -C-.
- Remove motor and unhook lever -D- (color: white).
Pa
ge 20 of 34 Climate control com
ponents in
passen
ger com
partment, servicin
g
11/21/2002 htt
p://127.0.0.1:8080/audi/servlet/Dis
play?action=Goto&t
yp
e=re
pair&id=AUDI.B5.HA01.87.21
Page 21 of 34
87-137
Notes for installing:
When installing flap motor, ensure that relay
lever -D- is correctly positioned ( illus. A87
-
0161 on page 87
-136
).
Install strap -A- (on bracket for motor) first into mounting -B- (on
heater/air conditioning assembly). After installing, always check DTC memory page 01
-18
.
Testing -V85- page 01
-42
(output DTM).
Electrical test page 01
-115
.
Wiring harness must be installed so that it does not come in contact
with moving components (e.g. motor linkage). If the crank on the motor is positioned so that the lever can not be
hooked in or the motor can not be installed, connect motor to the
wiring harness, switch on ignition and place lever in appropriate
position by activating the button for air distribution on A/C control head
-E87-.
Pa
ge 21 of 34 Climate control com
ponents in
passen
ger com
partment, servicin
g
11/21/2002 htt
p://127.0.0.1:8080/audi/servlet/Dis
play?action=Goto&t
yp
e=re
pair&id=AUDI.B5.HA01.87.21
Page 22 of 34
87-138
Temperature regulator flap motor -V68-,
removing and installing (1996)
- Remove footwell air outlet page 87
-134
.
Notes: - Remove 3 screws -A-.
- Separate electrical connection to flap motor ("black" connector
housing).
- Release relay lever -B- and remove flap motor.
- Install in reverse order of removal.
After installing, always check DTC memory page 01
-18
.
When installing flap motor, ensure that relay lever -B- is correctly
positioned. Testing -V68-, output Diagnostic Test Mode (DTM) page 01
-42
.
Electrical test page 01
-115
.
Pa
ge 22 of 34 Climate control com
ponents in
passen
ger com
partment, servicin
g
11/21/2002 htt
p://127.0.0.1:8080/audi/servlet/Dis
play?action=Goto&t
yp
e=re
pair&id=AUDI.B5.HA01.87.21
Page 23 of 34
87-139
Temperature regulator flap motor -V68-,
removing and installing (1997 )
Remove complete front section of center console
Repair Manual, Body Interior, Repair Group
70
- Loosen floor outlet from the right instrument
panel support page 87
-134
.
Notes for installing: - Identify and mark electrical connectors at flap motor prior to
disconnecting (to prevent mix up) and remove from motor.
- Remove 3 bolts -A-.
- Remove motor and unhook lever -B- (color: red).
After installing, always check DTC memory page 01
-18
.
When installing flap motor, ensure that relay lever -B- is correctly
positioned. Testing -V68- page 01
-42
(output DTM).
Electrical test page 01
-115
.
Wiring harness must be installed so that it does not come in contact
with moving components (e.g. motor linkage).
Pa
ge 23 of 34 Climate control com
ponents in
passen
ger com
partment, servicin
g
11/21/2002 htt
p://127.0.0.1:8080/audi/servlet/Dis
play?action=Goto&t
yp
e=re
pair&id=AUDI.B5.HA01.87.21
Page 24 of 34
87-140
Central air flap motor -V70-, removing
and installing (1996)
- Remove footwell air outlet page 87
-134
.
Notes: - Remove 3 screws -A-.
- Separate electrical connection to flap motor ("blue" connector housing).
- Release relay lever -B- and remove flap motor.
- Install in reverse order of removal.
After installing, always check DTC memory page 01
-18
.
When installing flap motor, ensure that relay lever -B- is correctly
positioned. Testing -V70-, output Diagnostic Test Mode (DTM) page 01
-42
.
Electrical test page 01
-115
.
Pa
ge 24 of 34 Climate control com
ponents in
passen
ger com
partment, servicin
g
11/21/2002 htt
p://127.0.0.1:8080/audi/servlet/Dis
play?action=Goto&t
yp
e=re
pair&id=AUDI.B5.HA01.87.21


Remove driver side under-dash panel
Repair Manual, Body Interior, Repair Group
70")

Repair M")

- Remove footwell air outlet page 87
-134
.
Notes: - Remove 3 screws -A-.
- Separate electrical")

Remove driver side under dash panel
Repair Manual, Body Interior, Repair Group
70
- Remov")
.
Install strap -A- (on brack")

- Remove footwell air outlet page 87
-134
.
Notes: - Remove 3 screws -A-.
- Separate electric")

Remove complete front section of center console
Repair Manual, Body Interior, Repair Group
70")

- Remove footwell air outlet page 87
-134
.
Notes: - Remove 3 screws -A-.
- Separate electrical connect")