Page 1 of 11
57-39
Central locking system Assembly overview
1 -
Vacuum line
2 -
Right-front door lock actuator
Removing and installing page 57
-12
3 -
Vacuum line connectors
Disengage harness connectors page 57
-
42
Additional vacuum line connectors are
located at bottom of A-pillar and in boot at
B-pillar
4 -
Right-rear door lock actuator Removing and installing page 58
-14
5 -
Fuel filler flap lock actuator
Removing and installing page 57
-46
6 -
Central locking system pump
Removing and installing page 57
-49
7 -
Distribution box
Connected with all other wires excluding
wire for rear lid
Pa
ge 1 of 11 Central lockin
g system
11/21/2002 htt
p://127.0.0.1:8080/audi/servlet/Dis
play?action=Goto&t
yp
e=re
pair&id=AUDI.B5.BD01.57.8
Page 2 of 11
57-40
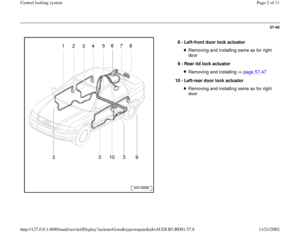
8 -
Left-front door lock actuator
Removing and installing same as for right
door
9 -
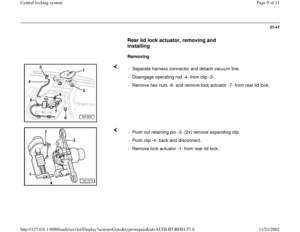
Rear lid lock actuator Removing and installing page 57
-47
10 -
Left-rear door lock actuator
Removing and installing same as for right
door
Pa
ge 2 of 11 Central lockin
g system
11/21/2002 htt
p://127.0.0.1:8080/audi/servlet/Dis
play?action=Goto&t
yp
e=re
pair&id=AUDI.B5.BD01.57.8
Page 3 of 11
57-41
Repairing central locking system
For additional information Electrical Wiring
Diagrams, Troubleshooting & Component
Locations binder.
Notes:
After the car has been parked for a lengthy time
and/or after replacing the central locking system
pump, the central locking system will not
function properly until prompted repeatedly.
When the system is operating correctly, all
locks will close within 2 seconds.
If the pump operates for longer than 5 seconds,
there is a leak in the system.
When there is a leak in the system, the pump
must not run for more than 30 seconds. The
pump's control unit must shut it off at this point.
All the lock actuators are equipped with special
vacuum line connectors that must lock when
plugged in.
Pa
ge 3 of 11 Central lockin
g system
11/21/2002 htt
p://127.0.0.1:8080/audi/servlet/Dis
play?action=Goto&t
yp
e=re
pair&id=AUDI.B5.BD01.57.8
Page 4 of 11
57-42
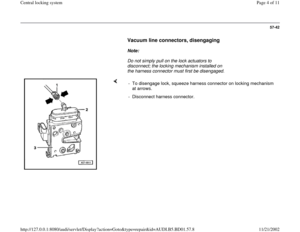
Vacuum line connectors, disengaging
Note:
Do not simply pull on the lock actuators to
disconnect; the locking mechanism installed on
the harness connector must first be disengaged.
- To disengage lock, squeeze harness connector on locking mechanism
at arrows.
- Disconnect harness connector.
Pa
ge 4 of 11 Central lockin
g system
11/21/2002 htt
p://127.0.0.1:8080/audi/servlet/Dis
play?action=Goto&t
yp
e=re
pair&id=AUDI.B5.BD01.57.8
Page 5 of 11
57-43
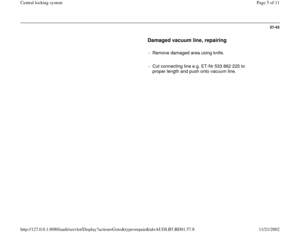
Damaged vacuum line, repairing
- Remove damaged area using knife.
- Cut connecting line e.g. ET-Nr 533 862 225 to
proper length and push onto vacuum line.
Pa
ge 5 of 11 Central lockin
g system
11/21/2002 htt
p://127.0.0.1:8080/audi/servlet/Dis
play?action=Goto&t
yp
e=re
pair&id=AUDI.B5.BD01.57.8
Page 6 of 11
57-44
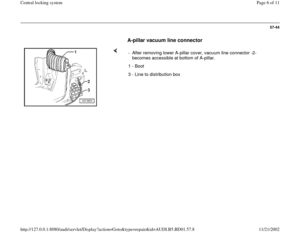
A-pillar vacuum line connector
- After removing lower A-pillar cover, vacuum line connector -2-
becomes accessible at bottom of A-pillar.
1 - Boot
3 - Line to distribution box
Pa
ge 6 of 11 Central lockin
g system
11/21/2002 htt
p://127.0.0.1:8080/audi/servlet/Dis
play?action=Goto&t
yp
e=re
pair&id=AUDI.B5.BD01.57.8
Page 7 of 11
57-45
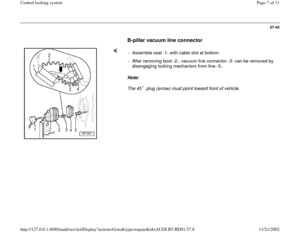
B-pillar vacuum line connector
Note:
The 45 plug (arrow) must point toward front of vehicle. - Assemble seal -1- with cable slot at bottom.
- After removing boot -2-, vacuum line connector -3- can be removed by
disengaging locking mechanism from line -5-.
Pa
ge 7 of 11 Central lockin
g system
11/21/2002 htt
p://127.0.0.1:8080/audi/servlet/Dis
play?action=Goto&t
yp
e=re
pair&id=AUDI.B5.BD01.57.8
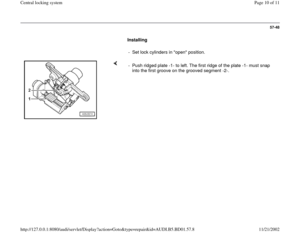
Page 8 of 11
57-46
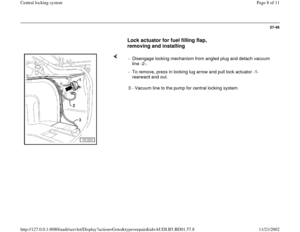
Lock actuator for fuel filling flap,
removing and installing
- Disengage locking mechanism from angled plug and detach vacuum
line -2-.
- To remove, press in locking lug arrow and pull lock actuator -1-
rearward and out.
3 - Vacuum line to the pump for central locking system
Pa
ge 8 of 11 Central lockin
g system
11/21/2002 htt
p://127.0.0.1:8080/audi/servlet/Dis
play?action=Goto&t
yp
e=re
pair&id=AUDI.B5.BD01.57.8


 must point toward front of vehicle. - Assemble seal -1- with cable slot at bottom.
- After removing boot -2-, vacuum")
