Page 9 of 58
15-45
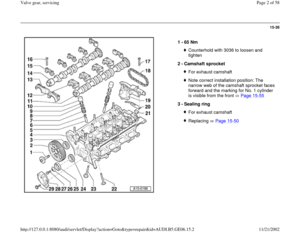
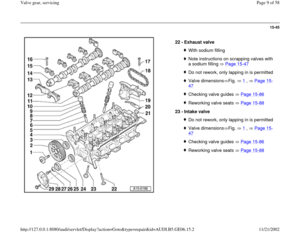
22 -
Exhaust valve
With sodium fillingNote instructions on scrapping valves with
a sodium filling Page 15
-47
Do not rework, only lapping in is permittedValve dimensions Fig. 1
, Page 15
-
47
Checking valve guides Page 15
-86
Reworking valve seats Page 15
-88
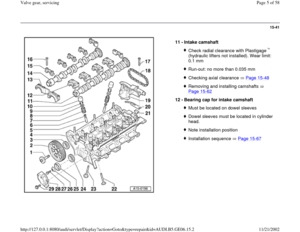
23 -
Intake valve
Do not rework, only lapping in is permittedValve dimensions Fig. 1
, Page 15
-
47
Checking valve guides Page 15
-86
Reworking valve seats Page 15
-88Pa
ge 9 of 58 Valve
gear, servicin
g
11/21/2002 htt
p://127.0.0.1:8080/audi/servlet/Dis
play?action=Goto&t
yp
e=re
pair&id=AUDI.B5.GE06.15.2
Page 10 of 58
15-46
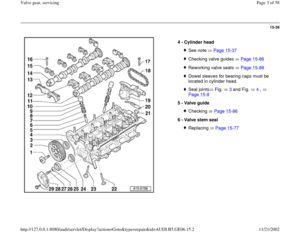
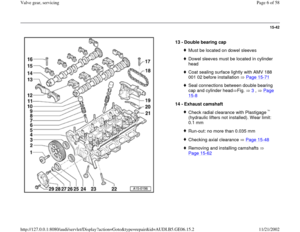
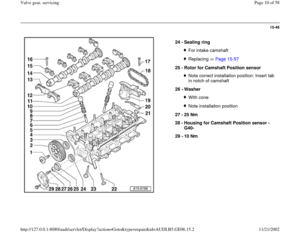
24 -
Sealing ring
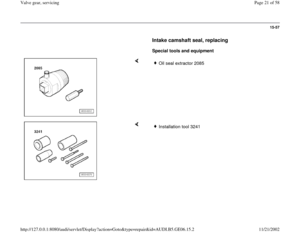
For intake camshaftReplacing Page 15
-57
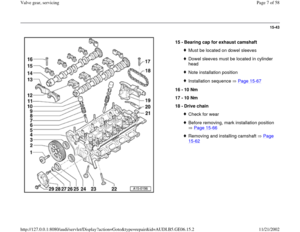
25 -
Rotor for Camshaft Position sensor
Note correct installation position: Insert tab
in notch of camshaft
26 -
Washer With coneNote installation position
27 -
25 Nm
28 -
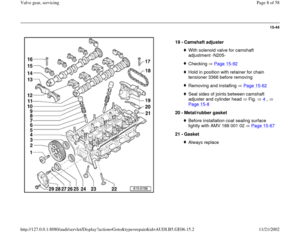
Housing for Camshaft Position sensor -
G40-
29 -
10 Nm
Pa
ge 10 of 58 Valve
gear, servicin
g
11/21/2002 htt
p://127.0.0.1:8080/audi/servlet/Dis
play?action=Goto&t
yp
e=re
pair&id=AUDI.B5.GE06.15.2
Page 11 of 58
15-47
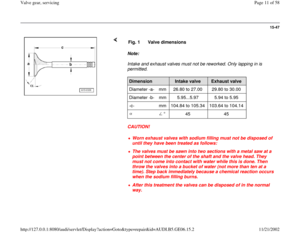
Note:
Intake and exhaust valves must not be reworked. Only lapping in is
permitted.
CAUTION! Fig. 1 Valve dimensionsDimension
Intake valve
Exhaust valve
Diameter -a- mm 26.80 to 27.00 29.80 to 30.00
Diameter -b- mm 5.95...5.97 5.94 to 5.95
-c- mm 104.84 to 105.34 103.64 to 104.14
45 45
Worn exhaust valves with sodium filling must not be disposed of
until they have been treated as follows: The valves must be sawn into two sections with a metal saw at a
point between the center of the shaft and the valve head. They
must not come into contact with water while this is done. Then
throw the valves into a bucket of water (not more than ten at a
time). Step back immediately because a chemical reaction occurs
when the sodium filling burns. After this treatment the valves can be disposed of in the normal
way.
Pa
ge 11 of 58 Valve
gear, servicin
g
11/21/2002 htt
p://127.0.0.1:8080/audi/servlet/Dis
play?action=Goto&t
yp
e=re
pair&id=AUDI.B5.GE06.15.2
Page 12 of 58
15-48
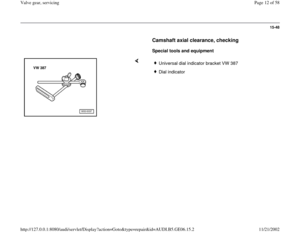
Camshaft axial clearance, checking
Special tools and equipment
Universal dial indicator bracket VW 387Dial indicator
Pa
ge 12 of 58 Valve
gear, servicin
g
11/21/2002 htt
p://127.0.0.1:8080/audi/servlet/Dis
play?action=Goto&t
yp
e=re
pair&id=AUDI.B5.GE06.15.2
Page 13 of 58
15-49
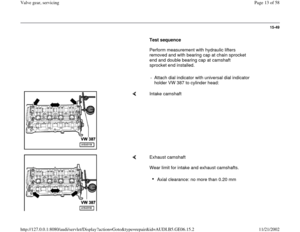
Test sequence
Perform measurement with hydraulic lifters
removed and with bearing cap at chain sprocket
end and double bearing cap at camshaft
sprocket end installed.
- Attach dial indicator with universal dial indicator
holder VW 387 to cylinder head:
Intake camshaft
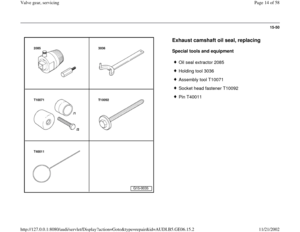
Exhaust camshaft
Wear limit for intake and exhaust camshafts.
Axial clearance: no more than 0.20 mm
Pa
ge 13 of 58 Valve
gear, servicin
g
11/21/2002 htt
p://127.0.0.1:8080/audi/servlet/Dis
play?action=Goto&t
yp
e=re
pair&id=AUDI.B5.GE06.15.2
Page 14 of 58
15-50
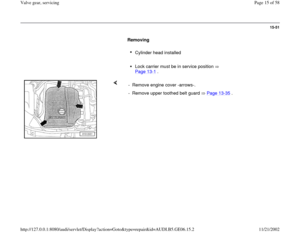
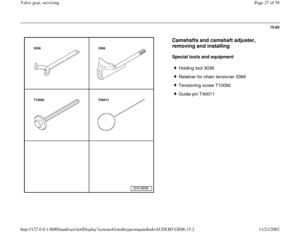
Exhaust camshaft oil seal, replacing
Special tools and equipment
Oil seal extractor 2085
Holding tool 3036
Assembly tool T10071
Socket head fastener T10092
Pin T40011
Pa
ge 14 of 58 Valve
gear, servicin
g
11/21/2002 htt
p://127.0.0.1:8080/audi/servlet/Dis
play?action=Goto&t
yp
e=re
pair&id=AUDI.B5.GE06.15.2
Page 15 of 58
15-51
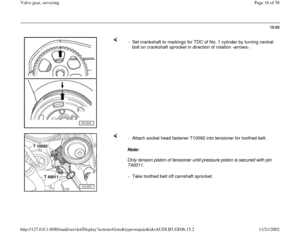
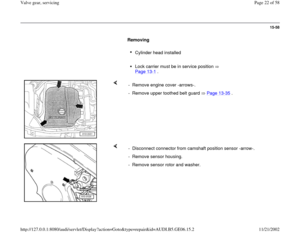
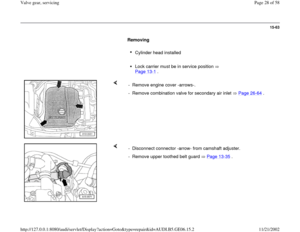
Removing
Cylinder head installed
Lock carrier must be in service position
Page 13
-1 .
- Remove engine cover -arrows-.
- Remove upper toothed belt guard Page 13
-35
.
Pa
ge 15 of 58 Valve
gear, servicin
g
11/21/2002 htt
p://127.0.0.1:8080/audi/servlet/Dis
play?action=Goto&t
yp
e=re
pair&id=AUDI.B5.GE06.15.2
Page 16 of 58
15-52
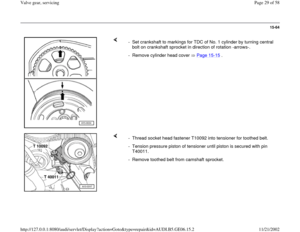
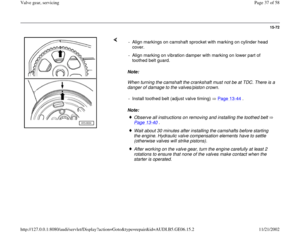
- Set crankshaft to markings for TDC of No. 1 cylinder by turning central
bolt on crankshaft sprocket in direction of rotation -arrows-.
Note:
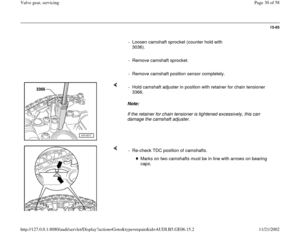
Only tension piston of tensioner until pressure piston is secured with pin
T40011. - Attach socket head fastener T10092 into tensioner for toothed belt.
- Take toothed belt off camshaft sprocket.
Pa
ge 16 of 58 Valve
gear, servicin
g
11/21/2002 htt
p://127.0.0.1:8080/audi/servlet/Dis
play?action=Goto&t
yp
e=re
pair&id=AUDI.B5.GE06.15.2