Page 9 of 24
- Disconnect battery Ground (GND) strap.
- Remove cover for fuel pump module flange
(under luggage compartment trim).
- Disconnect harness connector for fuel level
sensor and fuel pump.
Pa
ge 9 of 24 Fuel su
pp
ly system com
ponents, removin
g and installin
g
11/21/2002 htt
p://127.0.0.1:8080/audi/servlet/Dis
play?action=Goto&t
yp
e=re
pair&id=AUDI.B5.GE01.20.1
Page 10 of 24
20-6
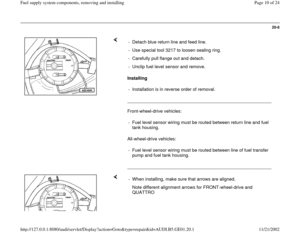
Installing
_________________________________________________________
Front-wheel-drive vehicles:
All-wheel-drive vehicles:
_________________________________________________________ - Detach blue return line and feed line.
- Use special tool 3217 to loosen sealing ring.
- Carefully pull flange out and detach.
- Unclip fuel level sensor and remove.
- Installation is in reverse order of removal.
- Fuel level sensor wiring must be routed between return line and fuel
tank housing.
- Fuel level sensor wiring must be routed between line of fuel transfer
pump and fuel tank housing.
- When installing, make sure that arrows are aligned.
Note different alignment arrows for FRONT-wheel-drive and
QUATTRO
Pa
ge 10 of 24 Fuel su
pp
ly system com
ponents, removin
g and installin
g
11/21/2002 htt
p://127.0.0.1:8080/audi/servlet/Dis
play?action=Goto&t
yp
e=re
pair&id=AUDI.B5.GE01.20.1
Page 11 of 24
20-7
Fuel pump, removing and installing
Observe safety measures page 20
-3
Pay attention to rules of cleanliness page 20
-2 .
Removing and installing sealing flange and fuel
level sensor page 20
-5
WARNING!
Fire hazard. DO NOT smoke or work near
heaters or have anything in the area that can
ignite fuel!
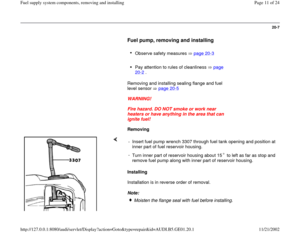
Removing
Installing
Installation is in reverse order of removal.
Note: - Insert fuel pump wrench 3307 through fuel tank opening and position at
inner part of fuel reservoir housing.
-
Turn inner part of reservoir housing about 15 to left as far as stop and
remove fuel pump along with inner part of reservoir housing.
Moisten the flange seal with fuel before installing.
Pa
ge 11 of 24 Fuel su
pp
ly system com
ponents, removin
g and installin
g
11/21/2002 htt
p://127.0.0.1:8080/audi/servlet/Dis
play?action=Goto&t
yp
e=re
pair&id=AUDI.B5.GE01.20.1
Page 12 of 24
Flange installation position page 20
-6 .
Pa
ge 12 of 24 Fuel su
pp
ly system com
ponents, removin
g and installin
g
11/21/2002 htt
p://127.0.0.1:8080/audi/servlet/Dis
play?action=Goto&t
yp
e=re
pair&id=AUDI.B5.GE01.20.1
Page 13 of 24
20-8
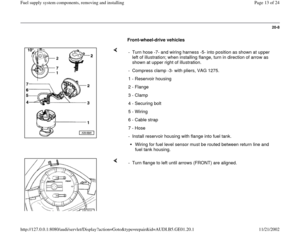
Front-wheel-drive vehicles
- Turn hose -7- and wiring harness -5- into position as shown at upper
left of illustration; when installing flange, turn in direction of arrow as
shown at upper right of illustration.
- Compress clamp -3- with pliers, VAG 1275.
1 - Reservoir housing
2 - Flange
3 - Clamp
4 - Securing bolt
5 - Wiring
6 - Cable strap
7 - Hose
- Install reservoir housing with flange into fuel tank.
Wiring for fuel level sensor must be routed between return line and
fuel tank housing.
- Turn flange to left until arrows (FRONT) are aligned.
Pa
ge 13 of 24 Fuel su
pp
ly system com
ponents, removin
g and installin
g
11/21/2002 htt
p://127.0.0.1:8080/audi/servlet/Dis
play?action=Goto&t
yp
e=re
pair&id=AUDI.B5.GE01.20.1
Page 14 of 24
20-9
All wheel-drive-vehicles
- Turn hose -7- and wiring harness -5- into position as shown in upper
left of illustration; when installing flange, turn in direction of arrow as
shown at upper right of illustration.
- Compress clamp -3- with pliers VAG 1275.
1 - Reservoir housing
2 - Flange
3 - Clamp
4 - Securing bolt
5 - Wiring
6 - Cable strap
7 - Hose
- Install reservoir housing with flange into fuel tank.
Wiring for fuel level sensor must be routed between fuel transfer
pump line and fuel tank housing.
- Turn flange to left until arrows (QUATTRO) are aligned.
Pa
ge 14 of 24 Fuel su
pp
ly system com
ponents, removin
g and installin
g
11/21/2002 htt
p://127.0.0.1:8080/audi/servlet/Dis
play?action=Goto&t
yp
e=re
pair&id=AUDI.B5.GE01.20.1
Page 15 of 24
20-10
Fuel pump, testing
WARNING!
Fire hazard! DO NOT smoke or work near
heaters or have anything in area that can
ignite fuel!
Checking power supply
Battery fully charged
Fuse 28 OK
Test voltage supply to fuse 28 Repair
Manual, 2.8 Liter V-6 OBD II Fuel Injection
and Ignition, Repair Group 24
Fuel supply OK
- Switch ignition on.
Fuel pump must be heard to run briefly.
(Second person will be required for this if
surrounding noise level is too high).
If fuel pump does NOT run:
Pa
ge 15 of 24 Fuel su
pp
ly system com
ponents, removin
g and installin
g
11/21/2002 htt
p://127.0.0.1:8080/audi/servlet/Dis
play?action=Goto&t
yp
e=re
pair&id=AUDI.B5.GE01.20.1
Page 16 of 24
- Remove cover for fuel pump module (under
luggage compartment trim, right rear).
- Disconnect harness connector for fuel pump and
fuel level sensor.
Pa
ge 16 of 24 Fuel su
pp
ly system com
ponents, removin
g and installin
g
11/21/2002 htt
p://127.0.0.1:8080/audi/servlet/Dis
play?action=Goto&t
yp
e=re
pair&id=AUDI.B5.GE01.20.1


 strap.
- Remove cover for fuel pump module flange
(under luggage compartment trim).
- Disconnect harness connector for fuel level
sensor and f")


.
- Disconnect harness connector for fuel pump and
fuel level sensor.
Pa
ge 16 of 24 Fuel su
pp
ly system co")