Page 25 of 38
13-23
- Follow procedures for "Coolant pump, removing
and installing" Page 19
-13
.
Note:
Coolant pump is bolted to mounting bracket for
generator, power steering pump and viscous fan.
Installing
Installation is the reverse of removal, noting the
following:
- Replace O-ring for coolant pump (to guard
against leakage).
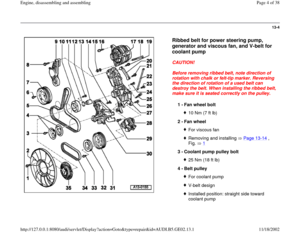
Tightening torques
Component
Tightening
torque
Belt pulley to power steering
pump 25 Nm (18 ft
lb)
Power steering pump to mounting
bracket for generator, power
steering pump and viscous fan
25 Nm (18 ft
lb)
Pa
ge 25 of 38 En
gine, disassemblin
g and assemblin
g
11/18/2002 htt
p://127.0.0.1:8080/audi/servlet/Dis
play?action=Goto&t
yp
e=re
pair&id=AUDI.B5.GE02.13.1
Page 26 of 38
13-24
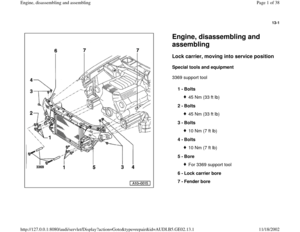
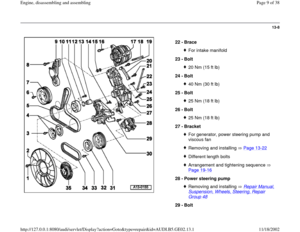
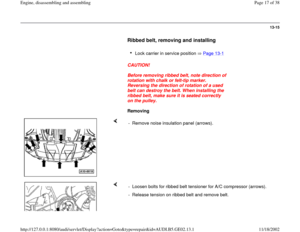
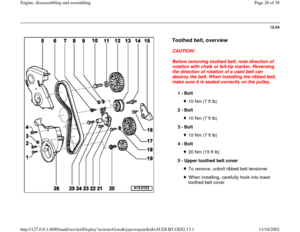
Toothed belt, overview
CAUTION!
Before removing toothed belt, note direction of
rotation with chalk or felt-tip marker. Reversing
the direction of rotation of a used belt can
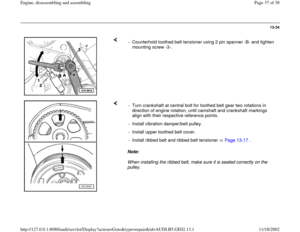
destroy the belt. When installing the ribbed belt,
make sure it is seated correctly on the pulley.
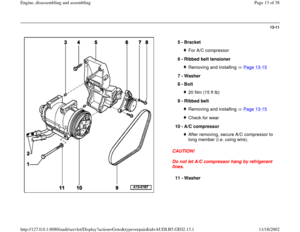
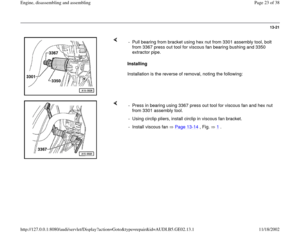
1 -
Bolt
10 Nm (7 ft lb)
2 -
Bolt 10 Nm (7 ft lb)
3 -
Bolt 10 Nm (7 ft lb)
4 -
Bolt 20 Nm (15 ft lb)
5 -
Upper toothed belt cover To remove, unbolt ribbed belt tensionerWhen installing, carefully hook into lower
toothed belt cover
Pa
ge 26 of 38 En
gine, disassemblin
g and assemblin
g
11/18/2002 htt
p://127.0.0.1:8080/audi/servlet/Dis
play?action=Goto&t
yp
e=re
pair&id=AUDI.B5.GE02.13.1
Page 27 of 38
13-25
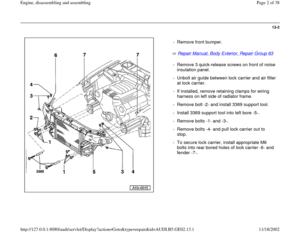
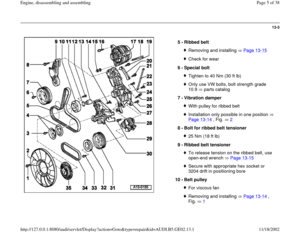
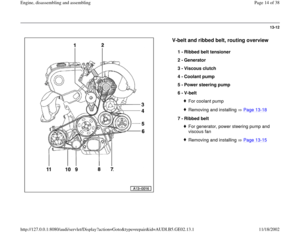
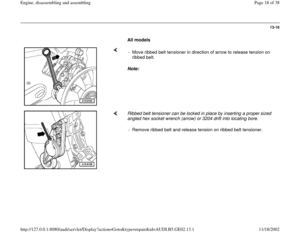
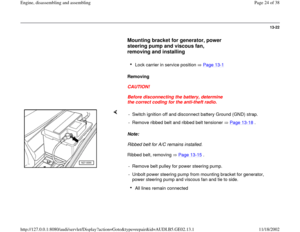
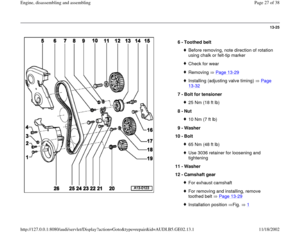
6 -
Toothed belt
Before removing, note direction of rotation
using chalk or felt-tip marker Check for wearRemoving Page 13
-29
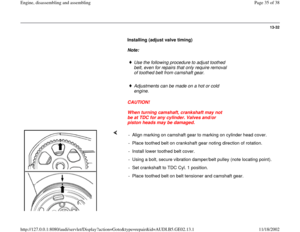
Installing (adjusting valve timing) Page 13
-32
7 -
Bolt for tensioner
25 Nm (18 ft lb)
8 -
Nut 10 Nm (7 ft lb)
9 -
Washer
10 -
Bolt 65 Nm (48 ft lb)Use 3036 retainer for loosening and
tightening
11 -
Washer
12 -
Camshaft gear For exhaust camshaftFor removing and installing, remove
toothed belt Page 13
-29
Installation position Fig. 1
Pa
ge 27 of 38 En
gine, disassemblin
g and assemblin
g
11/18/2002 htt
p://127.0.0.1:8080/audi/servlet/Dis
play?action=Goto&t
yp
e=re
pair&id=AUDI.B5.GE02.13.1
Page 28 of 38
13 -
Tensioner
Pa
ge 28 of 38 En
gine, disassemblin
g and assemblin
g
11/18/2002 htt
p://127.0.0.1:8080/audi/servlet/Dis
play?action=Goto&t
yp
e=re
pair&id=AUDI.B5.GE02.13.1
Page 29 of 38
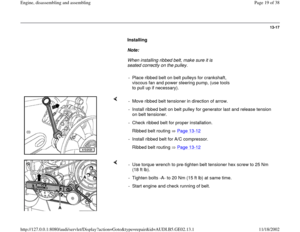
13-26
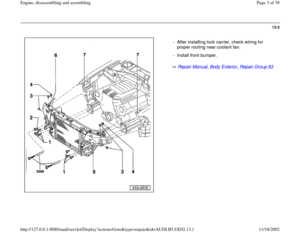
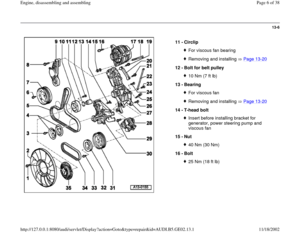
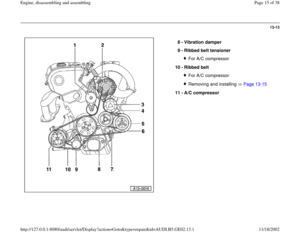
14 -
Connecting bolt
25 Nm (18 ft lb)For tensioner
15 -
Rear toothed belt cover
16 -
Bolt 20 Nm (15 ft lb)
17 -
Intermediate shaft gear
18 -
Washer
19 -
Toothed belt gear for crankshaft Contact surface between toothed belt gear
and crankshaft must be free of oil Installation only possible in one position
20 -
Bolt for toothed belt gear for crankshaft Always replace90 Nm (66 ft lb) + additional 1/4 turn (90 )Do not oilUse 3099 retainer for loosening or
tightening Attach 3099 retainer Page 13
-39
To secure retainer, remove torque support
bracket Page 17
-2 , item 5
Pa
ge 29 of 38 En
gine, disassemblin
g and assemblin
g
11/18/2002 htt
p://127.0.0.1:8080/audi/servlet/Dis
play?action=Goto&t
yp
e=re
pair&id=AUDI.B5.GE02.13.1
Page 30 of 38
13-27
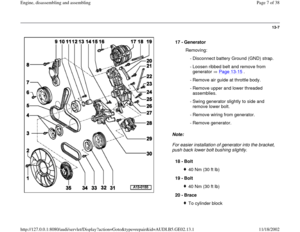
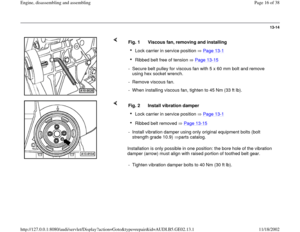
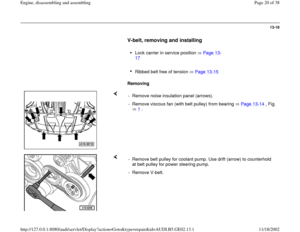
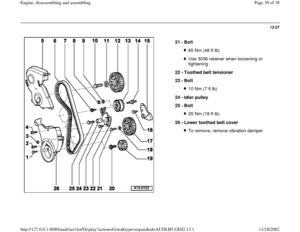
21 -
Bolt
65 Nm (48 ft lb)Use 3036 retainer when loosening or
tightening
22 -
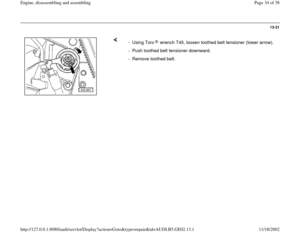
Toothed belt tensioner
23 -
Bolt 10 Nm (7 ft lb)
24 -
Idler pulley
25 -
Bolt 25 Nm (18 ft lb)
26 -
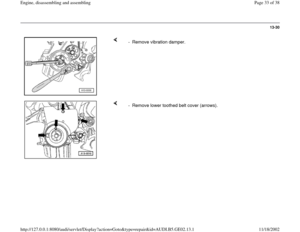
Lower toothed belt cover To remove, remove vibration damper
Pa
ge 30 of 38 En
gine, disassemblin
g and assemblin
g
11/18/2002 htt
p://127.0.0.1:8080/audi/servlet/Dis
play?action=Goto&t
yp
e=re
pair&id=AUDI.B5.GE02.13.1
Page 31 of 38
13-28
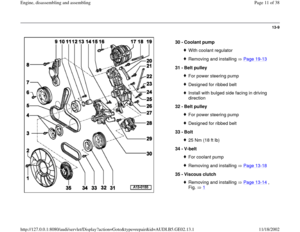
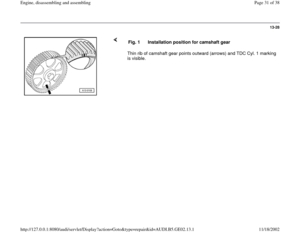
Thin rib of camshaft gear points outward (arrows) and TDC Cyl. 1 marking
is visible. Fig. 1 Installation position for camshaft gear
Pa
ge 31 of 38 En
gine, disassemblin
g and assemblin
g
11/18/2002 htt
p://127.0.0.1:8080/audi/servlet/Dis
play?action=Goto&t
yp
e=re
pair&id=AUDI.B5.GE02.13.1
Page 32 of 38
13-29
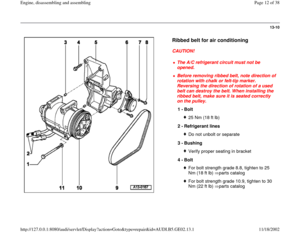
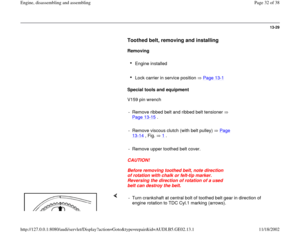
Toothed belt, removing and installing
Removing
Engine installed
Lock carrier in service position Page 13
-1
Special tools and equipment
V159 pin wrench
- Remove ribbed belt and ribbed belt tensioner
Page 13
-15
.
- Remove viscous clutch (with belt pulley) Page
13
-14
, Fig. 1
.
- Remove upper toothed belt cover.
CAUTION!
Before removing toothed belt, note direction
of rotation with chalk or felt-tip marker.
Reversing the direction of rotation of a used
belt can destroy the belt.
- Turn crankshaft at central bolt of toothed belt gear in direction of
engine rotation to TDC Cyl.1 marking (arrows).
Pa
ge 32 of 38 En
gine, disassemblin
g and assemblin
g
11/18/2002 htt
p://127.0.0.1:8080/audi/servlet/Dis
play?action=Goto&t
yp
e=re
pair&id=AUDI.B5.GE02.13.1


 Page 13
-32
7 -
B")

For tensioner
15 -
Rear toothed belt cover
16 -
Bolt 20 Nm (15 ft lb)
17 -
Intermediate shaft gear
18 -
Washer
19 -
Toothed belt gear for cran")
Use 3036 retainer when loosening or
tightening
22 -
Toothed belt tensioner
23 -
Bolt 10 Nm (7 ft lb)
24 -
Idler pulley
25 -
Bolt 25 Nm (18 ft lb)
26 -
L")
 and TDC Cyl. 1 marking
is visible. Fig. 1 Installation position for camshaft gear
Pa
ge 31 of 38 En
gine, disassemblin
g and assemblin")
