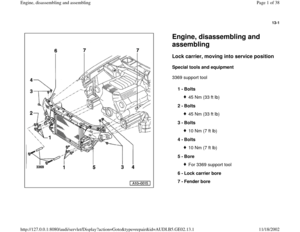
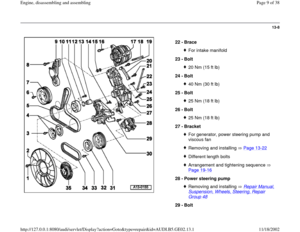
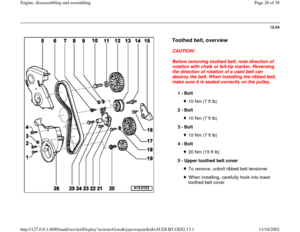
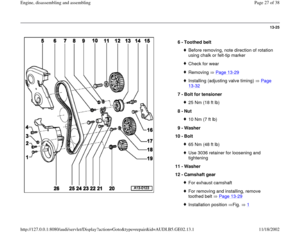
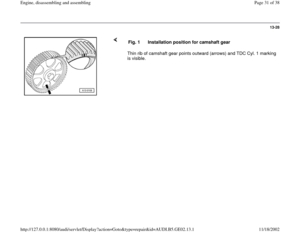
Page 17 of 38
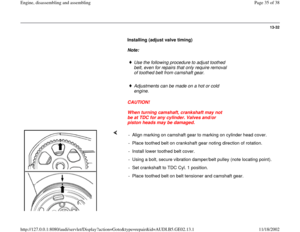
13-15
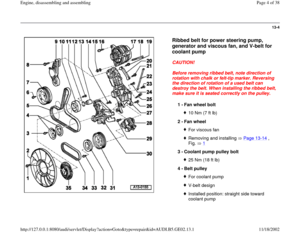
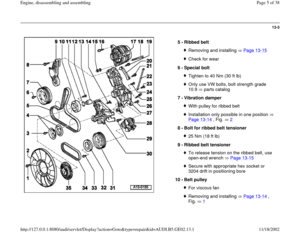
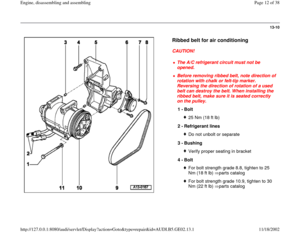
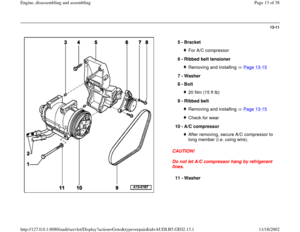
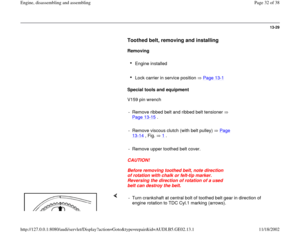
Ribbed belt, removing and installing
Lock carrier in service position Page 13
-1
CAUTION!
Before removing ribbed belt, note direction of
rotation with chalk or felt-tip marker.
Reversing the direction of rotation of a used
belt can destroy the belt. When installing the
ribbed belt, make sure it is seated correctly
on the pulley.
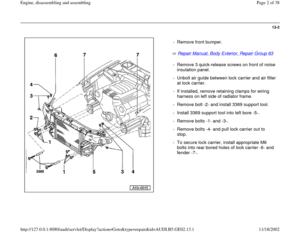
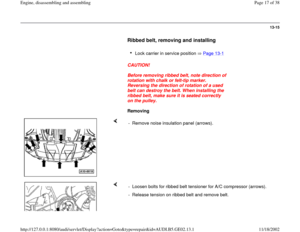
Removing
- Remove noise insulation panel (arrows).
- Loosen bolts for ribbed belt tensioner for A/C compressor (arrows).
- Release tension on ribbed belt and remove belt.
Pa
ge 17 of 38 En
gine, disassemblin
g and assemblin
g
11/18/2002 htt
p://127.0.0.1:8080/audi/servlet/Dis
play?action=Goto&t
yp
e=re
pair&id=AUDI.B5.GE02.13.1
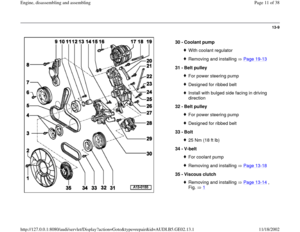
Page 18 of 38
13-16
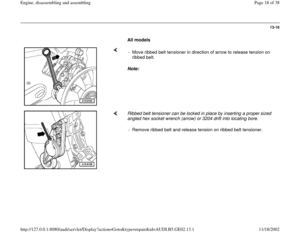
All models
Note: - Move ribbed belt tensioner in direction of arrow to release tension on
ribbed belt.
Ribbed belt tensioner can be locked in place by inserting a proper sized
angled hex socket wrench (arrow) or 3204 drift into locating bore.
- Remove ribbed belt and release tension on ribbed belt tensioner.
Pa
ge 18 of 38 En
gine, disassemblin
g and assemblin
g
11/18/2002 htt
p://127.0.0.1:8080/audi/servlet/Dis
play?action=Goto&t
yp
e=re
pair&id=AUDI.B5.GE02.13.1
Page 19 of 38
13-17
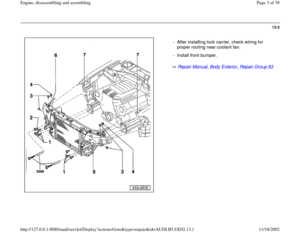
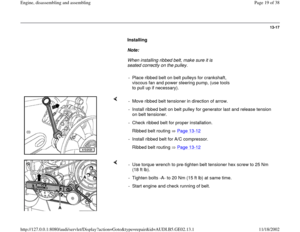
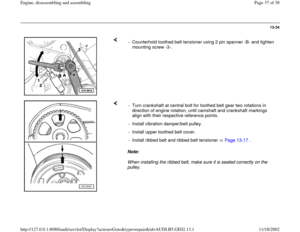
Installing
Note:
When installing ribbed belt, make sure it is
seated correctly on the pulley.
- Place ribbed belt on belt pulleys for crankshaft,
viscous fan and power steering pump, (use tools
to pull up if necessary).
- Move ribbed belt tensioner in direction of arrow.
- Install ribbed belt on belt pulley for generator last and release tension
on belt tensioner.
- Check ribbed belt for proper installation.
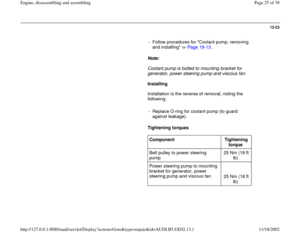
Ribbed belt routing Page 13
-12
- Install ribbed belt for A/C compressor.
Ribbed belt routing Page 13
-12
- Use torque wrench to pre-tighten belt tensioner hex screw to 25 Nm
(18 ft lb).
- Tighten bolts -A- to 20 Nm (15 ft lb) at same time.
- Start engine and check running of belt.
Pa
ge 19 of 38 En
gine, disassemblin
g and assemblin
g
11/18/2002 htt
p://127.0.0.1:8080/audi/servlet/Dis
play?action=Goto&t
yp
e=re
pair&id=AUDI.B5.GE02.13.1
Page 20 of 38
13-18
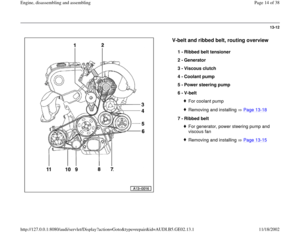
V-belt, removing and installing
Lock carrier in service position Page 13
-
17
Ribbed belt free of tension Page 13
-15
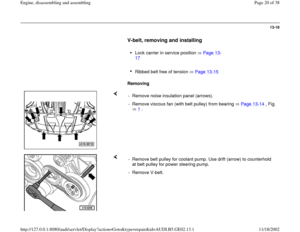
Removing
- Remove noise insulation panel (arrows).
- Remove viscous fan (with belt pulley) from bearing Page 13
-14
, Fig.
1
.
- Remove belt pulley for coolant pump. Use drift (arrow) to counterhold
at belt pulley for power steering pump.
- Remove V-belt.
Pa
ge 20 of 38 En
gine, disassemblin
g and assemblin
g
11/18/2002 htt
p://127.0.0.1:8080/audi/servlet/Dis
play?action=Goto&t
yp
e=re
pair&id=AUDI.B5.GE02.13.1
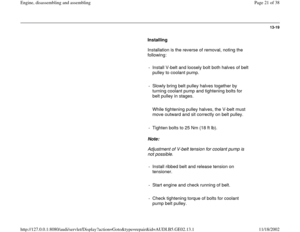
Page 21 of 38
13-19
Installing
Installation is the reverse of removal, noting the
following:
- Install V-belt and loosely bolt both halves of belt
pulley to coolant pump.
- Slowly bring belt pulley halves together by
turning coolant pump and tightening bolts for
belt pulley in stages.
While tightening pulley halves, the V-belt must
move outward and sit correctly on belt pulley.
- Tighten bolts to 25 Nm (18 ft lb).
Note:
Adjustment of V-belt tension for coolant pump is
not possible.
- Install ribbed belt and release tension on
tensioner.
- Start engine and check running of belt.
- Check tightening torque of bolts for coolant
pump belt pulley.
Pa
ge 21 of 38 En
gine, disassemblin
g and assemblin
g
11/18/2002 htt
p://127.0.0.1:8080/audi/servlet/Dis
play?action=Goto&t
yp
e=re
pair&id=AUDI.B5.GE02.13.1
Page 22 of 38
13-20
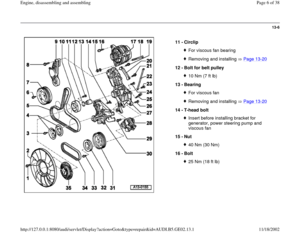
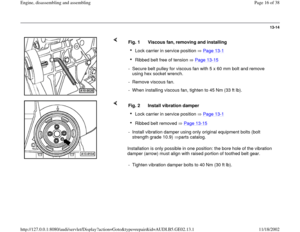
Bearing for viscous fan in mounting
bracket, removing and installing
Lock carrier in service position Page 13
-1
Special tools and equipment
Hex nut from 3301 assembly tool
Extractor pipe from 3350 installation device
3367 press out tool for viscous clutch fan
bearing bushing
Removing
- Remove ribbed belt Page 13
-15
.
- Remove viscous fan (together with belt pulley)
Page 13
-14
, Fig. 1
.
- Remove circlip (arrow) from bearing bushing.
Pa
ge 22 of 38 En
gine, disassemblin
g and assemblin
g
11/18/2002 htt
p://127.0.0.1:8080/audi/servlet/Dis
play?action=Goto&t
yp
e=re
pair&id=AUDI.B5.GE02.13.1
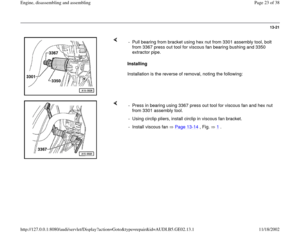
Page 23 of 38
13-21
Installing
Installation is the reverse of removal, noting the following: - Pull bearing from bracket using hex nut from 3301 assembly tool, bolt
from 3367 press out tool for viscous fan bearing bushing and 3350
extractor pipe.
- Press in bearing using 3367 press out tool for viscous fan and hex nut
from 3301 assembly tool.
- Using circlip pliers, install circlip in viscous fan bracket.
- Install viscous fan Page 13
-14
, Fig. 1
.
Pa
ge 23 of 38 En
gine, disassemblin
g and assemblin
g
11/18/2002 htt
p://127.0.0.1:8080/audi/servlet/Dis
play?action=Goto&t
yp
e=re
pair&id=AUDI.B5.GE02.13.1
Page 24 of 38
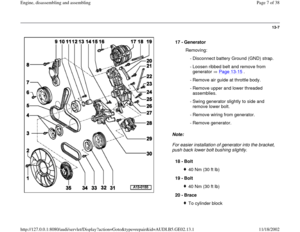
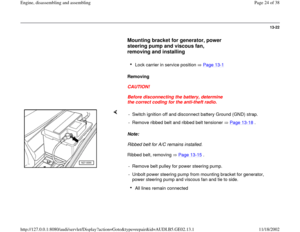
13-22
Mounting bracket for generator, power
steering pump and viscous fan,
removing and installing
Lock carrier in service position Page 13
-1
Removing
CAUTION!
Before disconnecting the battery, determine
the correct coding for the anti-theft radio.
Note:
Ribbed belt for A/C remains installed.
Ribbed belt, removing Page 13
-15
. - Switch ignition off and disconnect battery Ground (GND) strap.
- Remove ribbed belt and ribbed belt tensioner Page 13
-18
.
- Remove belt pulley for power steering pump.
- Unbolt power steering pump from mounting bracket for generator,
power steering pump and viscous fan and tie to side.
All lines remain connected
Pa
ge 24 of 38 En
gine, disassemblin
g and assemblin
g
11/18/2002 htt
p://127.0.0.1:8080/audi/servlet/Dis
play?action=Goto&t
yp
e=re
pair&id=AUDI.B5.GE02.13.1