Page 196 of 1202
A15678
A15679
DI-22
- DIAGNOSTICSENGINE
1996 TERCEL (RM440U)
2 Check voltage between terminals VC and E2 of ECM connector.
PREPARATION:
(a) Remove the lower finish panel.
(b) Turn the ignition switch ON.
CHECK:
Measure the voltage between terminals VC and E2 of the ECM
connector.
OK:
Voltage: 4.5 - 5.5 V
NG Check and replace ECM (See page IN-26).
OK
3 Check voltage between terminals PIM and E2 of ECM connector.
PREPARATION:
(a) Remove the lower finish panel.
(b) Turn ignition switch ON.
CHECK:
Measure voltage between terminals PIM and E2 of ECM con-
nector.
OK:
Voltage: 3.3 - 3.9 V
OK Check and replace ECM (See page IN-26).
NG
4 Check for open and short in harness and connector between manifold absolute
pressure sensor and ECM.
NG Repair or replace harness or connector.
OK
Replace manifold absolute pressure sensor.
Page 198 of 1202

FI4741 (-4) 0.1 0.2
0 -20 0.3 0.51 2 35 10 20 30
20 40 60 80 100
(32) (68) (104) (140) (212)(176)
Resistance kW
Acceptable
Temp.°C (°F) (fig.1)
DI-24
- DIAGNOSTICSENGINE
1996 TERCEL (RM440U)
DTC P0110 Intake Air Temp. Circuit Malfunction
CIRCUIT DESCRIPTION
The intake air temperature sensor is built into the air cleaner
cap and senses the intake air temperature. A thermistor built in
the sensor changes the resistance value according to the in-
take air temperature. The lower the intake air temperature, the
greater the thermistor resistance value, and the higher the in-
take air temperature, the lower the thermistor resistance value
(See Fig. 1). The intake air temperature sensor is connected to
the ECM (See next page). The 5 V power source voltage in the
ECM is applied to the intake air temperature sensor from the ter-
minal THA via a resistor R. That is, the resistor R and the intake
air temp. sensor are connected in series. When the resistance
value of the intake air temperature sensor changes in accor-
dance with changes in the intake air temperature, the potential
at terminal THA also changes. Based on this signal, the ECM
increases the fuel injection volume to improve driveability dur-
ing cold engine operation.
If the ECM detects the DTC ºP0110º, it operates the fail-safe
function in which the intake air temperature is assumed to be
20° (68°F).
Reference
Intake air temp.
°C (°F)Resistance
(kW)Voltage
(V)
-20 (-4)16.24.3
0 (32)5.93.4
20 (68)2.52.4
40 (104)1.11.5
60 (140)0.60.9
80 (176)0.30.5
100 (212)0.20.3
DTC No.DTC Detecting ConditionTrouble Area
P0110Open or short in intake air temp. sensor circuit
�Open or short in intake air temp. sensor circuit
�Intake air temp. sensor
�ECM
HINT:
After confirming DTC P0110, use the OBD II scan tool or TOYOTA hand-held tester to confirm the intake
air temperature from the CURRENT DATA.
Temperature DisplayedMalfunction
-40°C (-40°F)Open circuit
140°C (284°F) or moreShort circuit
DI1E5-08
Page 199 of 1202

A10940
ECM
E7
E7 L-B
BR5V
R
E1 E2 THA
2
1 Intake Air Temp. Sensor
15
16
- DIAGNOSTICSENGINE
DI-25
1996 TERCEL (RM440U)
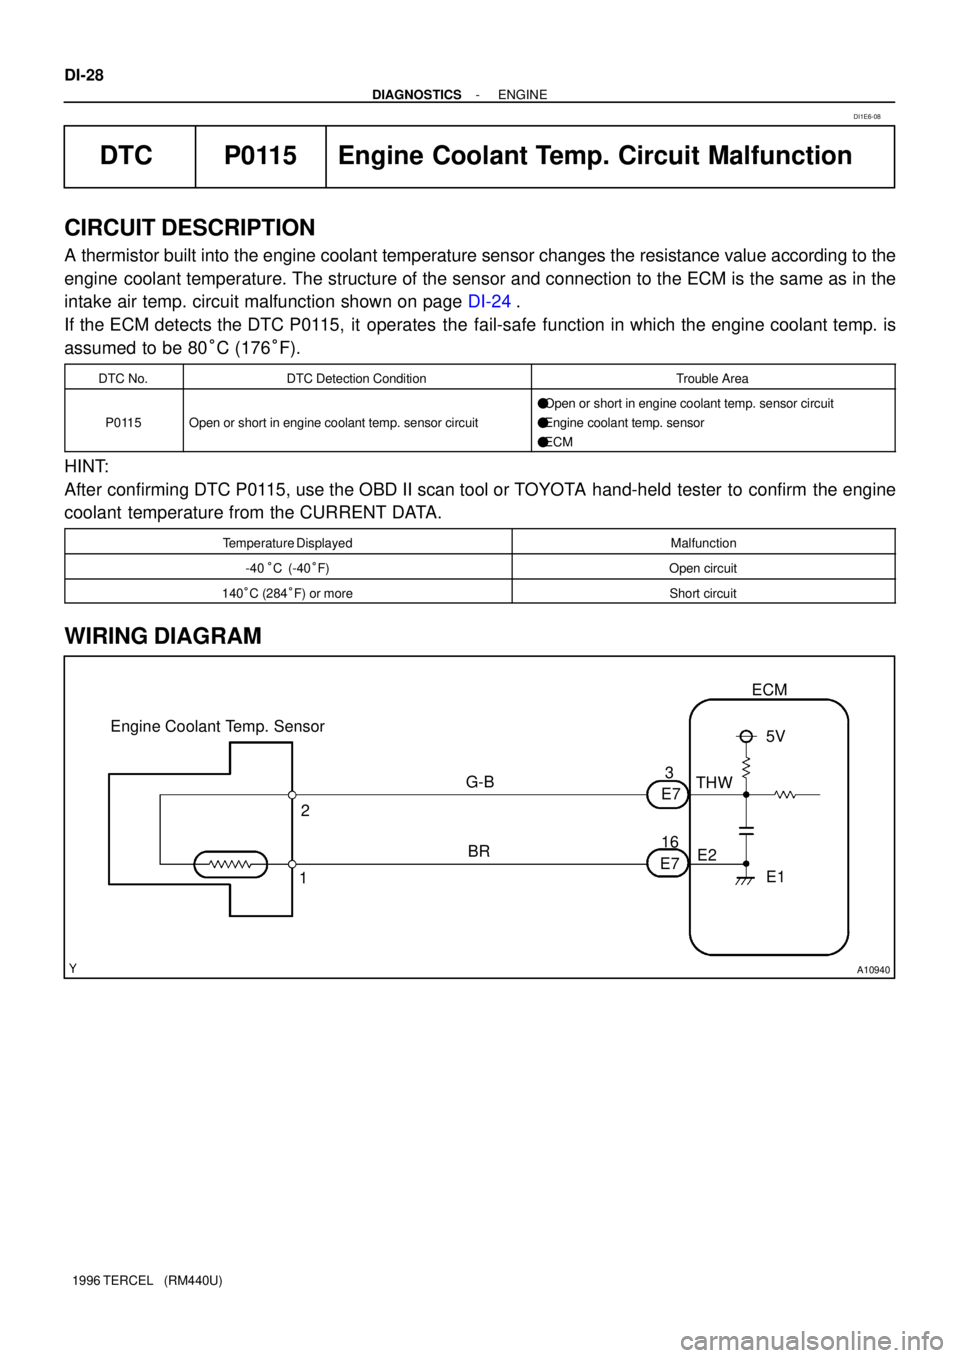
WIRING DIAGRAM
INSPECTION PROCEDURE
HINT:
If DTC P0105, P0106, P0110, P0115, P0120 are output simultaneously, E2 (sensor ground) may be open.
1 Connect OBD II scan tool or TOYOTA hand-held tester, and read value of intake
air temperature.
PREPARATION:
(a) Remove the fuse cover on the instrument panel.
(b) Connect the OBD II scan tool or TOYOTA hand-held tester to the DLC3.
(c) Turn the ignition switch ON and OBD II scan tool or TOYOTA hand-held tester main switch ON.
CHECK:
Read the temperature value on the OBD II scan tool or TOYOTA hand-held tester.
OK:
Same value as the actual intake air temperature.
HINT:
�If there is open circuit, OBD II scan tool or TOYOTA hand-held tester indicates -40°C (-40°F).
�If there is short circuit, OBD II scan tool or TOYOTA hand-held tester indicates 140°C (284°F) or more.
NG -40°C (-40°F) ... Go to step 2.
140°C (284°F) or more ... Go to step 4.
OK
Check for intermittent problems
(See page DI-3).
Page 200 of 1202

A15681
A15682
DI-26
- DIAGNOSTICSENGINE
1996 TERCEL (RM440U)
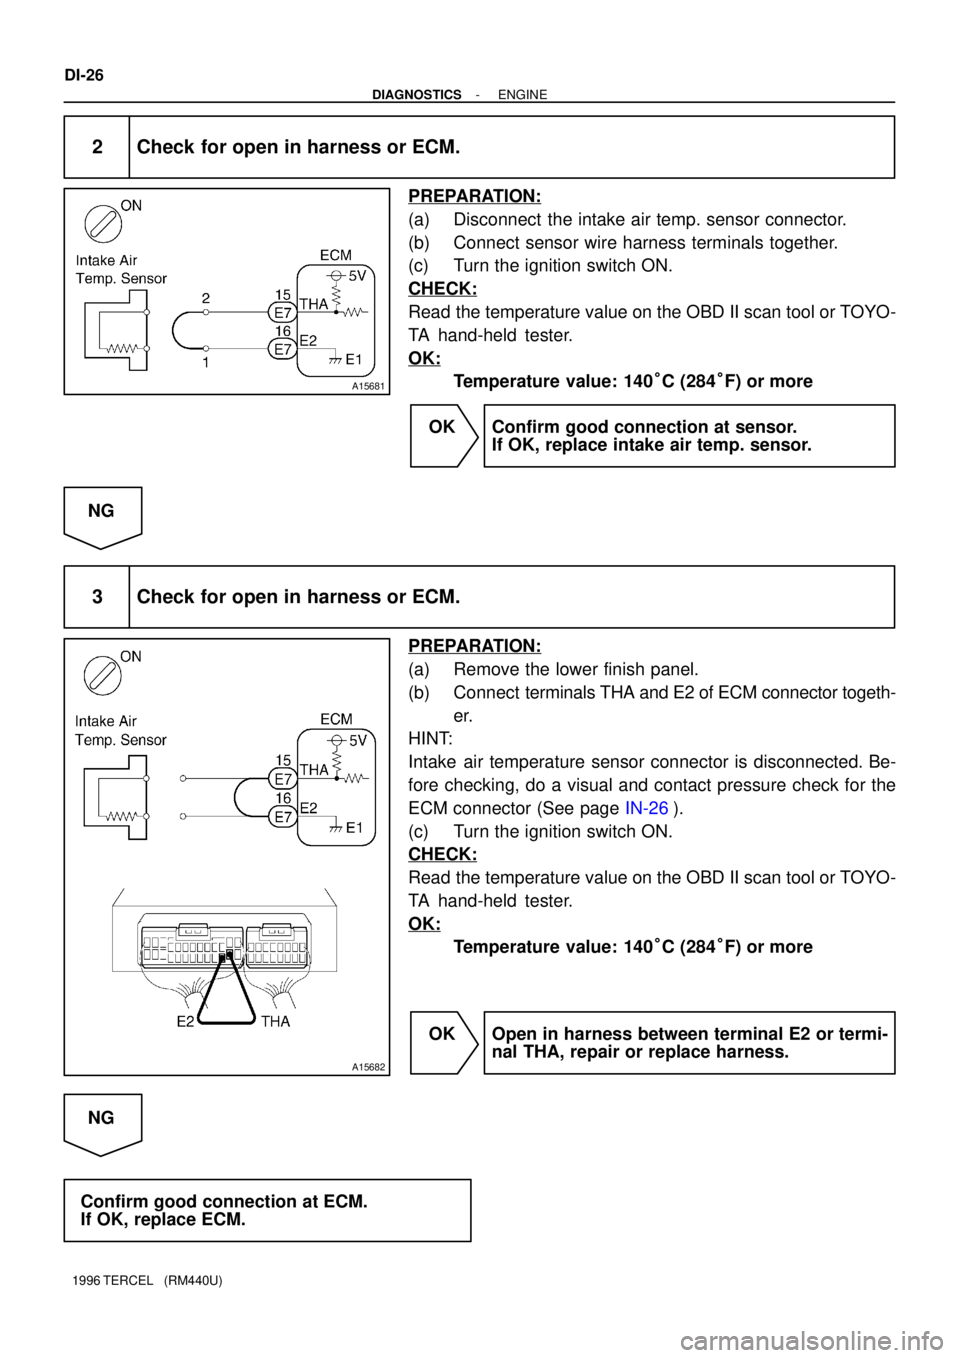
2 Check for open in harness or ECM.
PREPARATION:
(a) Disconnect the intake air temp. sensor connector.
(b) Connect sensor wire harness terminals together.
(c) Turn the ignition switch ON.
CHECK:
Read the temperature value on the OBD II scan tool or TOYO-
TA hand-held tester.
OK:
Temperature value: 140°C (284°F) or more
OK Confirm good connection at sensor.
If OK, replace intake air temp. sensor.
NG
3 Check for open in harness or ECM.
PREPARATION:
(a) Remove the lower finish panel.
(b) Connect terminals THA and E2 of ECM connector togeth-
er.
HINT:
Intake air temperature sensor connector is disconnected. Be-
fore checking, do a visual and contact pressure check for the
ECM connector (See page IN-26).
(c) Turn the ignition switch ON.
CHECK:
Read the temperature value on the OBD II scan tool or TOYO-
TA hand-held tester.
OK:
Temperature value: 140°C (284°F) or more
OK Open in harness between terminal E2 or termi-
nal THA, repair or replace harness.
NG
Confirm good connection at ECM.
If OK, replace ECM.
Page 201 of 1202
A15742
A15683
- DIAGNOSTICSENGINE
DI-27
1996 TERCEL (RM440U)
4 Check for short in harness and ECM.
PREPARATION:
(a) Disconnect the intake air temp. sensor connector.
(b) Turn the ignition switch ON.
CHECK:
Read the temperature value on the OBD II scan tool or TOYO-
TA hand-held tester.
OK:
Temperature value: -40°C (-40°F)
OK Replace intake air temp. sensor.
NG
5 Check for short in harness or ECM.
PREPARATION:
(a) Remove the lower finish panel.
(b) Disconnect the E7 connector of ECM.
HINT:
Intake air temperature sensor connector is disconnected.
(c) Turn the ignition switch ON.
CHECK:
Read the temperature value on the OBD II scan tool or TOYO-
TA hand-held tester.
OK:
Temperature value: -40°C (-40°F)
OK Repair or replace harness or connector.
NG
Check and replace ECM (See page IN-26).
Page 202 of 1202

A10940
ECM
E7
E7 G-B
BR5V
E1 E2 THW
2
1 Engine Coolant Temp. Sensor
3
16 DI-28
- DIAGNOSTICSENGINE
1996 TERCEL (RM440U)
DTC P0115 Engine Coolant Temp. Circuit Malfunction
CIRCUIT DESCRIPTION
A thermistor built into the engine coolant temperature sensor changes the resistance value according to the
engine coolant temperature. The structure of the sensor and connection to the ECM is the same as in the
intake air temp. circuit malfunction shown on page DI-24.
If the ECM detects the DTC P0115, it operates the fail-safe function in which the engine coolant temp. is
assumed to be 80°C (176°F).
DTC No.DTC Detection ConditionTrouble Area
P0115Open or short in engine coolant temp. sensor circuit
�Open or short in engine coolant temp. sensor circuit
�Engine coolant temp. sensor
�ECM
HINT:
After confirming DTC P0115, use the OBD II scan tool or TOYOTA hand-held tester to confirm the engine
coolant temperature from the CURRENT DATA.
Temperature DisplayedMalfunction
-40°C (-40°F)Open circuit
140°C (284°F) or moreShort circuit
WIRING DIAGRAM
DI1E6-08
Page 203 of 1202

A15685
- DIAGNOSTICSENGINE
DI-29
1996 TERCEL (RM440U)
INSPECTION PROCEDURE
HINT:
If DTC P0105, P0106, P0110, P0115, P0120 are output simultaneously, E2 (sensor ground) may be open.
1 Connect OBD II scan tool or TOYOTA hand-held tester, and read value of engine
coolant temperature.
PREPARATION:
(a) Remove the fuse cover on the instrument panel.
(b) Connect the OBD II scan tool or TOYOTA hand-held tester to the DLC3.
(c) Turn the ignition switch ON and OBD II scan tool or TOYOTA hand-held tester main switch ON.
CHECK:
Read temperature value on the OBD II scan tool or TOYOTA hand-held tester.
OK:
Same value as the actual engine coolant temperature
HINT:
�If there is open circuit, OBD II scan tool or TOYOTA hand-held tester indicates -40°C (-40°F).
�If there is short circuit, OBD II scan tool or TOYOTA hand-held tester indicates 140°C (284°F) or more.
NG -40°C (-40°F) ... Go to step 2.
140°C (284°F) or more ... Go to step 4.
OK
Check for intermittent problems (See page
DI-3).
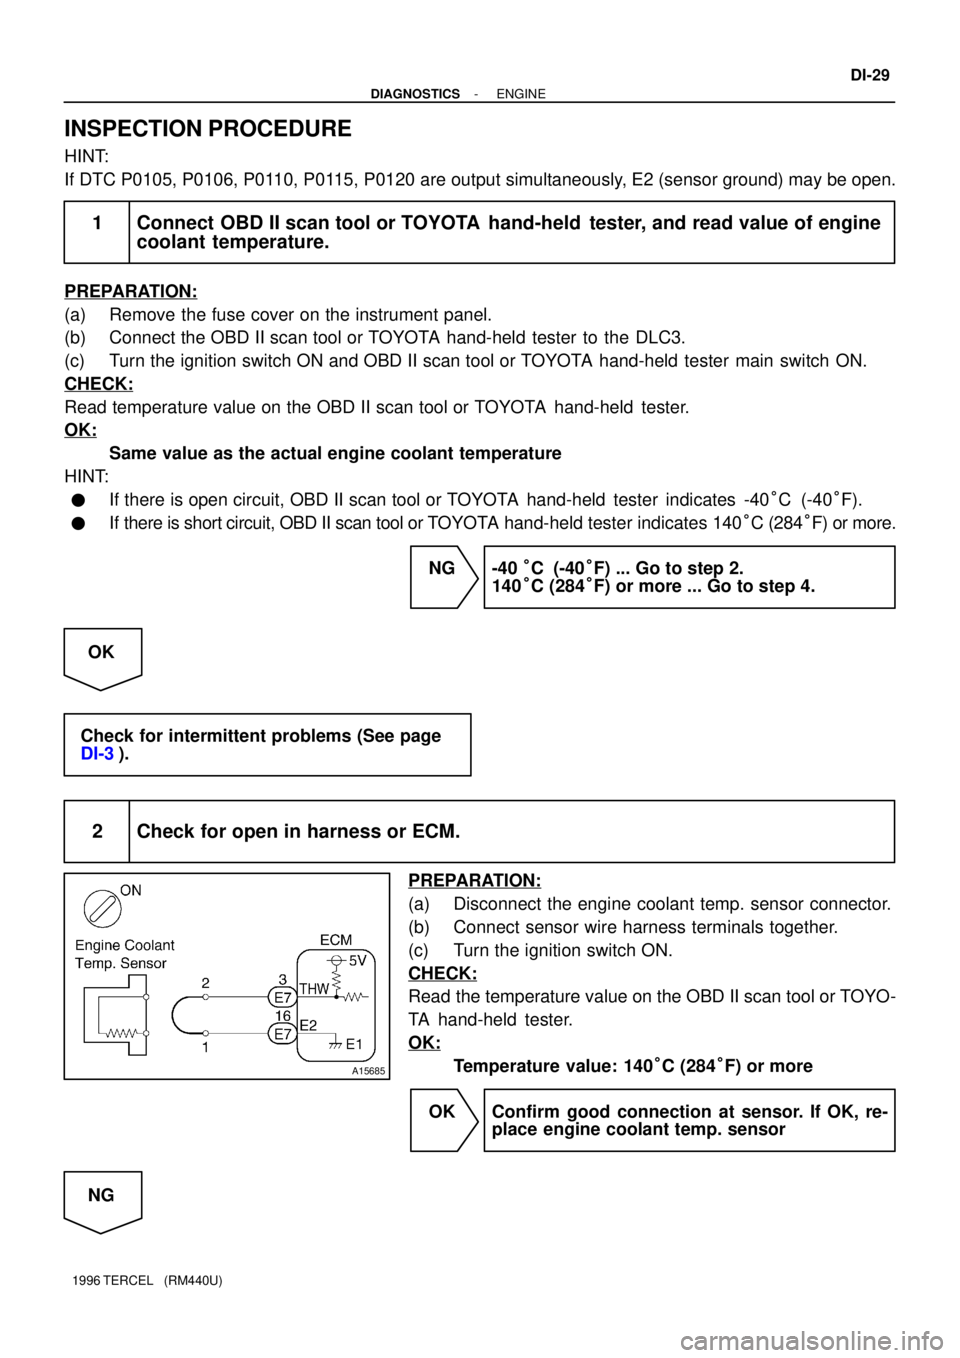
2 Check for open in harness or ECM.
PREPARATION:
(a) Disconnect the engine coolant temp. sensor connector.
(b) Connect sensor wire harness terminals together.
(c) Turn the ignition switch ON.
CHECK:
Read the temperature value on the OBD II scan tool or TOYO-
TA hand-held tester.
OK:
Temperature value: 140°C (284°F) or more
OK Confirm good connection at sensor. If OK, re-
place engine coolant temp. sensor
NG
Page 204 of 1202

A15686
A15687
DI-30
- DIAGNOSTICSENGINE
1996 TERCEL (RM440U)
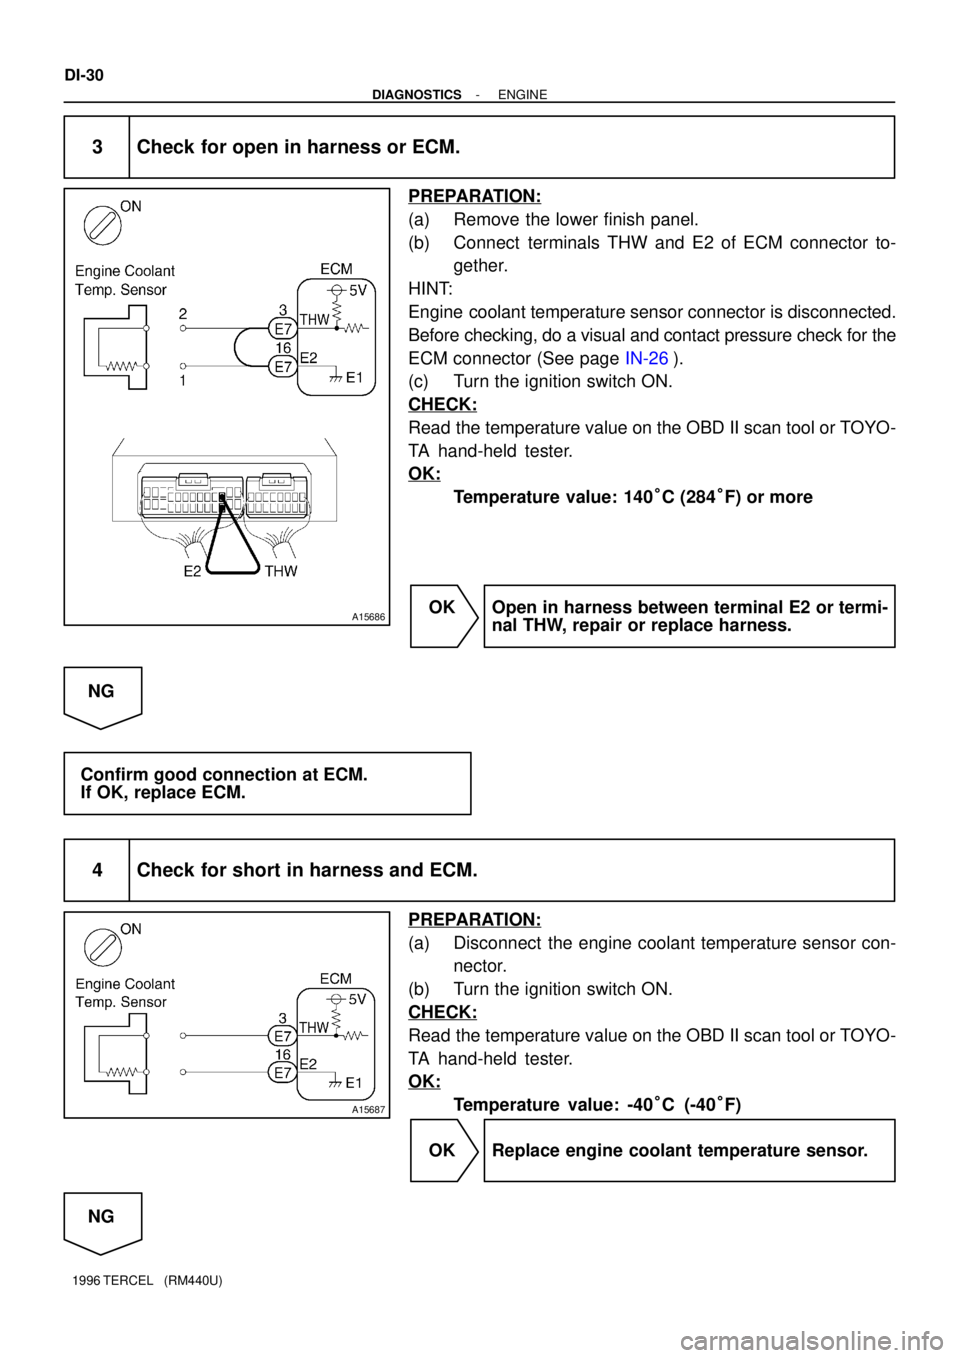
3 Check for open in harness or ECM.
PREPARATION:
(a) Remove the lower finish panel.
(b) Connect terminals THW and E2 of ECM connector to-
gether.
HINT:
Engine coolant temperature sensor connector is disconnected.
Before checking, do a visual and contact pressure check for the
ECM connector (See page IN-26).
(c) Turn the ignition switch ON.
CHECK:
Read the temperature value on the OBD II scan tool or TOYO-
TA hand-held tester.
OK:
Temperature value: 140°C (284°F) or more
OK Open in harness between terminal E2 or termi-
nal THW, repair or replace harness.
NG
Confirm good connection at ECM.
If OK, replace ECM.
4 Check for short in harness and ECM.
PREPARATION:
(a) Disconnect the engine coolant temperature sensor con-
nector.
(b) Turn the ignition switch ON.
CHECK:
Read the temperature value on the OBD II scan tool or TOYO-
TA hand-held tester.
OK:
Temperature value: -40°C (-40°F)
OK Replace engine coolant temperature sensor.
NG