Page 41 of 2062

Downloaded from www.Manualslib.com manuals search engine MA002−05
MA−2
− MAINTENANCEINSIDE VEHICLE
37 Author�: Date�:
1996 TOYOTA T100 (RM449U)
INSIDE VEHICLE
GENERAL MAINTENANCE
These are maintenance and inspection items which are considered to be the owner’s responsibility.
They can be done by the owner or they can have them done at a service shop.
These items include those which should be checked on a daily basis, those which, in most cases, do not
require (special) tools and those which are considered to be reasonable for the owner to do.
Items and procedures for general maintenance are as follows.
1. GENERAL NOTES
�Maintenance items may vary from country to country. Check the owner’s manual supplement in which
the maintenance schedule is shown.
�Every service item in the periodic maintenance schedule must be performed.
�Periodic maintenance service must be performed according to whichever interval in the periodic main-
tenance schedule occurs first, the odometer reading (miles) or the time interval (months).
�Maintenance service after the last period should be performed at the same interval as before unless
otherwise noted.
�Failure to do even one item can cause the engine to run poorly and increase exhaust emissions.
2. LIGHTS
(a) Check that the headlights, stop lights, taillights, turn signal lights, and other lights are all working.
(b) Check the headlight aim.
3. WARNING LIGHTS AND BUZZERS
Check that all warning lights and buzzers function properly.
4. HORN
Check that it is working.
5. WINDSHIELD GLASS
Check for scratches, pits or abrasions.
6. WINDSHIELD WIPER AND WASHER
(a) Check operation of the wipers and washer.
(b) Check that the wipers do not streak.
7. WINDSHIELD DEFROSTER
Check that air comes out from the defroster outlet when operating the heater or air conditioner.
8. REAR VIEW MIRROR
Check that it is mounted securely.
9. SUN VISORS
Check that they move freely and are mounted securely.
10. STEERING WHEEL
Check that it has the specified freeplay. Be alert for changes in steering condition, such as hard steering,
excessive freeplay or strange noises.
11. SEATS
(a) Check that the seat adjusters operate smoothly.
(b) Check that all latches lock securely in any position.
(c) Check that the head restraints move up and down smoothly and that the locks hold securely in any
latch position.
(d) For fold−down seat backs, check that the latches lock securely.
12. SEAT BELTS
(a) Check that the seat belt system such as the buckles, retractors and anchors operate properly and
smoothly.
(b) Check that the belt webbing is not cut, frayed, worn or damaged.
Page 172 of 2062
Downloaded from www.Manualslib.com manuals search engine PP06H−01
PP−11 8
− PREPARATIONBODY ELECTRICAL
1996 TOYOTA T100 (RM449U)
EQUIPMENT
Voltmeter
Ammeter
Ohmmeter
Test lead
SyphonBrake fluid level warning switch
Bulb (3W)Fuel sender gauge
Bulb (3.4W)Seat belt warning relay
Bulb (21W)Turn signal flasher relay
Dry cell batteryFuel sender gauge
Torque wrench
Page 1842 of 2062
Downloaded from www.Manualslib.com manuals search engine − BODY ELECTRICALBODY ELECTRICAL SYSTEM
BE−7
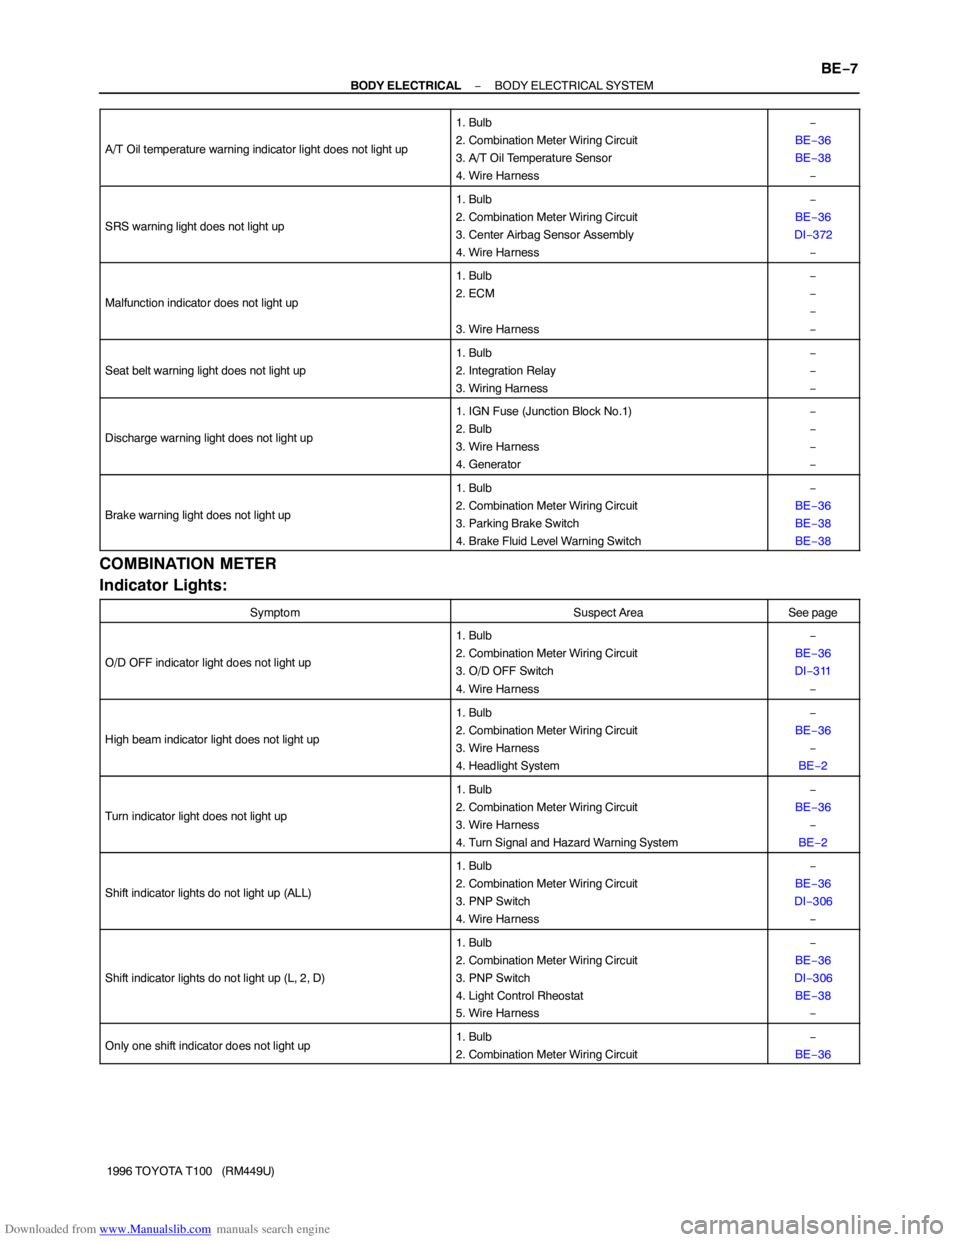
1996 TOYOTA T100 (RM449U) A/T Oil temperature warning indicator light does not light up
1. Bulb
2. Combination Meter Wiring Circuit
3. A/T Oil Temperature Sensor
4. Wire Harness−
BE−36
BE−38
−
SRS warning light does not light up
1. Bulb
2. Combination Meter Wiring Circuit
3. Center Airbag Sensor Assembly
4. Wire Harness−
BE−36
DI−372
−
Malfunction indicator does not light up
1. Bulb
2. ECM
3. Wire Harness−
−
−
−
Seat belt warning light does not light up
1. Bulb
2. Integration Relay
3. Wiring Harness−
−
−
Discharge warning light does not light up
1. IGN Fuse (Junction Block No.1)
2. Bulb
3. Wire Harness
4. Generator−
−
−
−
Brake warning light does not light up
1. Bulb
2. Combination Meter Wiring Circuit
3. Parking Brake Switch
4. Brake Fluid Level Warning Switch−
BE−36
BE−38
BE−38
COMBINATION METER
Indicator Lights:
SymptomSuspect AreaSee page
O/D OFF indicator light does not light up
1. Bulb
2. Combination Meter Wiring Circuit
3. O/D OFF Switch
4. Wire Harness−
BE−36
DI−311
−
High beam indicator light does not light up
1. Bulb
2. Combination Meter Wiring Circuit
3. Wire Harness
4. Headlight System−
BE−36
−
BE−2
Turn indicator light does not light up
1. Bulb
2. Combination Meter Wiring Circuit
3. Wire Harness
4. Turn Signal and Hazard Warning System−
BE−36
−
BE−2
Shift indicator lights do not light up (ALL)
1. Bulb
2. Combination Meter Wiring Circuit
3. PNP Switch
4. Wire Harness−
BE−36
DI−306
−
Shift indicator lights do not light up (L, 2, D)
1. Bulb
2. Combination Meter Wiring Circuit
3. PNP Switch
4. Light Control Rheostat
5. Wire Harness−
BE−36
DI−306
BE−38
−
Only one shift indicator does not light up1. Bulb
2. Combination Meter Wiring Circuit−
BE−36
Page 1879 of 2062
Downloaded from www.Manualslib.com manuals search engine N06136
ON
OFF
BE1217
Warning Light
Ignition
Switch
Battery
N07797
ONOFF
N13155
Warning Light
Ignition
Switch
Battery
N06137
ON
OFF BE−44
− BODY ELECTRICALCOMBINATION METER
1996 TOYOTA T100 (RM449U)
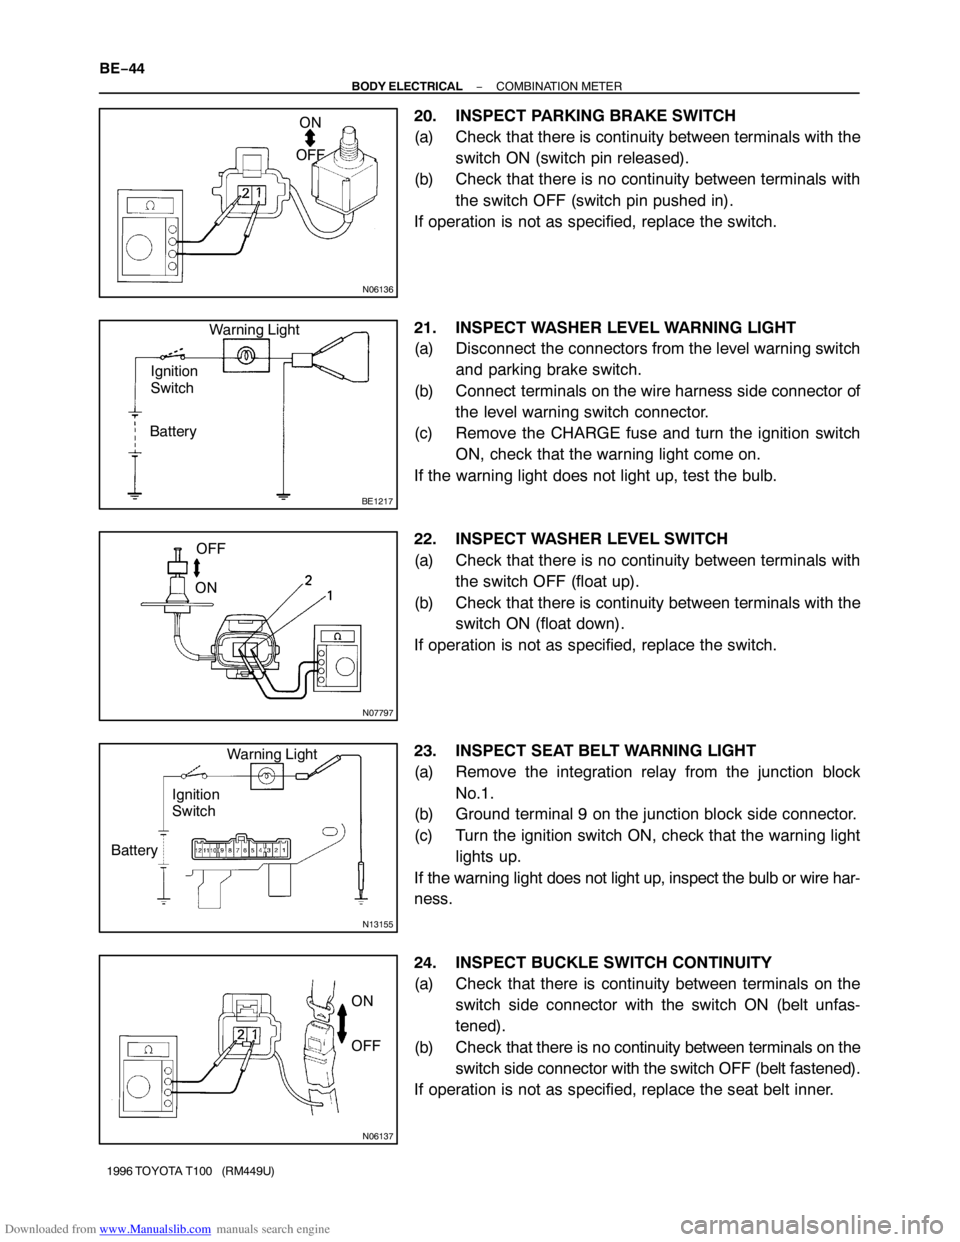
20. INSPECT PARKING BRAKE SWITCH
(a) Check that there is continuity between terminals with the
switch ON (switch pin released).
(b) Check that there is no continuity between terminals with
the switch OFF (switch pin pushed in).
If operation is not as specified, replace the switch.
21. INSPECT WASHER LEVEL WARNING LIGHT
(a) Disconnect the connectors from the level warning switch
and parking brake switch.
(b) Connect terminals on the wire harness side connector of
the level warning switch connector.
(c) Remove the CHARGE fuse and turn the ignition switch
ON, check that the warning light come on.
If the warning light does not light up, test the bulb.
22. INSPECT WASHER LEVEL SWITCH
(a) Check that there is no continuity between terminals with
the switch OFF (float up).
(b) Check that there is continuity between terminals with the
switch ON (float down).
If operation is not as specified, replace the switch.
23. INSPECT SEAT BELT WARNING LIGHT
(a) Remove the integration relay from the junction block
No.1.
(b) Ground terminal 9 on the junction block side connector.
(c) Turn the ignition switch ON, check that the warning light
lights up.
If the warning light does not light up, inspect the bulb or wire har-
ness.
24. INSPECT BUCKLE SWITCH CONTINUITY
(a) Check that there is continuity between terminals on the
switch side connector with the switch ON (belt unfas-
tened).
(b) Check that there is no continuity between terminals on the
switch side connector with the switch OFF (belt fastened).
If operation is not as specified, replace the seat belt inner.
