1996 TOYOTA SUPRA lock
[x] Cancel search: lockPage 23 of 188
22
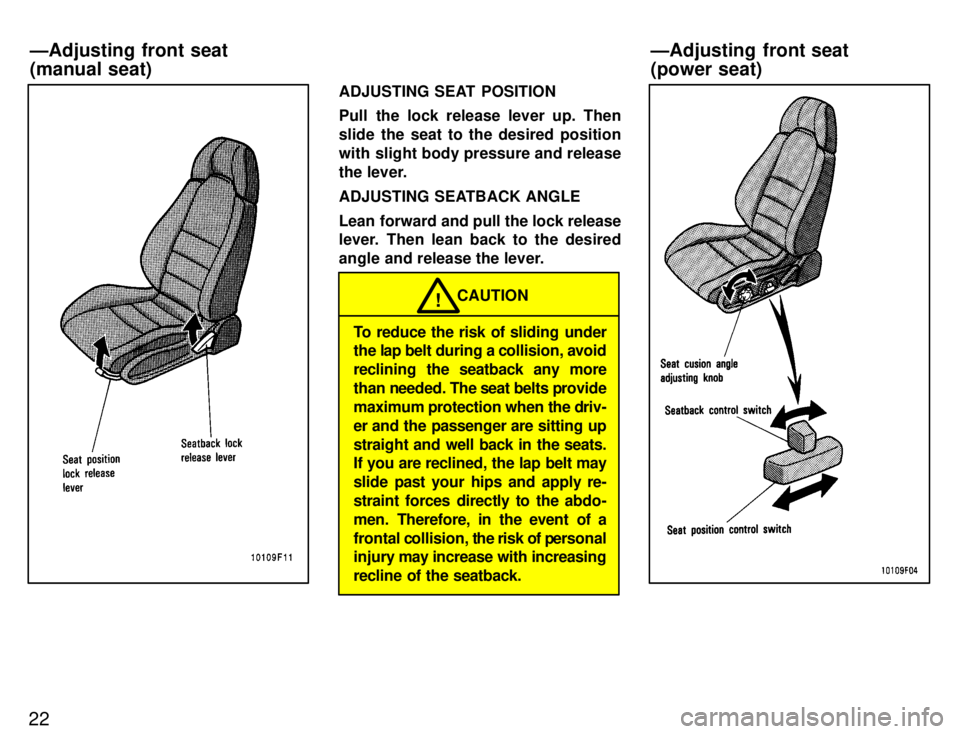
ADJUSTING SEAT POSITION
Pull the lock release lever up. Then
slide the seat to the desired position
with slight body pressure and release
the lever.
ADJUSTING SEATBACK ANGLE
Lean forward and pull the lock release
lever. Then lean back to the desired
angle and release the lever.
CAUTION!
To reduce the risk of sliding under
the lap belt during a collision, avoid
reclining the seatback any more
than needed. The seat belts provide
maximum protection when the driv-
er and the passenger are sitting up
straight and well back in the seats.
If you are reclined, the lap belt may
slide past your hips and apply re-
straint forces directly to the abdo-
men. Therefore, in the event of a
frontal collision, the risk of personal
injury may increase with increasing
recline of the seatback.
ÐAdjusting front seat (power seat)
ÐAdjusting front seat(manual seat)
Page 24 of 188
23
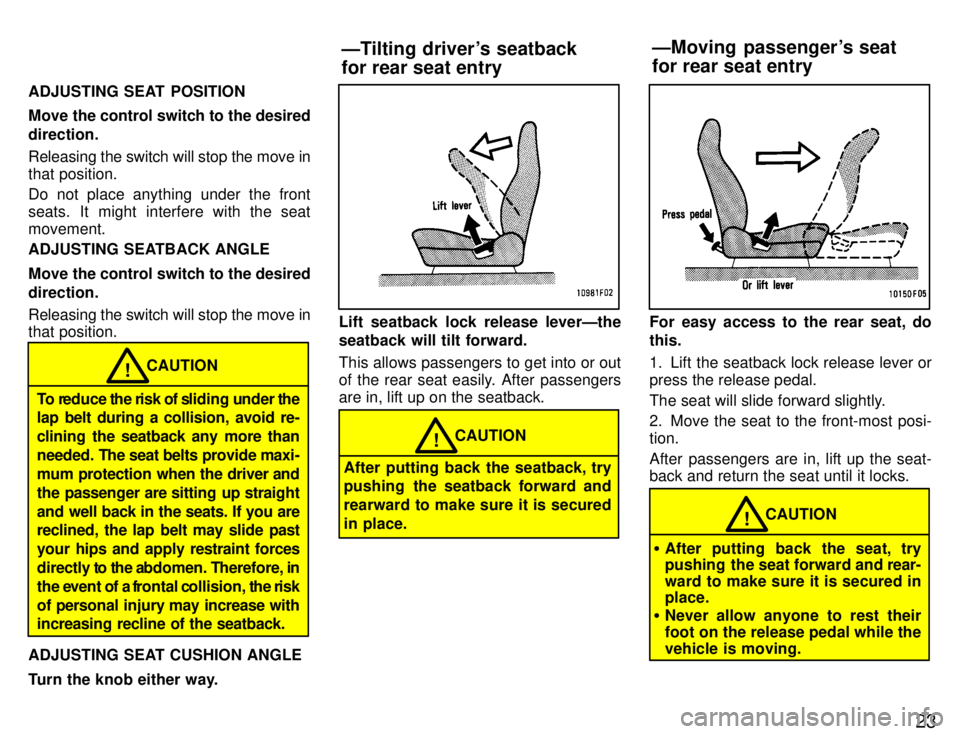
ADJUSTING SEAT POSITION
Move the control switch to the desired direction. Releasing the switch will stop the move in
that position.
Do not place anything under the front
seats. It might interfere with the seatmovement.
ADJUSTING SEATBACK ANGLE
Move the control switch to the desired direction. Releasing the switch will stop the move in
that position.
CAUTION!
To reduce the risk of sliding under the
lap belt during a collision, avoid re-
clining the seatback any more than
needed. The seat belts provide maxi-
mum protection when the driver and
the passenger are sitting up straight
and well back in the seats. If you are
reclined, the lap belt may slide past
your hips and apply restraint forces
directly to the abdomen. Therefore, in
the event of a frontal collision, the risk
of personal injury may increase with
increasing recline of the seatback.
ADJUSTING SEAT CUSHION ANGLE
Turn the knob either way.
Lift seatback lock release leverÐthe
seatback will tilt forward. This allows passengers to get into or out
of the rear seat easily. After passengersare in, lift up on the seatback.
CAUTION!
After putting back the seatback, try
pushing the seatback forward and rearward to make sure it is secured
in place.
For easy access to the rear seat, do this.
1. Lift the seatback lock release lever or press the release pedal.
The seat will slide forward slightly.
2. Move the seat to the front-most posi- tion.
After passengers are in, lift up the seat- back and return the seat until it locks.
CAUTION!
� After putting back the seat, try
pushing the seat forward and rear-
ward to make sure it is secured inplace.
� Never allow anyone to rest their
foot on the release pedal while the
vehicle is moving.
ÐMoving passenger's seat for rear seat entry
ÐTilting driver's seatbackfor rear seat entry
Page 25 of 188

24
FOLDING DOWN REAR SEAT
Unlock the seatback, and fold it down.
This will enlarge the luggage compart-
ment as far as the front seatbacks. See
Luggage stowage precautionsº in Part 2 for precautions to observe in loading lug- gage.SETTING UP REAR SEAT Unlock the seatback, and set it up.
CAUTION!
When returning the seatback to the
upright position: � Make sure the seat belts are not
twisted or caught in the seatback
and are arranged in their proper
position for ready use.
� Make sure the seatback is securely
locked by pushing forward and
rearward on the top of the seat- back.
To turn on the seat heater, push the Lº
switch for the driver's seat, and Rº
switch for the passenger's seat. The key must be in the ONº position. Once the seat is warmed up, the heat of
the seat heater is reduced automatically.
The indicator light above the switch illumi-nates when the seat heater is operating.
NOTICE
To prevent the battery from being discharged, turn the switch on
when the engine is running.
Fold-down rear seat Seat heaters
Page 27 of 188
26
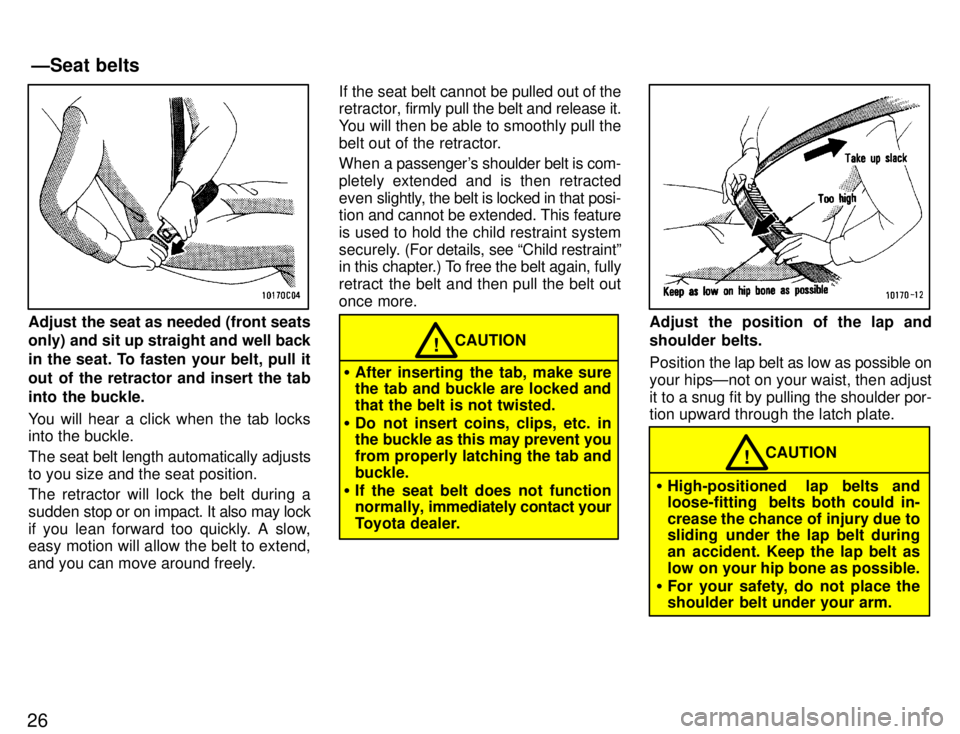
Adjust the seat as needed (front seats only) and sit up straight and well back
in the seat. To fasten your belt, pull it
out of the retractor and insert the tab
into the buckle.
You will hear a click when the tab locks into the buckle.
The seat belt length automatically adjusts
to you size and the seat position.
The retractor will lock the belt during a
sudden stop or on impact. It also may lock
if you lean forward too quickly. A slow, easy motion will allow the belt to extend,
and you can move around freely. If the seat belt cannot be pulled out of the
retractor,
firmly pull the belt and release it.
You will then be able to smoothly pull the
belt out of the retractor.
When a passenger's shoulder belt is com-
pletely extended and is then retracted
even slightly, the belt is locked in that posi-
tion and cannot be extended. This feature
is used to hold the child restraint system
securely. (For details, see Child restraintº
in this chapter.) To free the belt again, fully
retract the belt and then pull the belt out
once more.
CAUTION!
� After inserting the tab, make sure
the tab and buckle are locked and that the belt is not twisted.
� Do not insert coins, clips, etc. in
the buckle as this may prevent you
from properly latching the tab andbuckle.
� If the seat belt does not function
normally, i mmediately contact your
Toyota dealer.
Adjust the position of the lap and
shoulder belts. Position the lap belt as low as possible on
your hipsÐnot on your waist, then adjust
it to a snug fit by pulling the shoulder por- tion upward through the latch plate.
CAUTION!
� High-positioned lap belts and
loose-fitting belts both could in-
crease the chance of injury due to
sliding under the lap belt during
an accident. Keep the lap belt as
low on your hip bone as possible.
� For your safety, do not place the
shoulder belt under your arm.
ÐSeat belts
Page 29 of 188
28
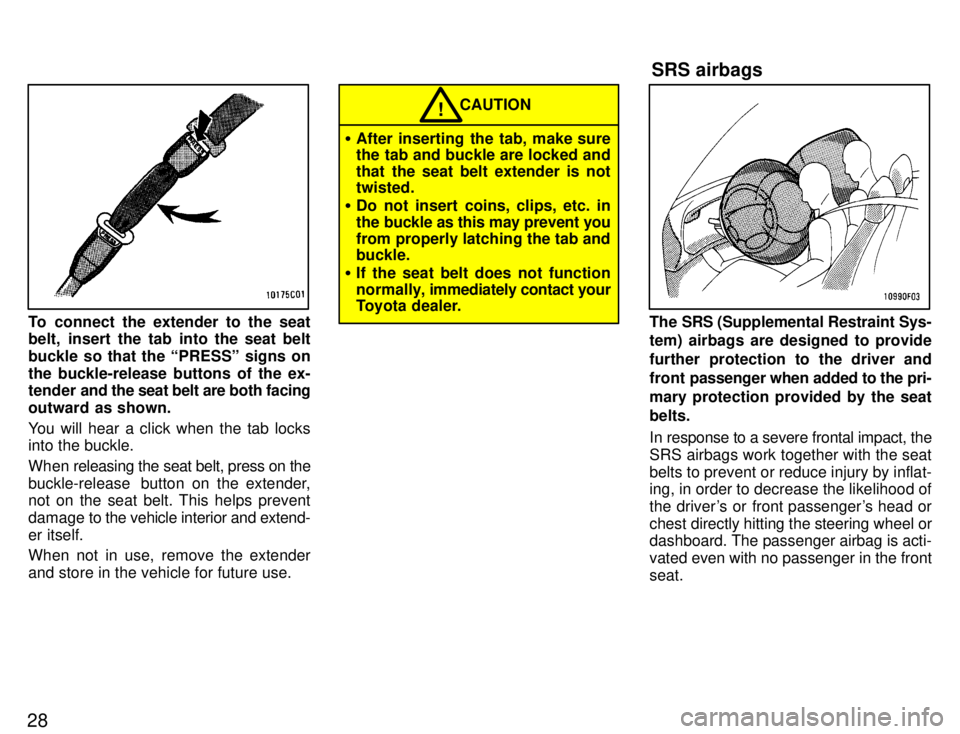
To connect the extender to the seat
belt, insert the tab into the seat belt
buckle so that the PRESSº signs onthe buckle-release buttons of the ex-
tender and the seat belt are both facing
outward as shown.
You will hear a click when the tab locks into the buckle.
When releasing the seat belt, press on the
buckle-release button on the extender, not on the seat belt. This helps prevent
damage to the vehicle interior and extend-er itself.
When not in use, remove the extender
and store in the vehicle for future use.
� After inserting the tab, make sure
the tab and buckle are locked and
that the seat belt extender is not twisted.
� Do not insert coins, clips, etc. in
the buckle as this may prevent you
from properly latching the tab and buckle.
� If the seat belt does not function
normally, i mmediately contact your
Toyota dealer.
CAUTION!
The SRS (Supplemental Restraint Sys-
tem) airbags are designed to provide
further protection to the driver and
front passenger when added to the pri-
mary protection provided by the seatbelts.
In response to a severe frontal impact, the
SRS airbags work together with the seatbelts to prevent or reduce injury by inflat- ing, in order to decrease the likelihood of
the driver's or front passenger's head or
chest directly hitting the steering wheel or dashboard. The passenger airbag is acti- vated even with no passenger in the frontseat. SRS airbags
Page 35 of 188
34Toyota strongly urges the use of child re-
straint systems for children small enough
to use them.
The laws of all fifty states in the U.S.A.
and Canada now require the use of a child
restraint system.
CAUTION!
� For effective protection in automo-
bile accidents and sudden stops,
children must be properly re-
strained. Holding a child in your
arms is not a substitute for a child
restraint system. In an accident,
the child can be crushed against
the windshield, or between you
and the vehicle's interior if you are unrestrained. A child restraint system for a small
child or baby must itself be restrained
on the seat with the lap portion of thelap/shoulder belt.
The child restraint system should conform
to the size of the child and properly fit the
vehicle seat. For greater safety, the child
restraint
system should be installed in the
rear seat. According to accident statistics,
children are safer when properly re-strained in the rear seat than in the frontseat. When installing a child restraint system,
follow the instructions provided by the
manufacturer of the system. General di- rections are also provided under the fol-
lowing illustrations.
CAUTION!
� After installing the child restraint system, make sure it is secured in
place. If it is not restrained secure-
ly, it may cause injury to the child
in the event of a sudden stop or ac-cident.
When not using the child restraint system, keep it secured with the seat belt or place
it somewhere other than in passenger
compartment. This will prevent it injuringpassengers in the event of a sudden stop or accident. Your vehicle has anchors for securing the
top strap of a child restraint system. The
anchor
nuts are welded beneath the sheet
metal to permit installation of an anchor
bracket for a child restraint system.
To install an anchor bracket, use an 8 mm
X 30 mm X 1.25 mm coarse thread metric
bolt and a 5mm (0.2 in.) spacer. Note that
the bolts accompanying many child re-
straint systems are not metric. You can
damage the anchor nuts on your vehicle
if you force bolts with different thread intothe anchor nuts.
For instructions about how to install the
anchor bracket, see (B) TOP STRAP
ANCHORS AND LOCATIONSº.
If your child restraint system does not pro-
vide any of the necessary parts, you can
purchase the following items from your
Toyota dealer. * CRS installation kit
(Part No. 04731-22012) Ðcontains 1 bolt, 3 types of spacers and 1 locking clip.
* Bolt (Part No. 91511-60830)
Child restraintÐ ÐChild restraint precautions
ÐChild restraint system
Page 36 of 188
35
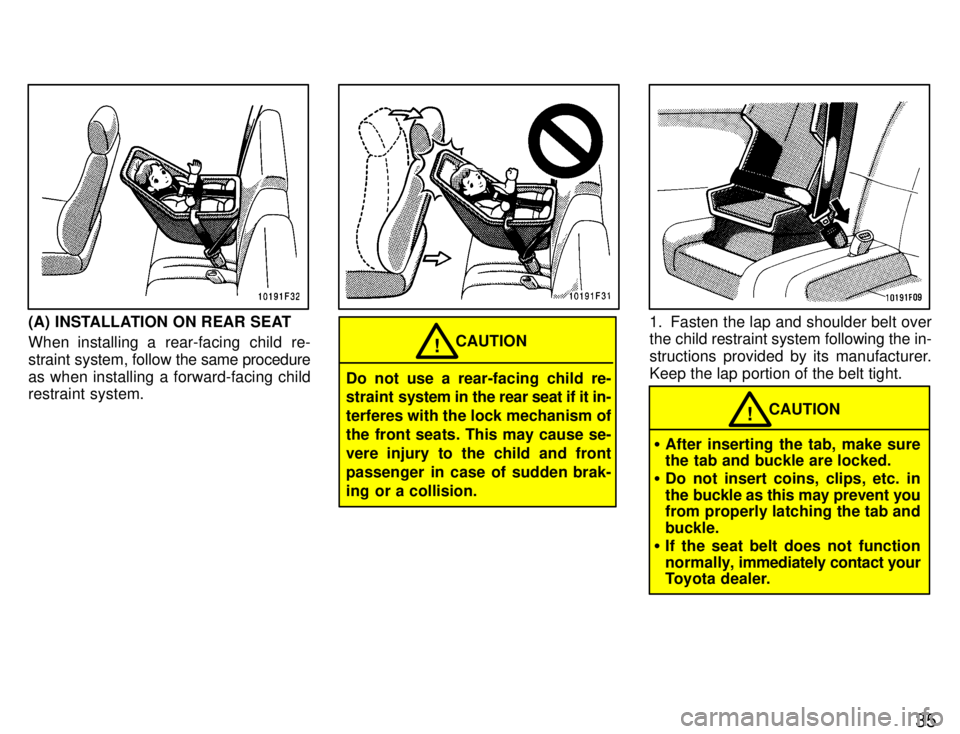
(A) INSTALLATION ON REAR SEAT
When installing a rear-facing child re-
straint system, follow the same procedure
as when installing a forward-facing child
restraint system.
CAUTION!
Do not use a rear-facing child re-
straint system in the rear seat if it in-
terferes with the lock mechanism of
the front seats. This may cause se-
vere injury to the child and front
passenger in case of sudden brak-
ing or a collision.
1. Fasten the lap and shoulder belt over
the child restraint system following the in-
structions provided by its manufacturer.
Keep the lap portion of the belt tight.
CAUTION!
� After inserting the tab, make sure
the tab and buckle are locked.
� Do not insert coins, clips, etc. in
the buckle as this may prevent you
from properly latching the tab and buckle.
� If the seat belt does not function
normally, imm ediately contact your
Toyota dealer.
Page 37 of 188

36
2. Fully extend the shoulder belt to put it in the lock mode.3. Place the shoulder belt between the vehicle seatback and the child restraint
system and allow it to retract. To hold the
child restraint system securely, let the
shoulder belt retract as far as it will go
while firmly pushing down the child re-
straint system.4. If your child restraint system requires
the use of a top strap, latch the hook onto
the anchor bracket and tighten the topstrap.
Twist the top strap half a turn: make a twist
at front top of the rear seatback, not be-
hind it. Then pass the top strap through the cutout in the carpet on the rear cargo
floor.