Page 782 of 1399

EC−12
−
EMISSION CONTROL EXHAUST GAS RECIRCULATION (EGR) SYSTEM
1996 LAND CRUISER (RM451U)
HINT:
As a large amount of exhaust gas enters, the engine will misfire
slightly.
7. DISCONNECT TOYOTA HAND −HELD TESTER OR
OBD II SCAN TOOL
8. REMOVE VACUUM GAUGE
Remove the vacuum gauge, and reconnect the vacuum hoses
to the proper locations.
9. INSPECT EGR VALVE
(a) Apply vacuum directly to the EGR valve with the engine idle.
(b) Check that the engine runs rough or dies.
(c) Reconnect the vacuum hoses to the proper locations.
If no problem is found with this inspection, system is normal;
otherwise inspect each part.
10. CANCEL DIAGNOSTIC TROUBLE CODE
11. REMOVE AIR INTAKE CHAMBER (See page EM−28)
12. DISCONNECT VACUUM HOSES AND CONNECTOR
13. INSPECT VSV FOR OPEN CIRCUIT
Using an ohmmeter, check that there is continuity between the
terminals. Resistance: 30 − 34 Ω at 20° C (68°F)
If there is no continuity, replace the VSV.
14. INSPECT VSV FOR GROUND
Using an ohmmeter, check that there is no continuity between
each terminal and the body.
If there is continuity, replace the VSV.
Brought to you by BirfMark
Brought to you by BirfMark
Version 1.11 - 03/16/2010
Page 783 of 1399
(a)
(b)
(c)
−
EMISSION CONTROL EXHAUST GAS RECIRCULATION (EGR) SYSTEM
EC−13
1996 LAND CRUISER (RM451U)
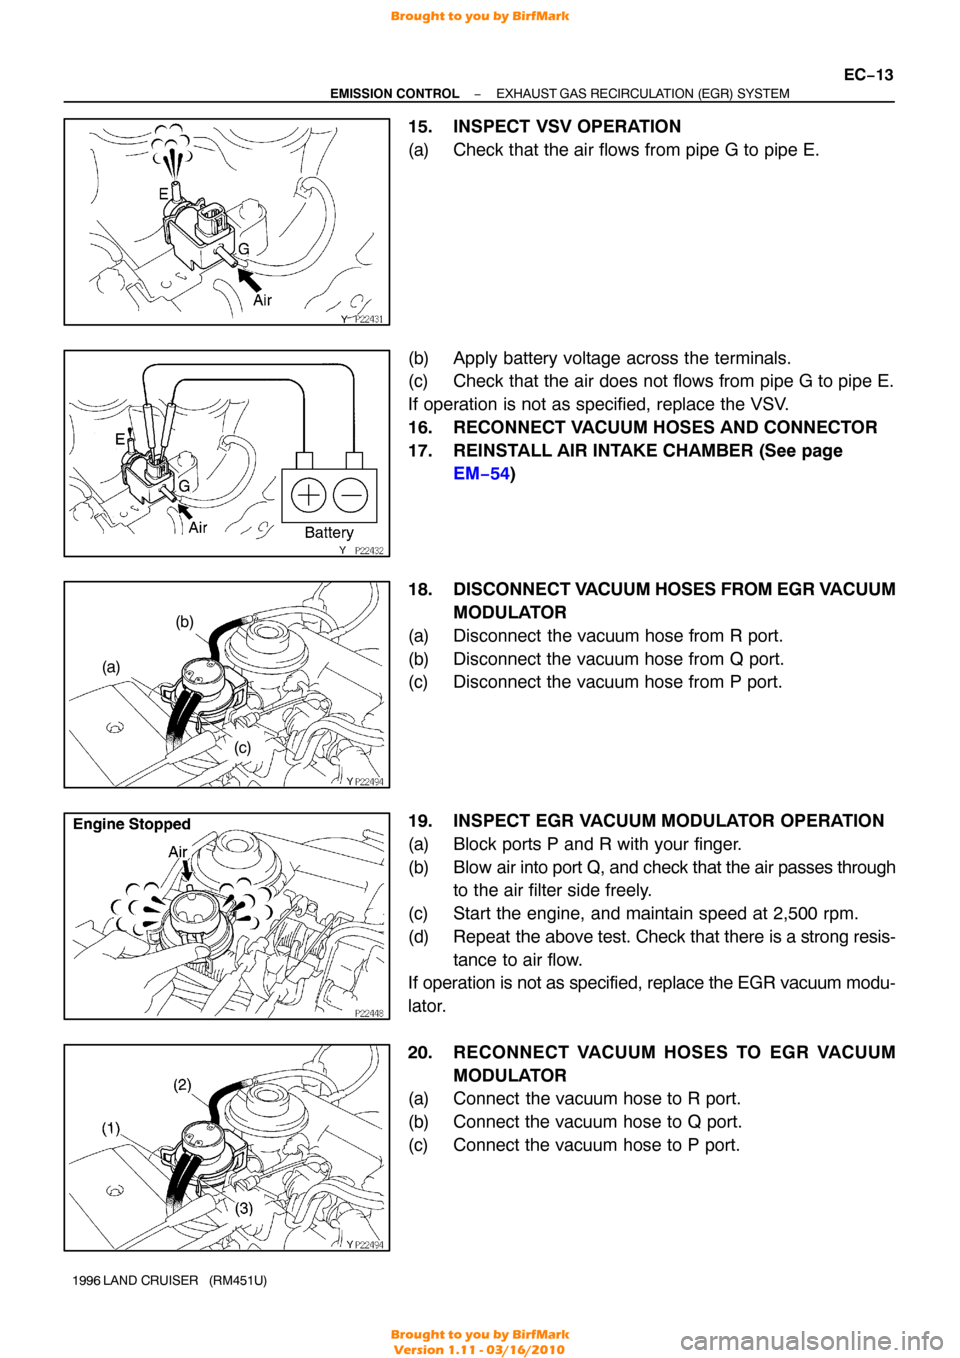
15. INSPECT VSV OPERATION
(a) Check that the air flows from pipe G to pipe E.
(b) Apply battery voltage across the terminals.
(c) Check that the air does not flows from pipe G to pipe E.
If operation is not as specified, replace the VSV.
16. RECONNECT VACUUM HOSES AND CONNECTOR
17. REINSTALL AIR INTAKE CHAMBER (See page
EM−54 )
18. DISCONNECT V ACUUM HOSES FROM EGR V ACUUM
MODULATOR
(a) Disconnect the vacuum hose from R port.
(b) Disconnect the vacuum hose from Q port.
(c) Disconnect the vacuum hose from P port.
19. INSPECT EGR VACUUM MODULATOR OPERATION
(a) Block ports P and R with your finger.
(b) Blow air into port Q, and check that the air passes through
to the air filter side freely.
(c) Start the engine, and maintain speed at 2,500 rpm.
(d) Repeat the above test. Check that there is a strong resis-
tance to air flow.
If operation is not as specified, replace the EGR vacuum modu-
lator.
20. RECONNECT VACUUM HOSES TO EGR VACUUM
MODULATOR
(a) Connect the vacuum hose to R port.
(b) Connect the vacuum hose to Q port.
(c) Connect the vacuum hose to P port.
Brought to you by BirfMark
Brought to you by BirfMark
Version 1.11 - 03/16/2010
Page 784 of 1399

EC−14
−
EMISSION CONTROL EXHAUST GAS RECIRCULATION (EGR) SYSTEM
1996 LAND CRUISER (RM451U)
21. REMOVE EGR VACUUM MODULATOR
22. REMOVE EGR VALVE
(a) Disconnect the vacuum hose from the EGR valve.
(b) Disconnect the engine wire from the clamp.
(c) Loosen the EGR pipe union nut.
(d) Remove the 2 nuts holding the EGR valve to the air intake
chamber.
(e) Using 2 nuts, remove the 2 stud bolts, EGR valve and gasket.
23. INSPECT EGR VALVE
Check for sticking and heavy carbon deposits.
If a problem is found, replace the valve.
24. REINSTALL EGR VALVE
(a) Using 2 nuts, temporarily install a new gasket, and EGR valve with the 2 stud bolts.
Torque: 9 N·m (90 kgf·cm, 78 in.·lbf)
(b) Install the 2 nuts holding the EGR valve to the air intake
chamber.
Torque: 18 N·m (180 kgf·cm, 13 ft·lbf)
(c) Tighten the union nut of the EGR pipe. Torque: 64 N·m (650 kgf·cm, 47 ft·lbf)
(d) Connect the engine wire to the clamp.
(e) Connect the vacuum hose to the EGR valve.
25. REINSTALL EGR VACUUM MODULATOR
Torque: 18 N·m (185 kgf·cm, 13 ft·lbf)
Brought to you by BirfMark
Brought to you by BirfMark
Version 1.11 - 03/16/2010
Page 787 of 1399

EM−2
−
ENGINE MECHANICAL CO/HC
505
Author�: Date�:
1996 LAND CRUISER (RM451U)
6. TROUBLESHOOTING
If the CO/HC concentration does not comply with regulations,
troubleshoot in the order given below.
See the table below for possible causes, and then inspect and
correct the applicable causes if necessary.
COHCProblemsCauses
NormalHighRough idle
3. Faulty ignitions:
�Incorrect timing
� Fouled, shorted or improperly gapped plugs
� Open or crossed high −tension cords
� Cracked distributor cap
4. Incorrect valve clearance
5. Leaky EGR valve
6. Leaky intake and exhaust valves
7. Leaky cylinders
LowHighRough idle
(Fluctuating HC reading)
1. Vacuum leaks:
� PCV hose
� EGR valve
� Intake manifold
� Air intake chamber
� Throttle body
� IAC valve
� Brake booster line
2. Lean mixture causing misfire
HighHighRough idle
(Black smoke from exhaust)
1. Restricted air filter
2. Faulty SFI systems:
� Faulty pressure regulator
� Clogged fuel return line
� Defective ECT sensor
� Faulty ECM
� Faulty injector
� Faulty throttle position sensor
� Faulty MAF meter
Brought to you by BirfMark
Brought to you by BirfMark
Version 1.11 - 03/16/2010
Page 813 of 1399

EM1E3−01
EM−28
−
ENGINE MECHANICAL CYLINDER HEAD
1996 LAND CRUISER (RM451U)
REMOVAL
1. DRAIN ENGINE COOLANT
2. REMOVE BATTERY AND BATTERY TRAY
(a) Disconnect the battery cables.
(b) Remove the nuts, hold −down clamp and battery.
(c) Remove the bolt and disconnect the ground strap.
(d) Remove the 5 bolts and battery tray.
3. REMOVE AIR CLEANER HOSE AND CAP
4. DISCONNECT CRUISE CONTROL ACTUATOR CABLE FROM THROTTLE BODY
5. DISCONNECT ACCELERATOR CABLE FROM
THROTTLE BODY
6. DISCONNECT THROTTLE CABLE FROM THROTTLE BODY
7. DISCONNECT ENGINE GROUND STRAPS
(a) Disconnect the ground strap from the No. 1 engine hang-
er.
(b) Disconnect the ground strap from the air intake chamber.
8. DISCONNECT CONNECTOR ON INTAKE MANIFOLD FROM LH FENDER APRON
9. DISCONNECT BRAKE BOOSTER VACUUM HOSE
10. DISCONNECT EVAP HOSE
11. DISCONNECT FUEL RETURN HOSE
12. DISCONNECT HEATER HOSES
13. DISCONNECT ENGINE WIRE AND HEATER VALVE FROM COWL PANEL
(a) Remove the 2 bolts and disconnect the engine wire and
ground strap.
(b) Remove the 2 bolts and disconnect the heater valve.
14. REMOVE NO. 2 AND NO. 3 CYLINDER HEAD COVERS
Remove the 4 bolts and head covers.
15. REMOVE DISTRIBUTOR (See page IG−10 )
Brought to you by BirfMark
Brought to you by BirfMark
Version 1.11 - 03/16/2010
Page 822 of 1399
EM1E4−01
−
ENGINE MECHANICAL CYLINDER HEAD
EM−37
1996 LAND CRUISER (RM451U)
DISASSEMBLY
1. REMOVE GENERATOR BRACKET
Remove the 2 bolts and generator bracket.
2. REMOVE WATER OUTLET
Remove the 2 nuts, water outlet and gasket.
3. REMOVE EGR PIPE
(a) Loosen the union nut.
(b) Remove the 2 bolts, EGR pipe and gasket.
4. REMOVE HEATER INLET PIPE AND HOSE
Remove the 2 bolts, and disconnect the pipe and hose.
5. REMOVE AIR INTAKE CHAMBER AND INTAKE MAN-
IFOLD ASSEMBLY
(a) Disconnect the 2 vacuum hoses from the TVV.
(b) Remove the 10 bolts, 2 nuts, intake manifold and gasket.
6. DISASSEMBLE AIR INTAKE CHAMBER AND INTAKE MANIFOLD ASSEMBLY
(a) Disconnect the vacuum sensing hose from the fuel pres-
sure regulator.
(b) Remove the 6 bolts, 2 nuts, air intake chamber and 2 gas-
kets from the intake manifold.
7. REMOVE NO. 1 WATER BYPASS HOSE
Brought to you by BirfMark
Brought to you by BirfMark
Version 1.11 - 03/16/2010
Page 832 of 1399

EM2196
−
ENGINE MECHANICAL CYLINDER HEAD
EM−47
1996 LAND CRUISER (RM451U)
(h) Inspect the gear backlash.
(1) Install the camshafts without installing the exhaustcam sub−gear (See page EM−54).
(2) Using a dial indicator, measure the backlash.
Standard backlash:
0.020 − 0.200 mm (0.0008 − 0.0079 in.)
Maximum backlash: 0.30 mm (0.0188 in.)
If the backlash is greater than maximum, replace the cam-
shafts.
10. INSPECT VALVE LIFTER OIL CLEARANCE
(a) Using a caliper gauge, measure the lifter bore diameter of the cylinder head.
Lifter bore diameter:
34.000 − 34.021 mm (1.3386 − 1.3394 in.)
(b) Using a micrometer, measure the lifter diameter. Lifter diameter:
33.966 − 33.976 mm (1.3372 − 1.3376 in.)
(c) Subtract the lifter diameter measurement from the lifter bore diameter measurement.
Standard oil clearance:
0.024 − 0.055 mm (0.0009 − 0.0022 in.)
Maximum oil clearance: 0.07 mm (0.0028 in.)
If the oil clearance is greater than maximum, replace the lifter.
If necessary, replace the cylinder head.
11. INSPECT AIR INTAKE CHAMBER
Using a precision straight edge and thickness gauge, measure
the surface contacting the intake manifold for warpage. Maximum warpage: 0.30 mm (0.0118 in.)
If warpage is greater than maximum, replace the air intake
chamber.
Brought to you by BirfMark
Brought to you by BirfMark
Version 1.11 - 03/16/2010
Page 833 of 1399
P22604
EM−48
−
ENGINE MECHANICAL CYLINDER HEAD
1996 LAND CRUISER (RM451U)
12. INSPECT INTAKE MANIFOLD
Using a precision straight edge and thickness gauge, measure
the surface contacting the cylinder head and air intake chamber
for warpage.
Maximum warpage: 0.30 mm (0.0118 in.)
If warpage is greater than maximum, replace the manifold.
13. INSPECT EXHAUST MANIFOLDS
Using a precision straight edge and thickness gauge, measure
the surface contacting the cylinder head for warpage. Maximum warpage: 0.30 mm (0.0118 in.)
If warpage is greater than maximum, replace the manifold.
14. INSPECT CHAIN TENSIONER
Check that the plunger moves smoothly.
Brought to you by BirfMark
Brought to you by BirfMark
Version 1.11 - 03/16/2010