Page 781 of 1399

EC0JT−01
−
EMISSION CONTROL EXHAUST GAS RECIRCULATION (EGR) SYSTEM
EC−11
1996 LAND CRUISER (RM451U)
INSPECTION
1. INSPECT AND CLEAN FILTER IN EGR V ACUUM MOD-
ULATOR
(a) Remove the cap and filter.
(b) Check the filter for contamination or damage.
(c) Using compressed air, clean the filter.
(d) Reinstall the filter and cap.
HINT:
Install the filter with the coarser surface facing the atmospheric
side (outward).
2. INSTALL VACUUM GAUGE
Using a 3 −way connector, connect a vacuum gauge to the hose
between the EGR valve and EGR vacuum modulator.
3. INSPECT SEATING OF EGR VALVE
Start the engine and check that the engine starts and runs at
idle.
4. CONNECT TOYOTA HAND− HELD TESTER OR OBD II
SCAN TOOL (See page EM−10)
5. INSPECT VSV OPERATION WITH COLD ENGINE
(a) The engine coolant temperature should be below 47 °C
(117 °F).
(b) Check that the vacuum gauge indicates zero at 2,500 rpm.
(c) Check that the EGR pipe is not hot.
6. INSPECT OPERATION OF VSV AND EGR VACUUM
MODULATOR WITH HOT ENGINE
(a) Warm up the engine to above 53° C (127°F).
(b) Check that the vacuum gauge indicates low vacuum at 2,500 rpm.
(c) Disconnect the vacuum hose port R of the EGR vacuum modulator and connect port R directly to the air intake
chamber with another hose.
(d) Check that the vacuum gauge indicates high vacuum at 2,500 rpm.
Brought to you by BirfMark
Brought to you by BirfMark
Version 1.11 - 03/16/2010
Page 782 of 1399

EC−12
−
EMISSION CONTROL EXHAUST GAS RECIRCULATION (EGR) SYSTEM
1996 LAND CRUISER (RM451U)
HINT:
As a large amount of exhaust gas enters, the engine will misfire
slightly.
7. DISCONNECT TOYOTA HAND −HELD TESTER OR
OBD II SCAN TOOL
8. REMOVE VACUUM GAUGE
Remove the vacuum gauge, and reconnect the vacuum hoses
to the proper locations.
9. INSPECT EGR VALVE
(a) Apply vacuum directly to the EGR valve with the engine idle.
(b) Check that the engine runs rough or dies.
(c) Reconnect the vacuum hoses to the proper locations.
If no problem is found with this inspection, system is normal;
otherwise inspect each part.
10. CANCEL DIAGNOSTIC TROUBLE CODE
11. REMOVE AIR INTAKE CHAMBER (See page EM−28)
12. DISCONNECT VACUUM HOSES AND CONNECTOR
13. INSPECT VSV FOR OPEN CIRCUIT
Using an ohmmeter, check that there is continuity between the
terminals. Resistance: 30 − 34 Ω at 20° C (68°F)
If there is no continuity, replace the VSV.
14. INSPECT VSV FOR GROUND
Using an ohmmeter, check that there is no continuity between
each terminal and the body.
If there is continuity, replace the VSV.
Brought to you by BirfMark
Brought to you by BirfMark
Version 1.11 - 03/16/2010
Page 783 of 1399

(a)
(b)
(c)
−
EMISSION CONTROL EXHAUST GAS RECIRCULATION (EGR) SYSTEM
EC−13
1996 LAND CRUISER (RM451U)
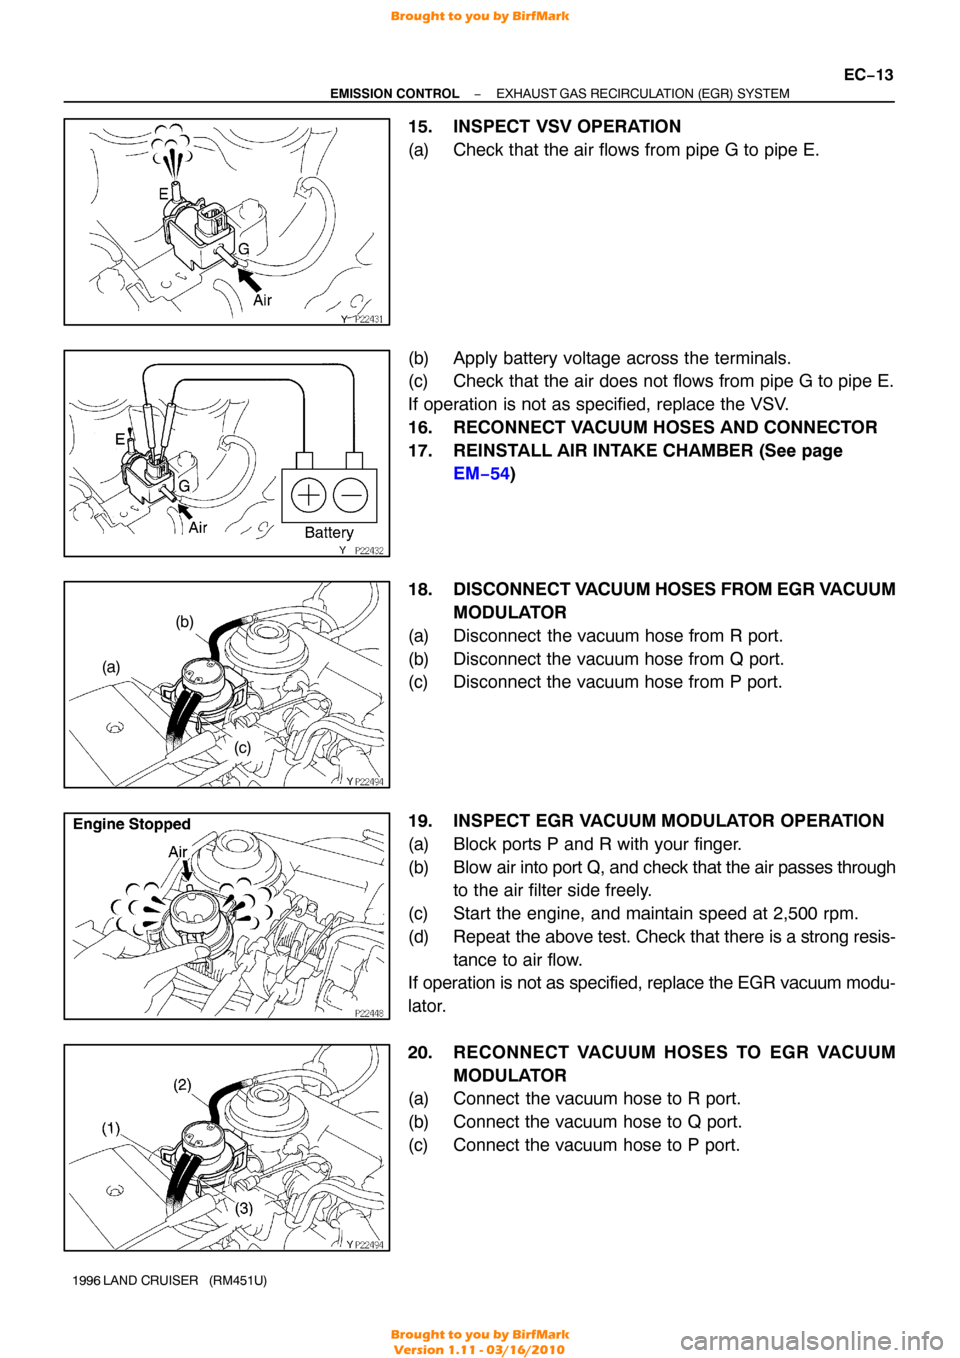
15. INSPECT VSV OPERATION
(a) Check that the air flows from pipe G to pipe E.
(b) Apply battery voltage across the terminals.
(c) Check that the air does not flows from pipe G to pipe E.
If operation is not as specified, replace the VSV.
16. RECONNECT VACUUM HOSES AND CONNECTOR
17. REINSTALL AIR INTAKE CHAMBER (See page
EM−54 )
18. DISCONNECT V ACUUM HOSES FROM EGR V ACUUM
MODULATOR
(a) Disconnect the vacuum hose from R port.
(b) Disconnect the vacuum hose from Q port.
(c) Disconnect the vacuum hose from P port.
19. INSPECT EGR VACUUM MODULATOR OPERATION
(a) Block ports P and R with your finger.
(b) Blow air into port Q, and check that the air passes through
to the air filter side freely.
(c) Start the engine, and maintain speed at 2,500 rpm.
(d) Repeat the above test. Check that there is a strong resis-
tance to air flow.
If operation is not as specified, replace the EGR vacuum modu-
lator.
20. RECONNECT VACUUM HOSES TO EGR VACUUM
MODULATOR
(a) Connect the vacuum hose to R port.
(b) Connect the vacuum hose to Q port.
(c) Connect the vacuum hose to P port.
Brought to you by BirfMark
Brought to you by BirfMark
Version 1.11 - 03/16/2010
Page 784 of 1399

EC−14
−
EMISSION CONTROL EXHAUST GAS RECIRCULATION (EGR) SYSTEM
1996 LAND CRUISER (RM451U)
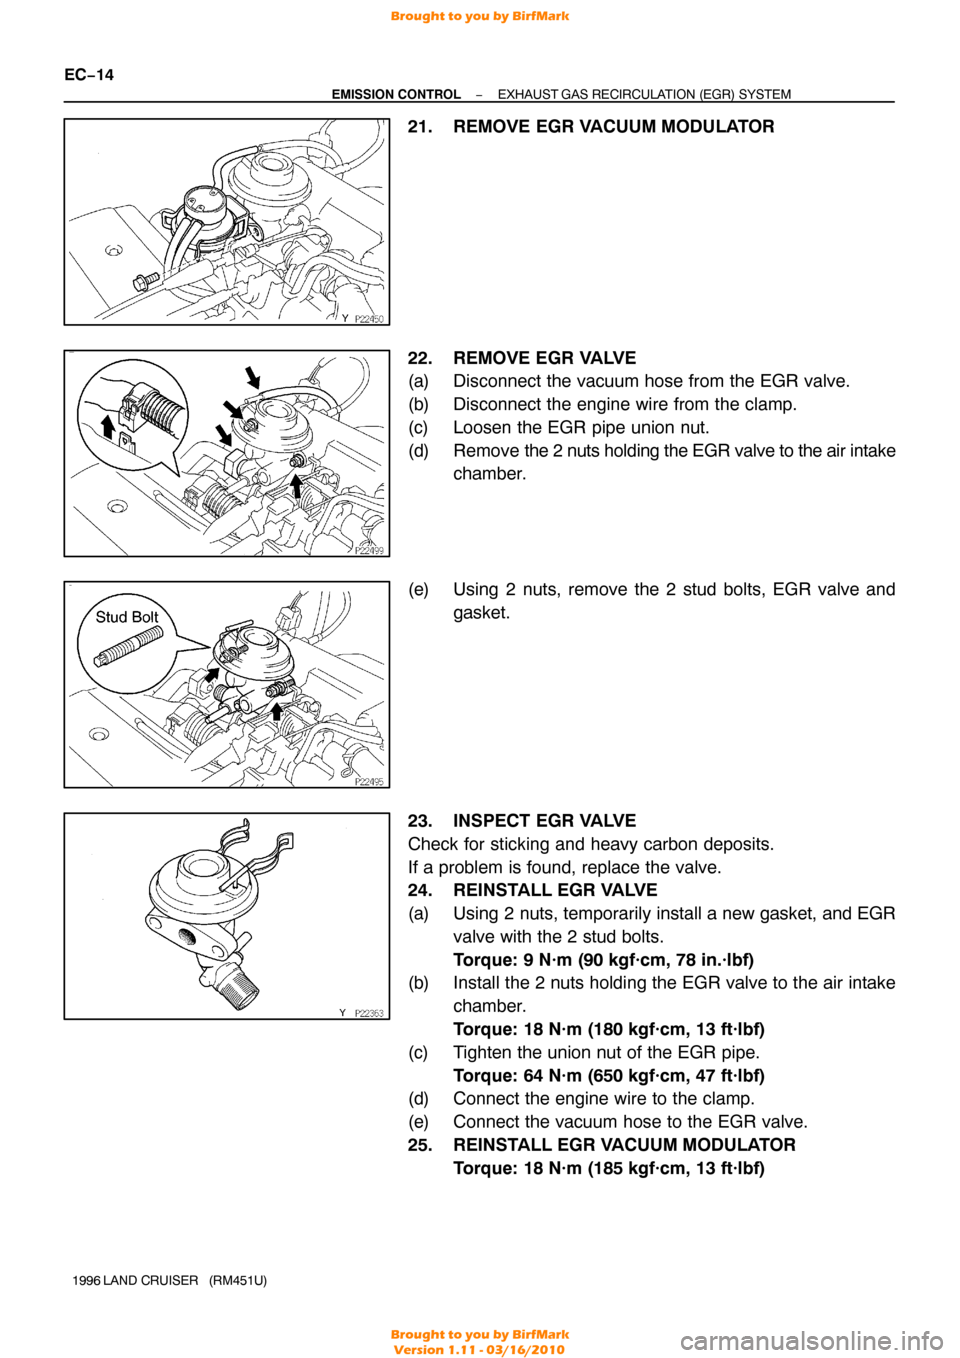
21. REMOVE EGR VACUUM MODULATOR
22. REMOVE EGR VALVE
(a) Disconnect the vacuum hose from the EGR valve.
(b) Disconnect the engine wire from the clamp.
(c) Loosen the EGR pipe union nut.
(d) Remove the 2 nuts holding the EGR valve to the air intake
chamber.
(e) Using 2 nuts, remove the 2 stud bolts, EGR valve and gasket.
23. INSPECT EGR VALVE
Check for sticking and heavy carbon deposits.
If a problem is found, replace the valve.
24. REINSTALL EGR VALVE
(a) Using 2 nuts, temporarily install a new gasket, and EGR valve with the 2 stud bolts.
Torque: 9 N·m (90 kgf·cm, 78 in.·lbf)
(b) Install the 2 nuts holding the EGR valve to the air intake
chamber.
Torque: 18 N·m (180 kgf·cm, 13 ft·lbf)
(c) Tighten the union nut of the EGR pipe. Torque: 64 N·m (650 kgf·cm, 47 ft·lbf)
(d) Connect the engine wire to the clamp.
(e) Connect the vacuum hose to the EGR valve.
25. REINSTALL EGR VACUUM MODULATOR
Torque: 18 N·m (185 kgf·cm, 13 ft·lbf)
Brought to you by BirfMark
Brought to you by BirfMark
Version 1.11 - 03/16/2010
Page 785 of 1399
EC0H3−02
−
EMISSION CONTROL THREE−WAY CATALYTIC CONVERTER (TWC)
SYSTEMEC−15
628
Author�: Date�:
1996 LAND CRUISER (RM451U)
THREE−WAY CATALYTIC CONVERTER (TWC) SYSTEM
INSPECTION
1. EXHAUST PIPE ASSEMBLY INSPECTION
(a) Check connection for looseness or damage
(b) Check clamps for weakness, cracks or damage
2. TWC INSPECTION
Check for dents or damage
If any part of the protector is damaged or dented to the extent that it touches the TWC, repair or replace it.
3. HEAT INSULATOR INSPECTION
(a) Check heat insulator for damage
(b) Check for adequate clearance between TWC and heat insulator.
4. FRONT TWC AND REAR TWC REPLACEMENT (See page EM−11 0 )
Brought to you by BirfMark
Brought to you by BirfMark
Version 1.11 - 03/16/2010
Page 815 of 1399

EM−30
−
ENGINE MECHANICAL CYLINDER HEAD
1996 LAND CRUISER (RM451U)
(b) Disconnect the connectors.
(1) Disconnect the knock sensor connector.
(2) Disconnect the oil level sensor connector.
(3) Disconnect the 2 connectors from the transmission.
(4) Disconnect the starter connector.
(c) Disconnect the 2 heated oxygen sensor connectors.
(d) Disconnect the PNP switch connector.
(e) Remove the 2 bolts and disconnect the engine wire from the intake manifold and cylinder block.
(f) Disconnect the PCV hose from the PCV valve.
(g) Remove the bolt holding the engine wire to the intake manifold.
(h) Disconnect the connectors. (1) Disconnect the connector for the emission controlvalve set assembly.
(2) Disconnect the 3 injector connectors.
(i) Disconnect the engine wire clamp.
(j) Disconnect the engine wire clamp.
(k) Disconnect the connectors.
(1) Disconnect the 3 injector connectors.
(2) Disconnect the EGR gas temp. sensor connector.
(l) Disconnect the clamp of the No. 6 injector wire from the bracket.
(m) Disconnect the engine wire from the cylinder head and in-
take manifold.
25. DISCONNECT NO. 2 WATER BYPASS PIPE
Remove the 3 bolts, and disconnect the bypass pipe from the
cylinder head.
Brought to you by BirfMark
Brought to you by BirfMark
Version 1.11 - 03/16/2010
Page 846 of 1399

−
ENGINE MECHANICAL CYLINDER HEAD
EM−61
1996 LAND CRUISER (RM451U)
14. INSTALL HEATER PIPE
Install a new gasket, the heater pipe and ground cable with the
2 bolts and 2 nuts.
Torque:
20 N·m (200 kgf·cm, 14 ft·lbf) for bolt:
21 N·m (210 kgf·cm, 15 ft·lbf) for nut
15. INSTALL NO. 1 AND NO. 2 EXHAUST MANIFOLDS
(a) Install 2 new gaskets, No. 1 exhaust manifold and No. 2
exhaust manifold with the 13 nuts.
Torque: 39 N·m (400 kgf·cm, 29 ft·lbf)
(b) Install the No. 1 heat insulator and No. 2 heat insulator with the 6 bolts.
Torque: 19 N·m (195 kgf·cm, 14 ft·lbf)
16. INSTALL FRONT EXHAUST PIPE
(a) Install 2 new gaskets and the front exhaust pipe with the 4 nuts.
Torque: 63 N·m (630 kgf·cm, 46 ft·lbf)
(b) Install the No. 1 support bracket with the 2 bolts. Torque: 24 N·m (240 kgf·cm, 17 ft·lbf)
(c) Connect the clamp and tighten the clamp bolt.
Torque: 19.5 N·m (195 kgf·cm, 14 ft·lbf)
(d) Connect the front exhaust pipe to the rear TWC with a new gasket, 2 bolts and 2 nuts.
Torque: 46 N·m (470 kgf·cm, 34 ft·lbf)
17. CONNECT NO. 2 WATER BYPASS PIPE
Connect the bypass pipe to the cylinder head with the 3 bolts.
Torque: 20 N·m (200 kgf·cm, 14 ft·lbf)
18. CONNECT ENGINE WIRE
(a) Place the engine wire on the intake manifold.
(b) Connect the connectors. (1) Connect the 3 injector connectors.
(2) Connect the EGR gas temp. sensor connector.
(c) Connect the clamp of the No.6 injector wire to the bracket.
(d) Connect the engine wire clamp.
(e) Connect the engine wire clamp.
(f) Connect the connectors. (1) Connect the connector for the emission control
valve set assembly.
(2) Connect the 3 injector connectors.
(g) Install the bolt holding the engine wire to the intake man- ifold.
Brought to you by BirfMark
Brought to you by BirfMark
Version 1.11 - 03/16/2010
Page 933 of 1399

MA02P−04
−
MAINTENANCE OUTSIDE VEHICLE
MA−1
1
Author�: Date�:
1996 LAND CRUISER (RM451U)
OUTSIDE VEHICLE
GENERAL MAINTENANCE
The owners are responsible for these maintenance and inspection items.
They can be done by the owner or they can have them done at a service sh\
op.
These items include those which should be checked on a daily basis, thos\
e which, in most cases, do not
require (special) tools and those which are considered to be reasonabl\
e for the owner to do.
Items and procedures for general maintenance are as follows.
1. GENERAL NOTES
�Maintenance items may vary from country to country. Check the owner’s manual supplement in which
the maintenance schedule is shown.
�Every service item in the periodic maintenance schedule must be performe\
d.
�Periodic maintenance service must be performed according to whichever interval in\
the periodic main-
tenance schedule occurs first, the odometer reading (miles) or the time inter\
val (months).
�Maintenance service after the last period should be performed at the same interval \
as before unless
otherwise noted.
�Failure to do even one item can cause the engine to run poorly and incre\
ase exhaust emissions.
2. TIRES
(a) Check the pressure with a gauge.
If necessary, adjust.
(b) Check for cuts, damage or excessive wear.
3. WHEEL NUTS
When checking the tires, check the nuts for looseness or for missing nut\
s.
If necessary, tighten them.
4. TIRE ROTATION
Check the owner’s manual supplement in which the maintenance schedule is shown.
5. WINDSHIELD WIPER BLADES
Check for wear or cracks whenever they do not wipe clean.
If necessary, replace.
6. FLUID LEAKS
(a) Check underneath for leaking fuel, oil, water or other fluid.
(b) If you smell gasoline fumes or notice any leak, have the cause found and\
corrected.
7. DOORS AND ENGINE HOOD
(a) Check that all doors and the tailgate operate smoothly, and that all larches lock securely.
(b) Check that the engine hood secondary latch secures the hood from opening\
when the primary latch is released.
Brought to you by BirfMark
Brought to you by BirfMark
Version 1.11 - 03/16/2010