Page 1 of 195

Foreword
Welcome to the growing group of value- conscious people who drive Toyotas. We are
proud of the advanced engineering and quality construction of each vehicle we build.
This Owner 's Manual explains the features of your new Toyota. Please read it and follow
the instructions carefully so that you can enjoy many years of safe motoring.
When it comes to service, remember that your Toyota dealer knows your vehicle best
and is interested in your complete satisfaction. He will provide quality maintenance and
any other assistance you may require.
Please leave this Owner's Manual in this vehicle at the time of resale. The next
owner will need this information also.
All information and specifications in this manual are current at the time of
printing. However, because of Toyota's policy of continual product improve-
ment, we reserve the right to make changes at any time without notice.
Please note that this manual applies to all models and explains all equipment,
including options. Therefore, you may find some explanations for equipment
not installed on your vehicle.
TOYOTA MOTOR CORPORATION
�1996 TOYOTA MOTOR CORPORATION
All rights reserved. This material may not be reproduced or copied, in whole or in part,
without the written permission of Toyota Motor Corporation.
ProCarManuals.com
Page 18 of 195

15
To deter the vehicle theft, the system is
designed to give an alarm and keep the
engine from being started if any of the
side doors, trunk lid, back door or hood
is forcibly unlocked or the battery ter-
minal is disconnected and then recon-
nected when the vehicle is locked.
The alarm blows the horn intermittently
and flashes the headlights, tail lights and
other exterior lights. The engine cannot
be started because the starter circuit will
be cut.SETTING THE SYSTEM
1. Turn the ignition key to the ºLOCKº
position.
2. Have all passengers get out of the ve-
hicle.
3. Close and lock all the side doors, trunk
lid, back door and hood.
The indicator light will come on when all
the side doors, trunk lid, back door and
hood are closed and locked.
As the side doors are locked, the system
will give you a preparation time of 30 se-
conds before the setting, during which the
side doors, trunk lid, back door and hood
may be opened to prepare for the setting.
Be careful not to use the key when open-
ing either front door. This will cancel the
system.
Theft deterrent system
ProCarManuals.com
Page 63 of 195
58
To adjust a power rear view mirror, first
push the master switch in Lº (left) or
Rº (right) depending on which mirror
needs adjusting, then push the con-
trol switch in desired direction.
If the engine is not running, the key must
be in the ACCº position.
If ice should jam the mirror, do not
operate the control or scrape the
mirror face. Use a spray de-icer to
free the mirror.
NOTICE
To fold the rear view mirror, push back-
ward.
The rear view mirrors can be folded back-
ward for parking in restricted areas.Pull the lever toward you to reduce
glare from the headlights of the ve-
hicle behind you during night driving.
Before adjusting the mirror to the position
with most clarity, push the day-night
change lever away from you (daylight
driving position).
Remember that by reducing glare you
also lose some rear view clarity.
Anti-glare inside rear view
mirror ÐFolding rear view mirrors ÐPower rear view mirror
control
ProCarManuals.com
Page 64 of 195

Part 1Headlights and turn signals
59
OPERATION OF
INSTRUMENTS
AND CONTROLSÐ
Chapter 1-4
Lights, Wipers and
Defogger
�Headlights and turn signals
�Emergency flashers
�Instrument panel light control
�Interior light
�Personal light
�Luggage compartment light
�Windshield wipers and washer
�Rear window wiper and washer
�Rear window defoggerTo turn the lights on, twist the knob on
the end of the lever.
Daytime running light system (Canada
only)ÐThe headlights turn on when the
parking brake is released with the engine
started, even with the light switch in the
OFFº position. They will not go off until
the ignition switch is turned off.
To turn on the other exterior lights and in-
strument panel lights, twist the knob to the
first clickstop.
Under the daytime running light system,
the headlights turn on at reduced intensi-
ty. Twist the knob to the second clickstop
to turn to full intensity for driving at night.FIRST CLICKSTOP: Only the parking,
tail, license plate, side marker and instru-
ment panel lights turn on.
SECOND CLICKSTOP: The headlights
also turn on.
If you remove the key with the headlights
left on, a buzzer reminds you to turn the
lights off when you open the driver's door.
NOTICE
To prevent the battery from being
discharged, do not leave the lights
on for a long period when the
engine is not running.
ProCarManuals.com
Page 65 of 195

60
For high beam, push the lever away
from you. Pull it toward you for low
beam. For the headlight flasher, pull it
further back.
A blue light in the instrument panel indi-
cates high beam is on.
The headlight flasher works even when
the headlight switch is off.For signaling turns, move the lever up
or down in the conventional manner.
The key must be in the ºONº position.
The turn signal is self-cancelling after a
turn, but after a lane change, you may
have to cancel it by hand. You can also
signal a lane change by moving the turn
signal lever partway and holding it there.
If the green light in the instrument panel
flashes faster than normal, it indicates
that the front or rear turn signal bulb has
burned out.To turn on the emergency flashers,
push the switch.
All the turn signal lights will flash.
Turn on the emergency flashers to warn
other drivers if your vehicle must be
stopped where it might be a traffic hazard.
Always pull as far off the road as possible.
The turn signal light switch will not work
when the emergency flashers are operat-
ing.
NOTICE
To prevent the battery from being
discharged, do not leave the switch
on longer than necessary when the
engine is not running.
Emergency flashers
ProCarManuals.com
Page 70 of 195
65
Make sure you turn the defogger off when
the window is clear. Leaving the defogger
on for a long time could cause the battery
to discharge, especially during stop-and-
go driving. The defogger is not designed
for drying rain water or for melting snow.
NOTICE
�Without timer: To prevent the bat-
tery from being discharged, turn
the switch on when the engine is
running.
�When cleaning the inside of the
rear window, be careful not to
scratch or damage the heater
wires.
ProCarManuals.com
Page 72 of 195
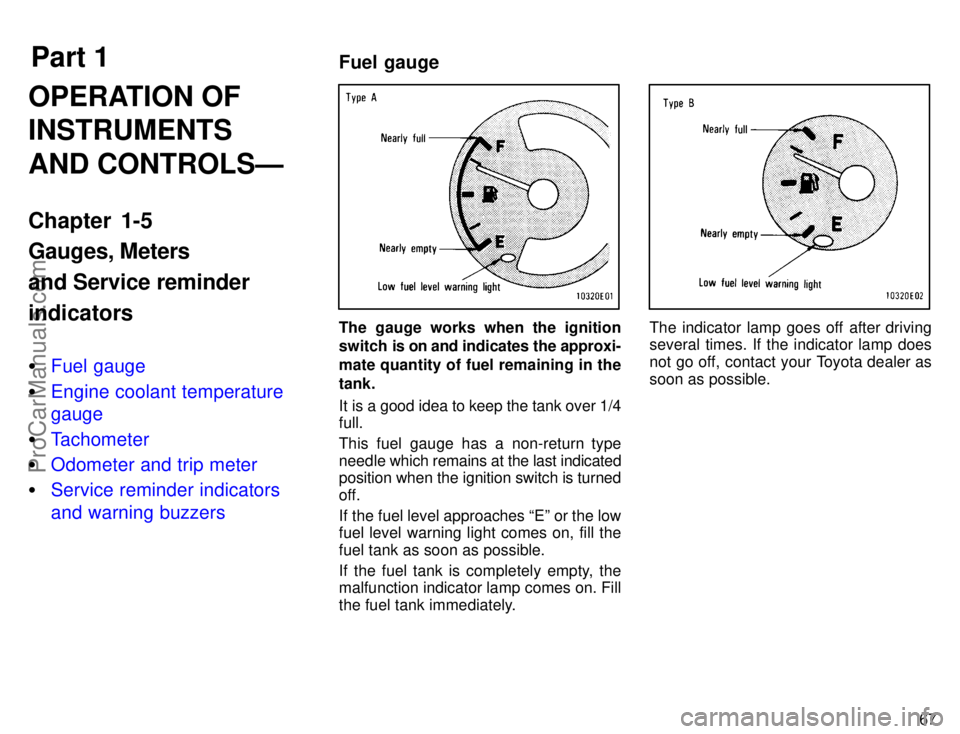
Part 1Fuel gauge
67
OPERATION OF
INSTRUMENTS
AND CONTROLSÐ
Chapter 1-5
Gauges, Meters
and Service reminder
indicators
�Fuel gauge
�Engine coolant temperature
gauge
�Tachometer
�Odometer and trip meter
�Service reminder indicators
and warning buzzers
The gauge works when the ignition
switch is on and indicates the approxi-
mate quantity of fuel remaining in the
tank.
It is a good idea to keep the tank over 1/4
full.
This fuel gauge has a non-return type
needle which remains at the last indicated
position when the ignition switch is turned
off.
If the fuel level approaches Eº or the low
fuel level warning light comes on, fill the
fuel tank as soon as possible.
If the fuel tank is completely empty, the
malfunction indicator lamp comes on. Fill
the fuel tank immediately.The indicator lamp goes off after driving
several times. If the indicator lamp does
not go off, contact your Toyota dealer as
soon as possible.
ProCarManuals.com
Page 73 of 195

68
The gauge indicates the engine cool-
ant temperature when the ignition
switch is on. The engine operating
temperature will vary with changes in
weather and engine load.
If the needle points to the red zone or high-
er, stop your vehicle and allow the engine
to cool.
Your vehicle may overheat during severe
operating conditions, such as:
�Driving up a long hill on a hot day.
�Reducing speed or stopping after high
speed driving.
�Idling for a long period with the air con-
ditioning on in stop-and-go traffic.
�Towing a trailer.NOTICE
�Do not remove the thermostat in
the engine cooling system as this
may cause the engine to overheat.
The thermostat is designed to
control the flow of coolant to keep
the temperature of the engine
within the specified operating
range.
�Do not continue driving with an
overheated engine. See If your
vehicle overheatsº in Part 4.
The tachometer indicates engine
speed in thousands of rpm (revolutions
per minute). Use it while driving to se-
lect correct shift points and to prevent
engine lugging and overrevving.
Driving with the engine running too fast
causes excessive engine wear and poor
fuel economy. Remember, in most cases
the slower the engine speed, the greater
the fuel economy.
NOTICE
Do not let the indicator needle get
into the red zone. This may cause
severe engine damage.
Tachometer Engine coolant temperature
gauge
ProCarManuals.com
 or
Rº (right) depending on which mirror
needs adjusting, then push the con-
trol switch in desired direction.
If th")