Page 16 of 226
11
�Never leave small children alone in
the vehicle, especially with the igni-
tion key still inserted. They could
use the power window switches
and get trapped in a window. Unat-
tended children can become in-
volved in serious accidents.
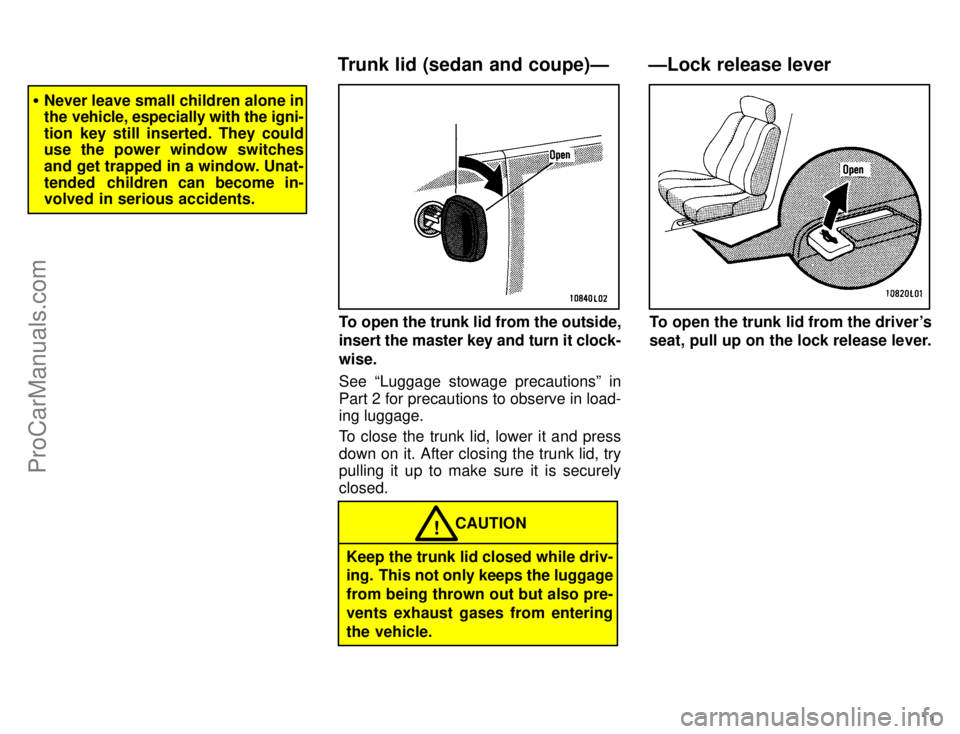
To open the trunk lid from the outside,
insert the master key and turn it clock-
wise.
See Luggage stowage precautionsº in
Part 2 for precautions to observe in load-
ing luggage.
To close the trunk lid, lower it and press
down on it. After closing the trunk lid, try
pulling it up to make sure it is securely
closed.
CAUTION!
Keep the trunk lid closed while driv-
ing. This not only keeps the luggage
from being thrown out but also pre-
vents exhaust gases from entering
the vehicle.
To open the trunk lid from the driver's
seat, pull up on the lock release lever.
ÐLock release lever Trunk lid (sedan and coupe)Ð
ProCarManuals.com
Page 17 of 226
12
This system deactivates the lock re-
lease lever so that things locked in the
trunk can be protected.
1. Push down the security lock levers
to lock the rear seatbacks.
After locking the rear seatbacks, try folding
them down to make sure they are securely
lockedÐotherwise, someone could get
into the trunk by folding down a rear seat.2. After closing the trunk lid, insert the
master key and turn it counterclock-
wise to deactivate the lock release lev-
er.
After closing the trunk lid, try pulling it up
to make sure it is securely locked.
ÐLuggage security system Back door (wagon)Ð
ProCarManuals.com
Page 29 of 226

24
Before entry, push the seat belt hanger
down as far as it will go if it is in the
raised position.
After passengers are in, lift up the seat-
back and return the seat until it locks.
CAUTION!
�After putting back the seat, try
pushing the seat forward and rear-
ward to make sure that it is se-
cured in place.
�Never allow anyone to rest their
foot on the release pedal while the
vehicle is moving.
Unlock the seatback, and fold it down.
This will enlarge the trunk room as far as
the front seatbacks. See Luggage stow-
age precautionsº in Part 2 for precautions
to observe in loading luggage.
If desired, each seatback may be folded
separately.
CAUTION!
When returning the seatback to the
upright position:
�Make sure the seat belts are not
twisted or caught in the seatback
and are arranged in their proper
position for ready use.
�Make sure the seatback is secure-
ly locked by pushing forward and
rearward on the top of the seat-
back.
Rear seatsÐ
ÐFold-down rear seat
(sedan and coupe)
ProCarManuals.com
Page 179 of 226

173 Tire surface and wheel nuts
Check the tires carefully for cuts, damage
or excessive wear. See Chapter 7-2 for
additional information. When checking
the tires, make sure no nuts are missing,
and check the nuts for looseness. Tighten
them if necessary.
Tire rotation
Rotate the tires every 12000 km (7500
miles). See Chapter 7-2 for additional in-
formation.
Fluid leaks
Check underneath for leaking fuel, oil, wa-
ter or other fluid after the vehicle has been
parked for a while. If you smell fuel fumes
or notice any leak, have the cause found
and corrected immediately.
Doors and engine hood
Check that all doors including trunk lid op-
erate smoothly and all latches lock se-
curely. Make sure the engine hood secon-
dary latch secures the hood from opening
when the primary latch is released.
INSIDE THE VEHICLE
Items listed below should be checked
regularly, e.g. while performing peri-
odic services, cleaning the vehicle,
etc.Lights
Make sure the headlights, stop lights, tail
lights, turn signal lights, and other lights
are all working. Check headlight aim.
Service reminder indicators and warn-
ing buzzers
Check that all service reminder indicators
and warning buzzers function properly.
Steering wheel
Be alert for changes in steering condition,
such as hard steering or strange noise.
Seats
Check that all front seat controls such as
seat adjusters, seatback recliner, etc. op-
erate smoothly and that all latches lock
securely in any position. Check that the
head restraints move up and down
smoothly and that the locks hold securely
in any latched position. For folding-down
or swing-up rear seatbacks or rear seat
cushion, check that the latches lock se-
curely.
Seat belts
Check that the seat belt system such as
buckles, retractors and anchors operate
properly and smoothly. Make sure that the
belt webbing is not cut, frayed, worn or
damaged.Accelerator pedal
Check the pedal for smooth operation and
uneven pedal effort or catching.
Clutch pedal
Check the pedal for smooth operation.
Brake pedal
Check the pedal for smooth operation and
that the pedal has the proper clearance.
Check the brake booster function.
Brakes
At a safe place, check that the brakes do
not pull to one side when applied.
Parking brake
Check that the lever (lever type) or pedal
(pedal type) has the proper travel and
that, on a safe incline, your vehicle is held
securely with only the parking brake ap-
plied.
Automatic transmission Parkº mech-
anism
Check the lock release button of the se-
lector lever for proper and smooth opera-
tion. On a safe incline, check that your ve-
hicle is held securely with the selector
lever in Pº position and all brakes re-
leased.ProCarManuals.com
Page 207 of 226
201
Light BulbsBulb No.WType
Stop and tail lights115727/
8C
Back-up lights115627C
License plate lights1685D
High mounted stop
light92118D
Interior lightÐ10E
Personal lightÐ10C
Vanity lightsÐ3E
Glovebox lightÐ1.2D
Door courtesy lights3.8D
Trunk lightÐ3.8E
Luggage compartment
lightÐ5E
A: HB4 halogen bulbs
B: HB3 halogen bulbs
C: Single end bulbs
D: Wedge base bulbs
E: Double end bulbs
1. Open the hood. Unplug the connec-
tor while depressing the lock release.
If the connector is tight, wiggle it.2. Turn the bulb and remove it. Install
the new bulb and install the connector.
To install a bulb, align the tabs of the bulb
socket with the cutouts of the mounting
hole.
Aiming is not necessary after replacing
the bulb. When aiming adjustment is nec-
essary, contact your Toyota dealer.
ÐHeadlights
ProCarManuals.com