Page 10 of 226
Indicator symbols on the instrument panel
5
Brake system warning light*1
Seat belt reminder light*1
Discharge warning light*1
Malfunction indicator lamp*1
Low fuel level warning light*1
Low oil pressure warning light*1
Anit-lock brake system warning light*1
Open door warning light*1
Rear light failure warning light*1
SRS airbag warning light*1
Turn signal indicator lights
Headlight high beam indicator light
Overdrive-of f indicator light
PWRº mode indicator light
Cruise control indicator light*
2
Automatic transmission indicator lights
*
1: For details, see Service reminder indicators and warn-
ing buzzersº in Chapter 1-5.
*
2: If this light flashes, see Cruise controlº in Chapter 1-6.
ProCarManuals.com
Page 13 of 226

8
LOCKING WITH KEY
Turn the key towards the front of the
vehicle to lock and towards the back to
unlock.
Vehicles with power door lock sys-
temÐAll the side doors and back door
lock and unlock simultaneously with either
front door. In the driver's door lock, turning
the key once will unlock the driver's door
and twice in succession will unlock all the
side doors and back door simultaneously.
On some models, the door keyhole light
will come on to help you locate the key-
hole if you pull up and release the door
handle when inserting the key into the
driver's door keyhole in the dark.LOCKING WITH INSIDE LOCK KNOB
Turn the lock knob forward to lock and
backward to unlock the door.
Closing the door with the lock knob in the
lock position will also lock the door. Be
careful not to lock your keys in the vehicle.
Vehicles with power door lock systemÐ
The door cannot be locked if you leave the
key in the ignition switch.LOCKING WITH POWER DOOR LOCK
SWITCH
To lock all the side doors and back
door simultaneously, push the power
door lock switch on the LOCK side.
Pushing on the UNLOCK side will un-
lock them.
Side doors
ProCarManuals.com
Page 14 of 226

9
CAUTION!
Before driving, be sure that the
doors are closed and locked, espe-
cially when small children are in the
vehicle. Along with the proper use of
seat belts, locking the doors helps
prevent the driver and passengers
from being thrown out from the ve-
hicle during an accident. It also
helps prevent the doors from being
opened unintentionally.
LOCKING WITH REAR DOOR CHILD-
PROTECTORS
Turn the lock knob to the LOCKº
position as shown on the label.
This feature allows you to lock a rear door
so it can be opened from the outside only,
not from inside. We recommend using this
feature whenever small children are in the
vehicle.The windows can be operated with the
switch on each side door.
The power windows work when the igni-
tion switch is in the ONº position. Howev-
er, if both front doors are closed, they work
for 60 seconds even after the ignition
switch is turned off. They stop working
when either front door is opened.
OPERATING THE DRIVER'S WINDOW
Use the switch on the driver's door.
Normal operation: The window moves
as long as you hold the switch.
To open: Lightly push down the switch.
To close: Pull up the switch.
Power windows
ProCarManuals.com
Page 15 of 226
:
Push the switch completely down and
then release it. The window will fully open.
To stop the window partway, lightly pull the
switch up and then release it.
OPER")
10
Automatic operation (to open only):
Push the switch completely down and
then release it. The window will fully open.
To stop the window partway, lightly pull the
switch up and then release it.
OPERATING THE PASSENGERS' WIN-
DOWS
Use the switch on each passenger's
door or the switches on the driver's
door that control each passenger's
window.
The windows move as long as you hold
the switch.
To open: Push down the switch.
To close: Pull up the switch.
If you push in the window lock button on
the driver's door, the passengers' win-
dows cannot be operated.
!CAUTION
To avoid serious personal injury,
you must do the following.
�Always make sure the head, hands
and other parts of the body of all oc-
cupants are kept completely inside
the vehicle before you close the
power windows. If someone's neck,
head or hands gets caught in a clos-
ing window, it could result in a seri-
ous injury. When anyone closes the
power windows, be sure that they
operate the windows safely.
�When small children are in the ve-
hicle, never let them use the power
window switches without supervi-
sion. Use the window lock button to
prevent them from making unex-
pected use of the switches.
ProCarManuals.com
Page 19 of 226

14
Move the lock lever to the LOCKº
position as shown on the label.
This feature allows you to lock a back door
so it can be opened from the outside only,
not from inside. We recommend using this
feature whenever small children are in the
vehicle.
CAUTION!
�Before driving, be sure that the
doors are closed and locked.
Along with the proper use of seat
belts, locking the back door helps
prevent the passengers from be-
ing thrown out from the vehicle
during an accident. It also helps
prevent the back door from being
opened unintentionally.
�Keep the back door closed while
driving. This not only keeps the
luggage from being thrown out
but also prevents exhaust gases
from entering the vehicle.
To open the hood, pull the hood lock
release lever under the dash. The hood
will spring up slightly. In front of the
vehicle, press up on the auxiliary
catch lever and lift the hood.
Before closing the hood, check to see that
you have not forgotten any tools, rags,
etc. Then lower the hood and make sure
it locks into place. If necessary, press
down gently on the front edge to lock it.
ÐBack door child protector
(with third seat) Hood
ProCarManuals.com
Page 20 of 226
15
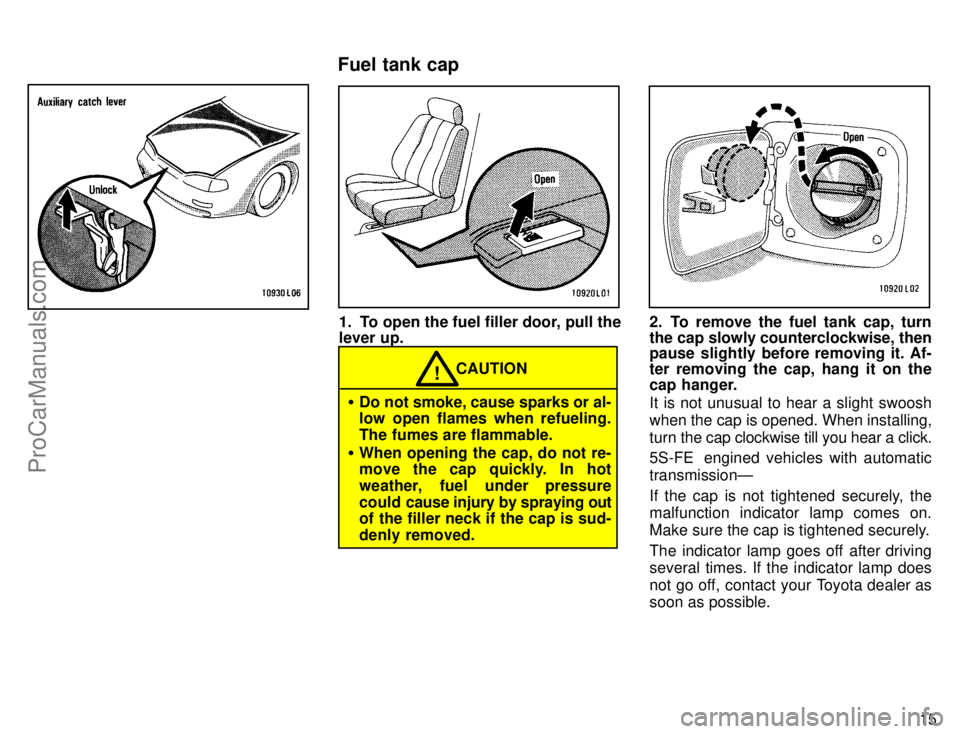
1. To open the fuel filler door, pull the
lever up.
CAUTION!
�Do not smoke, cause sparks or al-
low open flames when refueling.
The fumes are flammable.
�When opening the cap, do not re-
move the cap quickly. In hot
weather, fuel under pressure
could cause injury by spraying out
of the filler neck if the cap is sud-
denly removed.
2. To remove the fuel tank cap, turn
the cap slowly counterclockwise, then
pause slightly before removing it. Af-
ter removing the cap, hang it on the
cap hanger.
It is not unusual to hear a slight swoosh
when the cap is opened. When installing,
turn the cap clockwise till you hear a click.
5S-FE engined vehicles with automatic
transmissionÐ
If the cap is not tightened securely, the
malfunction indicator lamp comes on.
Make sure the cap is tightened securely.
The indicator lamp goes off after driving
several times. If the indicator lamp does
not go off, contact your Toyota dealer as
soon as possible.
Fuel tank cap
ProCarManuals.com
Page 25 of 226

20
ADJUSTING SEAT POSITION
Pull the lock release lever up. Then
slide the seat to the desired position
with slight body pressure and release
the lever.
ADJUSTING SEATBACK ANGLE
Lean forward and pull the lock release
lever. Then lean back to the desired
angle and release the lever.
CAUTION!
To reduce the risk of sliding under
the lap belt during a collision, avoid
reclining the seatback any more
than needed. The seat belts provide
maximum protection when the driv-
er and the passenger are sitting up
straight and well back in the seats.
If you are reclined, the lap belt may
slide past your hips and apply re-
straint forces directly to the abdo-
men. Therefore, in the event of a
frontal collision, the risk of personal
injury may increase with increasing
recline of the seatback.ADJUSTING DRIVER'S SEAT CUSH-
ION ANGLE
Turn the knob either way.
ADJUSTING DRIVER'S SEAT LUM-
BAR SUPPORT
Pull the lever forward and release.
Repeat this until you have a comfortable
support.
ÐAdjusting front seats
(manual seat)
ProCarManuals.com
Page 28 of 226

23
ADJUSTING SEAT POSITION
Move the control switch in the desired
direction.
Releasing the switch will stop the seat at
that position.
Do not place anything under the seat. It
might interfere with the seat movement.
ADJUSTING SEATBACK ANGLE
Move the control switch in the desired
direction.
Releasing the switch will stop the seat-
back at that position.
CAUTION!
To reduce the risk of sliding under
the lap belt during a collision, avoid
reclining the seatback any more
than needed. The seat belts provide
maximum protection when the driv-
er and the passenger are sitting up
straight and well back in the seats.
If you are reclined, the lap belt may
slide past your hips and apply re-
straint forces directly to the abdo-
men. Therefore, in the event of a
frontal collision, the risk of personal
injury may increase with increasing
recline of the seatback.
For easy access to the rear seat, do
this.
1. Lift the seatback lock release lever or
press the release pedal.
The seat will slide forward slightly.
2. Move the seat to the front-most posi-
tion.
ÐAdjusting front seats
(power seatÐtype C)ÐMoving passenger's seat
for rear seat entry (coupe)
ProCarManuals.com