1996 PONTIAC BONNEVILLE air conditioning
[x] Cancel search: air conditioningPage 138 of 387
Section 3 Comfort Controls and Audio Systems
In this section you'll find out how to operate the comfort Standard Climate Control System
control and audio systems offered with your Pontiac. Be
sure to read about the particular systems supplied with
your vehicle.
Comfort Controls
This section tells you how to make yo'ur air system
work
for you. Your comfort control system uses
ozone-friendly R- 134a refrigerant.
With these systems, you can control the heating,
cooling and ventilation in your Pontiac.
Your vehicle
also has a flow-through ventilation system described
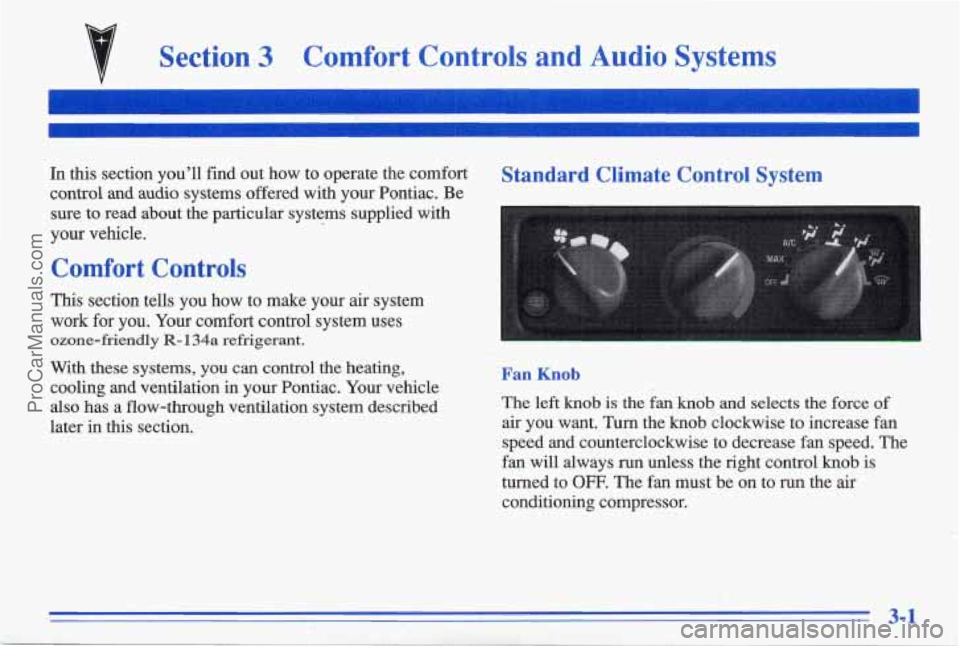
later in this section. Fan Knob
The left knob is the fan knob and selects the force of
air you want. Turn the knob clockwise to increase fan
speed and counterclockwise to decrease fan speed. The
fan
will always run unless the right control knob is
turned to
OFF. The fan must be on to run the air
conditioning compressor.
3-1
ProCarManuals.com
Page 139 of 387
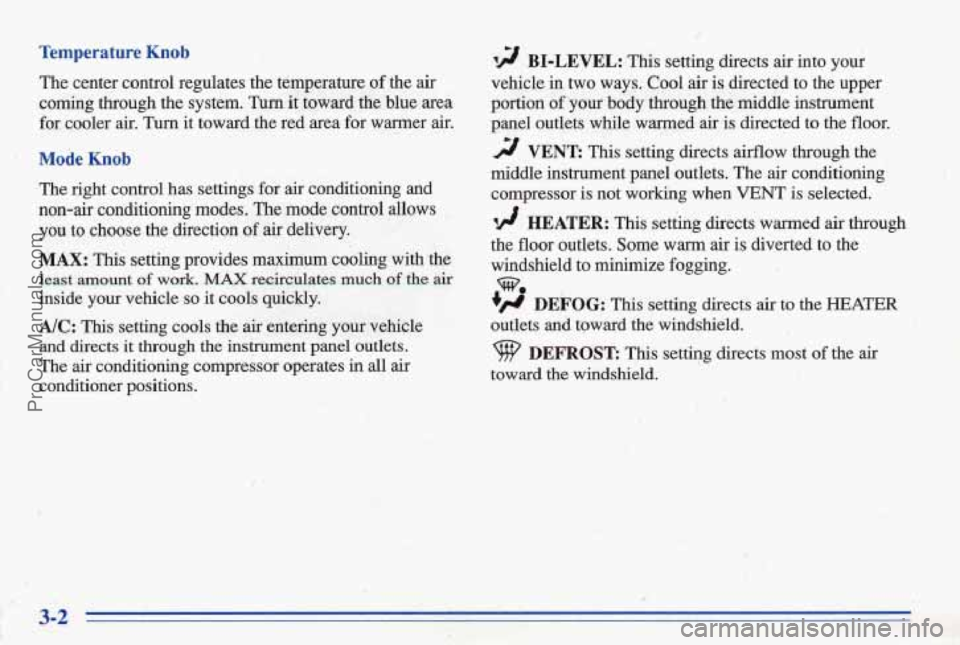
Temperature Knob 12 BI-LEVEL: This setting directs air into your
The center control regulates the temperature
of the air vehicle in two ways. Cool air is directed to the upper
coming through the system. Turn it toward the blue area
portion of your body through the middle instrument
for cooler
air. Turn it toward the red area for wmer air. panel outlets while warmed. air is directed to the floor. CI
Mode Knob
The right control has settings for air conditioning and
non-air conditioning modes. The mode control allows
you to choose the direction of air delivery.
MAX: This setting provides maximum cooling with the
least amount of work. MAX recircdates much of the air
inside your vehicle so it cools quickly.
Mc: his setting cools the air entering your vehicle
and directs it through the instrument panel outlets.
The
air conditioning compressor operates in all air
conditioner positions.
d VENT: This setting directs airflow through the
middle instrument panel outlets. The air conditioning' compressor is not
working when VENT is selected.
I! HEATER: This se&ng directs warmed air through
the floor outlets. Some warm
air is' diverted to the
windshield to minimize fogging.
w.
+H DEFOG: his setting directs &to ~e HEATER
outlets and toward the windshield.
9 DEFROST: This setting directs most of the air
toward the windshield.' . .. . .. . ,' i
3-2
ProCarManuals.com
Page 142 of 387
A/C: Press this button to turn the air conditioning
on and
off. The system will cool and dehumidify the
air inside the vehicle.
In the AUTO mode, the display
will show that
A/C is active, but the air conditioning
compressor
only operates when the system determines
it
is needed.
RECIRC,: Press this button to limit the amount of fresh
air entering your vehicle. You may use this setting to
limit odors entering your vehicle. Press
REClRC to
change to a manual
MODE and air will recirculate for
10 minutes. RECIRC will show on the display and then
return to
EXT TEMP display.
DEFROST: Press this button to clear the windshield.
The system will automatically control the fan speed
if
you select defrost from AUTO.
OF O C: ‘Press this button to display the temperature in
degrees Fahrenheit or Celsius.
Air Conditioning
On hot days, open the windows long enough to let hot
inside
air escape. This reduces the time it takes for your
vehicle to cool down. Then keep your windows closed
for the air conditioner to work its best.
If you have the standard system, for quick cool-down on
very hot days,
use MAX with the temperature knob in
the blue area. If this setting is used for long periods of
time, the air in your vehicle may become too cold and
dry. For normal cooling on hot days, use A/C with the
temperature
knob in. the blue area. This setting cools the
air entering your vehicle and directs it through the
instrument panel outlets.
If you have the electronic system, press the A/C button
to
turn the system on. The system will cool and
dehumidify the air inside the vehicle.
Also while in
AUTO mode, the system will use FtECIRC as necessary
to cool the air.
&1 cool but sunny days, with the standard system through
manual operation of the electron& system, use BI-LEVEL
to deliver warm air to the floor and cooler air to the
middle instrument panel outlets. To warrn or cool the
air
delivered, push the TE- button up or down.
When the air conditioner is on, you may sometimes notice
slight changes
in your vehicle’s engine speed and power.
This is normal because the system is designed to cycle the
cornpressor on
and off to keep the desired temperature.
ProCarManuals.com
Page 310 of 387
Capacities and Specifications
Automatic Transaxle AT (Overdrive)
Pan Removal and Replacement .... '. ......................................
After Complete Overhaul ................................................
When draining or replacing torque converter, more fluid may be needed.
CoolingSystem .......................................................
Enginecrankcase .....................................................
Oil change with filter change
FuelTank .........................................
Windshield Wiper Blades
Type ..............................................
..
..
...
...
6.5 quarts (6.1 L)
11 quarts (10.4 L)
13 quarts (12.3 L)
4.5 quarts (4.3 L)
..
..
............ 18 gallons (68 L)
....................... Pin
Length
............................................................ 22 inches (565 mm)
Tire Pressures
See Tire-Loading Information label on driver's door
WheelNutTorque ......................................... ;........ lOOlb-ft(140N~m)
Refrigerant (R=l34a), Air Conditioning .................... See refrigerant charge label under the hood.
ProCarManuals.com
Page 311 of 387

~ Air Conditioning Refrigerants'
I, 1 .c , ;Not all air conditioning refrigerants are the same.
If the air conditioning system in your vehicle needs
refrigerant, be sure the proper refrigerant is used.
If you're not sure, ask your Pontiac dealer.
Engine Specifications
VIN Engine Code ........................... K
Displacement ......................... 3.8 Liters
Horsepower
.......................... ,205-hp
3800 Series 11 Engine (L36)
Qpe ..................................... V6
Firing Order ........... I ........... 1-6-5-4-3-2
Thermostat Temperature
........... 195°F (91°C)
3800 Supercharged Engine (L67)
VIN Engine Code .......... '. ................ 1
Type .................................... V6
Displacement ........................ 3.8 Liters
Horsepower
.......................... .240-hp
Firing Order ...................... 1-6-5-4-3-2
Thermostat Temperature
.... ; ...... 195°F (91°C)
Normal Maintenance
Replacement Parts'
Air Cleaner Filter ............. AC Type A- 1096C
Engine
Oil Filter ................ AC Type PF-47
Transaxle Filter
............ GM Part No. 8651909
Sparkplugs
......... ; .......... AC Type 41-921
Gap:
0.060 inch (1.52 mm)
Vehicle Dimensions
Wheelbase ............ 110.8 inches (2 814.3 mm)
Tread Width
Front
................ 60.4 inches (1 534.2 mm)
Length .............. 201.9 inches (5 124.0 mm)
Width ................. 74.6 inches (1 893.2 mm)
Height ................. 55.7 inches (1 414.8 mm)
Rear ........... i ...... 60.3 inches (1 531.6 mm)
ProCarManuals.com
Page 312 of 387
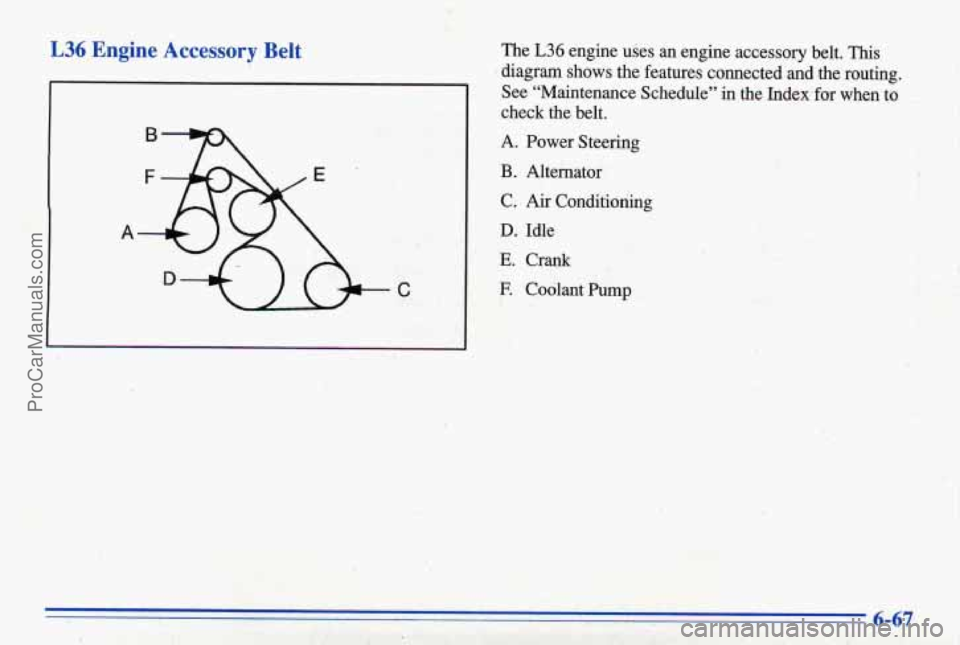
L36 Engine Accessory Belt
C
The L36 engine uses an engine accessory belt. This
diagram shows the features connected and the routing.
See “Maintenance Schedule”
in the Index for when to
check the belt.
A.
B.
C.
D.
E.
E
Power Steering
Alternator
Air Conditioning
Idle
Crank
Coolant
Pump
6-67
ProCarManuals.com
Page 313 of 387
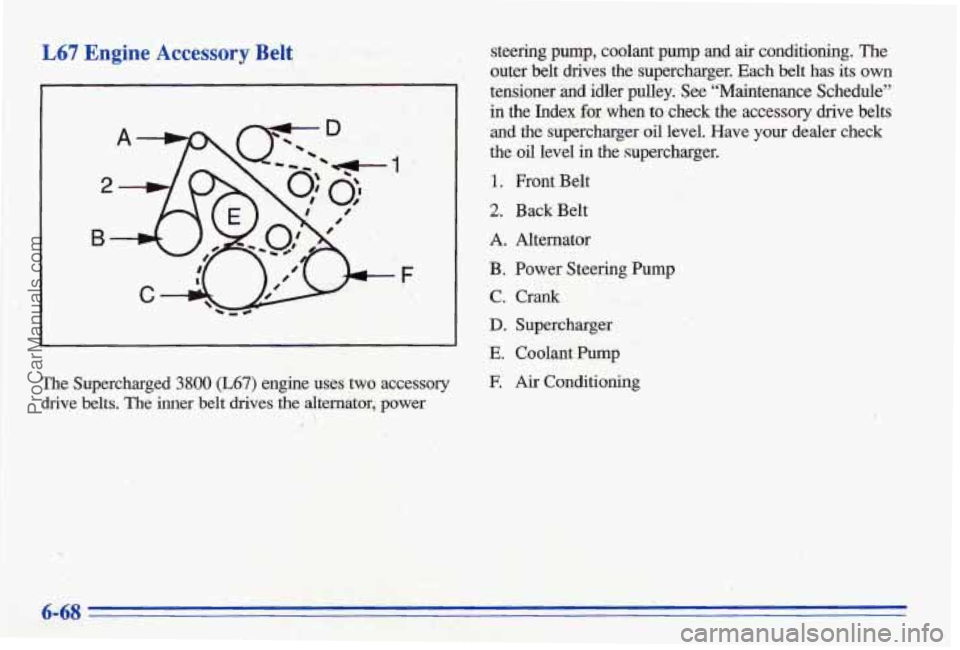
L67 Engine Accessory Belt
The Supercharged 3800 (L67) engine uses two accessory
drive
belts. The inner belt drives the alternator, power steering
pump, coolant pump and air conditioning. The
outer belt drives the supercharger, Each belt has its
own
tensioner and idler pulley. See “Maintenance Schedule”
in the Index for when to check the accessory drive belts
and the supercharger oil level. Have your dealer check
the oil level in the supercharger.
1. Front Belt
2. Back Belt
A. Alternator
B. Power Steering Pump
C. Crank
D. Supercharger
E. Coolant Pump
E Air Conditioning
ProCarManuals.com
Page 374 of 387
v Section 9 Index
Acceisory mator ........................ 2.54. 5.25
Accessory Power Outlet .... ..................... 2-52
Adjustable Support Seat ........................... 1-3
AirBag .:..................................... l-16
.How Does it Restrain ............................ 1-20
How it Works ................................ 1-18
Location ...................................... 1-18
Readiness Light ......................... 1-17, 2-63
Servicing ................................... 1 -2 1
What Makes it Inflate .......................... 1-19
What Will
You See After it Inflates ............... 1-20
When Should it Inflate ......................... 1-19
Aircleaner .................................... 6-17
Air Conditioning ................................ 3-5
Air Conditioning Refrigerants ..................... 6-66
Air Inflator ............................... 2-54, 5.25
Alarm, Universal Theft-Deterrent .................. 2- 14
Alignment and Balance, Tire ...................... 6-47
Aluminum Wheels, Cleaning ...................... 6-54
Antenna, Fixed ................................. 3-28
Antenna. Power ................................ 3-28
Antifreeze ..................................... 6-23
Anti-Lock I
Brake System Waming Light ................ 2-66, 4-6
Brakes ...................................... 4-6
~~ I
Anti-Lockout Feature ............................. 2-6
Appearance Care ............................... 6-49
Appearance Care Materials ....................... 6-56
Arbitration Program .............................. 8-9
Armrest. Storage ............................... 2-49
Audio Controls. Steering Wheel Touch Control
....... 3-25
Audio Equipment. Adding ........................ 3-26
Audio Systems .................................. 3-9
Automatic Overdrive
.................................... 2-23
Starting Your Engine .......................... 2-18
Transaxle ................................... 2-21
Transaxle Check .............................. 7-37
Transaxle Fluid ............................... 6-20
Transaxle Operation ............................ 2-21
Transaxle Park Mechanism Check ................ 7-39
Automatic Door Locks ............................ 2-4
Ashtrays ...................................... 2-53 .
Shifting ...................................... 2-21
Back-up amp Monitor ......... .... 2-80
Back-up Lamp Bulb Replacement ................. 6-37
ProCarManuals.com