1996 NISSAN SENTRA lock
[x] Cancel search: lockPage 104 of 191

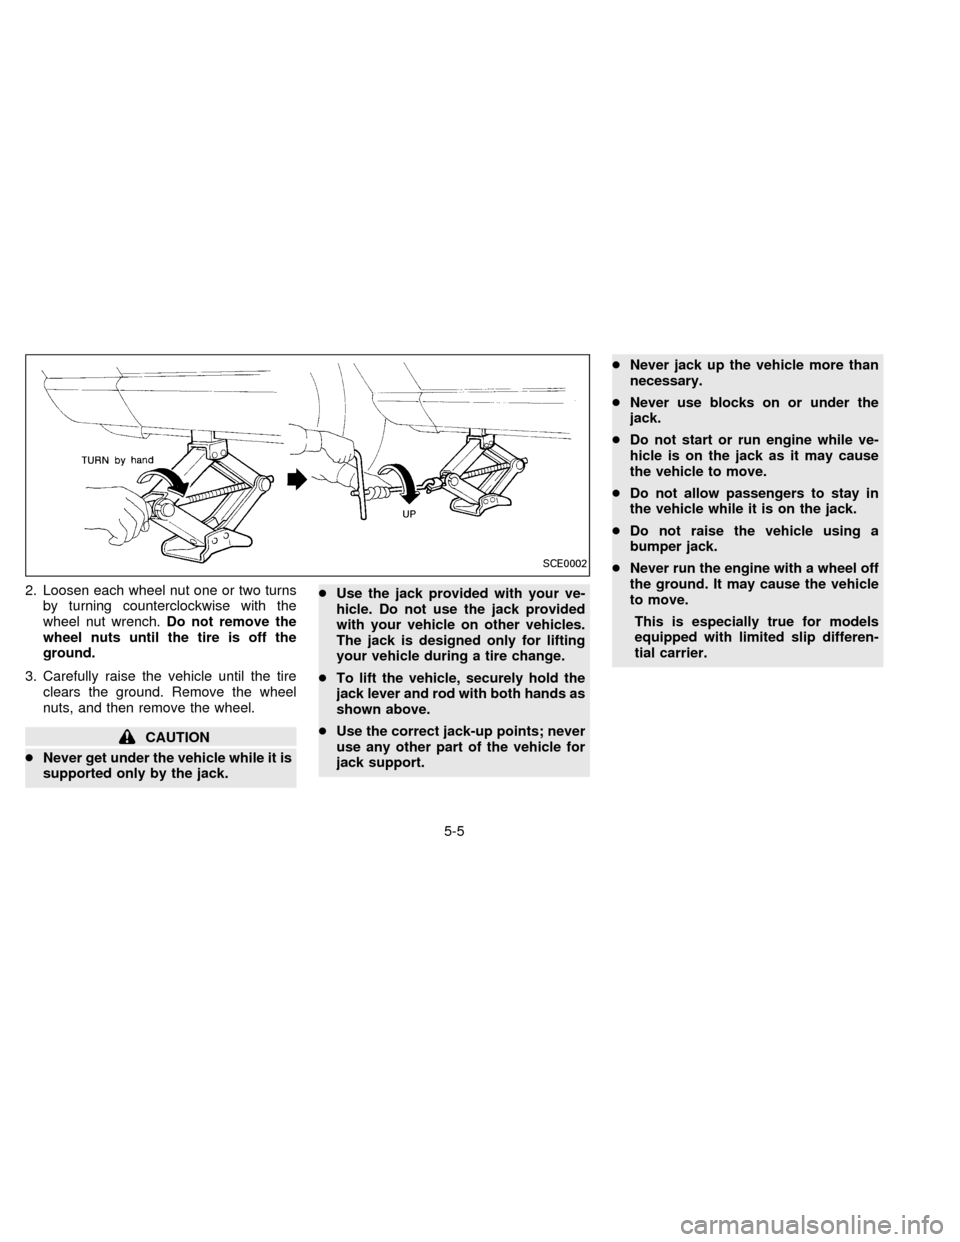
2. Loosen each wheel nut one or two turns
by turning counterclockwise with the
wheel nut wrench.Do not remove the
wheel nuts until the tire is off the
ground.
3. Carefully raise the vehicle until the tire
clears the ground. Remove the wheel
nuts, and then remove the wheel.
CAUTION
cNever get under the vehicle while it is
supported only by the jack.cUse the jack provided with your ve-
hicle. Do not use the jack provided
with your vehicle on other vehicles.
The jack is designed only for lifting
your vehicle during a tire change.
cTo lift the vehicle, securely hold the
jack lever and rod with both hands as
shown above.
cUse the correct jack-up points; never
use any other part of the vehicle for
jack support.cNever jack up the vehicle more than
necessary.
cNever use blocks on or under the
jack.
cDo not start or run engine while ve-
hicle is on the jack as it may cause
the vehicle to move.
cDo not allow passengers to stay in
the vehicle while it is on the jack.
cDo not raise the vehicle using a
bumper jack.
cNever run the engine with a wheel off
the ground. It may cause the vehicle
to move.
This is especially true for models
equipped with limited slip differen-
tial carrier.
SCE0002
5-5
ZX
Page 109 of 191

When towing your vehicle, all State (Provin-
cial in Canada) and local regulations for
towing must be followed. Incorrect towing
equipment could damage your vehicle.
Towing instructions are available from your
NISSAN dealer. Local service operators are
generally familiar with the applicable laws
and procedures for towing. To assure
proper towing and to prevent accidental
damage to your vehicle, NISSAN recom-
mends having a service operator tow your
vehicle. It is advisable to have the service
operator carefully read the following precau-
tions.
CAUTION
cWhen towing, make sure that the
transmission, axles, steering system
and powertrain are in working condi-
tion. If any unit is damaged, a dolly
must be used.
cWhen towing with the front wheels on
the ground:
Turn the ignition key to the ``OFF''
position and secure the steering
wheel in a straight ahead position
with a rope or similar device. Never
place the ignition key in the ``LOCK''position. This will result in damage
to the steering lock mechanism.
Move the gearshift lever to the Neu-
tral (``N'') position.
On automatic transmission models,
to move the shift lever to the Neutral
(``N'') position turn the ignition key
to the ``ACC'' position.
After moving the shift lever to the
Neutral (``N'') position, be sure to
turn the ignition key to the ``OFF''
position.
cWhen towing with the rear wheels on
the ground, release the parking
brake.
On automatic transmission models,
to move the shift lever to the Neutral
(``N'') position, turn the ignition key
to the ``ACC'' position. After moving
the shift lever to the Neutral position,
be sure to turn the ignition key to the
``OFF'' position.
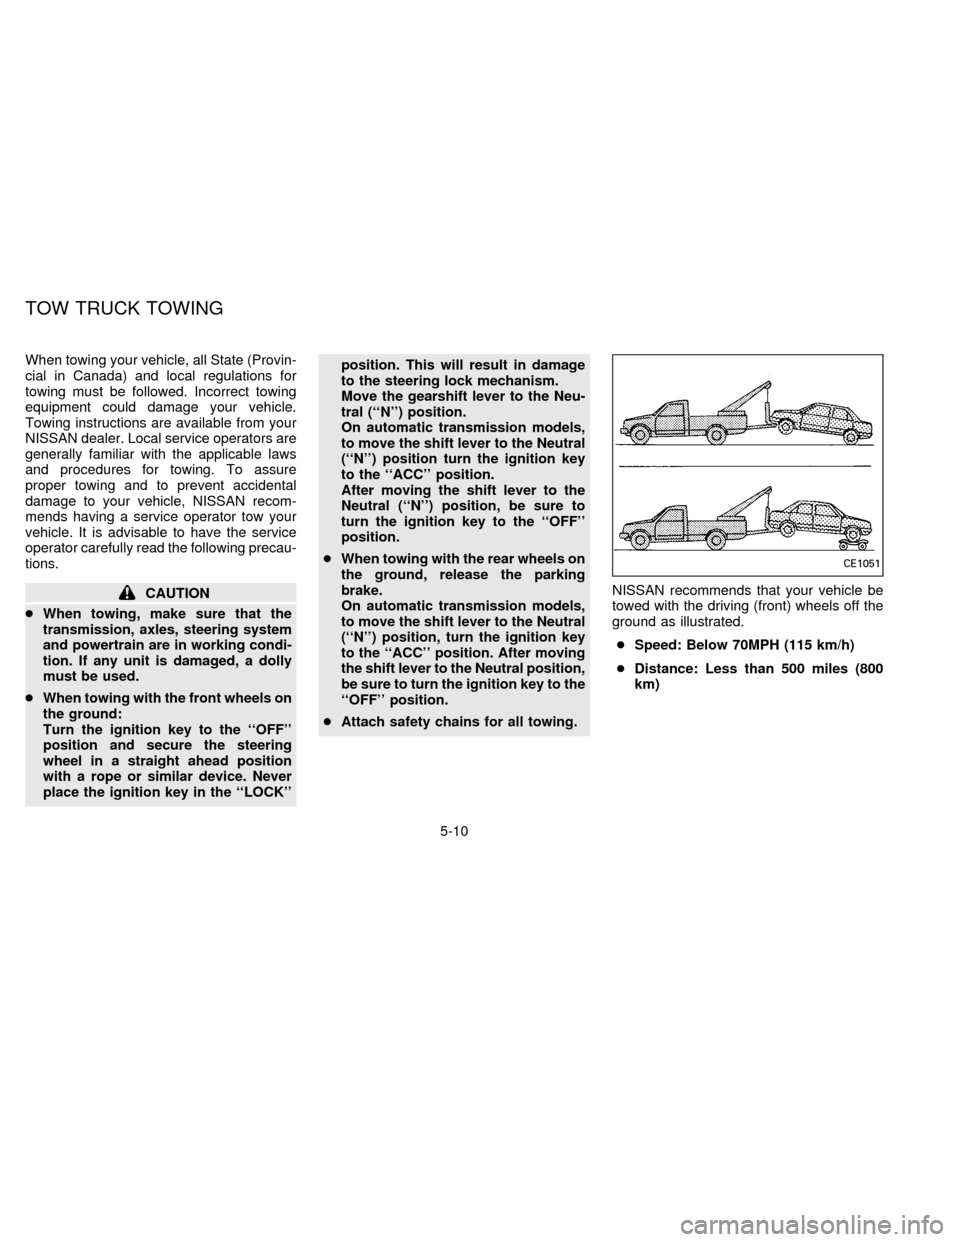
cAttach safety chains for all towing.NISSAN recommends that your vehicle be
towed with the driving (front) wheels off the
ground as illustrated.
cSpeed: Below 70MPH (115 km/h)
cDistance: Less than 500 miles (800
km)
CE1051
TOW TRUCK TOWING
5-10
ZX
Page 119 of 191

When performing any inspection or mainte-
nance work on your vehicle, always take
care to prevent serious accidental injury to
yourself or damage to the vehicle. The
following are general precautions which
should be closely observed.
cPark the vehicle on a level surface,
apply the parking brake securely and
block the wheels to prevent the ve-
hicle from moving. Move the gearshift
control lever to Neutral (N).
cBe sure the ignition key is OFF when
performing any parts replacement or
repairs.
cDo not work under the hood while the
engine is hot. Turn the engine off and
wait until it cools down.
cBe sure to turn the ignition key to the
OFF or LOCK position.
When the ignition key is in the ON or
ACC position, the cooling fan may
start to operate suddenly even when
the engine is not running.
cIf you must work with the engine run-
ning, keep your hands, clothing, hair
and tools away from moving fans,
belts and any other moving parts.cIt is advisable to remove ties and any
jewelry, such as rings, watches, etc.,
before working on your vehicle.
cIf you must run the engine in an en-
closed space such as a garage, be
sure there is proper ventilation for
exhaust gases.
cNever get under the vehicle while it is
supported only by a jack. If it is nec-
essary to work under the vehicle, sup-
port it with safety stands.
cKeep smoking materials, flame and
sparks away from fuel and battery.
cNever connect or disconnect either
the battery or any transistorized com-
ponent connector while the ignition is
on.
cOn gasoline engine models with the
Multiport Fuel Injection (MFI) system,
the fuel filter or fuel lines should be
serviced by a NISSAN dealer because
the fuel lines are under high pressure
even when the engine is off.
cFailure to follow these or other com-
mon sense guidelines may lead to
serious injury or vehicle damage.cImproperly disposed motor oil and/or
other vehicle fluids can hurt the envi-
ronment. Always conform to local
regulations for disposal of vehicle
fluid. Avoid contact with used motor
oil.
This ``Do-it-yourself operations'' section
gives instructions regarding only those
items which are relatively easy for an owner
to perform.
You should be aware that incomplete or
improper servicing may result in operating
difficulties or excessive emissions, and
could affect your warranty coverage.If in
doubt about any servicing, have it done
by your NISSAN dealer.
MAINTENANCE
PRECAUTIONS
7-2
ZX
Page 124 of 191

1. Move the heater or air conditioner tem-
perature control dial to the maximum hot
position.
2. Open the radiator drain plug. Open the
drain plug on the engine block.3. Open the radiator cap to drain the cool-
ant.
4. Flush the cooling system by running
fresh water through the radiator.
5. Close the drain plugs on the radiator and
the engine block securely.
6. See the ``Technical and consumer infor-
mation'' section for cooling system ca-
pacity. Fill the radiator slowly with the
proper mixture of coolant and water. Fill
the reservoir tank up to the MAX level.
7. Open and close the air release plug(s) to
release air. Then fill the radiator again
and install the radiator cap.
8. Start the engine, and warm it up until it
reaches normal operating temperature.
Then race the engine 2 or 3 times under
no load. Watch the coolant temperature
gauge for signs of overheating.
ADI0632
ADI0615
7-7
ZX
Page 125 of 191

9. Stop the engine. After it completely
cools down, refill the radiator up to the
filler opening. Fill the reservoir tank up
to the MAX level.
10. Open and close the air release plug(s)
to release air. Then fill the radiator again
and install the radiator cap.
11. Check the drain plugs on the radiator
and the engine block for any sign of
leakage. Also check the air release plug
for any sign of leakage.CHECKING ENGINE OIL LEVEL
1. Park the vehicle on a level surface and
apply the parking brake.
2. Run the engine until it reaches operating
temperature.3. Turn off the engine.Wait a few minutes
for the oil to drain back into the oil
pan.
4. Remove the dipstick and wipe it clean.
Reinsert it all the way.
5. Remove the dipstick again and check the
oil level. It should be between the H and
L marks. If the oil level is below the L
mark, remove the oil filler cap and pour
recommended oil through the opening.
Do not overfill.
DI1249MDI1217MDI1251M
ENGINE OIL
7-8
ZX
Page 143 of 191

cAiming is not necessary after replac-
ing the bulb. When aiming adjust-
ment is necessary, contact your NIS-
SAN dealer.
cDo not leave the bulb out of the head-
light reflector for a long period of
time as dust, moisture, and smoke
may enter the headlight body and
affect the performance of the head-
light.
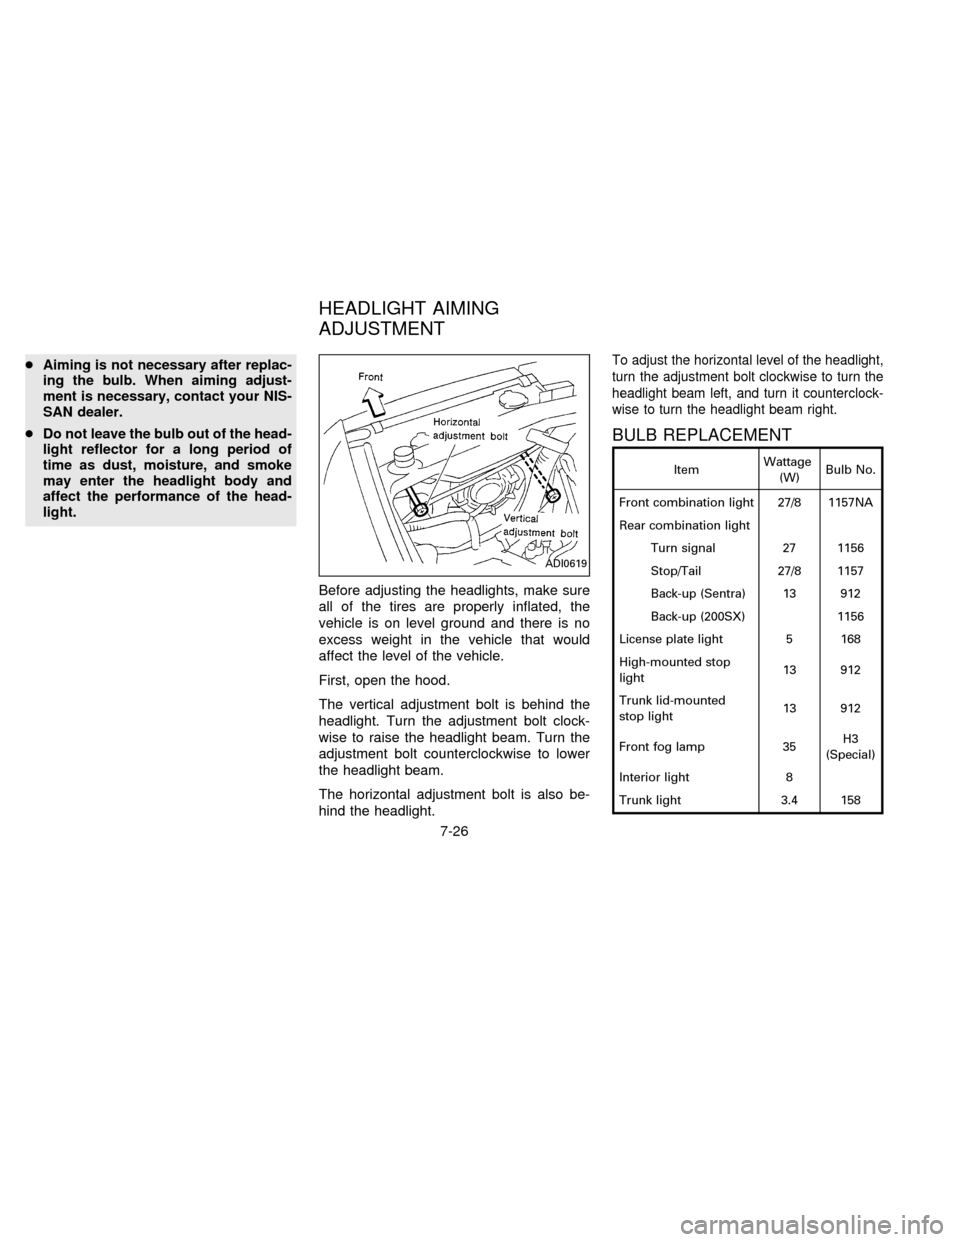
Before adjusting the headlights, make sure
all of the tires are properly inflated, the
vehicle is on level ground and there is no
excess weight in the vehicle that would
affect the level of the vehicle.
First, open the hood.
The vertical adjustment bolt is behind the
headlight. Turn the adjustment bolt clock-
wise to raise the headlight beam. Turn the
adjustment bolt counterclockwise to lower
the headlight beam.
The horizontal adjustment bolt is also be-
hind the headlight.To adjust the horizontal level of the headlight,
turn the adjustment bolt clockwise to turn the
headlight beam left, and turn it counterclock-
wise to turn the headlight beam right.
BULB REPLACEMENT
ItemWattage
(W)Bulb No.
Front combination light 27/8 1157NA
Rear combination light
Turn signal 27 1156
Stop/Tail 27/8 1157
Back-up (Sentra) 13 912
Back-up (200SX) 1156
License plate light 5 168
High-mounted stop
light13 912
Trunk lid-mounted
stop light13 912
Front fog lamp 35H3
(Special)
Interior light 8
Trunk light 3.4 158
ADI0619
HEADLIGHT AIMING
ADJUSTMENT
7-26
ZX
Page 156 of 191

Tire rotation*Tires should be rotated every
7,500 miles (12,000 km).
Wheel alignment and balanceIf the ve-
hicle should pull to either side while driving
on a straight and level road, or if you detect
uneven or abnormal tire wear, there may be
a need for wheel alignment.
If the steering wheel or seat vibrates at
normal highway speeds, wheel balancing
may be needed.
Windshield wiper blades*Check for
cracks or wear if they do not wipe properly.
Doors and engine hoodCheck that all
doors and the engine hood operate prop-
erly. Also ensure that all latches lock se-
curely. Lubricate hinges, latches, rollers and
links if necessary. Make sure the secondary
latch keeps the hood from opening when
the primary latch is released.
When driving in areas using road salt or
other corrosive materials, check lubrication
frequently.
Lights*Make sure the headlights, stop
lights, tail lights, turn signal lights, and other
lights are all operating properly and installed
securely. Also check headlight aim.INSIDE THE VEHICLE
The maintenance items listed here should
be checked on a regular basis, such as
when performing periodic maintenance,
cleaning the vehicle, etc.
Additional information on the following
items with ``*'' is found in the ``Do-it-
yourself operations'' section.
Warning lights and chimesMake sure all
warning lights and chimes are operating
properly.
Windshield wiper and washer*Check that
the wipers and washer operate properly and
that the wipers do not streak.
Windshield defrosterCheck that the air
comes out of the defroster outlets properly
and in sufficient quantity when operating the
heater or air conditioner.
Steering wheelCheck for changes in the
steering conditions, such as excessive free-
play, hard steering or strange noises.
SeatsCheck seat position controls such as
seat adjusters, seatback recliner, etc. to
ensure they operate smoothly and all
latches lock securely in every position.
Check that the head restraints move up anddown smoothly and the locks (if so
equipped) hold securely in all latched posi-
tions.
Seat beltsCheck that all parts of the seat
belt system (e.g. buckles, anchors, adjust-
ers and retractors) operate properly and
smoothly, and are installed securely. Check
the belt webbing for cuts, fraying, wear or
damage.
Accelerator pedalCheck the pedal for
smooth operation and make sure the pedal
does not catch or require uneven effort.
Keep the floor mats away from the pedal.
Clutch pedal*Make sure the pedal oper-
ates smoothly and check that it has the
proper free travel.
BrakesCheck that the brakes do not pull
the vehicle to one side when applied.
Brake pedal*Check the pedal for smooth
operation and make sure it has the proper
distance under it when depressed fully.
Check the brake booster function. Be cer-
tain to keep floor mats away from the pedal.
Parking brake*Check that the lever has
the proper travel and confirm that your
vehicle is held securely on a fairly steep hill
8-3
ZX
Page 182 of 191

After the hitch is removed, seal the bolt
holes to prevent exhaust fumes, water
or dust from entering the passenger
compartment.
cRegularly check that all hitch mounting
bolts are securely mounted.
Tire pressures
cWhen towing a trailer, inflate the vehicle
tires to the recommended cold tire pres-
sure indicated on the tire placard (lo-
cated on the driver side center pillar.)
cTrailer tire condition, size, load rating
and proper inflation pressure should be
in accordance with the trailer and tire
manufacturers' specifications.
Safety chain
Always use a suitable chain between your
vehicle and the trailer. The chain should be
crossed and should be attached to the hitch,
not to the vehicle bumper or axle. Be sure to
leave enough slack in the chain to permit
turning corners.
Trailer lights
Trailer lights should comply with federal
and/ or local regulations. When wiring thevehicle for towing, connect the stop and tail
light pickup into the vehicle electrical circuit.
Trailer brakes
If your trailer is equipped with a braking
system, make sure it conforms to federal
and/or local regulations and that it is prop-
erly installed.
CAUTION
Never connect a trailer brake system
directly to the vehicle brake system.
Pre-towing tips
cBe certain your vehicle maintains a level
position when a loaded and/or unloaded
trailer is hitched. Do not drive the vehicle if
it has an abnormal nose-up or nose- down
condition; check for improper tongue load,
overload, worn suspension or other pos-
sible causes of either condition.
cAlways secure items in the trailer to
prevent load shifts while driving.
cBe certain your rear view mirrors con-
form to all federal, state or local regula-
tions. If not, install any mirrors required
for towing before driving the vehicle.
Trailer towing tips
In order to gain skill and an understanding
of the vehicle's behavior, you should prac-
tice turning, stopping and backing up in an
area which is free from traffic. Steering,
stability, and braking performance are
somewhat different than under normal driv-
ing conditions.
cAlways secure items in the trailer to
prevent load shift while driving.
c
Avoid abrupt starts, acceleration or stops.
cAvoid sharp turns or lane changes.
cAlways drive your vehicle at a moderate
speed.
c
Always block the wheels on both vehicle
and trailer when parking. Parking on a
slope is not recommended; however, if
you must do so, and if your vehicle is
equipped with automatic transmission,
first block the wheels and apply the park-
ing brake, and then move the transmis-
sion shift lever into the P position. If you
move the shift lever to the P position
before blocking the wheels and applying
the parking brake, transmission damage
could occur.
9-17
ZX