1996 NISSAN QUEST ignition
[x] Cancel search: ignitionPage 124 of 235

BAL
Balance control allows you to adjust the
sound distribution between the right and left
speakers.
Push the BAL button either
or
; BAL and the setting indicator bar
appear in the display window. Press the
BAL button
to shift the sound to the
right speakers. The single indicator bar
moves to the right of the display window.
Press the BAL button
to shift the
sound to the left speakers. The single indi-
cator bar moves to the left of the display
window. When the indicator bar is in the
center position the sound is equally distrib-
uted between the right and left speakers.
Following balance adjustment, the display
window shows the current setting for three
seconds, then returns to the display prior to
adjustment.
FADE
Fader control allows you to adjust sound
distribution between the front and rear
speakers.
Push the FADE button either
or; FADE and the setting indicator barappear in the display window. Press the
FADE button
to shift the sound to the
front speakers. The single indicator bar
moves to the right of the display window.
Press the FADE button
to shift the
sound to the rear speakers. The single
indicator bar moves to the left of the display
window. When the indicator bar is in the
center position the sound is equally distrib-
uted between the front and rear speakers.
Following fader adjustment, the display win-
dow shows the current setting for three
seconds, then returns to the display prior to
adjustment.
CASSETTE TAPE OPERATIONS
Turn the ignition key to ACC or ON, then
insert the cassette tape into the tape door
by lightly pushing it. Because of the power
loading feature, the cassette tape is auto-
matically pulled into the player and begins
to play.
Do not force the cassette tape into the tape
door. Forcing a tape in or pushing too hard
could damage the player.
When a cassette is inserted into the audio
system, the word TAPE and a cassette sidesymbol (either 1 or 2) illuminate in the
display window.
A cassette tape can be loaded with the
ignition ON whether or not the radio power
is on. Inserting a cassette tape with the
radio power off causes the audio system to
turn on. After the cassette is ejected, the
audio system turns off. Also, the power
antenna (if so equipped) stays in the down
position during cassette tape operation.
The cassette tape automatically changes
directions to play the other side when the
first side is completed.
cTo maintain good quality sound, NIS-
SAN recommends using cassette
tapes of 60 minutes or shorter in
length.
cCassette tapes should be removed
from the player when not in use. Store
cassettes in their protective cases
and away from direct sunlight, heat,
moisture, and magnetic sources.
cDirect sunlight can cause the cassette
to become deformed. The use of de-
formed cassettes may cause the cas-
sette to jam in the player.
3-19
ZX
Page 125 of 235

cDo not use cassettes with peeling or
loose labels, as the label could jam in
the player.
cIf a cassette has loose tape, insert a
pencil through one of the cassette
hubs and rewind the tape firmly
around the hubs. Loose tape may
cause tape jamming and wavering
sound quality.
cOver a period of time, the playback
head, capstan, and pinch roller may
cause a tape coating residue as the
tape passes over the head. This resi-
due accumulation can cause weak or
wavering sound, and should be re-
moved periodically with a head clean-
ing tape.
If the residue is not removed periodi-
cally, the player may need to be dis-
assembled for cleaning.
Using a Nissan Cassette Deck Cleaning
System or equivalent to clean the tape
player head after 10-12 hours of play helps
to maintain the best playback sound and
proper tape operation.REW and FF
Push the REW (rewind) or FF (fast forward)
button for the desired direction. When using
REW, push the FF button momentarily to
stop the tape and resume playing. Similarly,
when using FF, push the REW button mo-
mentarily to stop the tape and resume play-
ing.
Automatic Music Search (AMS)
Pushing the SEEK button while playing a
cassette tape activates the Automatic Music
Search (AMS) mode. Press
SEEK to
rewind the tape to the previous selection, or
press SEEK
to forward the tape to
the next selection.
This system searches for the blank intervals
between selections. If there is a blank inter-
val within one program or there is no interval
between programs, the system may not
stop in the desired or expected location.
Changing the direction of tape play
Press the SIDE 1-2 button to reverse the
tape to the opposite track. The display win-
dow indicates the track being played with a
1or2.
Stopping and ejecting the cassette
tape
Push the EJ button. The cassette tape
automatically ejects from the player and the
radio turns off. A tape may be ejected with
the ignition switch in the ON or OFF posi-
tion.
Dolby NR (noise reduction)
Push thebutton for Dolby NR en-
coded tapes to reduce high frequency tape
noise. When activated, a
appears in
the display window.
Dolby NR is manufactured under license
from Dolby Laboratories Licensing Corpora-
tion. ``Dolby NR'' and the double-D symbol
are trademarks of Dolby Laboratories Li-
censing Corporation.
3-20
ZX
Page 126 of 235

Manual antenna
The manual antenna on your vehicle re-
mains in the up position at all times. The
antenna cannot be shortened, but can be
removed. When you need to remove the
antenna, turn its base counterclockwise.
Power antenna (If so equipped)
The power antenna automatically extends
when the radio is turned on, and retracts
when turned off or when a tape or CD is
played. If the radio is left on, the antenna
retracts and extends with the ignition key
OFF-ON operation.
CAUTION
Before turning the radio on, make sure
that there is no one near the antenna
outlet and there is enough space for it
to extend.
To prevent damage, be sure that the
power antenna is fully retracted before
the vehicle enters an automated car
wash.Dirt and other foreign matter on the
power antenna rod may interrupt its
operation. Clean the rod periodically
with a damp cloth. This type of cleaning
is especially important during the win-
ter seasons in areas where road salt
and other chemicals may be spread on
the road surfaces and splashed onto
the antenna rod.
ANTENNA
3-21
ZX
Page 127 of 235

COMPACT DISC PLAYER
(If so equipped)
NOTE: Audio control features include com-
mand buttons for CD players which can be
installed as optional equipment to upgrade
the audio system. A CD player is not in-
cluded with this system, but can be pur-
chased as an option at any time. Consult
with your NISSAN dealer for feature avail-
ability.
The compact disc player consists of two
main components, the 6 CD magazine and
the CD changer. Both components are lo-cated on the center instrument panel con-
sole, below the ashtray.How to load the CD magazine
To load the magazine with CD's, first push
the
button on the CD changer to eject
the magazine, then remove the magazine
from the changer. The inside of the CD
magazine contains six shelves, one for
each CD to be loaded. Carefully slide a CD
(label side up) onto one of the shelves and
push it in. Repeat as desired, loading up to
six CD's.
CD magazine insert
Once the desired number of CD's are
loaded into the magazine, insert the maga-
zine back into the CD changer.
With the ignition switch OFF, the CD maga-
zine loads into the CD changer. Once the
ignition switch is turned to ACC or ON, the
audio system returns to its previous mode.
With the ignition switch in the ACC or ON
position, the CD magazine loads into the
CD changer and begins play with disc 1,
track 1.
CD player controls
BASS, TREB, BAL, AND FADE
The bass, treble, balance, and fader con-
trols for the CD player are the same as
those for the radio and cassette tape player.
Refer to the ADJUSTING TONE QUALITY
section for operating instructions on these
controls.
CD
Push this button to switch from radio or tape
mode to CD mode. CD play begins auto-
matically if at least one disc is loaded in the
magazine. The display window shows the
AHA0597
3-22
ZX
Page 130 of 235

Rear audio controls
Radio features controlled by the rear seat
remote control (if so equipped) are listed
below:
cVolume: þ/+
cProgram advance: proceed to the next
preset station (AM/FM), the other side of
the tape, or the next CD.
cSource select: AM/FM, tape, or CD
cSpeakers ON/OFF
cSeek:bcPush the Memory 3 and Memory 5 buttons
on the front radio controls simultaneously to
turn the rear controls on. Push them again
to turn the rear audio controls off.
The headphones symbol illuminates in the
front display when the rear audio controls
are on. Two headphone jacks are provided
so two rear seat passengers may listen to
the audio system privately.
The rear controls can only increase the
volume to the level which the front radio is
set.
Headphones are not included with the ve-hicle. Most portable radio headphones work
with the rear audio controls.
When the rear seat controls are on, push
the SPKRS ON-OFF button to turn all
speakers off. Push again to turn all speak-
ers on.
If the rear audio system was on when the
ignition was turned OFF, the audio system
``remembers'' and the rear system is still on
when the engine is started again. The sys-
tem also ``remembers'' if the speakers were
ON or OFF. Therefore, the speakers may
have to be turned on again with the SPKRS
ON-OFF button.
AHA0595
3-25
ZX
Page 132 of 235

4 Starting and driving
Precautions when starting and driving ................. 4-2
Avoiding collision and rollover.............................. 4-3
Drinking alcohol/drugs and driving ....................... 4-3
Ignition switch ....................................................... 4-4
Before starting the engine .................................... 4-4
Driving with an automatic transmission ............... 4-5
Starting the engine ............................................... 4-8
Parking brake operation ....................................... 4-8Cruise control ....................................................... 4-9
Break-in schedule............................................... 4-11
Increasing fuel economy .................................... 4-11
Parking/parking on hills ...................................... 4-12
Precautions when driving ................................... 4-13
Anti-lock brake system ....................................... 4-13
Cold weather driving cautions ............................ 4-15
ZX
Page 134 of 235

To help prevent damage
cDo not use leaded gasoline.
Deposits from leaded gasoline will se-
riously reduce the three way cata-
lyst's ability to help reduce exhaust
pollutants.
cKeep your engine tuned up. Malfunc-
tions in the ignition, fuel injection, or
electrical systems can cause overrich
fuel flow into the catalyst, causing it to
overheat. Do not keep driving if the
engine misfires, or if noticeable loss
of performance or other unusual op-
erating conditions are detected. Have
the vehicle inspected promptly by an
authorized NISSAN dealer.
cAvoid driving with an extremely low
fuel level. Running out of fuel could
cause the engine to misfire, damaging
the three way catalyst.
cDo not race the engine while warming
it up.
cDo not push or tow your vehicle to
start the engine.Failure to operate this vehicle in a safe and
prudent manner may result in loss of control
or an accident. Be alert and drive defen-
sively at all times. Obey all traffic regula-
tions. Avoid excessive speed, high speed
cornering, or sudden steering maneuvers,
because these driving practices could
cause you to lose control of your vehicle.As
with any vehicle, a loss of control could
result in a collision with other vehicles or
objects, or cause the vehicle to rollover,
particularly if the loss of control causes
the vehicle to slide sideways.Be attentive
at all times, and avoid driving when tired.
Never drive when under the influence of
alcohol or drugs (including prescription or
over-the-counter drugs which may cause
drowsiness). Always wear your seat belt as
outlined in the ``Seat Belts'' section of this
manual, and also instruct your passengers
to do so.
WARNING
Alcohol in the blood stream reduces
coordination, delays reaction time and
impairs judgement. Driving after drink-
ing alcohol increases the likelihood of
being involved in an accident injuring
yourself and others. Additionally, if you
are injured in an accident alcohol can
increase the severity of the injury.
Nissan is committed to safe driving. How-
ever, you must choose not to drive under
the influence of alcohol. Every year thou-
sands of people are injured or killed in
alcohol related accidents. Although the local
laws vary on what is considered to be
legally intoxicated, the fact is that alcohol
affects all people differently and most
people underestimate the effects of alcohol.
Remember, drinking and driving don't mix!
And that's true for drugs, too (over the
counter, prescription, and illegal drugs).
Don't drive if your ability to operate your
vehicle is impaired by alcohol, drugs, or
some other physical condition.
AVOIDING COLLISION AND
ROLLOVERDRINKING ALCOHOL/DRUGS
AND DRIVING
4-3
ZX
Page 135 of 235

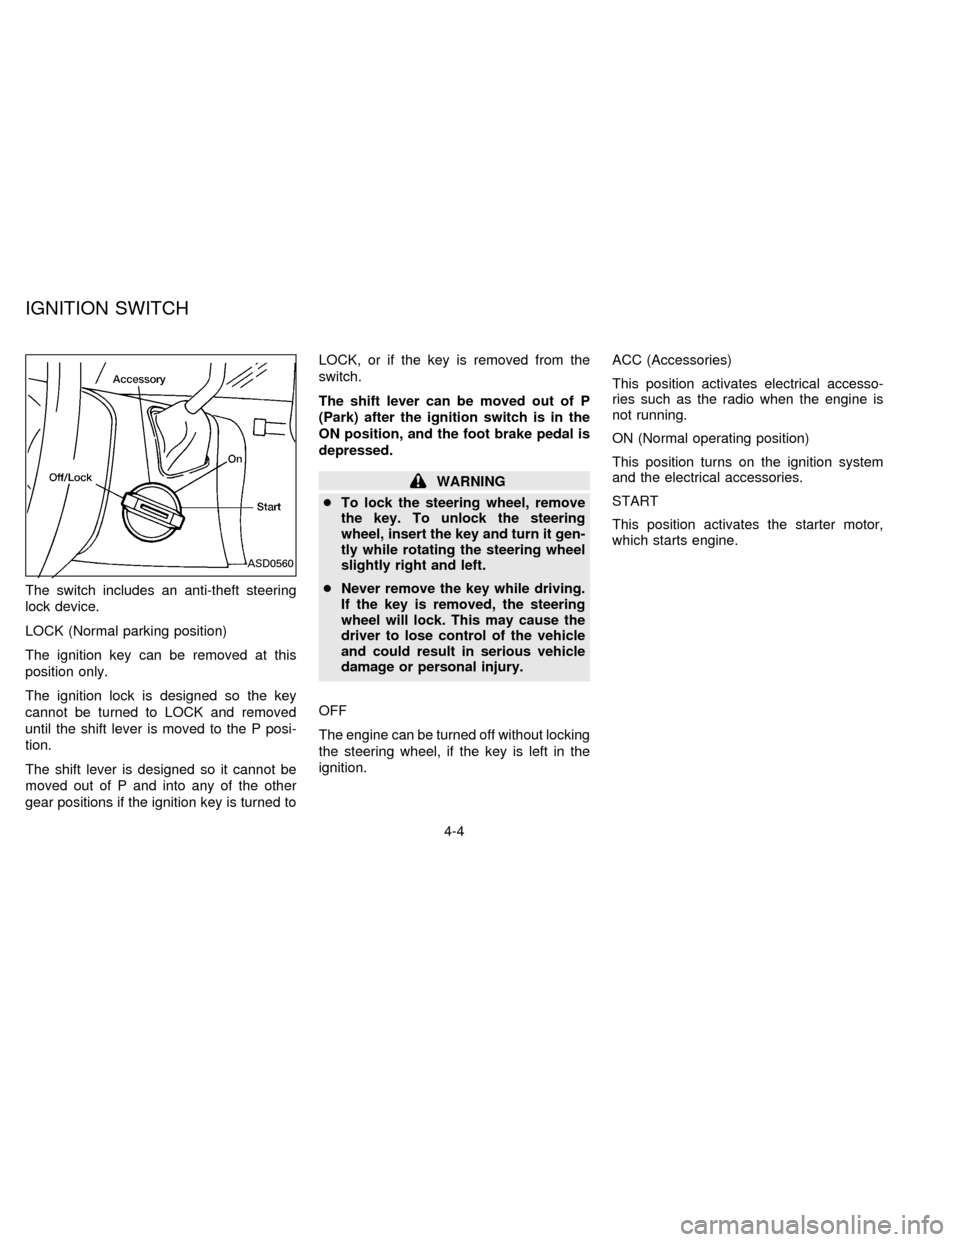
The switch includes an anti-theft steering
lock device.
LOCK (Normal parking position)
The ignition key can be removed at this
position only.
The ignition lock is designed so the key
cannot be turned to LOCK and removed
until the shift lever is moved to the P posi-
tion.
The shift lever is designed so it cannot be
moved out of P and into any of the other
gear positions if the ignition key is turned toLOCK, or if the key is removed from the
switch.
The shift lever can be moved out of P
(Park) after the ignition switch is in the
ON position, and the foot brake pedal is
depressed.
WARNING
cTo lock the steering wheel, remove
the key. To unlock the steering
wheel, insert the key and turn it gen-
tly while rotating the steering wheel
slightly right and left.
cNever remove the key while driving.
If the key is removed, the steering
wheel will lock. This may cause the
driver to lose control of the vehicle
and could result in serious vehicle
damage or personal injury.
OFF
The engine can be turned off without locking
the steering wheel, if the key is left in the
ignition.ACC (Accessories)
This position activates electrical accesso-
ries such as the radio when the engine is
not running.
ON (Normal operating position)
This position turns on the ignition system
and the electrical accessories.
START
This position activates the starter motor,
which starts engine.
ASD0560
IGNITION SWITCH
4-4
ZX