1996 NISSAN QUEST ECO mode
[x] Cancel search: ECO modePage 94 of 235

4. Pull on the third row shoulder belt until all
of the belt is fully extended and a click is
heard. At this time, the belt retractor is in
the automatic locking mode (child re-
straint mode). (The lap/shoulder belt re-
verts back to emergency locking mode
when it is disconnected from the tether
strap and fully retracted.)
5. Allow the belt to retract. A clicking sound
is heard as the belt retracts. This indi-
cates that the retractor is in the automatic
locking mode. Tighten the tether strap to
remove any slack.
6. Before placing the child in the child re-
straint, use force to tilt the child restraint
from side to side, and tug it forward to
make sure it is securely held in place.
7. Check that the retractor is in the auto-
matic locking mode by trying to pull more
belt out of the retractor. If you cannot pull
any more belt webbing out of the retrac-
tor, the belt is in the automatic locking
mode.
8. Check to make sure the child restraint is
properly secured prior to each use. If the
belt is not locking, repeat steps 4 through
7.
INSTALLATION ON THREE-
PASSENGER BENCH SEAT IN
THIRD ROW
A child restraint with a top tether strap may
be placed on the three-passenger bench
seat when the bench seat is in the third row
location. Once the child restraint is properly
secured to the seat (see ``Installation at
second and third row outboard positions'' or
``Installation at three-passenger bench seat
center position'' earlier in this section), fol-
low the directions below to attach the tether
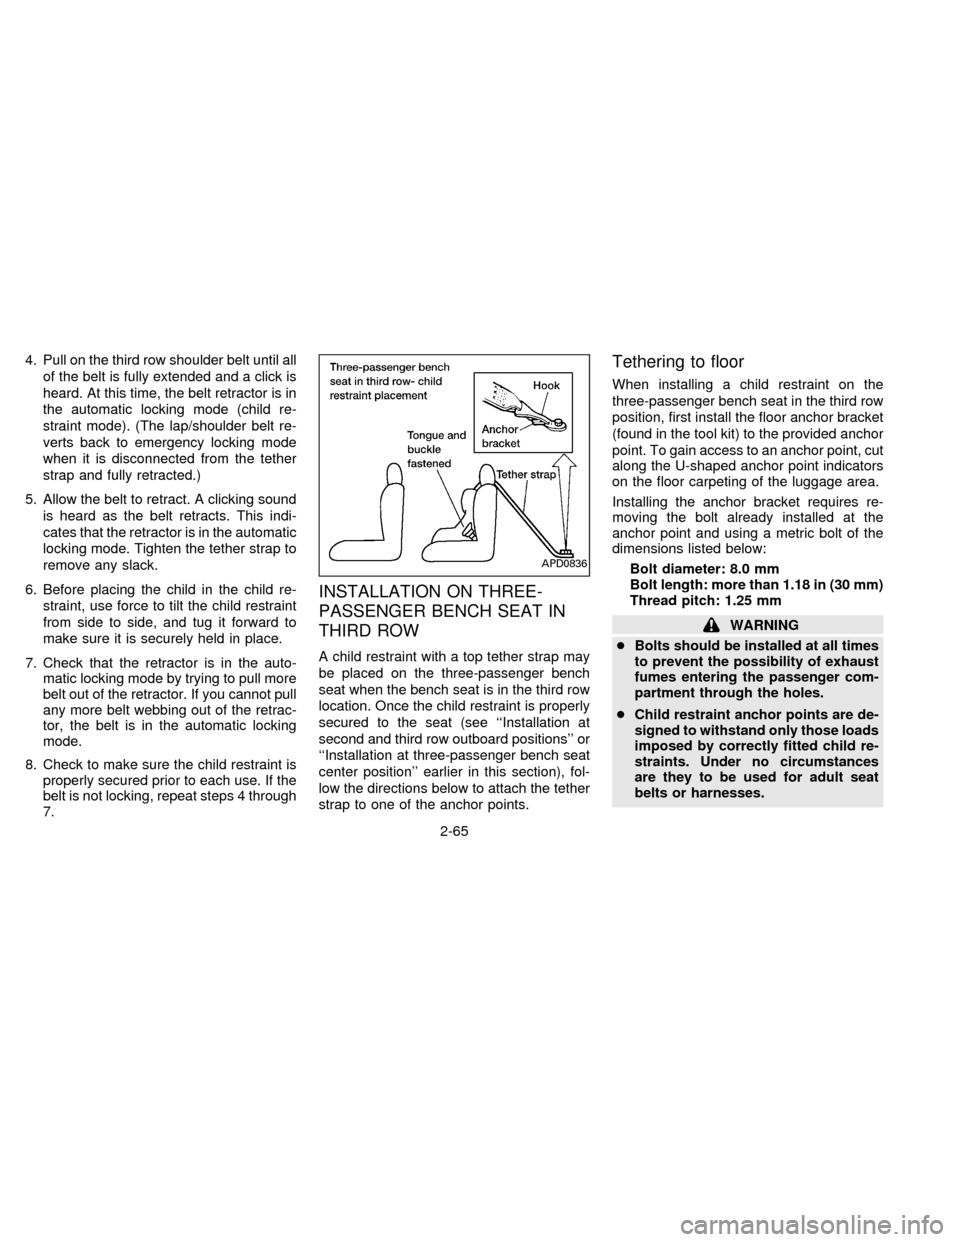
strap to one of the anchor points.
Tethering to floor
When installing a child restraint on the
three-passenger bench seat in the third row
position, first install the floor anchor bracket
(found in the tool kit) to the provided anchor
point. To gain access to an anchor point, cut
along the U-shaped anchor point indicators
on the floor carpeting of the luggage area.
Installing the anchor bracket requires re-
moving the bolt already installed at the
anchor point and using a metric bolt of the
dimensions listed below:
Bolt diameter: 8.0 mm
Bolt length: more than 1.18 in (30 mm)
Thread pitch: 1.25 mm
WARNING
cBolts should be installed at all times
to prevent the possibility of exhaust
fumes entering the passenger com-
partment through the holes.
cChild restraint anchor points are de-
signed to withstand only those loads
imposed by correctly fitted child re-
straints. Under no circumstances
are they to be used for adult seat
belts or harnesses.
APD0836
2-65
ZX
Page 97 of 235

5. Before placing the child in the child re-
straint, use force to tilt the child restraint
from side to side, and tug it forward to
make sure it is securely held in place.
6. Check that the retractor is in the auto-
matic locking mode by trying to pull more
belt out of the retractor. If you cannot pull
any more belt webbing out of the retrac-
tor, the belt is in the automatic locking
mode.
7. Check to make sure the child restraint is
properly secured prior to each use. If the
lap belt is not locked, repeat steps 3
through 6.
After the child restraint is removed and the
seat belt is allowed to wind back into the
retractor, the automatic locking mode (child
restraint mode) is canceled; the seat belt
may be used as normal and will only lock
during a sudden stop or impact.INTEGRATED CHILD SAFETY
SEATS (If so equipped)
WARNING
cFailure to follow the instructions for
the use of these integrated child
safety seats can result in your child
striking vehicle's interior during a
sudden stop or crash, causing the
injury or death of your child.
cImproper use of a child restraint can
increase the risk or severity of injury
for both the child and other occu-
pants of the vehicle.
cAll U.S. states and provinces of
Canada require that infants and
small children be restrained in ap-
proved child restraints at all times
while the vehicle is being operated.
The optional second row bench seat con-
tains two integrated child safety seats.
These seats are designed for use only by
children who weigh between 22 and 60
pounds (10-27 kg) and whose height is 45
inches (1145 mm) or less and who are
capable of sitting upright alone.In addition, these integrated child safety
seats must only be used by children who
meet the following requirements:
cAGE:
At least one year old
cSEATED HEIGHT:
Top of child's shoulders must be below
the shoulder harness openings of the
integrated child seat.
Children smaller than these requirements
should be restrained in an appropriate
separate child restraint. Children larger than
these requirements should also be re-
strained in an appropriate separate child
restraint or in the appropriate vehicle seat
belt system. Refer to ``Child Restraints for
Infants and Small Children'' and ``Precau-
tions On Seat Belt Usage'' in this chapter for
important child safety information.
2-68
ZX
Page 102 of 235

properly positioned over the child's left
shoulder.
11. Check that the shoulder harness is in
the automatic locking mode by trying to
pull the shoulder harness out of the
retractor. If you cannot pull any of the
shoulder harness webbing out of the
retractor, the shoulder harness is in the
automatic locking mode. If the shoulder
harness is not locked, repeat step 10. If,
after repeated attempts, the integrated
child safety seat shoulder harness can-
not be placed in the automatic locking
mode, do not use the integrated child
safety seat and have it inspected by
your NISSAN dealer.
To cancel the automatic locking mode, un-
buckle the chest clip and both shoulder
harness tongues. Allow the shoulder har-
nesses to retract completely. The automatic
locking mode is now canceled and the
shoulder harness retractor is in the emer-
gency locking mode.
The automatic locking mode (child re-
straint mode) must be reactivated each
time you place a child in the integrated
child safety seats.In addition to the automatic locking retrac-
tors, the integrated child safety seat shoul-
der harnesses are equipped with emer-
gency locking retractors. The automatic
locking mode is best to use, especially for
children who need help staying properly
positioned in the seat and its harnesses (for
example, children who are younger and
smaller), because the belts are always
locked. In the emergency locking mode, the
shoulder belts only lock in a sudden stop or
accident, allowing a child more freedom of
movement. Use the emergency locking
mode only if you judge your child able to
remain properly positioned in the integrated
child safety seat.
Removing the Child
1. Release the chest clip.
2. Release the left and right shoulder har-
ness tongues from the belt buckle by
pressing the red belt buckle button.
3. Move the left and right shoulder har-
nesses aside and assist the child from
the integrated child safety seat.
Storing the Integrated Child Safety
Seat
1. Be sure the shoulder harnesses are fully
retracted and resting inside the inte-
grated child safety seat recess. It is not
necessary to reconnect the shoulder har-
nesses and belt buckle prior to storing
the integrated child safety seat.
2. While holding onto, but not pulling, the
cushion release strap, rotate the cushion
upward until it fits flush with the second
row seat back cushion and locks into
position.
3. Be sure the integrated child safety seat is
locked in the stowed position by grasping
the safety seat cushion and attempting to
lower it without pulling the cushion re-
lease strap. If the integrated child safety
seat is not locked in the stowed position,
repeat steps 1 through 3.
Integrated Child Safety Seat Main-
tenance
cTo clean the shoulder harnesses and belt
buckle webbing, apply a mild soap solu-
tion or any solution recommended for
cleaning upholstery or carpets. Then
2-73
ZX
Page 108 of 235

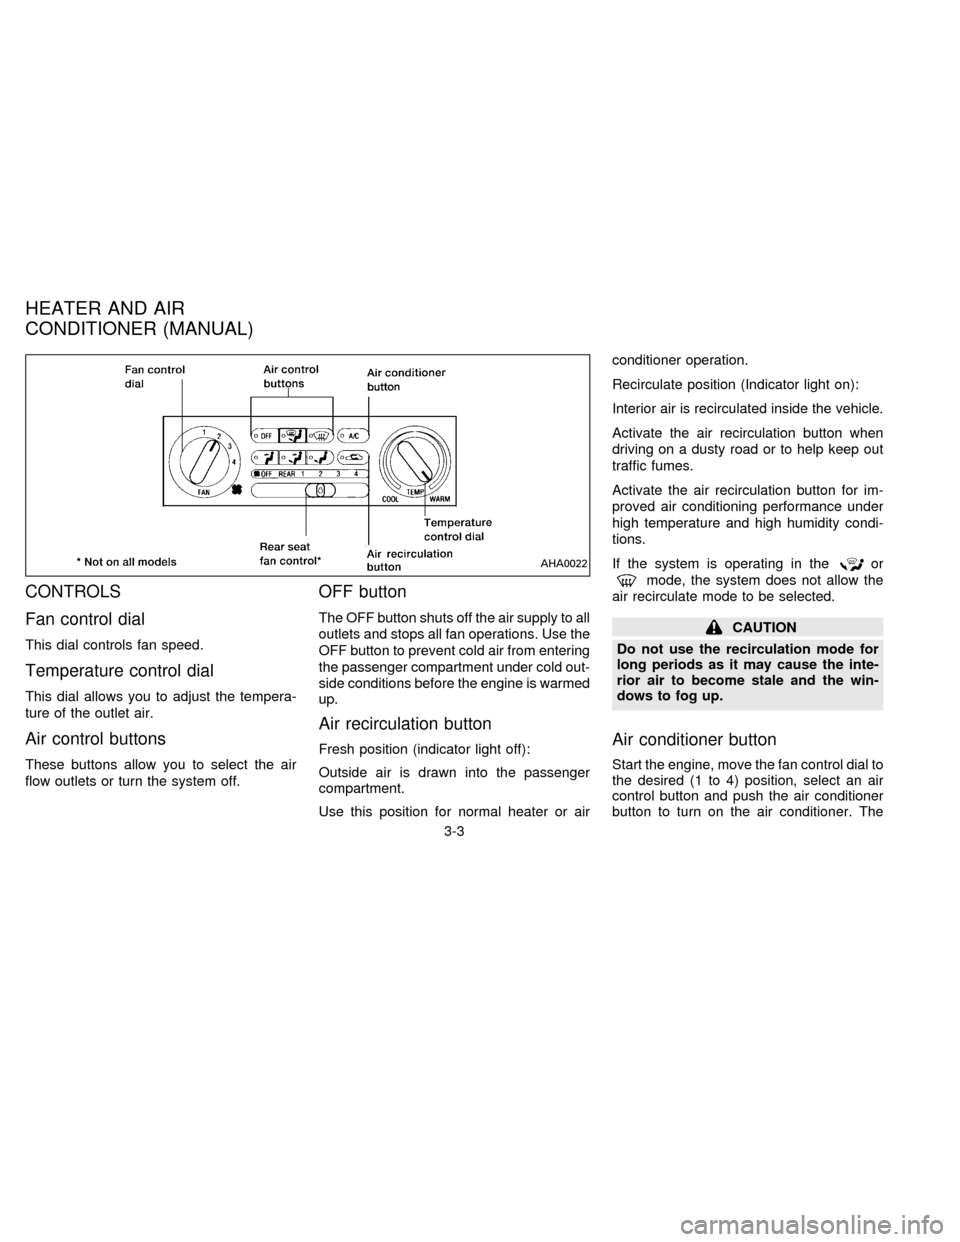
CONTROLS
Fan control dial
This dial controls fan speed.
Temperature control dial
This dial allows you to adjust the tempera-
ture of the outlet air.
Air control buttons
These buttons allow you to select the air
flow outlets or turn the system off.
OFF button
The OFF button shuts off the air supply to all
outlets and stops all fan operations. Use the
OFF button to prevent cold air from entering
the passenger compartment under cold out-
side conditions before the engine is warmed
up.
Air recirculation button
Fresh position (indicator light off):
Outside air is drawn into the passenger
compartment.
Use this position for normal heater or airconditioner operation.
Recirculate position (Indicator light on):
Interior air is recirculated inside the vehicle.
Activate the air recirculation button when
driving on a dusty road or to help keep out
traffic fumes.
Activate the air recirculation button for im-
proved air conditioning performance under
high temperature and high humidity condi-
tions.
If the system is operating in the
or
mode, the system does not allow the
air recirculate mode to be selected.
CAUTION
Do not use the recirculation mode for
long periods as it may cause the inte-
rior air to become stale and the win-
dows to fog up.
Air conditioner button
Start the engine, move the fan control dial to
the desired (1 to 4) position, select an air
control button and push the air conditioner
button to turn on the air conditioner. The
AHA0022
HEATER AND AIR
CONDITIONER (MANUAL)
3-3
ZX
Page 111 of 235

2. Push thebutton in.
3. Turn the fan control dial to select speed.
4. Push on the air conditioner button. The
indicator light comes on.
5. Move the temperature control dial to the
desired position.
Dehumidified defogging
This mode is used to defog the windows
and dehumidify.
1. Push the
button in.
2. Turn the fan control dial to the desired
speed.
3. Move the temperature control dial to the
desired position.
When the
button is pushed, the air
conditioner automatically turns on to de-
fog the windshield, (however, the light
does not illuminate unless illuminated in
the previously selected mode) and the
recirculated air mode automatically turns
off.
Operating tips
cKeep windows and sun roof closed while
the air conditioner is in operation.cAfter parking in the sun, drive for two or
three minutes with the windows open to
vent hot air from the passenger compart-
ment. Then, close the windows. This
allows the air conditioner to cool the
interior more quickly.
cThe air conditioning system should be
operated for about ten minutes at
least once a month. This helps pre-
vent damage to the system due to lack
of lubrication.
cIf the coolant temperature gauge ex-
ceeds the H (hot) position, turn the air
conditioner off. See ``If your vehicle over-
heats'' in the ``In case of emergency''
section for additional information.
Servicing air conditioning
The air conditioning system in your NISSAN
vehicle is charged with a new refrigerant
designed with the environment in mind.
This new refrigerant does not harm the
earth's ozone layer.
Special charging equipment and lubricant
are required when servicing your NISSAN
air conditioner. Using improper refrigerants
or lubricants causes severe damage to yourair conditioning system. See ``Air condition-
ing system refrigerant and lubricant recom-
mendations'' in the ``Technical and con-
sumer information'' section of this manual.
Your NISSAN dealer is able to service your
environmentally ``friendly'' air conditioning
system.
3-6
ZX
Page 118 of 235

A/C button. The A/C indicator light comes
on to verify activation, and cooled air flows
from the vents. Fan speed continues to be
controlled by the EATC unless the fan
speed thumbwheel is used to override.
Press the
button to choose air recir-
culation. In this mode the EATC system
recirculates the air inside the vehicle rather
than drawing air from outside. Use this
mode together with the air conditioning to
rapidly cool the inside of the vehicle, or to
dehumidify the air inside the vehicle.
ENGLISH METRIC MODE
Switch from English to metric temperature
display by simultaneously pressing the
and A/C buttons and holding the
thumbwheel in upper position (HI) for one
second.
AHA762
3-13
ZX
Page 123 of 235

the frequency band. To change frequencies
quickly, press and hold either side of the
SEEK button.
SCAN tuning
Push SCAN to enter the scan tuning mode.
The radio searches up the frequency band,
stopping and playing each strong frequency
station for five seconds. This continues until
the SCAN button is pushed a second time
or a different tuning function is selected.
The AM or FM1 or FM2 symbol in the
display window flashes while each station is
being played.
AM/FM
Press the AM/FM button to select the de-
sired band: AM, FM1, or FM2. The stereo
indicator shows in the display window dur-
ing FM stereo reception. When the stereo
broadcast signal is weak, the radio auto-
matically changes from stereo to monaural
reception.
Station memory operations
Your radio comes equipped with six
memory buttons, which are used to preset
up to six AM stations and 12 FM stations.NOTE: If the vehicle's battery is discon-
nected, the memory buttons need to be
reset.
To set the memory buttons:
1. Select the desired band (AM, FM1, or
FM2) by pressing the AM/FM button.
2. Tune to the desired frequency.
3. Press one of the memory buttons and
hold the button in. The sound mutes out
for about two seconds, then returns. That
station is now held in memory on that
button.
Repeat the three steps above for each
memory button you want to set.
The memory buttons also control the rear
audio controls. Push memory buttons 3 and
5 simultaneously to turn the rear audio
controls on. Push them again to turn the
rear audio controls off. A headphone sym-
bol appears in the display window when the
rear controls are activated.
ADJUSTING TONE QUALITY
BASS
Bass control allows you to adjust the lower,
bass frequencies to your preference.Push the BASS button either
or
; BASS and the setting indicator bar
appear in the display window. Pressing the
BASS button either
orin-
creases or decreases the level of bass, as
indicated by the number of bar segments
showing in the display window.
Following bass adjustment, the display win-
dow shows the current setting for three
seconds, then returns to the display prior to
adjustment.
TREB
Treble control allows you to adjust the
higher, treble frequencies to your prefer-
ence.
Push the TREB button either
or
; TREB and the setting indicator bar
appear in the display window. Pressing the
TREB button either
orin-
creases or decreases the level of treble, as
indicated by the number of bar segments
showing in the display window.
Following treble adjustment, the display
window shows the current setting for three
seconds, then returns to the display prior to
adjustment.
3-18
ZX
Page 128 of 235

CD number for three seconds, then the
track number for three seconds, then dis-
plays both together for the remainder of the
track.
Push this button when a CD is already
playing to stop the CD.
If the CD button is pushed while in the radio
or tape mode, and there are no CD's loaded
in the magazine, the display window flashes
a NO DISC message for 4 seconds.
SEEK
PushSEEK to select the previous
track number, or push SEEKto se-
lect the next track number. After the last
track on a disc, pushing SEEK
se-
lects the first track of the same disc.
TUNE DISCS
PushTUNE DISCS to select the pre-
vious CD in the magazine. Push TUNE
DISCS
to select the next CD in the
magazine.
SCAN
Push this button to audition the first 10
seconds of each track on a disc. At the end
of the disc, the SCAN function continueswith the first track on the same disc. The
display window flashes the track number
being auditioned during the SCAN function.
REW
Press this button to reverse the CD mecha-
nism and move back to a previous point on
the disc. If held for less than three seconds,
this button causes the CD to reverse at
three times the normal play speed. If held
for more than three seconds, the CD re-
verses at 10 times the normal play speed.
The mechanism reverses to the beginning
of track 1 and begins play if the button is
held continuously. The volume decreases
and the display window shows the elapsed
time during the entire fast reverse period.
FF
Press this button to advance the CD mecha-
nism and move ahead on the disc. If held for
less than three seconds, this button causes
the CD to advance at three times the normal
play speed. If held for more than three
seconds, the CD advances at 10 times the
normal play speed.
The volume decreases and the display win-
dow shows the elapsed time during theentire fast forward period.
COMP
Press this button to activate the compres-
sion function. This function reduces the
dynamic range of the CD program material,
which provides the listener with a more
consistent level of volume. The display win-
dow shows a C when the compression
function is activated.
SHUFFLE
Press this button to randomly select the play
order of the tracks on a CD. When all tracks
of one CD have been played, the system
changes to the next CD in the magazine
and proceeds to play the tracks in a ran-
domly selected order. The shuffle feature
remains in effect until turned off by pressing
the SHUFFLE button again.
When the shuffle function is activated, the
display window shows the letters SHF for two
seconds, then shows the disc number and
track selected for the remainder of that selec-
tion. When a new track is selected, the letters
SHF again appear for two seconds, followed
by the new disc and track number, and so on
as long as the shuffle function is active.
3-23
ZX