Page 38 of 197
Trunk lid release operation
Type A
The trunk lid release lever is located on the
outside of the driver's seat. To open the trunk
lid, pull up the trunk lid release lever. To close,push the trunk lid down securely.
Type B
The trunk lid release button is located under
the drivers arm rest.
To open the trunk lid, push the release button.
To close, push the trunk lid down securely.
Key operation
To open the trunk lid, turn the key clockwise.
To close, lower and push the trunk lid down
securely.
Do not drive with the trunk lid open. This
could allow dangerous exhaust gases to
be drawn into the vehicle.
SPA0093
SPA0094
TRUNK LID LOCK
2-9
Z01.2.1/A32-DX
Page 39 of 197
OPENER CANCEL LEVER FOR
TRUNK LID
When the lever is in the ªCANCELº position,
the trunk lid cannot be opened with the trunk
lid release lever or handle. It can be opened
only with the key.
Opener lever
Type A
To open the fuel filler lid, pull the opener lever.
To lock, close the fuel filler lid securely.
Type B
To open the fuel filler lid, push the opener lever
down. To lock, close the fuel filler lid securely.
FUEL FILLER CAP
The fuel filler cap is a screw-on ratcheting
type. Tighten the cap clockwise until ratcheting
clicks are heard.
IGasoline is extremely flammable and
highly explosive under certain condi-
tions. Always stop engine and do not
smoke or allow open flames or
sparks near the vehicle when refuel-
ing.
SPA0095SPA0096SPA0119
FUEL FILLER LID LOCK
2-10
Z01.2.1/A32-DX
Page 45 of 197
REAR SEAT
Center armrest and tray
Pull the armrest forward and lay it horizontal.
Then release the lever (inset) and pull the tray
forward (If so equipped). In this condition youare able to gain access to the trunk room.
SPA0102
2-16
Z01.2.1/A32-DX
Page 59 of 197

not be possible to properly install
some types of child restraints in your
vehicle.
Improper use of a child restraint can
result in increased injuries for both
the infant or child and other occu-
pants in the vehicle.
IWhen your child restraint is not in
use, store it in the trunk or keep it
secured with a seat belt to prevent it
from being thrown forward in case of
a sudden stop or accident.
IAfter attaching a child restraint, test
the restraint before you place the
child in it. Tilt it from side to side. Try
to tug it forward and check to see if
the belt holds it in place. If the re-
straint is not secure, tighten the belt
as necessary, or put the restraint in
another seat and test it again.
IIf the child restraint is not anchored
properly, the risk of a child being
injured in a collision or a sudden stop
greatly increases.
IAdjustable seatbacks should be posi-
tioned to fit the child restraint, but asupright as possible.
IRemember that a child restraint left in
a closed vehicle can become very
hot. Check the seating surface and
buckles before placing your child in
the child restraint.
IAll U.S. states and provinces of
Canada require that infants and small
children be restrained in approved
child restraints at all times while the
vehicle is being operated.
IFor a front facing child restraint, if the
seat position where it is installed has
a 3-point type lap/shoulder belt,
check to make sure the shoulder belt
does not go in front of the child's face
or neck. If it does, put the shoulder
belt behind the child restraint.
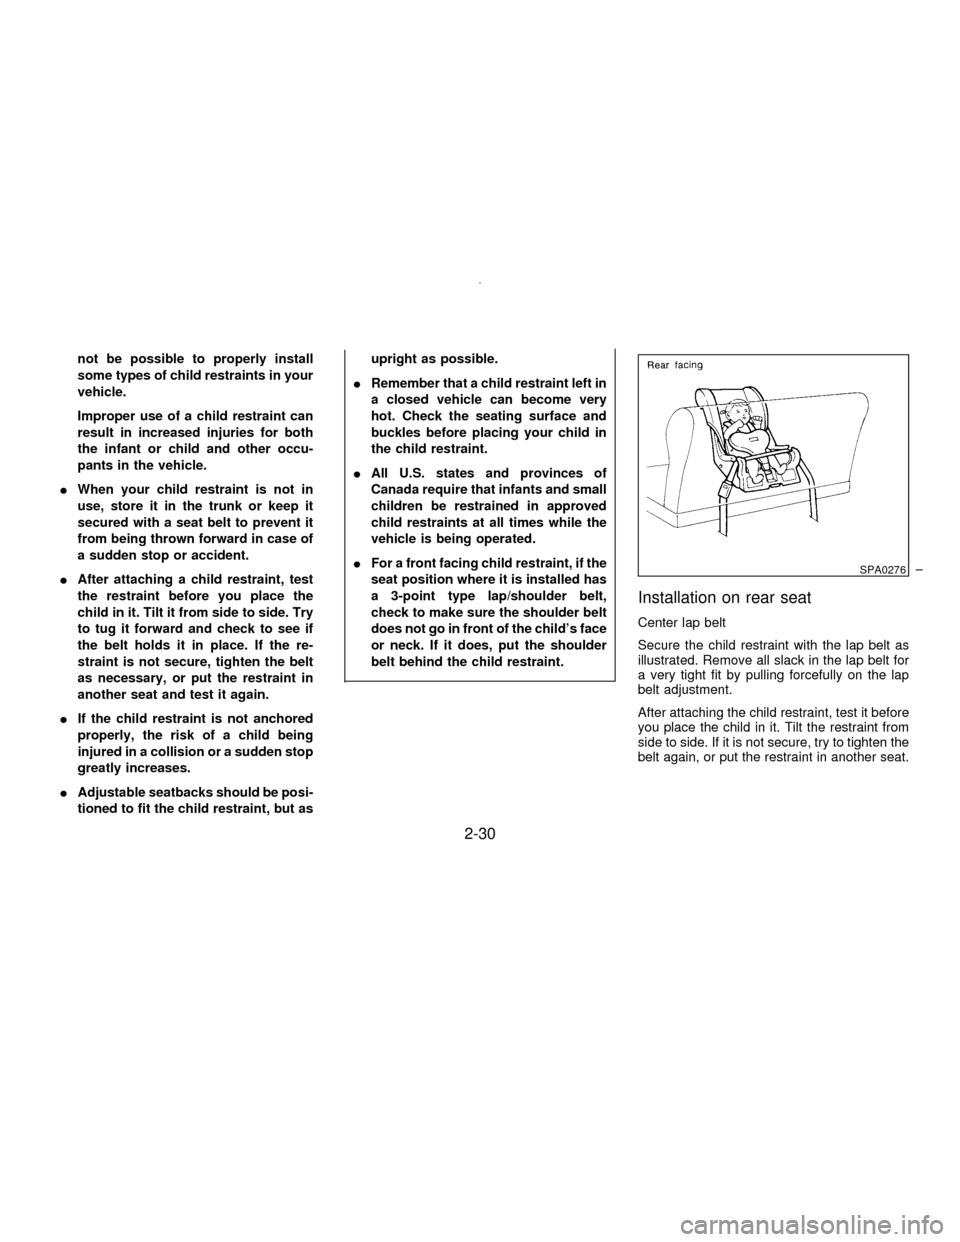
Installation on rear seat
Center lap belt
Secure the child restraint with the lap belt as
illustrated. Remove all slack in the lap belt for
a very tight fit by pulling forcefully on the lap
belt adjustment.
After attaching the child restraint, test it before
you place the child in it. Tilt the restraint from
side to side. If it is not secure, try to tighten the
belt again, or put the restraint in another seat.
SPA0276
2-30
Z01.2.1/A32-DX
Page 62 of 197

ing bolt which provides the straightest installa-
tion of the top strap.
Child restraint anchor points are designed
to withstand only those loads imposed by
correctly fitted child restraints. Under no
circumstances are they to be used for adult
seat belts or harnesses.
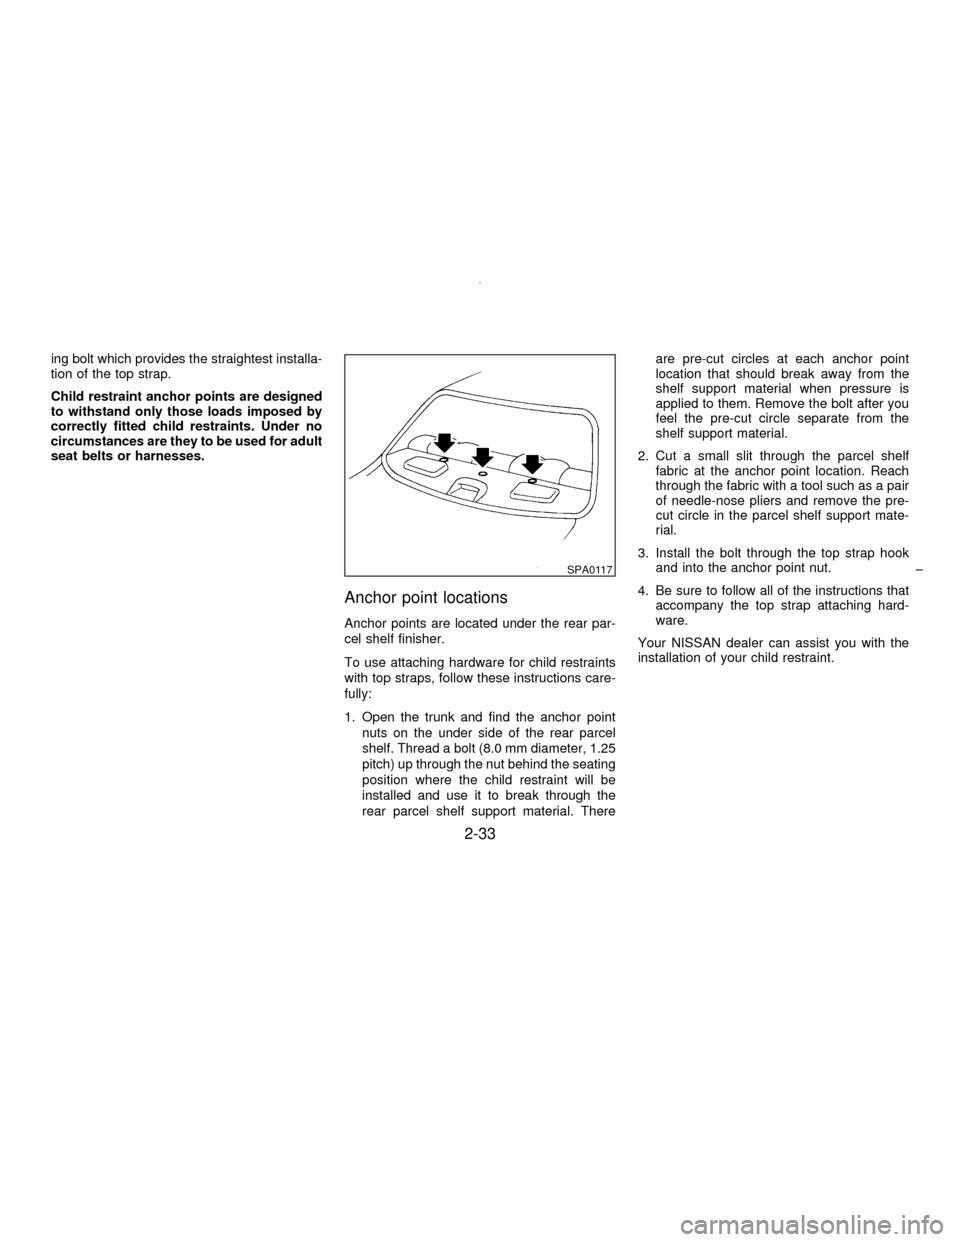
Anchor point locations
Anchor points are located under the rear par-
cel shelf finisher.
To use attaching hardware for child restraints
with top straps, follow these instructions care-
fully:
1. Open the trunk and find the anchor point
nuts on the under side of the rear parcel
shelf. Thread a bolt (8.0 mm diameter, 1.25
pitch) up through the nut behind the seating
position where the child restraint will be
installed and use it to break through the
rear parcel shelf support material. Thereare pre-cut circles at each anchor point
location that should break away from the
shelf support material when pressure is
applied to them. Remove the bolt after you
feel the pre-cut circle separate from the
shelf support material.
2. Cut a small slit through the parcel shelf
fabric at the anchor point location. Reach
through the fabric with a tool such as a pair
of needle-nose pliers and remove the pre-
cut circle in the parcel shelf support mate-
rial.
3. Install the bolt through the top strap hook
and into the anchor point nut.
4. Be sure to follow all of the instructions that
accompany the top strap attaching hard-
ware.
Your NISSAN dealer can assist you with the
installation of your child restraint.
SPA0117
2-33
Z01.2.1/A32-DX
Page 91 of 197

Do not leave children, unreliable adults,
or pets alone in your vehicle. They could
accidentally injure themselves or others
through inadvertent operation of the ve-
hicle. Also, on hot, sunny days, tem-
peratures in a closed vehicle could
quickly become high enough to cause
severe or possibly fatal injuries to
people or animals.
EXHAUST GAS (Carbon Monoxide)
Do not breathe exhaust gases; they con-
tain colorless and odorless carbon mon-
oxide. Carbon monoxide is dangerous. It
can cause unconsciousness or death.
IIf you suspect that exhaust fumes are
entering the vehicle, drive with all
windows fully open, and have the
vehicle inspected immediately.
IDo not run the engine in closed
spaces such as a garage for anylonger than is absolutely necessary.
IDo not park the vehicle with the en-
gine running for any extended length
of time.
IKeep the trunk lid, or back door
closed while driving, otherwise ex-
haust gases could be drawn into the
passenger compartment. If you must
drive in this manner for some reason,
take the following steps.
1. Open all the windows.
2. Set the air recirculate switch
ªOFFº and the fan control at
ªhighº to circulate the air.
IIf electrical wiring or other cable con-
nections must pass to a trailer
through the seal on the trunk lid or
the body, follow the manufacturer's
recommendation to prevent carbon
monoxide entry into the vehicle.
IIf a special body or other equipment
is added for recreational or other us-
age, follow the manufacturer's rec-
ommendation to prevent carbon
monoxide entry into the vehicle.(Some recreational vehicle appli-
ances such as stoves, refrigerator,
heaters, etc. may also generate car-
bon monoxide.)
IThe exhaust system and body should
be inspected by a qualified mechanic
whenever:
a. The vehicle is raised for service.
b. You suspect that exhaust fumes
are entering into the passenger
compartment.
c. You notice a change in the sound
of the exhaust system.
d. You have had an accident involv-
ing damage to the exhaust system,
underbody, or rear of the vehicle.
THREE WAY CATALYST
The three way catalyst is an emission control
device installed in the exhaust system. Ex-
haust gases in the converter are burned at
high temperatures to help reduce pollutants.
PRECAUTIONS WHEN STARTING
AND DRIVING
4-2
Z01.2.1/A32-DX
Page 111 of 197

If you have a flat tire, follow the instructions
below.
Stopping the vehicle
1. Safely move the vehicle off the road away
from traffic.
2. Turn on the hazard warning flashers.
3. Park on a level surface and apply the
parking brake. Shift the manual transmis-
sion into reverse (automatic transmission in
ªPº).
4. Turn off the engine.
IMake sure that the parking brake is
securely applied and the manual
transmission is shifted into reverse
(automatic transmission in ªPº).
INever change tires when the vehicle
is on a slope, ice or slippery areas.
This is dangerous.
INever change tires if oncoming traffic
is close to your vehicle. Wait for pro-
fessional road assistance.
IRaise the hood to warn other traffic,and to signal professional road assis-
tance personnel that you need assis-
tance.
IHave all passengers get out of the
vehicle and stand in a safe place,
away from traffic and clear of the
vehicle.
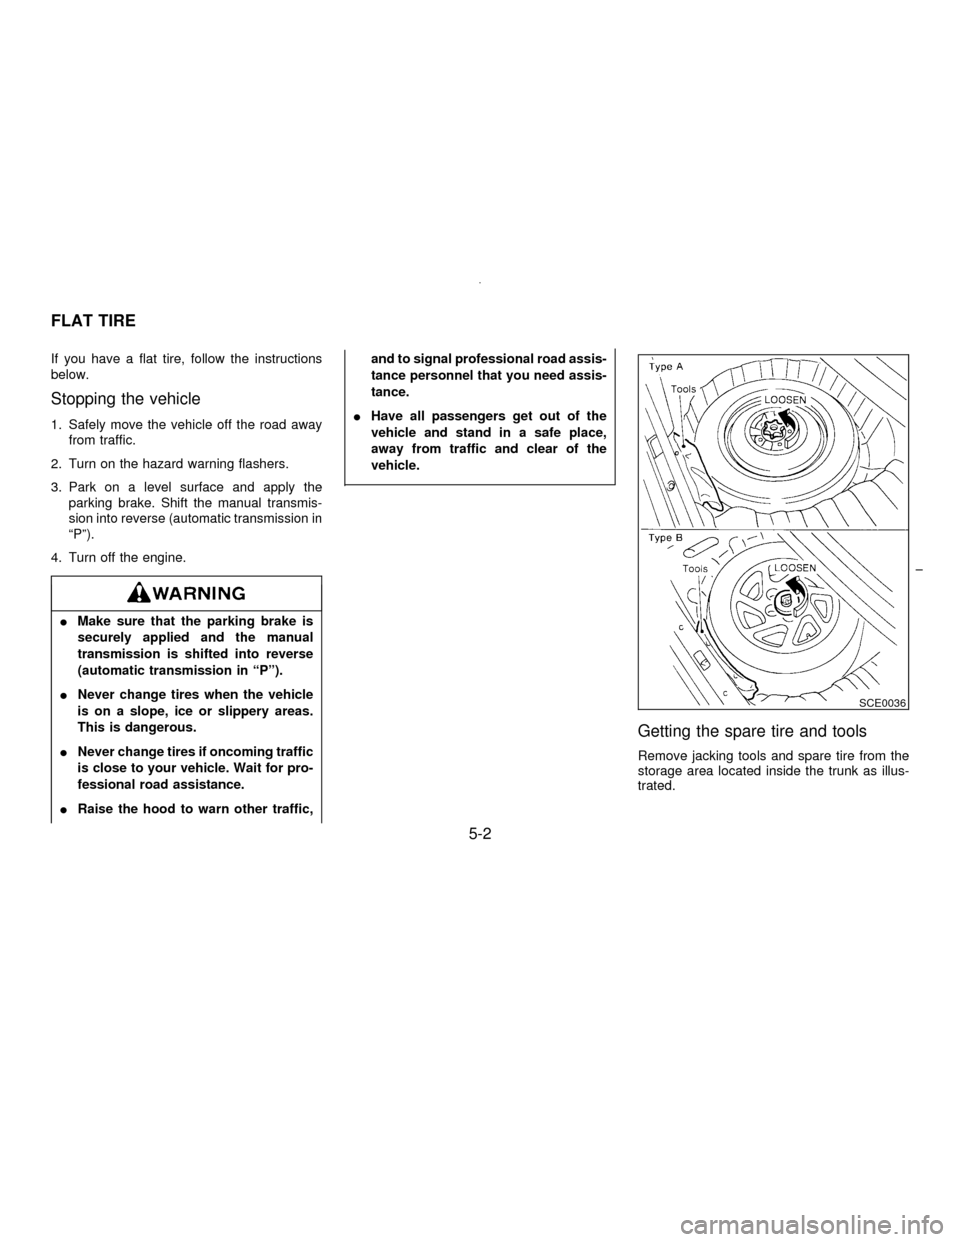
Getting the spare tire and tools
Remove jacking tools and spare tire from the
storage area located inside the trunk as illus-
trated.
SCE0036
FLAT TIRE
5-2
Z01.2.1/A32-DX
Page 150 of 197

Replacing the headlight bulb
1. Insert the bulb into the headlight reflector
with the flat side of the plastic base facing
upward.
2. Install the bulb retaining ring and turn it
clockwise until it stops.
3. Push the electrical connector into the bulb
plastic base until it snaps and stops.
DO NOT TOUCH THE BULB.
IUse the same number and wattage as
originally installed:
Wattage 65/45
Bulb no. 9004
IAiming is not necessary after replac-
ing the bulb. When aiming adjust-
ment is necessary, contact your NIS-
SAN dealer.
IDo not leave the bulb out of the head-
light reflector for a long period of time
as dust, moisture, and smoke may
enter the headlight body and affect
the performance of the headlight.
OTHER LIGHTS
Item Wattage (W) Bulb No.
Cornering/clearance 27/8 1157
Front turn signal light 27 1156
Front side marker light 3.8 194
Front fog light 55
Rear combination light
Turn signal 27 1156
Stop/Tail 27/8 1157
Back-up 27 1156
Rear side marker light 3.8 194
License plate light 5
High-mounted stop light 27 1156
Interior light 10
Front personal light 10
Step light 2.7 161
Trunk light 3.4 158
Vanity mirror light 1.4 Ð
7-23
Z01.2.1/A32-DX