1996 NISSAN FRONTIER display
[x] Cancel search: displayPage 10 of 198

The digital clock displays time regardless of
ignition switch position. When the ignition
key is in the ACC or ON position, the clock
illuminates.
Adjusting the time
Turn the adjust knob counterclockwise to
advance the hour display.
Turn the adjust knob clockwise to advance
the minute display.
Resetting the time
To reset the time to the time signal, push the
adjust knob.
For example, if the adjust knob is depressed
while the time is between 8:00 and 8:29, the
display resets to 8:00. If depressed while it
is between 8:30 and 8:59, the display resets
to 9:00.
Once the power supply is disconnected, the
clock starts to operate from the time 1:00. It
may be necessary to adjust the time.
SIC0047A
INSTRUMENT CLUSTER CLOCK
(If so equipped)
1-5
ZX
Page 40 of 198

Warning labels about the supplemental air
bag system are placed in the vehicle as
shown in the illustration.The supplemental air bag light, displaying
AIR BAG in the instrument panel, monitors
the circuits of the supplemental air bag. The
circuits monitored by the supplemental air
bag light are the diagnosis sensor unit, the
supplemental air bag module and all related
wiring.
When the ignition key is in the ON or START
position, the supplemental air bag warning
light illuminates for about 7 seconds and
then turns off. This means the system is
operational.
If any of the following conditions occur, the
supplemental air bag needs servicing and
APD0705APD0706
WARNING LABELS SUPPLEMENTAL AIR BAG
WARNING LIGHT
2-15
ZX
Page 64 of 198

AM-FM ELECTRONIC TUNING
RADIO WITH CASSETTE
PLAYER
RADIO OPERATION
Push the ON-OFF/VOL knob to turn the
radio on. Push the ON-OFF/VOL button
once more to turn the radio off.
Turn the ON-OFF/VOL knob to adjust the
volume.
Inserting a cassette tape into the cassette
player while the radio is on turns the radio
off and turns the cassette player on.
Pushing the ON-OFF/VOL knob while the
cassette tape is playing turns the cassette
player off.
Clock Operation
By pressing the CLOCK button, you can
alternate the clock and the radio/cassette
tape options in the display.
Clock Set
Depressing the CLOCK and thebut-
tons together sets hours. Depressing the
CLOCK and
buttons together sets min-
utes.
Clock Priority Mode
In this mode the clock is shown in the
display. If any radio or cassette tape func-
tions are activated, the radio (or cassette
tape) display illuminates for ten seconds
then returns to the clock mode.
NOTE:
After clock adjustment, the radio is in the
clock priority mode.
Radio/cassette tape priority mode
In this mode, the radio station illuminates in
the display during radio operation. During
cassette tape operation, TAPE illuminates
in the display.
Selecting the desired band
Push the band select button (FM/AM) to
change from AM to FM reception.
The stereo indicator illuminates during FM
stereo reception. When the stereo broad-cast signal is weak, the radio automatically
changes from stereo to monaural reception.
Tuning
WARNING
The radio should not be tuned while
driving in order that full attention may
be given to the driving operation.
Manual tuning
Push down either manual tuning button
or.
SEEK tuning
Push the SEEK/SCAN tuning button
for less than 1.5 seconds. SEEK tun-
ing begins from low to high frequencies and
stops at the next broadcasting station. Push
the button again for less than 1.5 seconds,
and the next highest broadcasting station is
tuned. Once the highest broadcasting sta-
tion is reached, the radio continues in the
SEEK mode at the lowest broadcast station.
SCAN tuning
Push the SEEK/SCAN tuning button
for more than 1.5 seconds. SCAN
3-11
ZX
Page 65 of 198

illuminates in the display window. SCAN
tuning begins from low to high frequencies
and stops at each broadcasting station for
five seconds. Pushing the button again dur-
ing this five second period stops SCAN
tuning and the radio remains tuned to that
station.
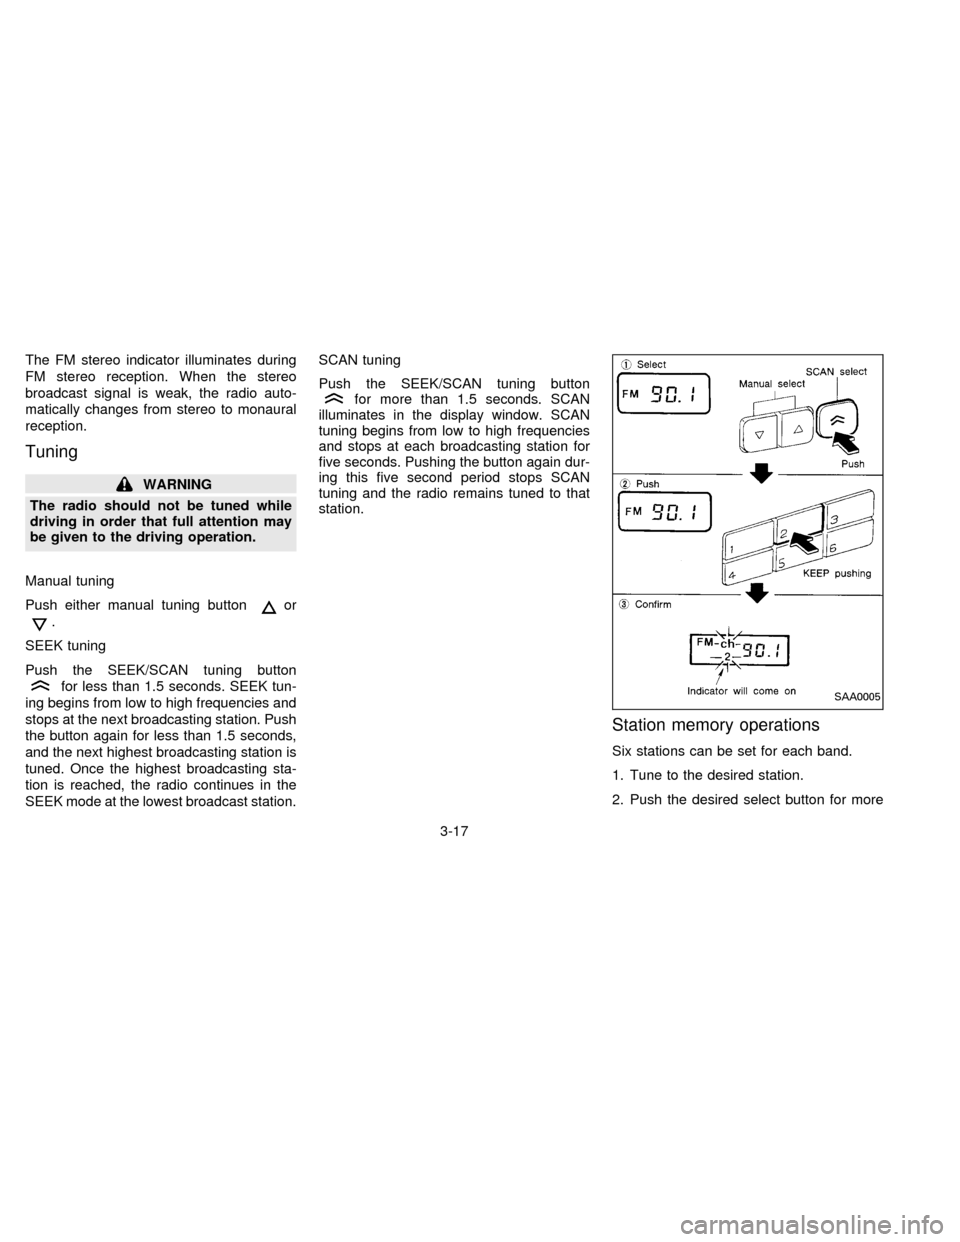
Station memory operations
Six stations can be set for each band.
1. Tune to the desired station.
2. Push the desired select button for morethan 2 seconds. For example, in the
diagram ch2 is to be memorized. The
radio mutes when the select button is
pushed.
3. The indicator, ch2, then comes on in the
display and the sound resumes. Memo-
rizing is now complete.
4. Other buttons can be set in the same
manner.
If the battery cable is disconnected, or if the
fuse blows, the radio memory is cancelled.
In that case, reset the desired stations.
HA1088
3-12
ZX
Page 67 of 198

The cassette tape automatically changes
direction to play the other side when the first
side is complete. At this time, the arrow in
the display window changes direction.
Fast forwarding or rewinding the
tape
Push either the FF (fast forward) or REW
(rewind) button for the desired direction.
The
orsymbol illuminates in the
display. To stop the FF or REW function,
press the PLAY/STOP button.
Automatic Program Search (APS)
fast forwarding or APS rewinding
the tape
Push either the APS FF or APS REW button
while the tape is playing. The tape runs
quickly, stops, then plays the next selection.
The
orsymbol illuminates in
the display.
This system searches for the blank intervals
between selections. If there is a blank inter-
val within one program or there is no interval
between programs, the system may not
stop in the desired or expected location.
Changing the direction of tape play
Push the PROG (program) select button.
The
orsymbol illuminates in the
display window to indicate which program
side is playing.
PLAY/STOP button
Push the PLAY/STOP button to stop cas-
sette tape play and turn the audio system
off. Press the PLAY/STOP button again to
resume cassette tape play.
Also use the PLAY/STOP button to resume
play when the tape is in the fast forward or
rewind mode.
Dolby NR (noise reduction)
Push theDOLBY NR button for
Dolby NR encoded tapes to reduce high
frequency tape noise. The indicator light
comes on.
Dolby NR is manufactured under license
from Dolby Laboratories Licensing Corpora-
tion. DOLBY NR and the double-D symbol
are trademarks of Dolby Laboratories Li-
censing Corporation.
If in the clock priority mode when the
button is pressed,and TAPE il-luminate in the display window for about ten
seconds. The clock mode than returns to
the display window.
Metal or chrome tape usage
The cassette player is automatically set to
high performance play when playing a metal
or chrome cassette tape. The indicator
METAL comes on when playing a metal or
chrome cassette tape.
Ejecting the cassette tape
Push the EJECT button.
The cassette tape automatically comes out.
Precautions on cassette player op-
eration
cTo maintain good quality sound, NIS-
SAN recommends using cassette
tapes of 60 minutes or shorter in
length.
cCassette tapes should be removed
from the player when not in use. Store
cassettes in their protective cases,
away from direct sunlight, heat, mois-
ture and magnetic sources.
3-14
ZX
Page 70 of 198

The FM stereo indicator illuminates during
FM stereo reception. When the stereo
broadcast signal is weak, the radio auto-
matically changes from stereo to monaural
reception.
Tuning
WARNING
The radio should not be tuned while
driving in order that full attention may
be given to the driving operation.
Manual tuning
Push either manual tuning button
or
.
SEEK tuning
Push the SEEK/SCAN tuning button
for less than 1.5 seconds. SEEK tun-
ing begins from low to high frequencies and
stops at the next broadcasting station. Push
the button again for less than 1.5 seconds,
and the next highest broadcasting station is
tuned. Once the highest broadcasting sta-
tion is reached, the radio continues in the
SEEK mode at the lowest broadcast station.SCAN tuning
Push the SEEK/SCAN tuning button
for more than 1.5 seconds. SCAN
illuminates in the display window. SCAN
tuning begins from low to high frequencies
and stops at each broadcasting station for
five seconds. Pushing the button again dur-
ing this five second period stops SCAN
tuning and the radio remains tuned to that
station.
Station memory operations
Six stations can be set for each band.
1. Tune to the desired station.
2. Push the desired select button for more
SAA0005
3-17
ZX
Page 72 of 198

CASSETTE TAPE OPERATION
Turn the ignition key to ACC or ON, then
lightly insert the cassette tape into the tape
door.
The cassette tape automatically pulls into
the player. The word TAPE and an arrow
indicating tape side illuminates in the dis-
play window.
The radio turns off and the cassette tape
begins to play.
Do not force the cassette tape into the
tape door.Pressing strongly could cause player
damage.
The cassette tape automatically changes
direction to play the other side when the first
side is complete. At this time, the arrow in
the display window changes direction.
PLAY/STOP button
Push the PLAY/STOP button to resume
tape play when:
cthe tape has stopped playing.
cthe tape is in the fast forward mode.
cthe tape is in the rewind mode.
Pressing the PLAY/STOP button during
tape play stops the tape and turns the audio
system off.
Fast forwarding or rewinding the
tape
Push either the FF (fast forward) or REW
(rewind) button for the desired direction.
Automatic Program Search (APS)
fast forwarding or APS rewinding
the tape
Push either the APS FF or APS REW button
while the cassette tape is playing. The tape
runs quickly, stops, then plays the next
selection.
This system searches for the blank intervals
between selections. If there is a blank inter-
val within one program or there is no interval
between programs, the system may not
stop in the desired or expected location.
Changing the direction of tape play
Push the PROG (program) select button.
Dolby NR (noise reduction)
Push theDOLBY NR button for
DOLBY NR encoded tapes to reduce high
frequency tape noise. The indicator light
comes on.
Dolby NR is manufactured under license
from Dolby Laboratories Licensing Corpora-
tion. Dolby NR and the double-D symbol are
trademarks of Dolby Laboratories Licensing
Corporation.
AIC0713
3-19
ZX