1996 NISSAN FRONTIER cooling
[x] Cancel search: coolingPage 56 of 198
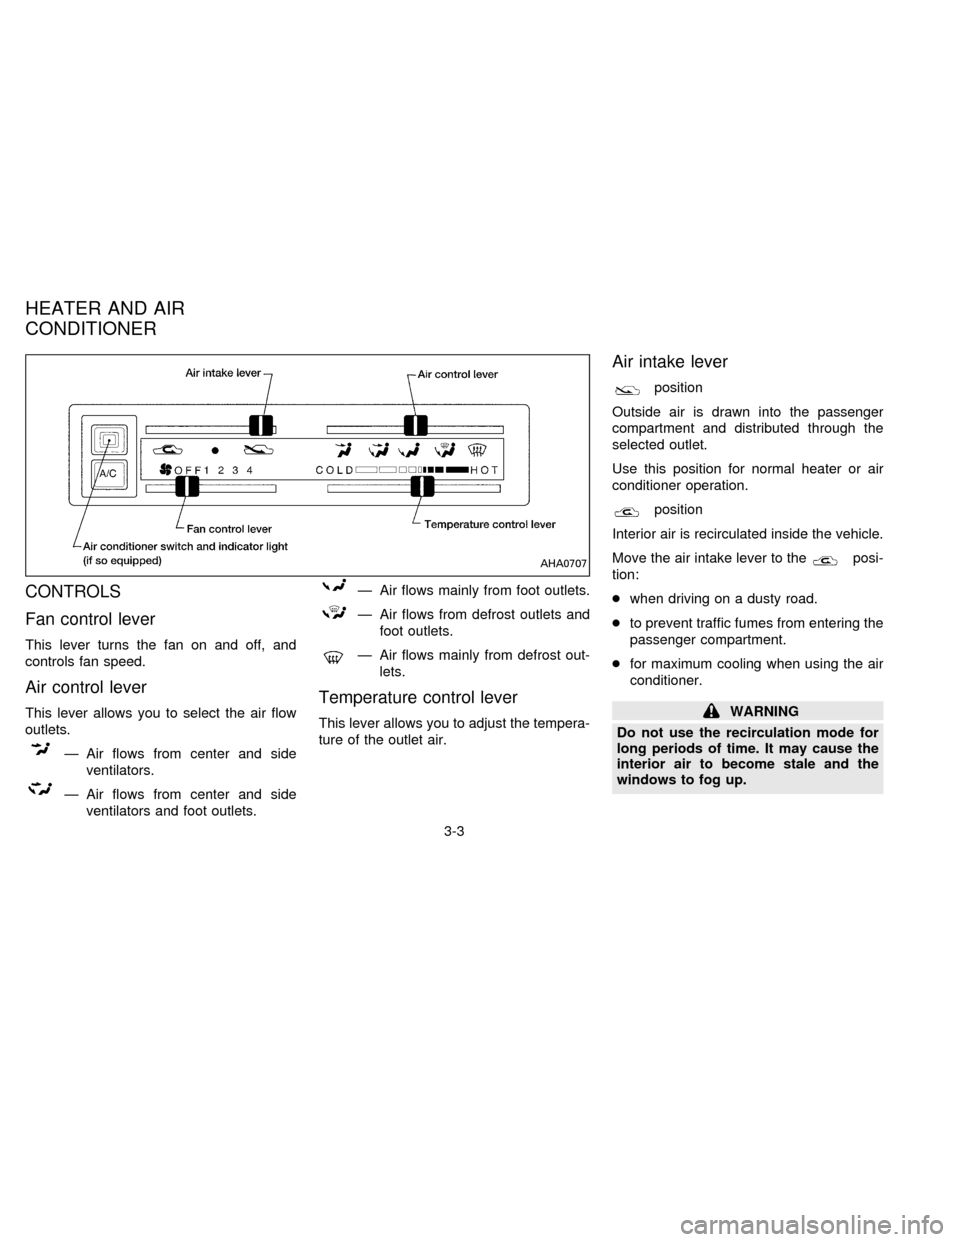
CONTROLS
Fan control lever
This lever turns the fan on and off, and
controls fan speed.
Air control lever
This lever allows you to select the air flow
outlets.
Ð Air flows from center and side
ventilators.
Ð Air flows from center and side
ventilators and foot outlets.
Ð Air flows mainly from foot outlets.
Ð Air flows from defrost outlets and
foot outlets.
Ð Air flows mainly from defrost out-
lets.
Temperature control lever
This lever allows you to adjust the tempera-
ture of the outlet air.
Air intake lever
position
Outside air is drawn into the passenger
compartment and distributed through the
selected outlet.
Use this position for normal heater or air
conditioner operation.
position
Interior air is recirculated inside the vehicle.
Move the air intake lever to the
posi-
tion:
cwhen driving on a dusty road.
cto prevent traffic fumes from entering the
passenger compartment.
cfor maximum cooling when using the air
conditioner.
WARNING
Do not use the recirculation mode for
long periods of time. It may cause the
interior air to become stale and the
windows to fog up.
AHA0707
HEATER AND AIR
CONDITIONER
3-3
ZX
Page 58 of 198

4. Move the temperature control lever to the
desired position between the middle and
the HOT position.
Operating tips
Clear snow and ice from the wiper blade
and air inlet in front of the windshield.
This improves heater and defroster op-
eration.
AIR CONDITIONER OPERATION
(If so equipped)
Start the engine, move the fan control lever
to the desired (1 to 4) position, and push in
the air conditioner switch to activate the air
conditioner. When the air conditioner is on,
cooling and dehumidifying functions are
added to the heater operation.
The air conditioner cooling function op-
erates only when the engine is running.
Cooling
This mode cools and dehumidifies.
1. Move the air intake lever to the
po-
sition.
2. Move the air control lever to the
position.3. Move the fan control lever to the desired
position.
4. Push in the air conditioner switch. The
indicator light comes on.
5. Move the temperature control lever to the
desired position.
cFor quick cooling when the outside tem-
perature is high, move the air intake lever
to the
position. Be sure to return
the air intake lever to the
position
for normal cooling.
Dehumidified heating
This mode heats and dehumidifies.
1. Move the air intake lever to the
po-
sition.
2. Move the air control lever to the
position.
3. Move the fan control lever to the desired
position.
4. Push in the air conditioner switch. The
indicator light comes on.
5. Move the temperature control lever to the
desired position.
Dehumidified defrosting
This mode defrosts/defogs the windows and
dehumidifies.
1. Move the air intake lever to the
po-
sition.
2. Move the air control lever to the
position.
3. Move the fan control lever to the desired
position.
4. Push in the air conditioner switch. The
indicator light comes on.
5. Move the temperature control lever to the
desired position.
Operating tips
cKeep windows and sunroof closed while
operating the air conditioner.
cAfter parking in the sun, drive for two or
three minutes with the windows open to
vent hot air from the passenger compart-
ment. Then, close the windows. This
allows the air conditioner to cool the
interior more quickly.
cThe air conditioning system should be
operated for about ten minutes at least
3-5
ZX
Page 59 of 198

once a month, especially in winter. This
helps prevent damage to the system due
to lack of lubrication.
cIf the coolant temperature gauge ex-
ceeds the (hot) position, turn the air
conditioner off. Have your vehicle in-
spected by a NISSAN dealer. See ``If
your vehicle overheats'' in the ``In case of
emergency'' section for additional infor-
mation.
AIR FLOW CHARTS
The following charts show the switch and
lever positions forMAXIMUM and QUICK
heating, cooling or defrosting.
The air intake lever should always be in
the
position for heating and de-
frosting.
AHA0700
3-6
ZX
Page 102 of 198
the transfer gear. The rear wheels lock if the
front wheels lock. If this happens, the rear
anti-lock brake system may cease function-
ing but the ordinary brakes will continue to
operate normally. The ABS brake warning
light will then come on.
The above condition is not a malfunction
and the rear anti-lock brake system recov-
ers when the engine is started again. The
ABS brake warning light then goes off.
Using the System
Depress the brake pedal and hold it down.
It is not necessary to pump the brake pedal.
Doing so may result in increased stopping
distances.
WARNING
The rear anti-lock brake system is a
sophisticated device. But it cannot pre-
vent accidents resulting from careless
or dangerous driving techniques. It can
help maintain vehicle control under
some conditions, but remember that
the stopping distance on slippery sur-
faces will be longer than on normal
surfaces even with rear wheel ABS.Stopping distances may also be long-
eron rough, gravel, or snow covered
roads, or if you are using tire chains.
Always maintain a safe distance from
the vehicle in front of you. Ultimately
the responsibility for safety of self and
others rests in the hands of the driver.
Tire type and condition may also affect
braking effectiveness.
cWhen replacing tires, install the
specified size of tires on all 4 wheels.
cWhen installing a spare tire, make
sure it is the proper size and type as
specified on the tire placard. See
``Tire placard'' in the ``Technical and
consumer information'' section.
Freeing a frozen door lock
To prevent a door lock from freezing, apply
de-icer or glycerin through the key hole. If
the lock becomes frozen, heat the key be-
fore inserting it into the key hole.
Anti-freeze
In the winter when it is anticipated that the
temperature will drop below 32ÉF (0ÉC),
check anti-freeze (ethylene glycol base) to
assure proper winter protection. For details,
see ``Engine cooling system'' in the ``Do-it-
yourself operations'' section.
Battery
If the battery is not fully charged during
extremely cold weather conditions, the bat-
tery fluid may freeze and damage the bat-
tery. To maintain maximum efficiency, the
battery should be checked regularly. For
details, see ``Battery'' in the ``Do-it-yourself
operations'' section.
Draining of coolant water
If the vehicle is to be left outside without
anti-freeze, drain the cooling system by
opening the drain valves located under the
radiator and on the engine block. Refill
COLD WEATHER DRIVING
CAUTIONS
4-27
ZX
Page 113 of 198
To start your engine with a booster battery,
the instructions and precautions below must
be followed.
CAUTION
cIf done incorrectly, jump starting can
lead to a battery explosion, resulting
in severe injury or death. It could
also damage your vehicle.
cExplosive hydrogen gas is always
present in the vicinity of the battery.
Keep all sparks and flames away
from the battery.
cDo not allow battery fluid to come
into contact with eyes, skin, cloth or
painted surfaces. Battery fluid is a
corrosive sulphuric acid solution
which can cause severe burns. If the
fluid should come into contact with
anything, immediately flush the con-
tacted area with water.
cKeep battery out of the reach of
children
cThe booster battery must be rated at
12 volts. Use of an improper rated
battery can damage your vehicle.
c
Whenever working on or near a bat-
tery, always wear suitable eye protectors (e.g., goggles or industrial safety
spectacles) and remove rings, metal
bands, or any other jewelry. Do not lean
over the battery when jump starting.
cDo not attempt to jump start a frozen
battery. It could explode and cause
serious injury
cYour vehicle has an automatic en-
gine cooling fan. It could come on at
any time. Keep hands and other ob-
jects away from it.
Always follow the instructions belowexactly. Failure to do so could result
in damage to the charging system and
cause personal injury.
1. If the booster battery is in another ve-
hicle, position the two vehicles to bring
their batteries into close proximity to
each other.
Do not allow the two vehicles to touch.
2. Apply the parking brake. Move the shift
lever to Neutral (N) (on automatic trans-
mission models, move the lever to P).
Switch off all unnecessary electrical sys-
tems (lights, heater, air conditioner, etc.).
3. Remove vent caps on the battery (if so
equipped). Cover the battery with an old
cloth to reduce explosion hazard.
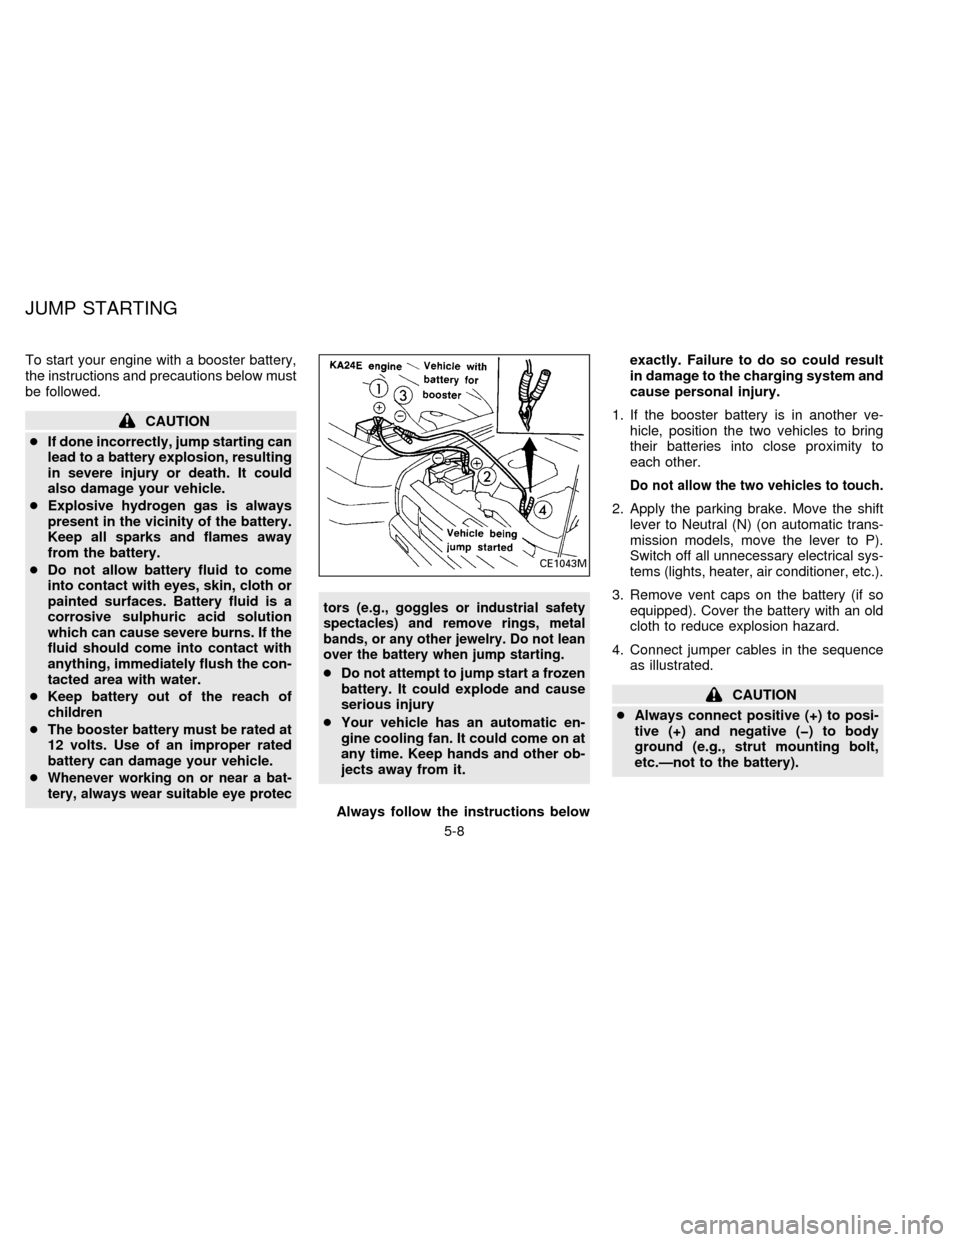
4. Connect jumper cables in the sequence
as illustrated.
CAUTION
cAlways connect positive (+) to posi-
tive (+) and negative (þ) to body
ground (e.g., strut mounting bolt,
etc.Ðnot to the battery).
CE1043M
JUMP STARTING
5-8
ZX
Page 115 of 198
hot and fan control to high speed.
3. If engine overheating is caused by climb-
ing a long hill on a hot day, run the engine
at a fast idle (approximately 1,500 rpm)
until the temperature gauge indication
returns to normal.
4. Get out of the vehicle. Look and listen for
steam or coolant escaping from the ra-
diator before opening the hood. Wait until
no steam or coolant can be seen before
proceeding.
5. Open the engine hood.
WARNING
If steam or water is coming from the
engine, stand clear to prevent getting
burned.
6. Visually check drive belts for damage or
looseness. Also check if the cooling fan
is running. The radiator hoses and radia-
tor should not leak water.If coolant is
leaking, the water pump belt is missing or
loose, or the cooling fan does not run,
stop the engine
WARNING
cBe careful not to allow your hands,
hair, jewelry or clothing to come into
contact with, or to get caught in, the
running fan or belts.
7. After the engine cools down, check the
coolant level in the reservoir tank with the
engine running. Add coolant to the res-
ervoir tank if necessary. Have your ve-
hicle repaired at the nearest NISSAN
dealer.When towing your vehicle, all State (Provin-
cial in Canada) and local regulations for
towing must be followed. Incorrect towing
equipment could damage your vehicle. Tow-
ing instructions are available from your NIS-
SAN dealer. Local service operators are
generally familiar with the applicable laws
and procedures for towing. To assure proper
towing and to prevent accidental damage to
your vehicle, NISSAN recommends having a
service operator tow your vehicle. It is advis-
able to have the service operator carefully
read the following precautions:
WARNING
cNever ride in a vahicle that is being
towed.
cNever get under your vehicle after is
has been lifted by a tow truck.
CAUTION
cWhen towing, make sure that the
transmission, axles, steering system
and powertrain are in working con-
dition. If any unit is damaged, a dolly
must be used.
cWhen towing with the front wheels
TOW TRUCK TOWING
5-10
ZX
Page 117 of 198
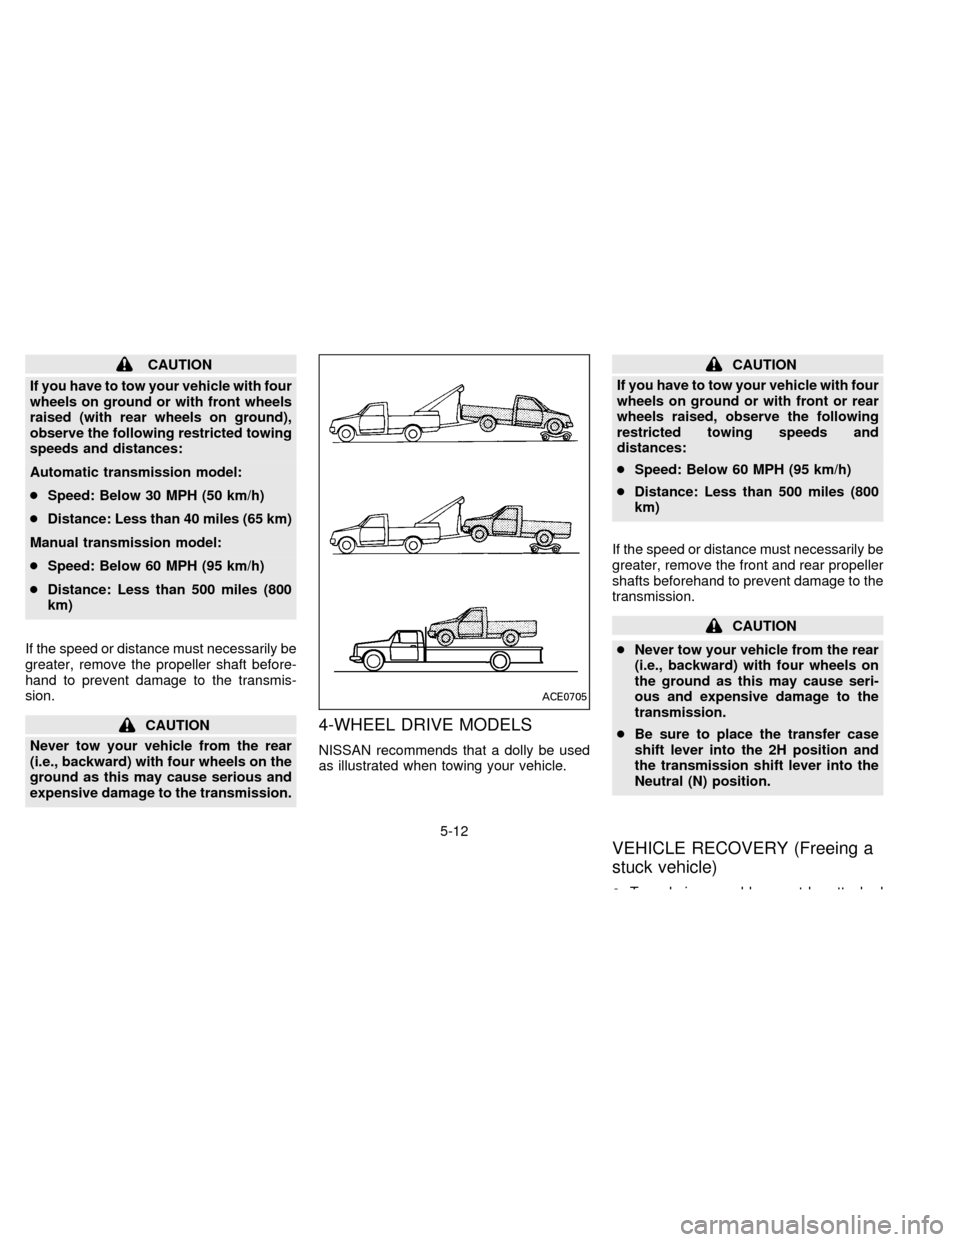
CAUTION
If you have to tow your vehicle with four
wheels on ground or with front wheels
raised (with rear wheels on ground),
observe the following restricted towing
speeds and distances:
Automatic transmission model:
cSpeed: Below 30 MPH (50 km/h)
cDistance: Less than 40 miles (65 km)
Manual transmission model:
cSpeed: Below 60 MPH (95 km/h)
cDistance: Less than 500 miles (800
km)
If the speed or distance must necessarily be
greater, remove the propeller shaft before-
hand to prevent damage to the transmis-
sion.
CAUTION
Never tow your vehicle from the rear
(i.e., backward) with four wheels on the
ground as this may cause serious and
expensive damage to the transmission.4-WHEEL DRIVE MODELS
NISSAN recommends that a dolly be used
as illustrated when towing your vehicle.
CAUTION
If you have to tow your vehicle with four
wheels on ground or with front or rear
wheels raised, observe the following
restricted towing speeds and
distances:
cSpeed: Below 60 MPH (95 km/h)
cDistance: Less than 500 miles (800
km)
If the speed or distance must necessarily be
greater, remove the front and rear propeller
shafts beforehand to prevent damage to the
transmission.
CAUTION
cNever tow your vehicle from the rear
(i.e., backward) with four wheels on
the ground as this may cause seri-
ous and expensive damage to the
transmission.
cBe sure to place the transfer case
shift lever into the 2H position and
the transmission shift lever into the
Neutral (N) position.
VEHICLE RECOVERY (Freeing a
stuck vehicle)
cTow chains or cables must be attached
only to the main structual members of the
vehicle.
cPulling devices should be routed so they
do not touch any part of the suspension,
steering, brake or cooling systems.
cAlways pull the cable straight out from
the front or rear of the vehicle. Never pull
on the vehicle at an angle.
cPulling devices such as ropes or canvas
straps are not recommended for use in
vehicle towing or recovery.
ACE0705
5-12
ZX
Page 124 of 198

7 Do-it-yourself operations
Maintenance precautions ................................... 7-2
Engine compartment check locations ................ 7-3
Engine cooling system ....................................... 7-4
Engine oil ............................................................ 7-6
Automatic transmission fluid .............................. 7-9
Power steering fluid .......................................... 7-11
Brake and clutch fluid ....................................... 7-11
Window washer fluid ........................................ 7-12
Battery .............................................................. 7-13
Drive belts ........................................................ 7-14
Spark plug replacement ................................... 7-14
Air cleaner housing filter .................................. 7-15
Wiper blades .................................................... 7-16
Parking brake check ......................................... 7-17
Brake pedal ...................................................... 7-18
Brake booster ................................................... 7-19
Clutch pedal ..................................................... 7-19
Fuses ................................................................ 7-20
Light bulbs ........................................................ 7-20
Bulb replacement ............................................. 7-22
Wheels and tires .............................................. 7-24
Clutch housing ..................................... 7-29
ZX