Page 122 of 320

Memory Profile System
The Personality Memory Feature customizes your
Continental for up to two (2) drivers. The
following features are automatically recalled when
unlocking the doors using the remote entry
transmitter, keyless entry keypad, or by pressing
the Memory 1 or Memory 2 switches on the
driver's door: All driver's seat positions except power lumbar
and head restraint. Both left and right outside mirror settings. Radio station presets including the last selected
station and band and 0 preset preferences on
FMI, FM2, and AM. Instrument panel dimming setting. Autolamp delay time-out setting. Ride/Steering menu setting. Feature Menu settingsThe Ride/Steering menu is located in the
Message Center. The RIDE display allows you
to adjust the suspension feel to FIRM,
NORMAL, or PLUSH.
Pressing the Ride/Steering menu switch again
brings the STEERING display. This allows you
to adjust steering effort to LOW, NORMAL, or
HIGH.
For more information on ride/steering options,
see Road Calibrated Suspension later in this
chapter.
Personality Memory also allows you to
customize settings from the Feature menu
located in the Message Center. The Feature
menu contains five (5) features that you can
enable or disable. The features are listed in the
order they appear in the Feature menu. EXPRESS WINDOW - for one tap down
operation of the driver's window.
119
Page 126 of 320
Road Calibrated Suspension
Your Continental is equipped with a ride control
system that is designed to read disturbances in the
road surface every six inches at 60 mph (100 km/h)
to provide you with optimal driving response.
Ride control allows you to chose both a ride feel
and steering effort that best flts your personal
driving style. These options may be selected by
using the RIDE/STEER Message Center button.Pressing this button once will allow you to adjust
your RIDE CONTROL settings, between
NORMAL, PLUSH and FIRM. The settings are
changed by pressing the SELECT button while
RIDE CONTROL is displayed.
Pressing the RIDE/STEER button a second time
will allow you to adjust the STEERING
EFFORT settings between NORMAL, LOW,
and HIGH. The settings are changed by pressing
the SELECT button while STEERING EFFORT
is displayed.
123
Page 127 of 320
Steering
SuspensionHighNormalLowFirmStiff steeringStiff suspensionTrue sports carWinding roadsOptimum steering effortStiff suspensionSports car ride with luxury sedan steering feelNon-optimum positionNot allowedCannot reach this stateNormalStiff steeringIdeal rideContemporary ride with precise steerIdeal steering and suspensionBest balance of vehicle chassis systems'Set it and forget it" modeEasy steeringIdeal rideTraditional luxury steer and contemporary ridePlushStiff steeringSoft suspensionLuxury ride with sport steeringIdeal steeringSoft suspensionBroken pavement city trafficEasy steeringSoft suspensionWhat a Lincoln used to be (and can still be!!!)124
Page 189 of 320

Never hold the steering wheel to the extreme right or
left for more than five seconds if the engine is running.
This can damage the power steering pump.
Air Suspension Adaptive Ride
Control System
Your vehicle has an air suspension system with
automatic load leveling and automatic ride control.
This system keeps your vehicle at a constant level by
adding air or releasing air from the springs. Ride and
handling is enhanced by firming shock absorber
performance during certain road conditions, steering
maneuvers, braking, and accelerations and is
returned to the driver selected ride calibration when
driver or road surface induced motion changes are
completed.
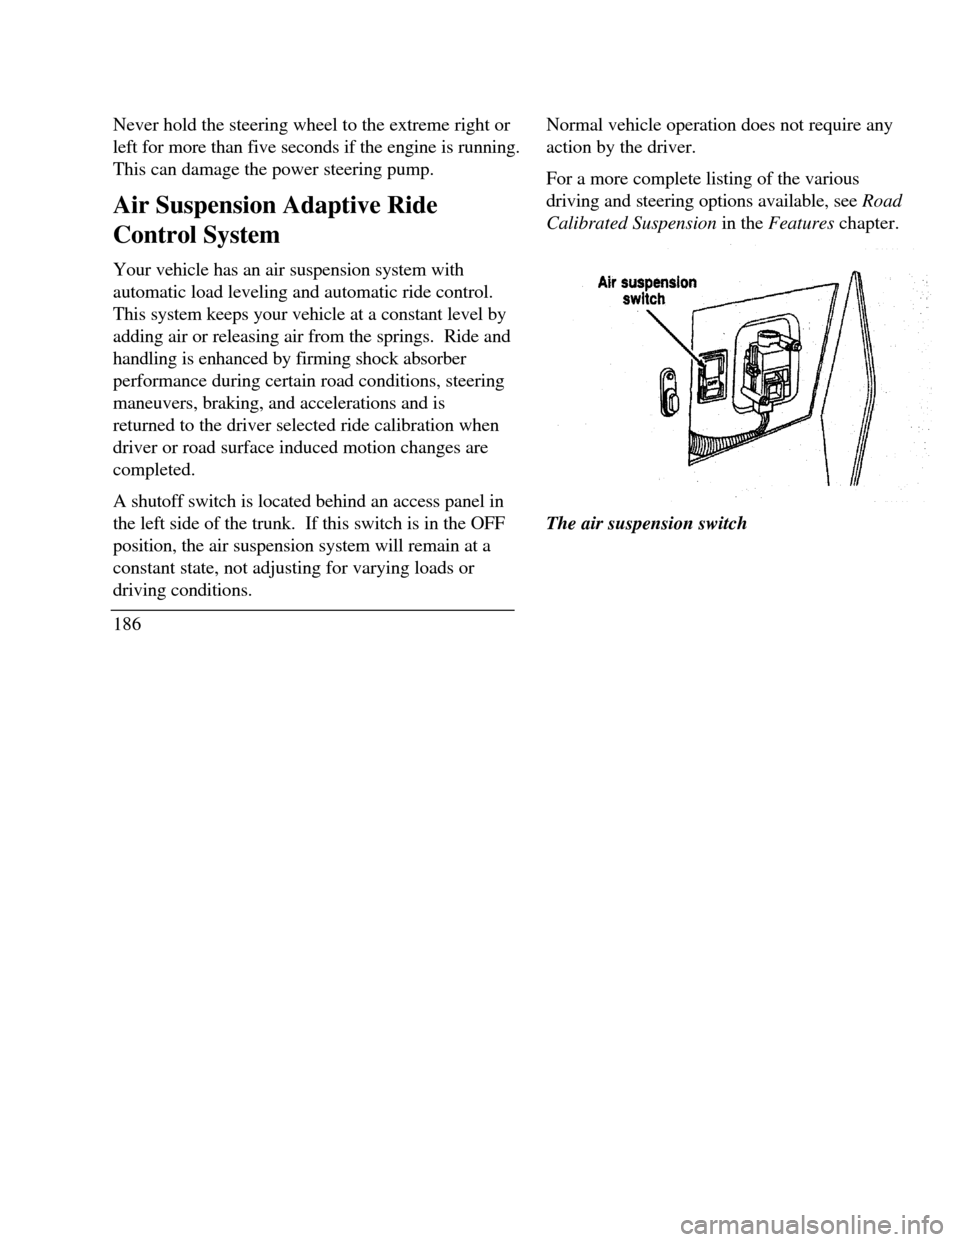
A shutoff switch is located behind an access panel in
the left side of the trunk. If this switch is in the OFF
position, the air suspension system will remain at a
constant state, not adjusting for varying loads or
driving conditions.
186Normal vehicle operation does not require any
action by the driver.
For a more complete listing of the various
driving and steering options available, see Road
Calibrated Suspension in the Features chapter.Air suspension switchThe air suspension switch
Page 209 of 320
To remove the spare tire:
1.Remove the spare tire cover.
2.Unscrew the wing-nut holding down the spare
tire.
3. Lift out the spare tire and jack kit.
Preparing to Change the Tire
1.Make sure that your vehicle will not move or
roll. Put the gearshift in P (Park). Set the
parking brake and block the wheel that is
diagonally opposite the tire that you are
changing./! WARNINGIf the vehicle slips off the jack, you orsomeone else could be seriously injured.Turn off the air suspension switch prior to jacking.
206/! WARNINGOn vehicles equipped with Air Suspension,turn OFF the Air Suspension switch prior tojacking, hoisting or towing your vehicle.Air suspension switchThe air suspension switch - located in the trunk
Page 212 of 320

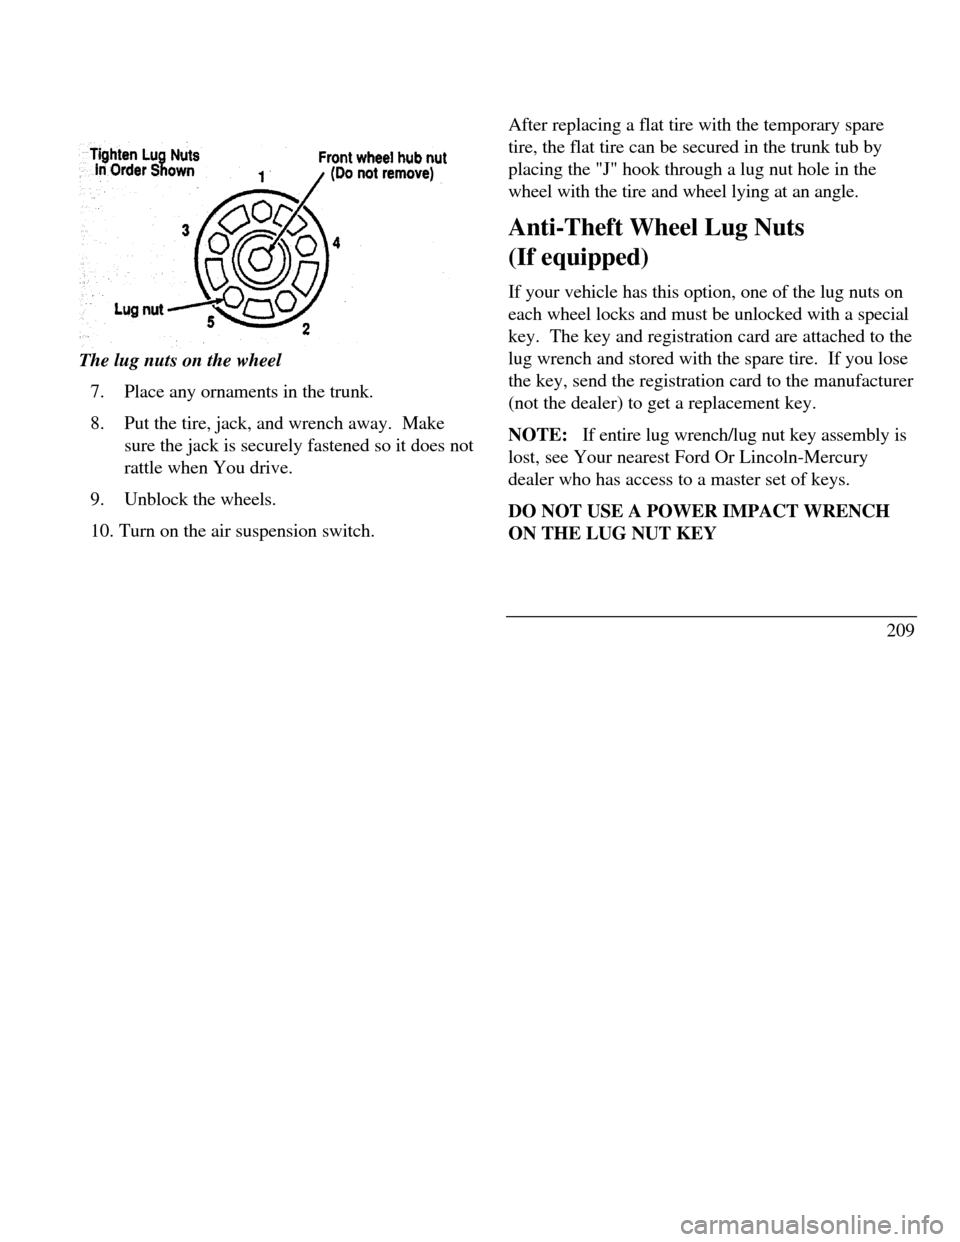
9. Lug nutThe lug nuts on the wheel
7.Place any ornaments in the trunk.
8.Put the tire, jack, and wrench away. Make
sure the jack is securely fastened so it does not
rattle when You drive.
9.Unblock the wheels.
10. Turn on the air suspension switch.After replacing a flat tire with the temporary spare
tire, the flat tire can be secured in the trunk tub by
placing the "J" hook through a lug nut hole in the
wheel with the tire and wheel lying at an angle.
Anti-Theft Wheel Lug Nuts
(If equipped)
If your vehicle has this option, one of the lug nuts on
each wheel locks and must be unlocked with a special
key. The key and registration card are attached to the
lug wrench and stored with the spare tire. If you lose
the key, send the registration card to the manufacturer
(not the dealer) to get a replacement key.
NOTE: If entire lug wrench/lug nut key assembly is
lost, see Your nearest Ford Or Lincoln-Mercury
dealer who has access to a master set of keys.
DO NOT USE A POWER IMPACT WRENCH
ON THE LUG NUT KEY
209
Page 276 of 320
Fuse
LocationMaxi-Fuse
Amp
RatingDescriptionFuse
LocationMaxi-Fuse
Amp RatingDescription1
2
340A
60A
60A· EATC blower motor
· Engine cooling fans
· Air suspension compressor relay1330A
· DSM
· Heated seats
· Driver 4-way power
lumbar seats460A
· ABS module
· EVAC and fill14 30A
· Passenger power seat
· Passenger 4-way power560A
· Fuse panel to LCM
· OBD 111530A
· Luxury radio
· Sub woofer amplifier
· CD player660A
· Fuse panel to LCM CD player1620A
· HI beam730A
· VDM1720A
· Horn840A
· Heated mirrors
· Heated backlight1810A
· Air bags940A
· DDM
· LH power windows
· Door locks19Not used1040A
· RH power windows2010A
· PCM KAPWR1140A
· Ignition switch to fuse panel2110A
· Alternator sensor
· Alternator field supply1240A
· Ignition switch to fuse panel
274
Page 283 of 320
NOTE: The following procedure assumes that
the vehicle's front structure is in factory alignment
condition. If the vehicle has been in an accident
requiring the front end of the vehicle to be
repaired, the horizontal indicator should be
recalibrated by the servicing facility.
Before adjusting your headlamps, you must make
sure that the air suspension has been adjusted to
the proper ride height. In order to do this:
1.Position the vehicle on a level surface.
2.Make sure the air suspension switch in the
luggage compartment is in the ON position.
3.Turn the ignition key to the ON position.
4. Open and close the driver's door to allow the
air suspension to fully level.Hori
zontal adjusting screw Vertical adjusting screw Horizontal indicator Bubble vial
281