Page 138 of 240
Maintenance Schedule
Your authorized Honda dealer knows your car best and can providecompetent, efficient service.
However, service at a dealer is not
mandatory to keep your warranties
in effect. Maintenance may be doneby any qualified service facility or
person who is skilled in this type ofautomotive service. Keep all thereceipts as proof of completion, and
have the person who does the workfill out the Maintenance Record.Check your warranty booklet formore information. We recommend the use of Genuine
Honda parts and fluids whenever you
have maintenance done. These are manufactured to the same high-quality standards as the originalcomponents, so you can be confidentof their perfomance and durability.
U.S. Cars: Maintenance, replacement or
repair of emission control devices
and systems may be done by anyautomotive repair establishment or individual using parts that are
"certified" to EPA standards. According to state and federal
regulations, failure to perform
maintenance on the items marked
with an asterisk (*) will not void youremissions warranties. However,
Honda recommends that all mainte-nance services be performed at the
recommended time or mileage
period to ensure long-term reliability.
MaintenanceProCarManuals.comMain Menu s t Table of Contents
Page 139 of 240
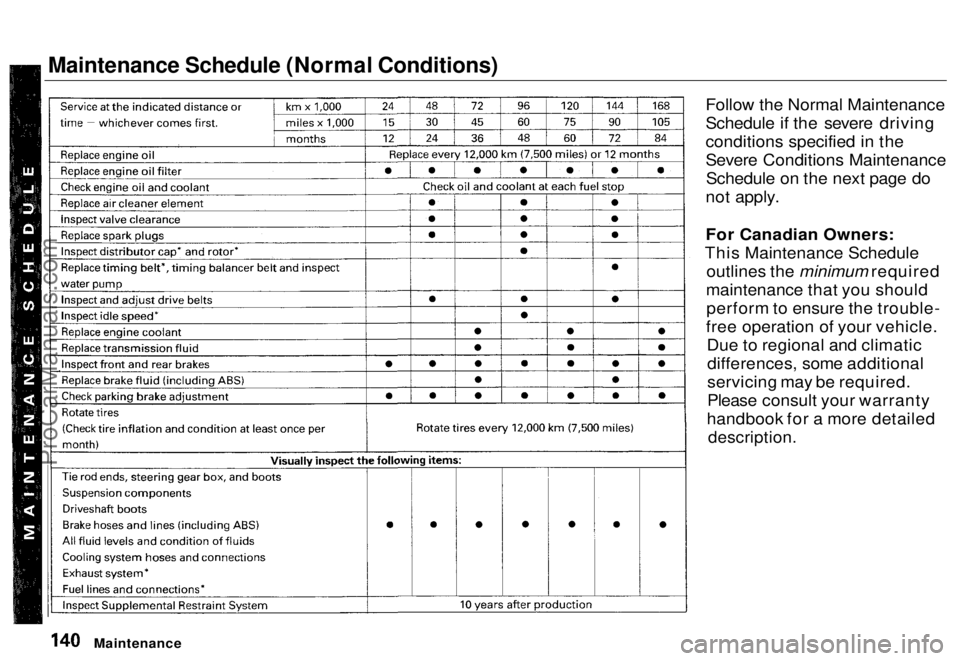
Maintenance Schedule (Normal Conditions)Follow the Normal Maintenance
Schedule if the severe driving
conditions specified in the
Severe Conditions Maintenance
Schedule on the next page do
not apply.
For Canadian Owners:
This Maintenance Schedule outlines the minimum required
maintenance that you should perform to ensure the trouble-
free operation of your vehicle. Due to regional and climaticdifferences, some additional
servicing may be required.
Please consult your warranty
handbook for a more detailed
description.
Maintenance
ProCarManuals.comMain Menu s t Table of Contents
Page 140 of 240
Maintenance Schedule (Severe Conditions)
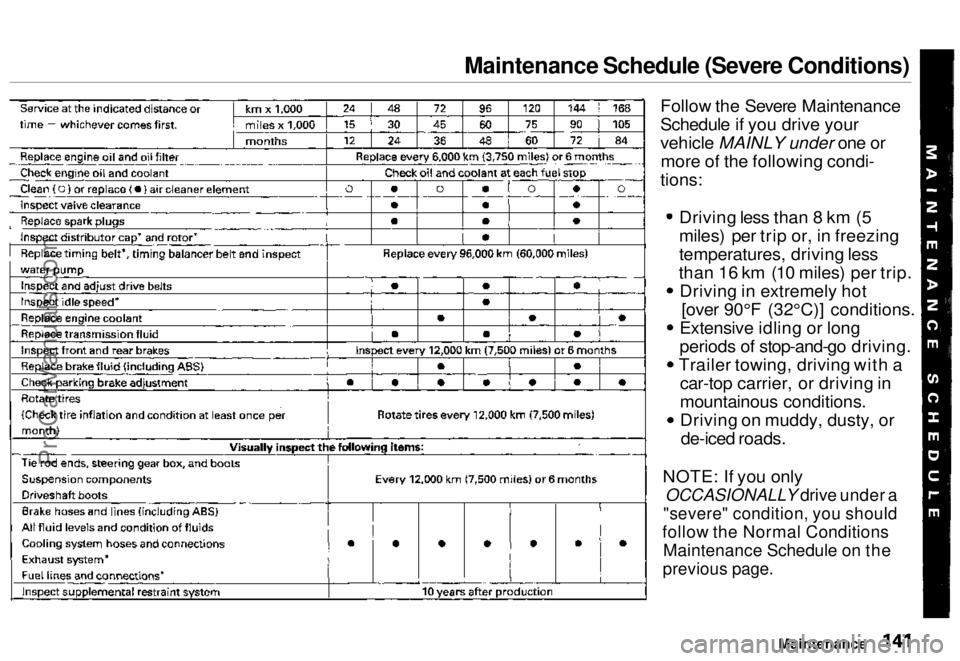
Follow the Severe Maintenance
Schedule if you drive your
vehicle MAINLY under one ormore of the following condi-
tions:
Driving less than 8 km (5
miles) per trip or, in freezing
temperatures, driving less
than 16 km (10 miles) per trip. Driving in extremely hot [over 90°F (32°C)] conditions.
Extensive idling or long
periods of stop-and-go driving.
Trailer towing, driving with a car-top carrier, or driving in
mountainous conditions.
Driving on muddy, dusty, or
de-iced roads.
NOTE: If you only
OCCASIONALLY drive under a
"severe" condition, you should
follow the Normal Conditions Maintenance Schedule on the
previous page.
MaintenanceProCarManuals.comMain Menu s t Table of Contents
Page 142 of 240
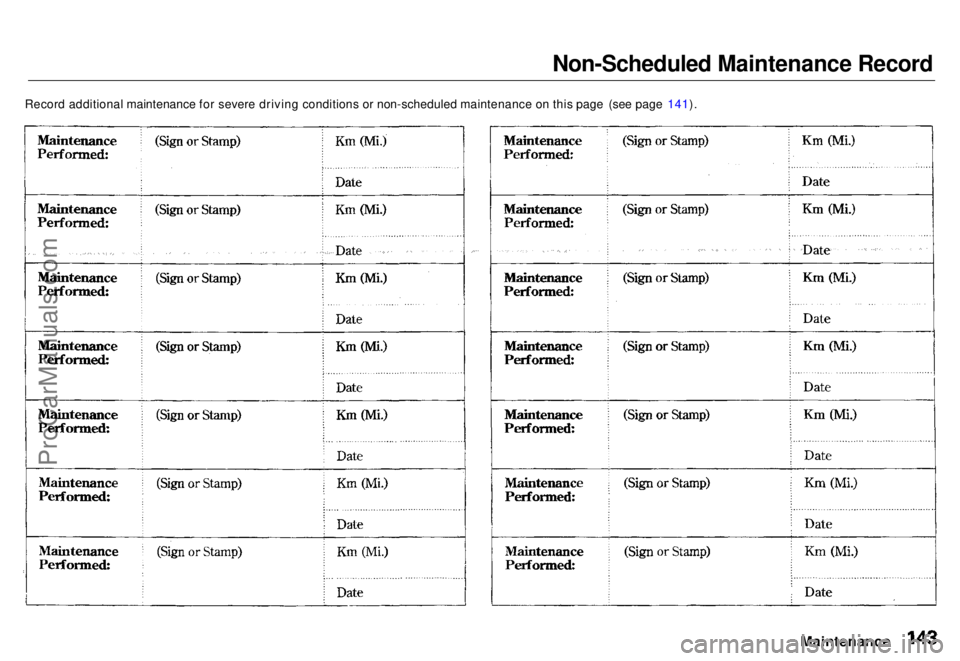
Non-Scheduled Maintenance Record
Record additional maintenance for severe driving conditions or non-scheduled maintenance on this page (see page 141).
MaintenanceProCarManuals.comMain Menu s t Table of Contents
Page 147 of 240
Engine Oil
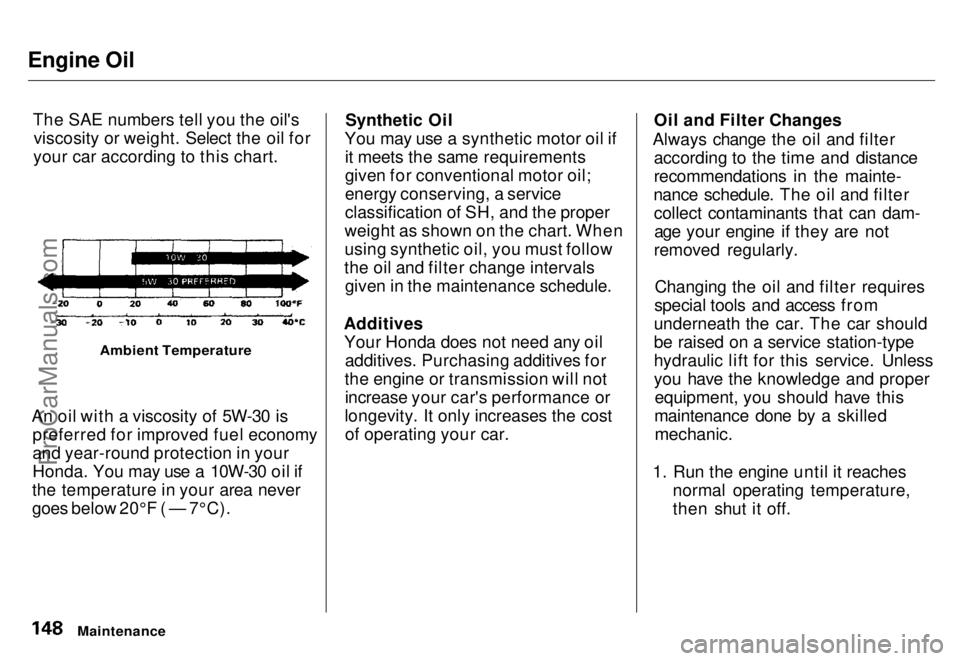
The SAE numbers tell you the oil'sviscosity or weight. Select the oil for
your car according to this chart.
Ambient Temperature
An oil with a viscosity of 5W-30 is preferred for improved fuel economy
and year-round protection in your
Honda. You may use a 10W-30 oil if
the temperature in your area never
goes below 20°F ( — 7°C).
Synthetic Oil
You may use a synthetic motor oil if it meets the same requirements
given for conventional motor oil;
energy conserving, a service
classification of SH, and the proper
weight as shown on the chart. When
using synthetic oil, you must follow
the oil and filter change intervals given in the maintenance schedule.
Additives Your Honda does not need any oil additives. Purchasing additives for
the engine or transmission will not increase your car's performance or
longevity. It only increases the cost of operating your car. Oil and Filter Changes
Always change the oil and filter according to the time and distance
recommendations in the mainte-
nance schedule. The oil and filter collect contaminants that can dam-age your engine if they are not
removed regularly.
Changing the oil and filter requires
special tools and access from
underneath the car. The car should
be raised on a service station-type
hydraulic lift for this service. Unless
you have the knowledge and proper equipment, you should have this
maintenance done by a skilled
mechanic.
1. Run the engine until it reaches normal operating temperature,
then shut it off.
MaintenanceProCarManuals.comMain Menu s t Table of Contents
Page 151 of 240
Cooling System
Do not add any rust inhibitors or
other additives to your car's cooling
system. They may not be compatible
with the coolant or engine compo-
nents.
Replacing Engine Coolant
The cooling system should be completely drained and refilled with
new coolant according to the time
and distance recommendations in
the maintenance schedule. Only use recommended antifreeze.
Draining the coolant requires access
to the underside of the car. Unless
you have the tools and knowledge,
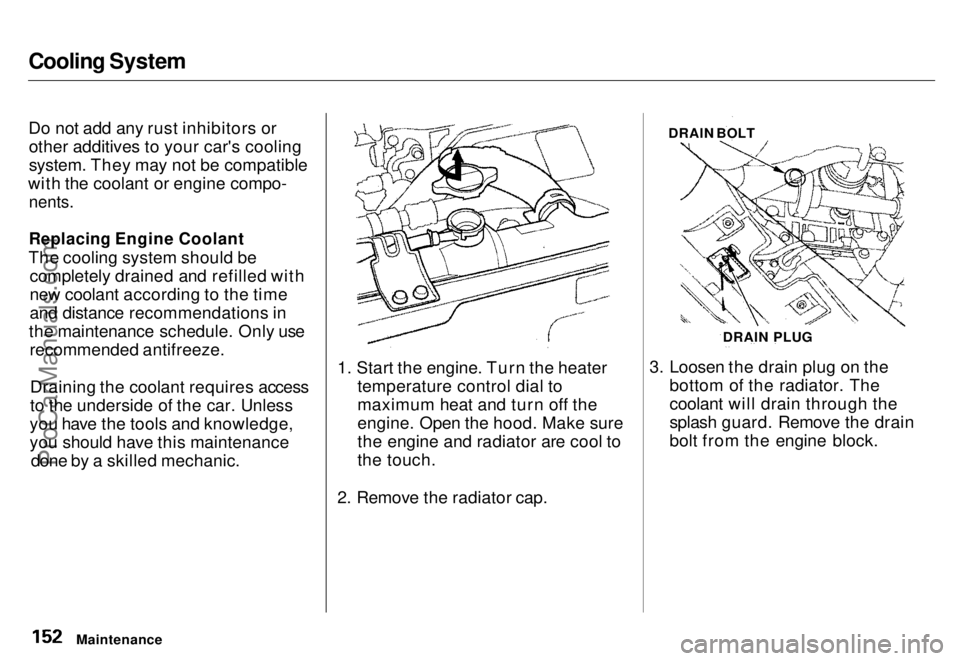
you should have this maintenance done by a skilled mechanic. 1. Start the engine. Turn the heater
temperature control dial to
maximum heat and turn off the
engine. Open the hood. Make sure
the engine and radiator are cool to
the touch.
2. Remove the radiator cap. 3. Loosen the drain plug on the
bottom of the radiator. The
coolant will drain through the
splash guard. Remove the drain
bolt from the engine block.
Maintenance DRAIN BOLT
DRAIN PLUGProCarManuals.comMain Menu s t Table of Contents
Page 154 of 240
Automatic Transmission Fluid
Check the fluid level with the engine
at normal operating temperature.
1. Park the car on level ground. Shut off the engine.
2. Remove the dipstick (yellow loop) from the transmission and wipe it
with a clean cloth. UPPER MARK
3. Insert the dipstick all the way into
the transmission.
4. Remove the dipstick and check
the fluid level. It should be
between the upper and lower
marks. 5. If the level is below the lower
mark, add fluid into the tube to
bring it to the upper mark. Use
Honda Premium Formula Auto-
matic Transmission Fluid or an equivalent DEXRON ®
II Auto-
matic Transmission Fluid (ATF)
only.
6. Insert the dipstick all the way back in the transmission.
The transmission should be drained and refilled with new fluid according
to the time and distance recommen- dations in the maintenance schedule.
Maintenance
DIPSTICK
LOWER MARKProCarManuals.comMain Menu s t Table of Contents
Page 157 of 240
Air Cleaner
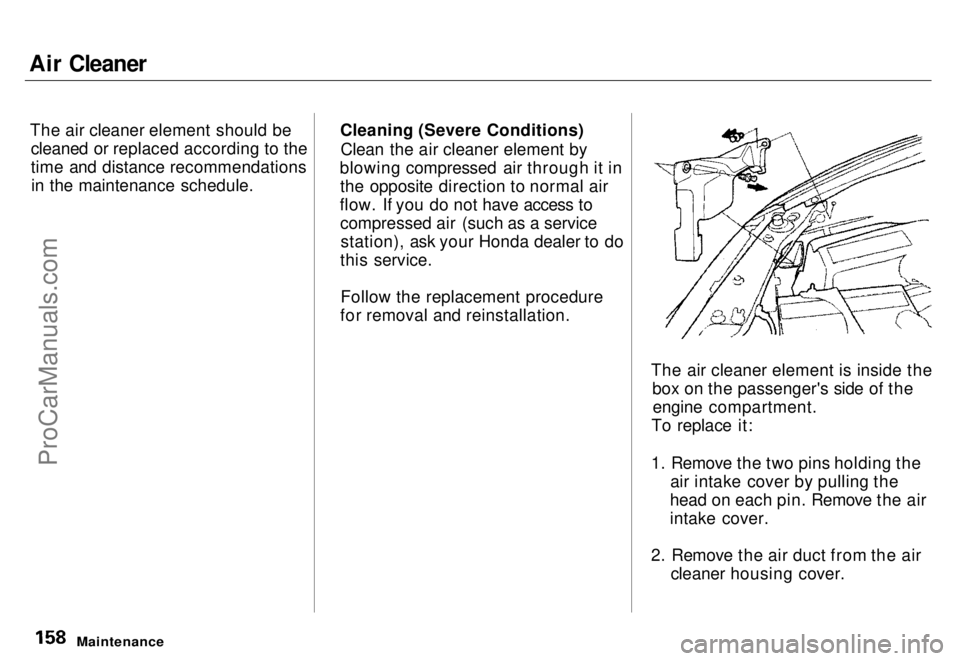
The air cleaner element should becleaned or replaced according to the
time and distance recommendationsin the maintenance schedule. Cleaning (Severe Conditions)
Clean the air cleaner element by
blowing compressed air through it in the opposite direction to normal air
flow. If you do not have access to compressed air (such as a servicestation), ask your Honda dealer to do
this service.
Follow the replacement procedure
for removal and reinstallation.
The air cleaner element is inside thebox on the passenger's side of theengine compartment.
To replace it:
1. Remove the two pins holding the air intake cover by pulling the
head on each pin. Remove the air
intake cover.
2. Remove the air duct from the air cleaner housing cover.
MaintenanceProCarManuals.comMain Menu s t Table of Contents