Page 44 of 240
Controls Near the Steering Wheel
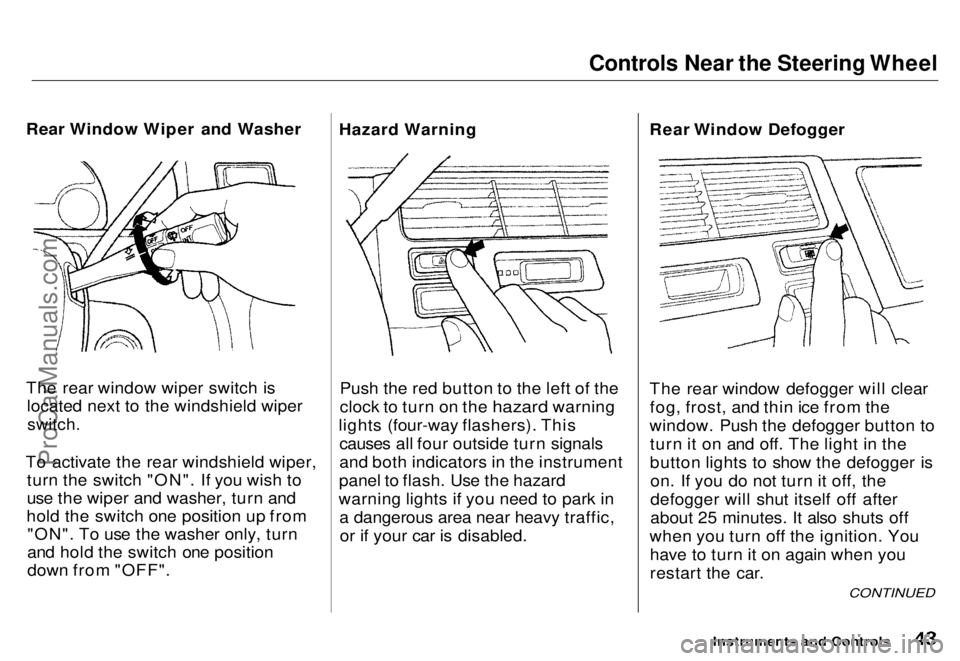
Rear Window Wiper and Washer
The rear window wiper switch is located next to the windshield wiper
switch.
To activate the rear windshield wiper, turn the switch "ON". If you wish to
use the wiper and washer, turn and
hold the switch one position up from "ON". To use the washer only, turn
and hold the switch one position
down from "OFF". Hazard Warning
Push the red button to the left of the
clock to turn on the hazard warning
lights (four-way flashers). This causes all four outside turn signals
and both indicators in the instrument
panel to flash. Use the hazard
warning lights if you need to park in a dangerous area near heavy traffic,or if your car is disabled. Rear Window Defogger
The rear window defogger will clear
fog, frost, and thin ice from the
window. Push the defogger button to turn it on and off. The light in the
button lights to show the defogger ison. If you do not turn it off, the
defogger will shut itself off after
about 25 minutes. It also shuts off
when you turn off the ignition. You have to turn it on again when you
restart the car.
Instruments and Controls
CONTINUED
ProCarManuals.comMain Menu s t Table of Contents
Page 46 of 240
Controls Near the Steering Wheel
Instruments and Controls
3. Move the steering wheel up or
down to the desired position.
Position the wheel so you can see
all the instrument panel gauges
and warning lights. Push the lever
up to lock the steering wheel in
that position.
4. Make sure you have securely locked the steering wheel in place
by trying to move it up and down.ProCarManuals.comMain Menu s t Table of Contents
Page 48 of 240
Steering Wheel Controls
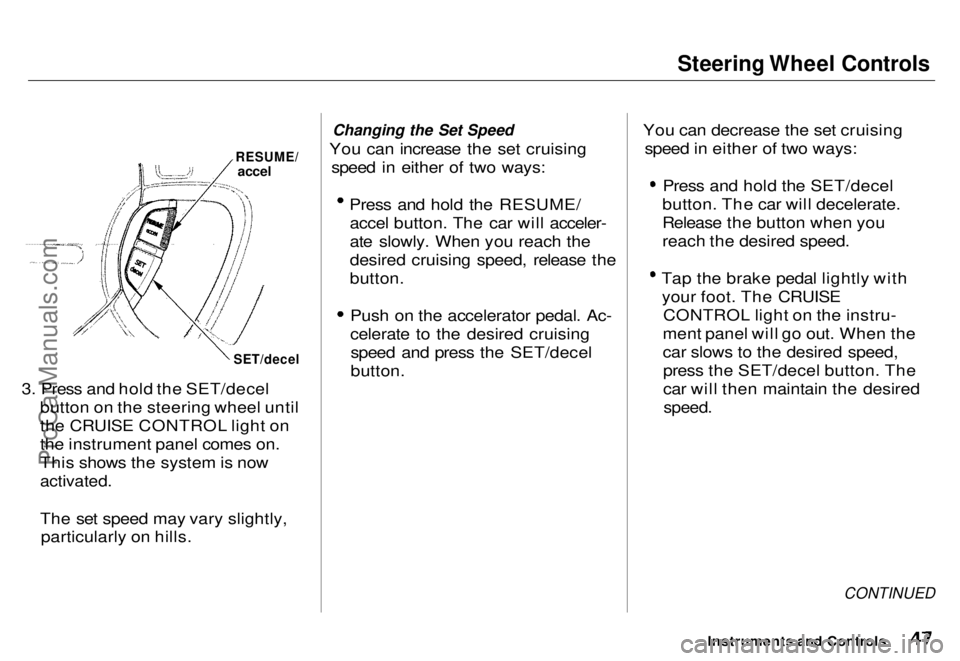
3. Press and hold the SET/decel button on the steering wheel until
the CRUISE CONTROL light on
the instrument panel comes on.
This shows the system is now
activated.
The set speed may vary slightly,particularly on hills.
Changing the Set Speed
You can increase the set cruising speed in either of two ways:
Press and hold the RESUME/accel button. The car will acceler-
ate slowly. When you reach the
desired cruising speed, release the
button. Push on the accelerator pedal. Ac-
celerate to the desired cruising
speed and press the SET/decel
button. You can decrease the set cruising
speed in either of two ways:
Press and hold the SET/decel
button. The car will decelerate.
Release the button when you
reach the desired speed. Tap the brake pedal lightly with
your foot. The CRUISE CONTROL light on the instru-
ment panel will go out. When the
car slows to the desired speed, press the SET/decel button. The
car will then maintain the desired
speed.
CONTINUED
Instruments and Controls
RESUME/
accel
SET/decelProCarManuals.comMain Menu s t Table of Contents
Page 49 of 240
Steering Wheel Controls
Even with the cruise control turnedon, you can still use the accelerator
pedal to speed up for passing. After
completing the pass, take your foot
off the accelerator pedal. The car
will return to the set cruising speed.
Resting your foot on the brake or clutch pedal will cause the cruise
control to cancel.
Cancelling the Cruise Control
Any of these actions cause the cruise
control to cancel.
Tap the brake pedal.
Press the SET/decel and RE-
SUME/accel buttons at the same
time.
Press the Cruise Control Master
Switch.
When you tap the brake pedal, or press the SET and RESUME buttonsat the same time, the CRUISECONTROL light on the instrument
panel will go out and the car will
begin to slow down. You can use the accelerator pedal in the normal way. If you use the brake pedal to cancel
cruise control, the system retains the
previously-set cruising speed. To
return to that speed, accelerate to
above 25 mph (40 km/h) and press
the RESUME/accel button until theCRUISE CONTROL light comes on.
The car will accelerate to the same cruising speed as before.
If you cancel cruise control by
pressing the SET and RESUME
buttons at the same time, the
previously-set cruising speed is erased. To use the cruise control,
accelerate to the desired cruisingspeed and press the SET/decel
button.
Pressing the Cruise Control Master
Switch turns the system completely off and erases the previous cruisingspeed from memory. To use the
system again, refer to Using the
Cruise Control.
Instruments and ControlsProCarManuals.comMain Menu s t Table of Contents
Page 51 of 240
Keys and Locks
LOCK (0) — You can insert or
remove the key only in this position.
When you turn the key from LOCK to ACCESSORY, you may have to
turn the steering wheel to release the anti-theft lock. To switch from
ACCESSORY to LOCK, you must push the key in slightly as you turn it.
The shift lever must also be in Park. The anti-theft lock will lock the steering column when you remove
the key.
ACCESSORY (I) — In this position, you can operate the audio systemand cigarette lighter.
ON (II) — This is the normal key
position when driving. All features and accessories on the car are usable.
Several of the lights on the instru-
ment panel come on as a test when
you turn the ignition switch from
ACCESSORY to ON (see page 35 ). START (III) — Use this position
only to start the engine. The switch
returns to ON when you let go of the
key.
You will hear a reminder beeper if
you open the driver's door with the key in the LOCK or ACCESSORYposition. Remove the key to turn itoff. Power Door Locks
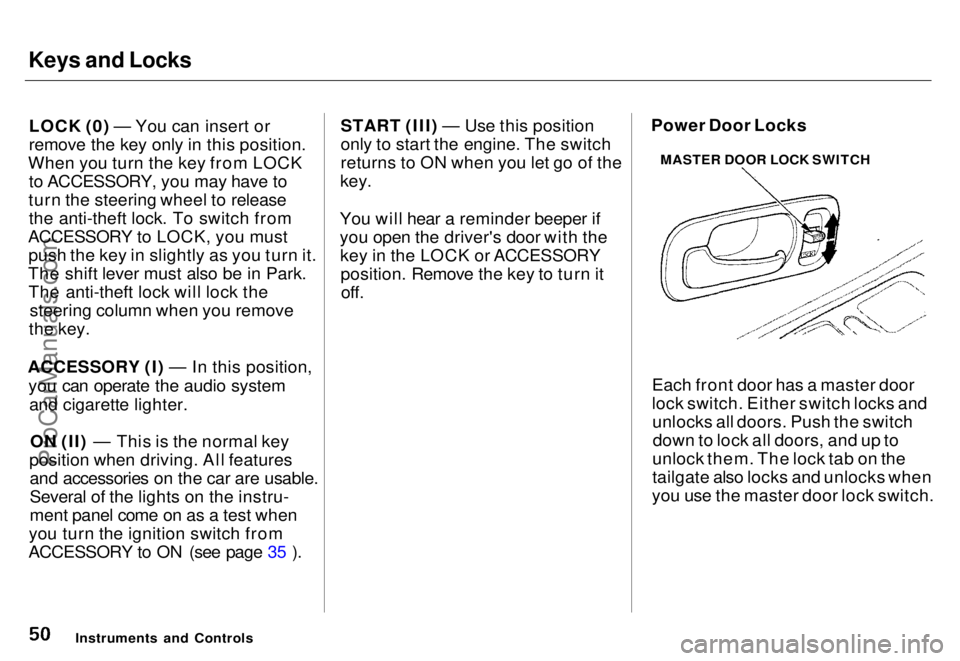
Each front door has a master door
lock switch. Either switch locks andunlocks all doors. Push the switchdown to lock all doors, and up to
unlock them. The lock tab on the
tailgate also locks and unlocks when
you use the master door lock switch.
Instruments and Controls MASTER DOOR LOCK SWITCHProCarManuals.comMain Menu s t Table of Contents
Page 60 of 240
Seats
SEAT-BACK ANGLE
ADJUSTMENT LEVER
LOCK RELEASE LEVER
Pull the seat-back angle adjustment
lever and tilt the seat-back forward.
Then pull the lock release lever and pivot the seat forward.
RIVET
Pull out the fastening strap. Hook
the ring on the fastening strap to the rivet on the side of the seat-back.
Make sure the seat is secure.
Reverse this procedure to return the seat to the upright position. Make
sure you store the fastening strap
properly, and that the seat is locked securely before driving. Reclining the Second Seat
Seven-passenger model only
You can recline the seat-backs on the second seat so they are level with
the seat cushion of the third seat,
making a large, cushioned area. To do this:
1. Remove the head restraints. Store them in the pocket in the left side
panel behind the third seat.
Instruments and Controls
CONTINUED
FASTENING STRAPProCarManuals.comMain Menu s t Table of Contents
Page 61 of 240
Seats
ANGLE ADJUSTMENT LEVER
SLIDE LEVER
2. Lift the lever and slide the seat forward as far as it will go. Pull the
seat-back angle adjustment lever
and pivot the seat-back backward.
Release the lever when the seat-
back is even with the cushion on
the third seat.
Reverse this procedure to return the
second seat to the upright position.
Make sure you install the head
restraints before driving (see page 56). Folding the Third Seat in All
Models
To create more cargo space, you can
fold the third seat into the floor
recess.
To fold the third seat:
1. Remove the head restraints. Store them in the pocket in the left side
panel.
KNOB
2. Unlock the seat-back by turning the knob. Push the seat-back
forward.
Instruments and ControlsProCarManuals.coms t Main Menu Table of Contents
Page 63 of 240
Power Windows
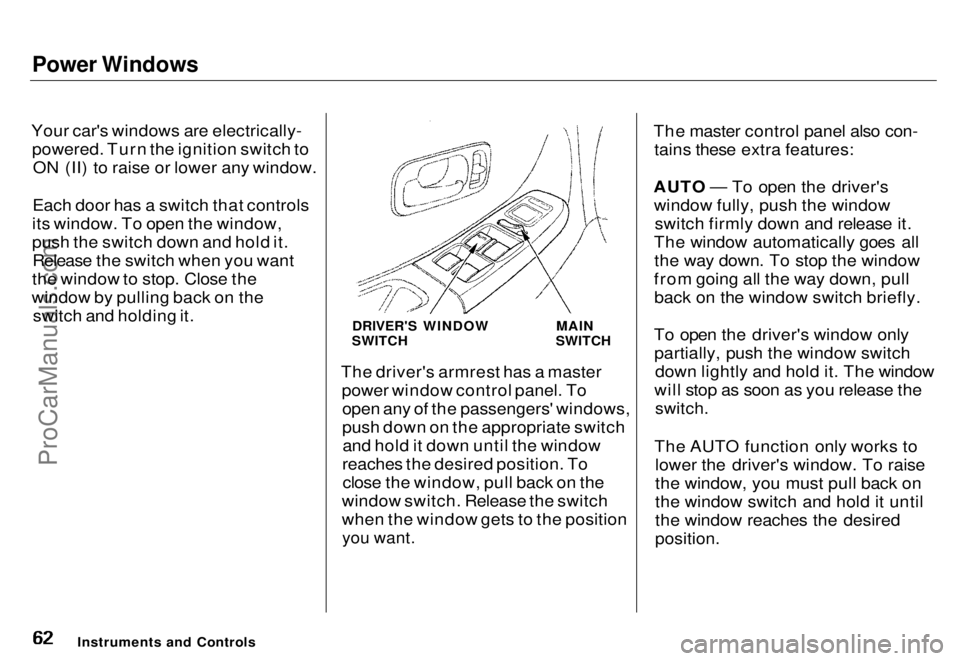
Your car's windows are electrically- powered. Turn the ignition switch toON (II) to raise or lower any window.
Each door has a switch that controls
its window. To open the window,
push the switch down and hold it. Release the switch when you want
the window to stop. Close the
window by pulling back on the switch and holding it.
The driver's armrest has a masterpower window control panel. Toopen any of the passengers' windows,
push down on the appropriate switchand hold it down until the window
reaches the desired position. To close the window, pull back on the
window switch. Release the switch
when the window gets to the position
you want.
The master control panel also con-
tains these extra features:
AUTO — To open the driver's window fully, push the window switch firmly down and release it.
The window automatically goes all the way down. To stop the window
from going all the way down, pull back on the window switch briefly.
To open the driver's window only partially, push the window switch down lightly and hold it. The window
will stop as soon as you release the
switch.
The AUTO function only works to lower the driver's window. To raise
the window, you must pull back on
the window switch and hold it until
the window reaches the desired
position.
Instruments and Controls DRIVER'S WINDOW
SWITCH MAIN
SWITCHProCarManuals.comMain Menu s t Table of Contents