1996 CHRYSLER VOYAGER air condition
[x] Cancel search: air conditionPage 1820 of 1938
absorb moisture readily out of the air. This moisture
will convert into acids within a closed system.
CAUTION: The system must be completely empty
before opening any fitting or connection in the
refrigeration system. Open fittings with caution
even after the system has been emptied. If any
pressure is noticed as a fitting is loosened,
retighten fitting and evacuate the system again.
A good rule for the flexible hose lines is to keep
the radius of all bends at least 10 times the diame-
ter of the hose. Sharper bends will reduce the flow
of refrigerant. The flexible hose lines should be
routed so they are at least 3 inches (80 mm) from
the exhaust manifold. Inspect all flexible hose lines
to make sure they are in good condition and prop-
erly routed.
The use of correct wrenches when making con-
nections is very important. Improper wrenches or
improper use of wrenches can damage the fittings.
The internal parts of the A/C system will remain
stable as long as moisture-free refrigerant and
refrigerant oil is used. Abnormal amounts of dirt,
moisture or air can upset the chemical stability.
This may cause operational troubles or even seri-
ous damage if present in more than very small
quantities.
When opening a refrigeration system, have every-
thing you will need to repair the system ready. This
will minimize the amount of time the system must
be opened. Cap or plug all lines and fittings as
soon as they are opened. This will help prevent the
entrance of dirt and moisture. All new lines and
components should be capped or sealed until they
are ready to be used.
All tools, including the refrigerant dispensing
manifold, the manifold gauge set, and test hoses
should be kept clean and dry.
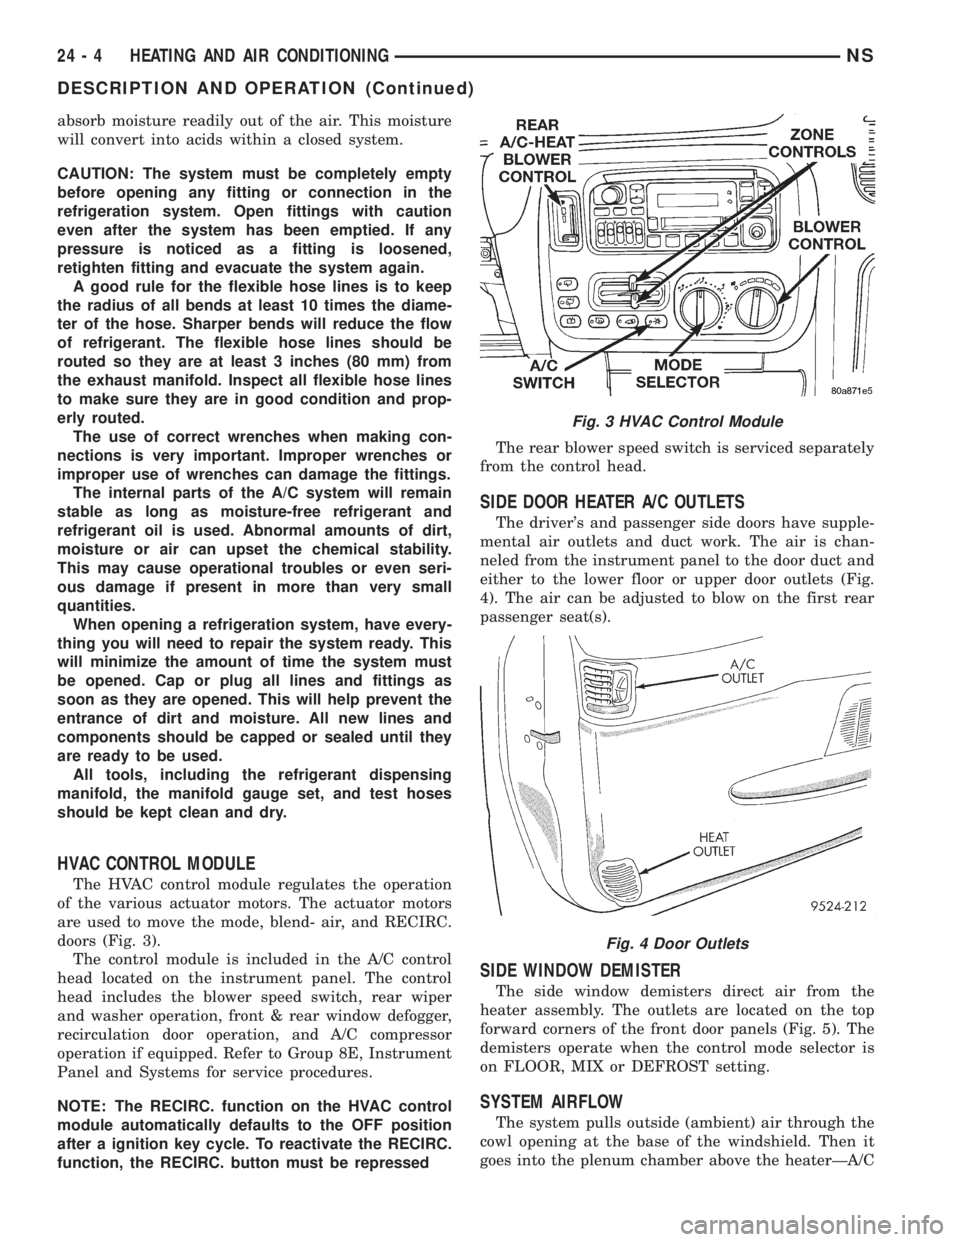
HVAC CONTROL MODULE
The HVAC control module regulates the operation
of the various actuator motors. The actuator motors
are used to move the mode, blend- air, and RECIRC.
doors (Fig. 3).
The control module is included in the A/C control
head located on the instrument panel. The control
head includes the blower speed switch, rear wiper
and washer operation, front & rear window defogger,
recirculation door operation, and A/C compressor
operation if equipped. Refer to Group 8E, Instrument
Panel and Systems for service procedures.
NOTE: The RECIRC. function on the HVAC control
module automatically defaults to the OFF position
after a ignition key cycle. To reactivate the RECIRC.
function, the RECIRC. button must be repressedThe rear blower speed switch is serviced separately
from the control head.
SIDE DOOR HEATER A/C OUTLETS
The driver's and passenger side doors have supple-
mental air outlets and duct work. The air is chan-
neled from the instrument panel to the door duct and
either to the lower floor or upper door outlets (Fig.
4). The air can be adjusted to blow on the first rear
passenger seat(s).
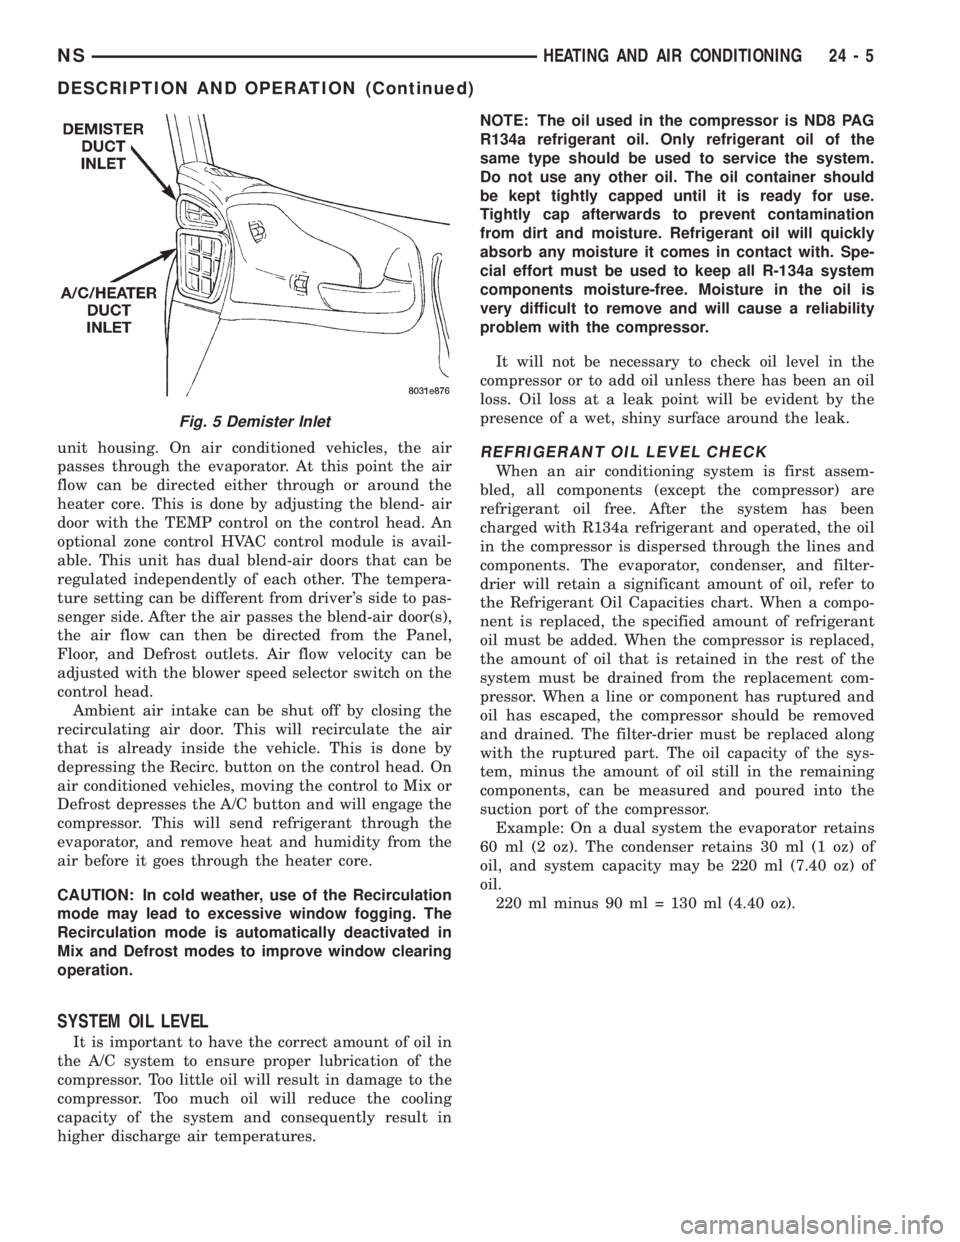
SIDE WINDOW DEMISTER
The side window demisters direct air from the
heater assembly. The outlets are located on the top
forward corners of the front door panels (Fig. 5). The
demisters operate when the control mode selector is
on FLOOR, MIX or DEFROST setting.
SYSTEM AIRFLOW
The system pulls outside (ambient) air through the
cowl opening at the base of the windshield. Then it
goes into the plenum chamber above the heaterÐA/C
Fig. 3 HVAC Control Module
Fig. 4 Door Outlets
24 - 4 HEATING AND AIR CONDITIONINGNS
DESCRIPTION AND OPERATION (Continued)
Page 1821 of 1938
unit housing. On air conditioned vehicles, the air
passes through the evaporator. At this point the air
flow can be directed either through or around the
heater core. This is done by adjusting the blend- air
door with the TEMP control on the control head. An
optional zone control HVAC control module is avail-
able. This unit has dual blend-air doors that can be
regulated independently of each other. The tempera-
ture setting can be different from driver's side to pas-
senger side. After the air passes the blend-air door(s),
the air flow can then be directed from the Panel,
Floor, and Defrost outlets. Air flow velocity can be
adjusted with the blower speed selector switch on the
control head.
Ambient air intake can be shut off by closing the
recirculating air door. This will recirculate the air
that is already inside the vehicle. This is done by
depressing the Recirc. button on the control head. On
air conditioned vehicles, moving the control to Mix or
Defrost depresses the A/C button and will engage the
compressor. This will send refrigerant through the
evaporator, and remove heat and humidity from the
air before it goes through the heater core.
CAUTION: In cold weather, use of the Recirculation
mode may lead to excessive window fogging. The
Recirculation mode is automatically deactivated in
Mix and Defrost modes to improve window clearing
operation.
SYSTEM OIL LEVEL
It is important to have the correct amount of oil in
the A/C system to ensure proper lubrication of the
compressor. Too little oil will result in damage to the
compressor. Too much oil will reduce the cooling
capacity of the system and consequently result in
higher discharge air temperatures.NOTE: The oil used in the compressor is ND8 PAG
R134a refrigerant oil. Only refrigerant oil of the
same type should be used to service the system.
Do not use any other oil. The oil container should
be kept tightly capped until it is ready for use.
Tightly cap afterwards to prevent contamination
from dirt and moisture. Refrigerant oil will quickly
absorb any moisture it comes in contact with. Spe-
cial effort must be used to keep all R-134a system
components moisture-free. Moisture in the oil is
very difficult to remove and will cause a reliability
problem with the compressor.
It will not be necessary to check oil level in the
compressor or to add oil unless there has been an oil
loss. Oil loss at a leak point will be evident by the
presence of a wet, shiny surface around the leak.
REFRIGERANT OIL LEVEL CHECK
When an air conditioning system is first assem-
bled, all components (except the compressor) are
refrigerant oil free. After the system has been
charged with R134a refrigerant and operated, the oil
in the compressor is dispersed through the lines and
components. The evaporator, condenser, and filter-
drier will retain a significant amount of oil, refer to
the Refrigerant Oil Capacities chart. When a compo-
nent is replaced, the specified amount of refrigerant
oil must be added. When the compressor is replaced,
the amount of oil that is retained in the rest of the
system must be drained from the replacement com-
pressor. When a line or component has ruptured and
oil has escaped, the compressor should be removed
and drained. The filter-drier must be replaced along
with the ruptured part. The oil capacity of the sys-
tem, minus the amount of oil still in the remaining
components, can be measured and poured into the
suction port of the compressor.
Example: On a dual system the evaporator retains
60 ml (2 oz). The condenser retains 30 ml (1 oz) of
oil, and system capacity may be 220 ml (7.40 oz) of
oil.
220 ml minus 90 ml = 130 ml (4.40 oz).
Fig. 5 Demister Inlet
NSHEATING AND AIR CONDITIONING 24 - 5
DESCRIPTION AND OPERATION (Continued)
Page 1822 of 1938

CAUTION: The refrigerant oil used in a R-134a A/C
system is unique. Use only oils which were
designed to work with R-134a refrigerant. The oil
designated for this vehicle is ND8 PAG (polyalka-
lene glycol).
SERVICING REFRIGERANT OIL LEVEL
(1) Using a refrigerant recovery machine, remove
refrigerant from the A/C system.
(2) Remove refrigerant lines from A/C compressor.
(3) Remove compressor from vehicle.
(4) From suction port on top of compressor, drain
refrigerant oil from compressor.
(5) Add system capacity minus the capacity of
components that have not been replaced through suc-
tion port on compressor. Refer to the Refrigerant Oil
Capacity Chart.
(6) Install compressor, connect refrigerant lines,
evacuate, and charge refrigerant system.
DIAGNOSIS AND TESTING
ACTUATOR CALIBRATION/DIAGNOSTICS AND
COOLDOWN TEST
GENERAL INFORMATION
If the HVAC control module is replaced, the Cali-
bration Diagnostic and Cooldown tests will need to
be performed. Once this group of tests have success-
fully passed, they can be performed individually. The
engine must be running during the test to provide
hot coolant for the heater, A/C compressor operation
and to assure that the actuators are calibrated cor-
rectly. The HVAC control module is capable of trou-
bleshooting the system in approximately 120 seconds.
If a condition is detected, an error code is displayed.
The error code cannot be erased until the condition is
repaired and the diagnostic test is performed. Check
wire before replacing components, refer to Group 8W,
Wiring Diagrams.CAUTION: Do not remove the actuators from the
Heater-A/C unit assembly with power applied.
Removal should only be done with the Ignition OFF.
The actuators have no mechanical stops to limit the
travel. If the actuator rotates and is not connected
to the unit assembly, it will become out of calibra-
tion.
ACTUATOR CALIBRATION
Mode, Blend and Zone (if equipped) door calibra-
tion compensates for mechanical variations in the
actuators, HVAC control module and its linkages. In-
vehicle calibration can be entered from the control's
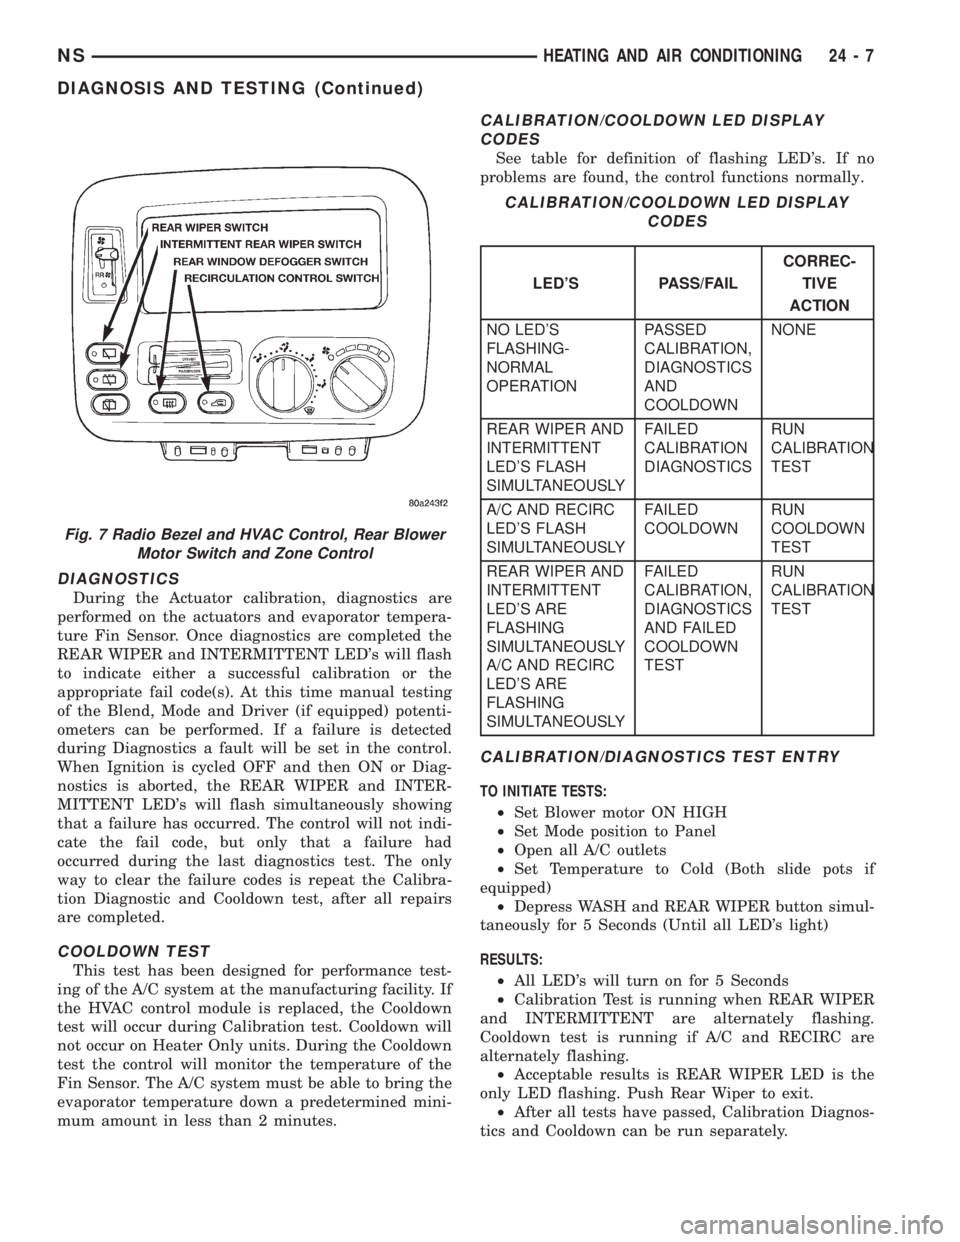
front panel. If the REAR WIPE and INTERMIT-
TENT LED's flash simultaneously when Ignition is
cycled ON, the actuators have not been calibrated or
during the previous calibration a failure occurred
(Fig. 6) and (Fig. 7). Diagnostics will always occur
during Calibration Diagnostic and Cooldown test.
REFRIGERANT OIL CAPACITIES
Refrigerant
Oil Capaci-
tiesFront A/C Dual A/C
Component ml oz ml oz
Compressor 150 ml 5.0 oz 220 ml 7.4 oz
Filter-Drier 30 ml 1.0 oz 30 ml 1.0 oz
Condenser 30 ml 1.0 oz 30 ml 1.0 oz
Evaporator 60 ml 2.0 oz 60 ml 2 .0 oz
Rear Evap. N/A N/A 60 ml 2.0 oz
Fig. 6 Radio Bezel and HVAC Control
24 - 6 HEATING AND AIR CONDITIONINGNS
DESCRIPTION AND OPERATION (Continued)
Page 1823 of 1938
DIAGNOSTICS
During the Actuator calibration, diagnostics are
performed on the actuators and evaporator tempera-
ture Fin Sensor. Once diagnostics are completed the
REAR WIPER and INTERMITTENT LED's will flash
to indicate either a successful calibration or the
appropriate fail code(s). At this time manual testing
of the Blend, Mode and Driver (if equipped) potenti-
ometers can be performed. If a failure is detected
during Diagnostics a fault will be set in the control.
When Ignition is cycled OFF and then ON or Diag-
nostics is aborted, the REAR WIPER and INTER-
MITTENT LED's will flash simultaneously showing
that a failure has occurred. The control will not indi-
cate the fail code, but only that a failure had
occurred during the last diagnostics test. The only
way to clear the failure codes is repeat the Calibra-
tion Diagnostic and Cooldown test, after all repairs
are completed.
COOLDOWN TEST
This test has been designed for performance test-
ing of the A/C system at the manufacturing facility. If
the HVAC control module is replaced, the Cooldown
test will occur during Calibration test. Cooldown will
not occur on Heater Only units. During the Cooldown
test the control will monitor the temperature of the
Fin Sensor. The A/C system must be able to bring the
evaporator temperature down a predetermined mini-
mum amount in less than 2 minutes.
CALIBRATION/COOLDOWN LED DISPLAY
CODES
See table for definition of flashing LED's. If no
problems are found, the control functions normally.
CALIBRATION/DIAGNOSTICS TEST ENTRY
TO INITIATE TESTS:
²Set Blower motor ON HIGH
²Set Mode position to Panel
²Open all A/C outlets
²Set Temperature to Cold (Both slide pots if
equipped)
²Depress WASH and REAR WIPER button simul-
taneously for 5 Seconds (Until all LED's light)
RESULTS:
²All LED's will turn on for 5 Seconds
²Calibration Test is running when REAR WIPER
and INTERMITTENT are alternately flashing.
Cooldown test is running if A/C and RECIRC are
alternately flashing.
²Acceptable results is REAR WIPER LED is the
only LED flashing. Push Rear Wiper to exit.
²After all tests have passed, Calibration Diagnos-
tics and Cooldown can be run separately.
Fig. 7 Radio Bezel and HVAC Control, Rear Blower
Motor Switch and Zone Control
CALIBRATION/COOLDOWN LED DISPLAY
CODES
LED'S PASS/FAILCORREC-
TIVE
ACTION
NO LED'S
FLASHING-
NORMAL
OPERATIONPASSED
CALIBRATION,
DIAGNOSTICS
AND
COOLDOWNNONE
REAR WIPER AND
INTERMITTENT
LED'S FLASH
SIMULTANEOUSLYFAILED
CALIBRATION
DIAGNOSTICSRUN
CALIBRATION
TEST
A/C AND RECIRC
LED'S FLASH
SIMULTANEOUSLYFAILED
COOLDOWNRUN
COOLDOWN
TEST
REAR WIPER AND
INTERMITTENT
LED'S ARE
FLASHING
SIMULTANEOUSLY
A/C AND RECIRC
LED'S ARE
FLASHING
SIMULTANEOUSLYFAILED
CALIBRATION,
DIAGNOSTICS
AND FAILED
COOLDOWN
TESTRUN
CALIBRATION
TEST
NSHEATING AND AIR CONDITIONING 24 - 7
DIAGNOSIS AND TESTING (Continued)
Page 1824 of 1938
COOLDOWN TEST ENTRY
TO INITIATE TESTS:
²Set Blower motor ON HIGH
²Set Mode position to Panel
²Open all A/C outlets
²Set Temperature to Cold (Both slide pots if
equipped)
²Depress WASH and A/C simultaneously for 5
Seconds
NOTE: Prior to start of test, If the evaporator is
already cold, the system will fail test. To correct,
operate system with A/C OFF and the blower motor
ON high for three minutes prior to starting test.
RESULTS:
²All LED's will turn on for 5 Seconds
²Cooldown Test is running when A/C and
RECIRC. are alternately flashing. If A/C and
RECIRC. are flashing simultaneously, Cooldown has
failed.
CALIBRATION DIAGNOSTICS AND
COOLDOWN ABORT
Test can be aborted by doing one of the following:
²Depressing Rear Window Defogger, RECIRC and
Rear Wiper buttons.
²Cycling Ignition OFF and then ON.
²Control will automatically abort after 15 min-
utes from the time Calibration Diagnostics and
Cooldown was entered.
The HVAC control module will return to normal
operation or may indicate unsuccessful Calibration
Diagnostics or Cooldown test by LED's flashing
simultaneously.
EEPROM DATA
Calibration Diagnostics, Cooldown Status and
evaporator temperature Fin Sensor values are stored
in an EEPROM memory internal to the control. The
microcomputer within the HVAC control module uses
this information:
²To determine if Cooldown needs to run
²For proper position of the Heater-A/C unit
assembly doors
ACTUATOR CALIBRATION AND
DIAGNOSTICS.
NOTE: Do not run actuators unless they are prop-
erly mounted on the HVAC control module.
Actuator end point calibration takes approximately
60 seconds. The REAR WIPER and INTERMITTENT
LED's will flash alternately during the test. The con-
trol will cycle the Blend actuator(s) to the Heat stopfirst then back to Cold. After the Blend actuator(s)
have been calibrated the Mode actuator will be cycled
to Defrost and then to Panel. Successful calibration
is defined as actuator travel falling within their min-
imum and maximum limits.
BLEND/PASSENGER ACTUATOR BACKGROUND
The Blend/Passenger Actuator can move the tem-
perature door in two directions. When the voltage at
Pin 12 of the control module is high, about 11.5 volts,
and the voltage at Pin 17 is low, about 1.5 volts, the
door will move towards the Heat position. When Pin
17 is High and Pin 12 is Low the door will move
towards the Cold position. When both Pins are high
or both Pins are low, the actuator will not move. The
Blend/Passenger feedback signal is a voltage signal
that is supplied by the actuator to the control. The
signal will be about 4.0 volts in the Heat position
and 1.0 volt in the Cold position. As the position of
the Blend/Passenger actuator changes, so will the
feedback signal. The feedback signal is necessary for
the correct positioning of the temperature door.
DRIVER ACTUATOR BACKGROUND
The Driver Actuator can move the temperature
door in two directions. When the voltage at Pin 15 of
the control module is high, about 11.5 volts, and the
voltage at Pin 13 is low, about 1.5 volts the door will
move towards the Cold position. When Pin 13 is High
and Pin 15 is Low the door will move towards the
Heat position. When both Pins are high or when both
Pins are low, the actuator will not move. The Driver
feedback signal is a voltage signal that is supplied by
the actuator to the control. The signal will be about
4.0 volts in the Heat position and 1.0 volt in the Cold
position. As the position of the Driver Actuator
changes, so will the feedback signal. The feedback
signal is necessary for the correct positioning of the
temperature door.
MODE ACTUATOR BACKGROUND
The Mode actuator can move the mode door in two
directions. When the voltage at Pin 18 of the control
module is high, about 11.5 volts, and the voltage at
Pin 12 is low, about 1.5 volts the door will move
towards the Panel position. When Pin 12 is High and
Pin 18 is Low the door will move towards the Defrost
position. When both Pin are high or when both Pins
are low, the actuator will not move. The Mode door
feedback signal is a voltage signal that is supplied by
the actuator to the control. The signal will be about
4.5 volts in the Panel position and 0.5 volts in the
Defrost position. As the position of the Mode actuator
changes, so will the feedback signal. The feedback
signal is necessary for the correct positioning of the
mode door.
24 - 8 HEATING AND AIR CONDITIONINGNS
DIAGNOSIS AND TESTING (Continued)
Page 1825 of 1938
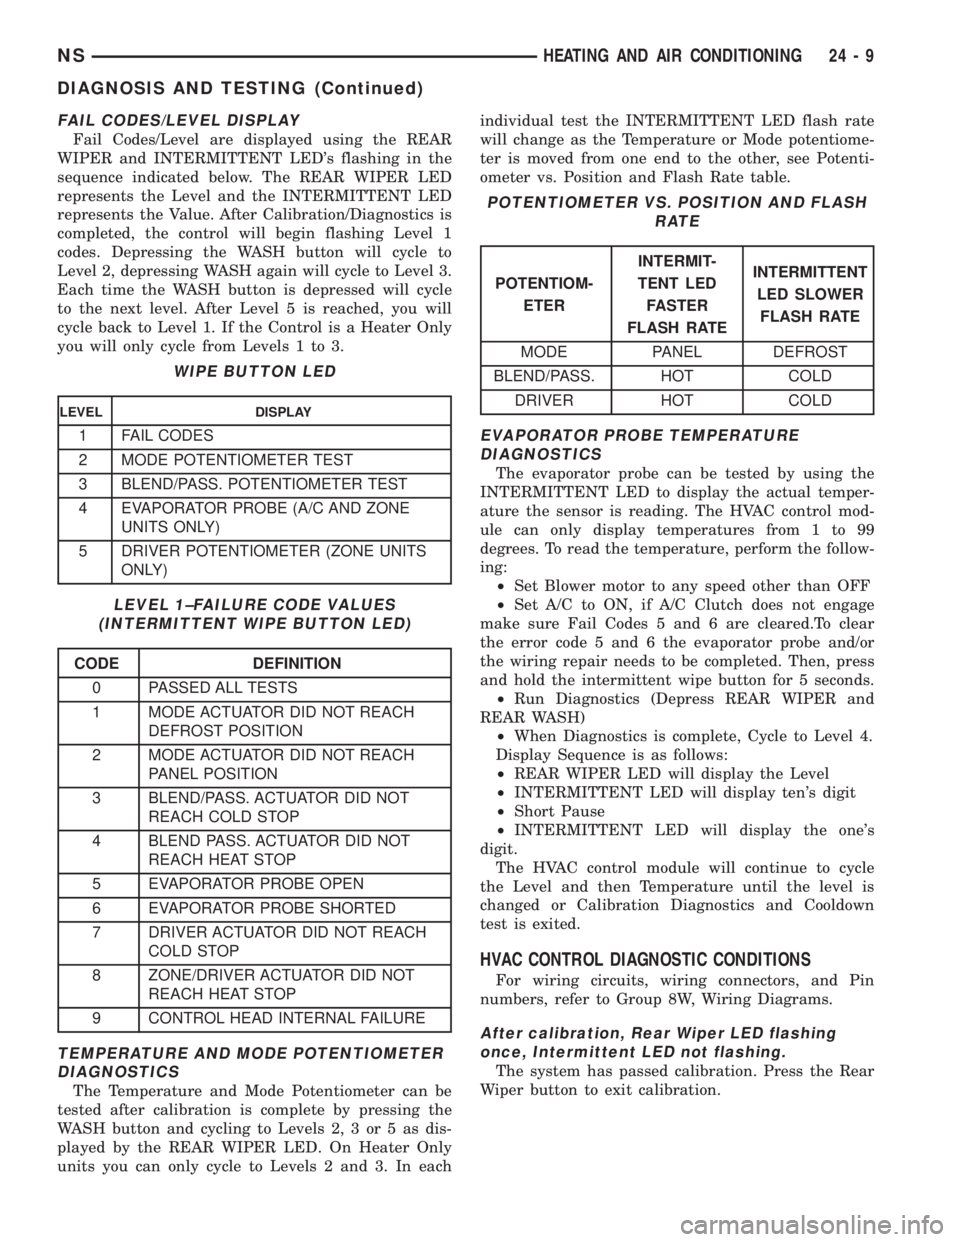
FAIL CODES/LEVEL DISPLAY
Fail Codes/Level are displayed using the REAR
WIPER and INTERMITTENT LED's flashing in the
sequence indicated below. The REAR WIPER LED
represents the Level and the INTERMITTENT LED
represents the Value. After Calibration/Diagnostics is
completed, the control will begin flashing Level 1
codes. Depressing the WASH button will cycle to
Level 2, depressing WASH again will cycle to Level 3.
Each time the WASH button is depressed will cycle
to the next level. After Level 5 is reached, you will
cycle back to Level 1. If the Control is a Heater Only
you will only cycle from Levels 1 to 3.
TEMPERATURE AND MODE POTENTIOMETER
DIAGNOSTICS
The Temperature and Mode Potentiometer can be
tested after calibration is complete by pressing the
WASH button and cycling to Levels 2, 3 or 5 as dis-
played by the REAR WIPER LED. On Heater Only
units you can only cycle to Levels 2 and 3. In eachindividual test the INTERMITTENT LED flash rate
will change as the Temperature or Mode potentiome-
ter is moved from one end to the other, see Potenti-
ometer vs. Position and Flash Rate table.
EVAPORATOR PROBE TEMPERATURE
DIAGNOSTICS
The evaporator probe can be tested by using the
INTERMITTENT LED to display the actual temper-
ature the sensor is reading. The HVAC control mod-
ule can only display temperatures from 1 to 99
degrees. To read the temperature, perform the follow-
ing:
²Set Blower motor to any speed other than OFF
²Set A/C to ON, if A/C Clutch does not engage
make sure Fail Codes 5 and 6 are cleared.To clear
the error code 5 and 6 the evaporator probe and/or
the wiring repair needs to be completed. Then, press
and hold the intermittent wipe button for 5 seconds.
²Run Diagnostics (Depress REAR WIPER and
REAR WASH)
²When Diagnostics is complete, Cycle to Level 4.
Display Sequence is as follows:
²REAR WIPER LED will display the Level
²INTERMITTENT LED will display ten's digit
²Short Pause
²INTERMITTENT LED will display the one's
digit.
The HVAC control module will continue to cycle
the Level and then Temperature until the level is
changed or Calibration Diagnostics and Cooldown
test is exited.
HVAC CONTROL DIAGNOSTIC CONDITIONS
For wiring circuits, wiring connectors, and Pin
numbers, refer to Group 8W, Wiring Diagrams.
After calibration, Rear Wiper LED flashing
once, Intermittent LED not flashing.
The system has passed calibration. Press the Rear
Wiper button to exit calibration.
WIPE BUTTON LED
LEVEL DISPLAY
1 FAIL CODES
2 MODE POTENTIOMETER TEST
3 BLEND/PASS. POTENTIOMETER TEST
4 EVAPORATOR PROBE (A/C AND ZONE
UNITS ONLY)
5 DRIVER POTENTIOMETER (ZONE UNITS
ONLY)
LEVEL 1±FAILURE CODE VALUES
(INTERMITTENT WIPE BUTTON LED)
CODE DEFINITION
0 PASSED ALL TESTS
1 MODE ACTUATOR DID NOT REACH
DEFROST POSITION
2 MODE ACTUATOR DID NOT REACH
PANEL POSITION
3 BLEND/PASS. ACTUATOR DID NOT
REACH COLD STOP
4 BLEND PASS. ACTUATOR DID NOT
REACH HEAT STOP
5 EVAPORATOR PROBE OPEN
6 EVAPORATOR PROBE SHORTED
7 DRIVER ACTUATOR DID NOT REACH
COLD STOP
8 ZONE/DRIVER ACTUATOR DID NOT
REACH HEAT STOP
9 CONTROL HEAD INTERNAL FAILURE
POTENTIOMETER VS. POSITION AND FLASH
RATE
POTENTIOM-
ETERINTERMIT-
TENT LED
FASTER
FLASH RATEINTERMITTENT
LED SLOWER
FLASH RATE
MODE PANEL DEFROST
BLEND/PASS. HOT COLD
DRIVER HOT COLD
NSHEATING AND AIR CONDITIONING 24 - 9
DIAGNOSIS AND TESTING (Continued)
Page 1826 of 1938
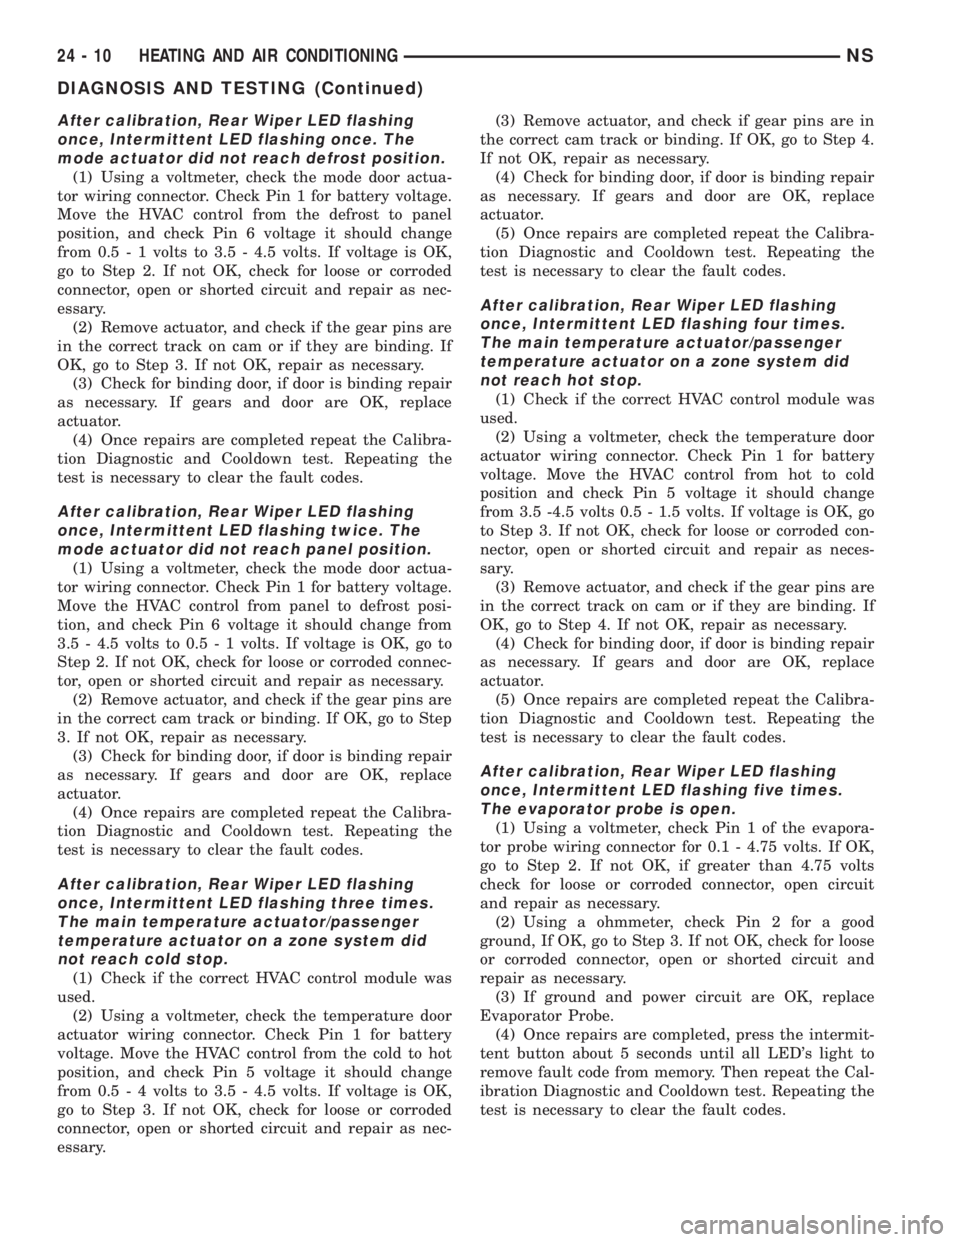
After calibration, Rear Wiper LED flashing
once, Intermittent LED flashing once. The
mode actuator did not reach defrost position.
(1) Using a voltmeter, check the mode door actua-
tor wiring connector. Check Pin 1 for battery voltage.
Move the HVAC control from the defrost to panel
position, and check Pin 6 voltage it should change
from 0.5 - 1 volts to 3.5 - 4.5 volts. If voltage is OK,
go to Step 2. If not OK, check for loose or corroded
connector, open or shorted circuit and repair as nec-
essary.
(2) Remove actuator, and check if the gear pins are
in the correct track on cam or if they are binding. If
OK, go to Step 3. If not OK, repair as necessary.
(3) Check for binding door, if door is binding repair
as necessary. If gears and door are OK, replace
actuator.
(4) Once repairs are completed repeat the Calibra-
tion Diagnostic and Cooldown test. Repeating the
test is necessary to clear the fault codes.
After calibration, Rear Wiper LED flashing
once, Intermittent LED flashing twice. The
mode actuator did not reach panel position.
(1) Using a voltmeter, check the mode door actua-
tor wiring connector. Check Pin 1 for battery voltage.
Move the HVAC control from panel to defrost posi-
tion, and check Pin 6 voltage it should change from
3.5 - 4.5 volts to 0.5 - 1 volts. If voltage is OK, go to
Step 2. If not OK, check for loose or corroded connec-
tor, open or shorted circuit and repair as necessary.
(2) Remove actuator, and check if the gear pins are
in the correct cam track or binding. If OK, go to Step
3. If not OK, repair as necessary.
(3) Check for binding door, if door is binding repair
as necessary. If gears and door are OK, replace
actuator.
(4) Once repairs are completed repeat the Calibra-
tion Diagnostic and Cooldown test. Repeating the
test is necessary to clear the fault codes.
After calibration, Rear Wiper LED flashing
once, Intermittent LED flashing three times.
The main temperature actuator/passenger
temperature actuator on a zone system did
not reach cold stop.
(1) Check if the correct HVAC control module was
used.
(2) Using a voltmeter, check the temperature door
actuator wiring connector. Check Pin 1 for battery
voltage. Move the HVAC control from the cold to hot
position, and check Pin 5 voltage it should change
from 0.5 - 4 volts to 3.5 - 4.5 volts. If voltage is OK,
go to Step 3. If not OK, check for loose or corroded
connector, open or shorted circuit and repair as nec-
essary.(3) Remove actuator, and check if gear pins are in
the correct cam track or binding. If OK, go to Step 4.
If not OK, repair as necessary.
(4) Check for binding door, if door is binding repair
as necessary. If gears and door are OK, replace
actuator.
(5) Once repairs are completed repeat the Calibra-
tion Diagnostic and Cooldown test. Repeating the
test is necessary to clear the fault codes.
After calibration, Rear Wiper LED flashing
once, Intermittent LED flashing four times.
The main temperature actuator/passenger
temperature actuator on a zone system did
not reach hot stop.
(1) Check if the correct HVAC control module was
used.
(2) Using a voltmeter, check the temperature door
actuator wiring connector. Check Pin 1 for battery
voltage. Move the HVAC control from hot to cold
position and check Pin 5 voltage it should change
from 3.5 -4.5 volts 0.5 - 1.5 volts. If voltage is OK, go
to Step 3. If not OK, check for loose or corroded con-
nector, open or shorted circuit and repair as neces-
sary.
(3) Remove actuator, and check if the gear pins are
in the correct track on cam or if they are binding. If
OK, go to Step 4. If not OK, repair as necessary.
(4) Check for binding door, if door is binding repair
as necessary. If gears and door are OK, replace
actuator.
(5) Once repairs are completed repeat the Calibra-
tion Diagnostic and Cooldown test. Repeating the
test is necessary to clear the fault codes.
After calibration, Rear Wiper LED flashing
once, Intermittent LED flashing five times.
The evaporator probe is open.
(1) Using a voltmeter, check Pin 1 of the evapora-
tor probe wiring connector for 0.1 - 4.75 volts. If OK,
go to Step 2. If not OK, if greater than 4.75 volts
check for loose or corroded connector, open circuit
and repair as necessary.
(2) Using a ohmmeter, check Pin 2 for a good
ground, If OK, go to Step 3. If not OK, check for loose
or corroded connector, open or shorted circuit and
repair as necessary.
(3) If ground and power circuit are OK, replace
Evaporator Probe.
(4) Once repairs are completed, press the intermit-
tent button about 5 seconds until all LED's light to
remove fault code from memory. Then repeat the Cal-
ibration Diagnostic and Cooldown test. Repeating the
test is necessary to clear the fault codes.
24 - 10 HEATING AND AIR CONDITIONINGNS
DIAGNOSIS AND TESTING (Continued)
Page 1827 of 1938

After calibration, Rear Wiper LED flashing
once, Intermittent LED flashing six times. The
evaporator probe is shorted.
(1) Using a voltmeter, check Pin 1 of the evapora-
tor probe wiring connector for 0.1 - 4.75 volts. If OK,
go to Step 2. If less than 0.1 volts, check for loose or
corroded connector, open or shorted circuit and repair
as necessary.
(2) Using a ohmmeter, check Pin 2 for a good
ground, If OK, go to Step 3. If not OK, check for
shorted circuit and repair as necessary.
(3) If ground and power circuit are OK, replace
Evaporator Probe
(4) Once repairs are completed, press the intermit-
tent button about 5 seconds until all LED's light to
remove fault code from memory. Then repeat the Cal-
ibration Diagnostic and Cooldown test. Repeating the
test is necessary to clear the fault codes.
After calibration, Rear Wiper LED flashing
once, Intermittent LED flashing seven times.
The Driver's temperature actuator on a zone
system did not reach cold stop.
(1) Check if the correct HVAC control module was
used.
(2) Using a voltmeter, check at the temperature
door actuator wiring connector, check Pin 1 for bat-
tery voltage. Move the HVAC control from cold to the
hot position, check Pin 4 voltage it should change
from 0.5 - 1.5 volts 3.5 - 4.5 volts. If voltage is OK, go
to Step 3. If not OK, check for loose or corroded con-
nector, open or shorted circuit and repair as neces-
sary.
(3) Remove actuator, and check if the gear pins are
in the correct track on cam or if they are binding. If
OK, go to Step 4. If not OK, repair as necessary.
(4) Check for binding doors, if door are binding
repair as necessary. If gears and door are OK, replace
actuator.
(5) Once repairs are completed repeat the Calibra-
tion Diagnostic and Cooldown test. Repeating the
test is necessary to clear the fault codes.
After calibration, Rear Wiper LED flashing
once, Intermittent LED flashing eight times.
The Driver's temperature actuator on a zone
system did not reach hot stop.
(1) Check if the correct HVAC control module was
used.
(2) Using a voltmeter, check at the temperature
door actuator wiring connector, check Pin 1 for bat-
tery voltage. Move the HVAC control from hot to cold
position, Pin 4 voltage it should change from 3.5 - 4.5
volts to 0.5 - 1.5 volts. If voltage is OK, go to Step 3.
If not OK, check for loose or corroded connector, open
or shorted circuit and repair as necessary.(3) Remove actuator, and check if the gear pins are
in the correct track on cam or if they are binding. If
OK, go to Step 4. If not OK, repair as necessary.
(4) Check for binding door, if door is binding repair
as necessary. If gears and door are OK, replace
actuator.
(5) Once repairs are completed repeat the Calibra-
tion Diagnostic and Cooldown test. Repeating the
test is necessary to clear the fault codes.
After calibration, Rear Wiper LED flashing
once, Intermittent LED flashing nine times.
The HVAC control module, has a internal
failure.
(1) Replace the HVAC control module.
(2) Once repairs are completed repeat the Calibra-
tion Diagnostic and Cooldown test. Repeating the
test is necessary to clear the fault codes.
After calibration and testing the A/C and
RECIRC LED flashing simultaneously. Failed
Cooldown test.
(1) Determine if the refrigerant system is operat-
ing correctly:
²Check the outlet air temperature
²Feel the compressor suction plumbing, is it hot?
(2) If not OK, go to Step 3. If OK, repeat the Cal-
ibration Diagnostic and Cooldown test.
(3) If system does not seem to be operating cor-
rectly, perform diagnostics for poor performance:
²Low refrigerant charge
²No charge
²Compressor not operating
Verify that the test was done with the evaporator
at room temperature. The test consists of starting
the compressor and measuring the time it takes for
the evaporator temperature to fall 7ÉC (20ÉF). If the
compressor has been running, the evaporator is cold
already and will not be capable of falling 7ÉC (20ÉF).
If the test was run with a cold evaporator, turn A/C
off and turn the blower motor switch to high position
for 3 to 5 minutes till the evaporator is to room tem-
perature. Then repeat the Calibration Diagnostic and
Cooldown test.
If refrigerant system is performing properly and
the system will not pass test. Repeat the Calibration
Diagnostic and Cooldown test to determine if the
evaporator temperature FIN sensor has developed an
open or a short circuit. If the HVAC control module
still passes Calibration test, verify Cooldown test
manually with a pocket thermometer. The outlet air
temperature must drop at least 7ÉC (20ÉF) within
two minutes. If the vehicle passes with the manual
thermometer, take HVAC control to level 4 (evapora-
tor probe temperature readout) and repeat the
Cooldown test. Ensure the evaporator is at room tem-
perature before starting test. Check if evaporator
NSHEATING AND AIR CONDITIONING 24 - 11
DIAGNOSIS AND TESTING (Continued)