1996 CHRYSLER VOYAGER diagram
[x] Cancel search: diagramPage 256 of 1938

(8) Disconnect one component at time, to see if any
component is at fault. If the high reading is not elim-
inated there is a short circuit in the wiring. Refer to
Group 8W, wiring diagrams.
(9) Remove interior and brake lamp fuses. Install
the fuses. The milliampere reading should be 2-4 mA.
If reading is higher than 4 mA:
(a) Disconnect PCM.
(b) If reading is OK, replace PCM.(c) If reading does not change, disconnect the
TCM.
(d) If reading is OK, replace TCM.
(e) If reading stays, there is a short circuit to
one of the modules. Refer to Group 8W, Wiring
Diagrams.
BATTERY LOAD TEST
A fully charged battery must have cranking capac-
ity, to provide the starter motor and ignition system
enough power to start the engine over a broad range
of ambient temperatures. A battery load test will ver-
ify the actual cranking capability of the battery.
WARNING: IF BATTERY SHOWS SIGNS OF FREEZ-
ING, LEAKING, LOOSE POSTS, OR EXCESSIVELY
LOW ELECTROLYTE LEVEL, DO NOT TEST. ACID
BURNS OR AN EXPLOSIVE CONDITION MAY
RESULT.
(1) Remove both battery cables, negative cable
first. The battery top, cables and posts should be
BATTERY DIAGNOSIS AND TESTING
STEPS POSSIBLE CAUSE CORRECTION
VISUAL INSPECTION
Check for possible damage to
battery and clean battery.(1) Loose battery post, Cracked
battery cover or case, Leaks or Any
other physical
(2) Battery OK.(1) Replace Battery
(2) Check state of charge. Refer to
Test Indicator.
TEST INDICATOR
Check Charge Eye Color(1) GREEN
(2) BLACK
(3) CLEAR(1) Battery is charged. Perform
Battery 0pen Circuit Voltage Test
(2) Perform Battery Charging
procedure.
(3) Replace Battery.
BATTERY OPEN CIRCUIT
VOLTAGE TEST(1) Battery is above 12.40 Volts
(2) Battery is below 12.40 Volts.(1) Perform the Battery Load Test.
(2) Perform Battery Charging
procedure.
BATTERY CHARGING (1) Battery accepted Charge.
(2) Battery will not accept charge(1) Ensure that the indicator eye is
GREEN and perform Battery 0pen
Circuit Voltage Test
(2) Perform Charging a Completely
Discharged Battery.
BATTERY LOAD TEST (1) Acceptable minimum voltage.
(2) Unacceptable minimum voltage(1) Battery is OK to put in use,
perform Battery Ignition Off Draw
Test.
(2) Replace Battery and perform
Battery Ignition Off Draw Test.
CHARGING A COMPLETELY
DISCHARGED BATTERY(1) Battery accepted charge.
(2) Battery will not accept charge.(1) Ensure that the indicator eye is
GREEN and perform Battery 0pen
Circuit Voltage Test.
(2) Replace Battery.
IGNITION OFF DRAW TEST (1) IOD is 5-25 Milliamperes.
(2) IOD Exceeds 25 Milliamperes.(1) Vehicle is normal.
(2) Eliminate excess IOD draw.
Fig. 4 Disconnect Battery Negative Cable
8A - 4 BATTERYNS
DIAGNOSIS AND TESTING (Continued)
Page 266 of 1938

CAUTION: Always disconnect the meter before
opening a door.
(3) Using an multimeter, that has least a milliam-
pere range of 200 mA. Set meter to the highest mA
range. Install meter between the battery negative
cable and battery negative post (Fig. 5). Carefully
remove the test lamp without disconnecting themeter. After all modules time-out the total vehicle
IOD should be less than 25 milliamperes. If ignition
off draw is more than 25 milliamperes go to Step 4.
(4) Each time the test lamp or milliampere meter
is disconnected and connected, all electronic timer
functions will be activated for approximately one
minute. The Body Control Module (BCM) ignition off
draw can reach 90 milliamperes.
(5) Remove the PDC fuses:
²Interior lamps
²Brake lamp
²IOD
(6) If there is any reading, with fuses removed
there is a short circuit in the wiring. Refer to Group
8W, wiring diagrams. If reading is less than 25 mA
go to Step 8.
(7) Install all fuses. After installing fuse, the cur-
rent can reach 90 mA. After time-out the reading
should not exceed 25 mA. If OK go to. If not, discon-
nect:
²Radio
BATTERY DIAGNOSIS AND TESTING
STEPS POSSIBLE CAUSE CORRECTION
VISUAL INSPECTION
Check for possible damage to
battery and clean battery.(1) Corroded post(s) or terminal(s)
(2) Loose terminal(s)
(3) Loose battery post, Cracked
battery cover or case, Leaks or Any
other physical
(4) Battery OK.(1) Clean post(s) or terminal(s)
(2) Clean and tighten
(3) Replace Battery
(4) Check state of charge. Refer to
Hydrometer Test
PERFORM BATTERY
HYDROMETER TEST(1) 1.285
(2) 1.235
(3) 1.175 or a variation between
cells of 0.050 or greater(1) Battery is charged. Perform
Battery 0pen Circuit Voltage Test
(2) Perform Battery Charging
procedure.
(3) Replace Battery.
BATTERY OPEN CIRCUIT
VOLTAGE TEST(1) Battery is above 12.40 Volts
(2) Battery is below 12.40 Volts.(1) Perform the Battery Load Test.
(2) Perform Battery Charging
procedure.
BATTERY CHARGING (1) Battery accepted Charge.
(2) Battery will not accept charge(1) Pass Hydrometer Test and
perform Battery 0pen Circuit Voltage
Test
(2) Perform Charging a Completely
Discharged Battery.
BATTERY LOAD TEST (1) Acceptable minimum voltage.
(2) Unacceptable minimum voltage(1) Battery is OK to put in use,
perform Battery Ignition Off Draw
Test.
(2) Replace Battery and perform
Battery Ignition Off Draw Test.
CHARGING A COMPLETELY
DISCHARGED BATTERY(1) Battery accepted charge.
(2) Battery will not accept charge.(1) Pass Hyrometer Test and
perform Battery 0pen Circuit Voltage
Test.
(2) Replace Battery.
IGNITION OFF DRAW TEST (1) IOD is 5-25 Milliamperes.
(2) IOD Exceeds 25 Milliamperes.(1) Vehicle is normal.
(2) Eliminate excess IOD draw.
Fig. 4 Disconnect Battery Negative Cable
8A - 4 BATTERYNS/GS
DIAGNOSIS AND TESTING (Continued)
Page 267 of 1938

²Body Control Module
²Remote Keyless Entry Module
(8) Disconnect one component at time, to see if any
component is at fault. If the high reading is not elim-
inated there is a short circuit in the wiring. Refer to
Group 8W, wiring diagrams.
(9) Remove interior and brake lamp fuses. Install
the fuses. The milliampere reading should be 2-4 mA.
If reading is higher than 4 mA:
(a) Disconnect PCM.
(b) If reading is OK, replace PCM.
(c) If reading does not change there is a short
circuit to the PCM. Refer to Group 8W, Wiring Dia-
grams.
BATTERY LOAD TEST
A fully charged battery must have cranking capac-
ity, to provide the starter motor and ignition system
enough power to start the engine over a broad range
of ambient temperatures. A battery load test will ver-
ify the actual cranking capability of the battery.
WARNING: IF BATTERY SHOWS SIGNS OF FREEZ-
ING, LEAKING, LOOSE POSTS, OR EXCESSIVELY
LOW ELECTROLYTE LEVEL, DO NOT TEST. ACID
BURNS OR AN EXPLOSIVE CONDITION MAY
RESULT.
(1) Remove both battery cables, negative cable
first. The battery top, cables and posts should be
clean. Test battery with a hydrometer. If battery
charge is low the charge battery. Refer to Battery
Charging Procedures.(2) Connect a Volt/Ammeter/Load tester to the bat-
tery posts (Fig. 6). Rotate the load control knob of the
Carbon pile rheostat to apply a 300 amp load. Apply
this load for 15 seconds to remove the surface charge
from the battery, and return the control knob to off
(Fig. 7).
(3) Allow the battery to stabilize for 2 minutes,
and then verify open circuit voltage.
(4) Rotate the load control knob on the tester to
maintain 50% of the battery cold crank rating for 15
seconds (Fig. 8). Record the loaded voltage reading
and return the load control to off. Refer to the Bat-
tery Specifications at the rear of this Group.
(5) Voltage drop will vary according to battery
temperature at the time of the load test. Battery
temperature can be estimated by the temperature of
exposure over the preceding several hours. If the bat-
tery has been charged or boosted a few minutes prior
to the test, the battery would be slightly warmer.
Refer to Load Test Voltage Chart for proper loaded
voltage reading.
Fig. 5 Milliampere Meter ConnectionFig. 6 Volt-Ammeter Load Tester Connections
Fig. 7 Remove Surface Charge From Battery
NS/GSBATTERY 8A - 5
DIAGNOSIS AND TESTING (Continued)
Page 275 of 1938

vehicles with a manual transmission, the clutch
pedal must be fully depressed for this test. Check for
battery voltage at the cavity for relay terminal 86
with the ignition switch in the Start position, and no
voltage when the ignition switch is released to the
On position. If OK, go to Step 5. If not OK with an
automatic transmission, check for an open or short
circuit to the ignition switch and repair, if required.
If the circuit to the ignition switch is OK, see the
Ignition Switch Test procedure in this group. If not
OK with a manual transmission, check the circuit
between the relay and the clutch pedal position
switch for an open or a short. If the circuit is OK, see
the Clutch Pedal Position Switch Test procedure in
this group.
(5) The coil ground terminal (85) is connected to
the electromagnet in the relay. On vehicles with an
automatic transmission, it is grounded through the
park/neutral position switch only when the gearshift
selector lever is in the Park or Neutral positions. On
vehicles with a manual transmission, it is grounded
at all times. Check for continuity to ground at the
cavity for relay terminal 85. If not OK with an auto-
matic transmission, check for an open or short circuit
to the park/neutral position switch and repair, if
required. If the circuit is OK, see the Park/Neutral
Position Switch Test procedure in this group. If not
OK with a manual transmission, repair the circuit to
ground as required.
SAFETY SWITCHES
For diagnostics,
²Clutch Pedal Position Switch, refer to Group 6,
Clutch.
²Park/Neutral Position Switch, refer to Group 21,
Transaxle
IGNITION SWITCH
After testing starter solenoid and relay, test igni-
tion switch and wiring. Refer to Group 8D, Ignition
Systems or Group 8W, Wiring Diagrams. Check all
wiring for opens or shorts, and all connectors for
being loose or corroded.
BATTERY
Refer to Group 8A, Battery for proper procedures.
ALL RELATED WIRING AND CONNECTORS
Refer to Group 8W, Wiring Diagrams,
FEED CIRCUIT RESISTANCE TEST
Before proceeding with this operation, review Diag-
nostic Preparation and Starter Feed Circuit Tests.
The following operation will require a voltmeter,
accurate to 1/10 of a volt.
CAUTION: Before performing any starter tests, the
ignition and fuel systems must be disabled.
(1) To disable the ignition and fuel systems, dis-
connect the Automatic Shutdown Relay (ASD). The
ASD relay is located in the Power Distribution Cen-
ter (PDC). Refer to the PDC cover for proper relay
location.
(2) With all wiring harnesses and components
properly connected, perform the following:
(a) Connect the negative lead of the voltmeter to
the battery negative post, and positive lead to the
battery negative cable clamp (Fig. 2). Rotate and
hold the ignition switch in the START position.
Observe the voltmeter. If voltage is detected, cor-
rect poor contact between cable clamp and post.
(b) Connect positive lead of the voltmeter to the
battery positive post, and negative lead to the bat-
tery positive cable clamp. Rotate and hold the igni-
tion switch key in the START position. Observe the
voltmeter. If voltage is detected, correct poor con-
tact between the cable clamp and post.
(c) Connect negative lead of voltmeter to battery
negative terminal, and positive lead to engine
Fig. 2 Test Battery Connection Resistance
NSSTARTER 8B - 3
DIAGNOSIS AND TESTING (Continued)
Page 287 of 1938

CHARGING SYSTEM
CONTENTS
page page
GENERAL INFORMATION
OVERVIEW............................. 1
DESCRIPTION AND OPERATION
BATTERY TEMPERATURE SENSOR.......... 2
CHARGING SYSTEM OPERATION........... 1
ELECTRONIC VOLTAGE REGULATOR......... 2
GENERATOR............................ 2
DIAGNOSIS AND TESTING
CHARGING SYSTEM RESISTANCE TESTS..... 4
CHARGING SYSTEM...................... 2CURRENT OUTPUT TEST.................. 4
ON-BOARD DIAGNOSTIC SYSTEM TEST...... 7
REMOVAL AND INSTALLATION
GENERATORÐ2.4L ENGINE................ 9
GENERATORÐ3.0L ENGINE................ 9
GENERATORÐ3.3/3.8 L ENGINE........... 10
SPECIFICATIONS
GENERATOR........................... 11
TORQUE.............................. 11
GENERAL INFORMATION
OVERVIEW
The battery, starting, and charging systems oper-
ate with one another, and must be tested as a com-
plete system. In order for the vehicle to start and
charge properly, all of the components involved in
these systems must perform within specifications.
Group 8A covers the battery, Group 8B covers the
starting system, and Group 8C covers the charging
system. Refer to Group 8W - Wiring Diagrams for
complete circuit descriptions and diagrams. We have
separated these systems to make it easier to locate
the information you are seeking within this Service
Manual. However, when attempting to diagnose any
of these systems, it is important that you keep their
interdependency in mind.
The diagnostic procedures used in these groups
include the most basic conventional diagnostic meth-
ods to the more sophisticated On-Board Diagnostics
(OBD) built into the Powertrain Control Module
(PCM). Use of an induction ammeter, volt/ohmmeter,
battery charger, carbon pile rheostat (load tester),
and 12-volt test lamp may be required.
All OBD-sensed systems are monitored by the
PCM. Each monitored circuit is assigned a Diagnos-
tic Trouble Code (DTC). The PCM will store a DTC in
electronic memory for any failure it detects. See the
On-Board Diagnostics Test in Group 8C - Charging
System for more information.
DESCRIPTION AND OPERATION
CHARGING SYSTEM OPERATION
The charging system consists of:
²Generator
²Electronic Voltage Regulator (EVR) circuitry
within the Powertrain Control Module (PCM)
²Ignition switch (refer to Group 8D, Ignition Sys-
tem for information)
²Battery (refer to Group 8A, Battery for informa-
tion)
²Temperature is measured by a sensor in the
PCM circuitry
²Wiring harness and connections (refer to Group
8W, Wiring for information)
The charging system is turned on and off with the
ignition switch. When the ignition switch is turned to
the ON position, battery voltage is applied to the
generator rotor through one of the two field termi-
nals to produce a magnetic field. The generator is
driven by the engine through a serpentine belt and
pulley arrangement.
The amount of DC current produced by the gener-
ator is controlled by the EVR (field control) circuitry,
contained within the PCM. This circuitry is con-
nected in series with the second rotor field terminal
and ground.
All vehicles are equipped with On-Board Diagnos-
tics (OBD). All OBD-sensed systems, including the
EVR (field control) circuitry, are monitored by the
PCM. Each monitored circuit is assigned a Diagnos-
tic Trouble Code (DTC). The PCM will store a DTC in
electronic memory for any failure it detects. See On-
Board Diagnostic System Test in this group for more
information.
NSCHARGING SYSTEM 8C - 1
Page 308 of 1938
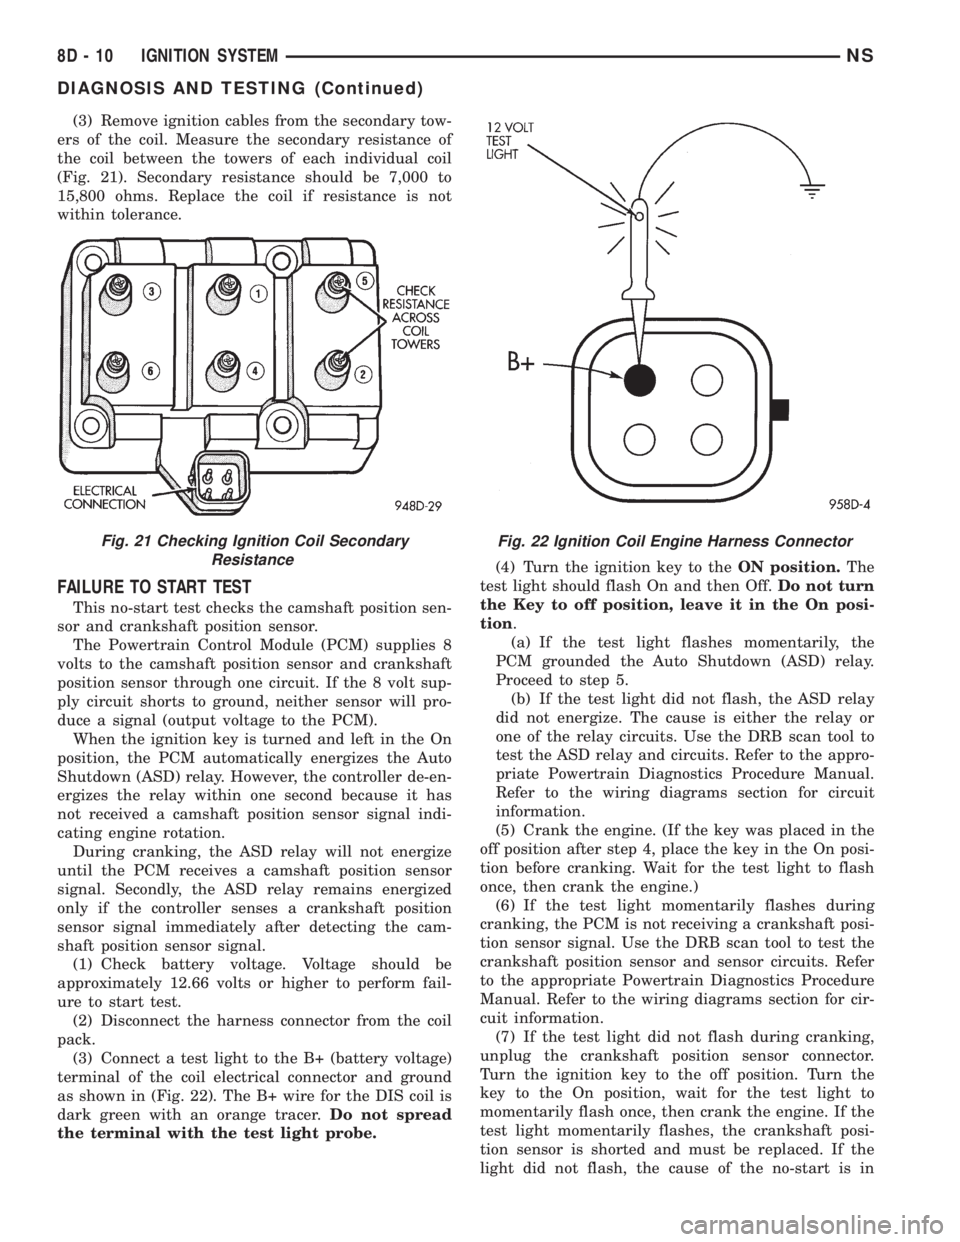
(3) Remove ignition cables from the secondary tow-
ers of the coil. Measure the secondary resistance of
the coil between the towers of each individual coil
(Fig. 21). Secondary resistance should be 7,000 to
15,800 ohms. Replace the coil if resistance is not
within tolerance.
FAILURE TO START TEST
This no-start test checks the camshaft position sen-
sor and crankshaft position sensor.
The Powertrain Control Module (PCM) supplies 8
volts to the camshaft position sensor and crankshaft
position sensor through one circuit. If the 8 volt sup-
ply circuit shorts to ground, neither sensor will pro-
duce a signal (output voltage to the PCM).
When the ignition key is turned and left in the On
position, the PCM automatically energizes the Auto
Shutdown (ASD) relay. However, the controller de-en-
ergizes the relay within one second because it has
not received a camshaft position sensor signal indi-
cating engine rotation.
During cranking, the ASD relay will not energize
until the PCM receives a camshaft position sensor
signal. Secondly, the ASD relay remains energized
only if the controller senses a crankshaft position
sensor signal immediately after detecting the cam-
shaft position sensor signal.
(1) Check battery voltage. Voltage should be
approximately 12.66 volts or higher to perform fail-
ure to start test.
(2) Disconnect the harness connector from the coil
pack.
(3) Connect a test light to the B+ (battery voltage)
terminal of the coil electrical connector and ground
as shown in (Fig. 22). The B+ wire for the DIS coil is
dark green with an orange tracer.Do not spread
the terminal with the test light probe.(4) Turn the ignition key to theON position.The
test light should flash On and then Off.Do not turn
the Key to off position, leave it in the On posi-
tion.
(a) If the test light flashes momentarily, the
PCM grounded the Auto Shutdown (ASD) relay.
Proceed to step 5.
(b) If the test light did not flash, the ASD relay
did not energize. The cause is either the relay or
one of the relay circuits. Use the DRB scan tool to
test the ASD relay and circuits. Refer to the appro-
priate Powertrain Diagnostics Procedure Manual.
Refer to the wiring diagrams section for circuit
information.
(5) Crank the engine. (If the key was placed in the
off position after step 4, place the key in the On posi-
tion before cranking. Wait for the test light to flash
once, then crank the engine.)
(6) If the test light momentarily flashes during
cranking, the PCM is not receiving a crankshaft posi-
tion sensor signal. Use the DRB scan tool to test the
crankshaft position sensor and sensor circuits. Refer
to the appropriate Powertrain Diagnostics Procedure
Manual. Refer to the wiring diagrams section for cir-
cuit information.
(7) If the test light did not flash during cranking,
unplug the crankshaft position sensor connector.
Turn the ignition key to the off position. Turn the
key to the On position, wait for the test light to
momentarily flash once, then crank the engine. If the
test light momentarily flashes, the crankshaft posi-
tion sensor is shorted and must be replaced. If the
light did not flash, the cause of the no-start is in
Fig. 21 Checking Ignition Coil Secondary
ResistanceFig. 22 Ignition Coil Engine Harness Connector
8D - 10 IGNITION SYSTEMNS
DIAGNOSIS AND TESTING (Continued)
Page 309 of 1938

either the crankshaft position sensor/camshaft posi-
tion sensor 8 volt supply circuit, or the camshaft
position sensor output or ground circuits. Use the
DRB scan tool to test the camshaft position sensor
and the sensor circuits. Refer to the appropriate Pow-
ertrain Diagnostics Procedure Manual. Refer to the
wiring diagrams section for circuit information.
IGNITION TIMING PROCEDURE
The engines for this vehicle, use a fixed ignition
system. The PCM regulates ignition timing. Basic
ignition timing is not adjustable.
MANIFOLD ABSOLUTE PRESSURE (MAP) SENSOR
TEST
Refer to Group 14, Fuel System for Diagnosis and
Testing.
CAMSHAFT POSITION SENSOR AND CRANKSHAFT
POSITION SENSOR
The output voltage of a properly operating cam-
shaft position sensor or crankshaft position sensor
switches from high (5.0 volts) to low (0.3 volts). By
connecting an Moper Diagonostic System (MDS) and
engine analyzer to the vehicle, technicians can view
the square wave pattern.
ENGINE COOLANT TEMPERATURE SENSOR
Refer to Group 14, Fuel System for Diagnosis and
Testing.
INTAKE AIR TEMPERATURE SENSOR
Refer to Group 14, Fuel System, for Diagnosis and
Testing.
SPARK PLUG CONDITION
NORMAL OPERATING CONDITIONS
The few deposits present will be probably light tan
or slightly gray in color with most grades of commer-
cial gasoline (Fig. 23). There will not be evidence of
electrode burning. Gap growth will not average more
than approximately 0.025 mm (.001 in) per 1600 km
(1000 miles) of operation for non platinum spark
plugs. Non-platnium spark plugs that have normal
wear can usually be cleaned, have the electrodes filed
and regapped, and then reinstalled.
CAUTION: Never attempt to file the electrodes or
use a wire brush for cleaning platinum spark plugs.
This would damage the platinum pads which would
shorten spark plug life.
Some fuel refiners in several areas of the United
States have introduced a manganese additive (MMT)
for unleaded fuel. During combustion, fuel with MMT
may coat the entire tip of the spark plug with a rustcolored deposit. The rust color deposits can be misdi-
agnosed as being caused by coolant in the combustion
chamber. Spark plug performance is not affected by
MMT deposits.
COLD FOULING (CARBON FOULING)
Cold fouling is sometimes referred to as carbon
fouling because the deposits that cause cold fouling
are basically carbon (Fig. 23). A dry, black deposit on
one or two plugs in a set may be caused by sticking
valves or misfire conditions. Cold (carbon) fouling of
the entire set may be caused by a clogged air cleaner.
Cold fouling is normal after short operating peri-
ods. The spark plugs do not reach a high enough
operating temperature during short operating peri-
ods.Replace carbon fouled plugs with new
spark plugs.
FUEL FOULING
A spark plug that is coated with excessive wet fuel
is called fuel fouled. This condition is normally
observed during hard start periods.Clean fuel
fouled spark plugs with compressed air and
reinstall them in the engine.
OIL FOULING
A spark plug that is coated with excessive wet oil
is oil fouled. In older engines, wet fouling can be
caused by worn rings or excessive cylinder wear.
Break-in fouling of new engines may occur before
normal oil control is achieved.Replace oil fouled
spark plugs with new ones.
OIL OR ASH ENCRUSTED
If one or more plugs are oil or ash encrusted, eval-
uate the engine for the cause of oil entering the com-
bustion chambers (Fig. 24). Sometimes fuel additives
can cause ash encrustation on an entire set of spark
Fig. 23 Normal Operation and Cold (Carbon) Fouling
NSIGNITION SYSTEM 8D - 11
DIAGNOSIS AND TESTING (Continued)
Page 325 of 1938

When replacing the distributor cap, transfer spark
plug wires from the original cap to the new cap one
at a time. Ensure that each wire is installed into the
tower of the new cap that corresponds to its tower
position in the original cap. Fully seat the wires into
the towers. If necessary, refer to the engine firing
order diagram.
Light scaling of the terminals can be cleaned with
a sharp knife. If the terminals are heavily scaled,
replace the distributor cap.
A cap that is greasy, dirty or has a powder-like
substance on the inside should be cleaned with asolution of warm water and a mild detergent. Scrub
the cap with a soft brush. Thoroughly rinse the cap
and dry it with a clean soft cloth.
DISTRIBUTOR ROTORÐ3.0L
Replace the rotor if it is cracked, the tip is exces-
sively burned or heavily scaled (Fig. 10).
SPECIFICATIONS
SPARK PLUG
TORQUE
DESCRIPTION......................TORQUE
Distributor Hold Down........14N´m(124 in. lbs.)
Ignition Coil Bracket..........10N´m(96in.lbs.)
Ignition Switch...............2N´m(17in.lbs.)
Spark Plugs.................28N´m(60in.lbs.)
SPARK PLUG CABLE RESISTANCEÐ3.0L
Fig. 9 Distributor Cap InspectionÐTypical
Fig. 10 Rotor InspectionÐTypical
Engine Spark Plug Gap Thread Size
3.0L RN11YC4 0.039 TO 0.044 14mm (3/4 in.) reach
CABLE Maximum
Resistance
#1 14.0K ohms
#2 10.4K ohms
#3 14.9K ohms
#4 11.5K ohms
#5 17.5K ohms
#6 10.3K ohms
Coil Lead 11.1K ohms
NSIGNITION SYSTEM 8D - 27
CLEANING AND INSPECTION (Continued)