1996 CHRYSLER VOYAGER gas mileage
[x] Cancel search: gas mileagePage 28 of 1938

MAINTENANCE SCHEDULES
INDEX
page page
GENERAL INFORMATION
MAINTENANCE SCHEDULE............... 2
MAINTENANCE SCHEDULEÐ
DIESEL ENGINE....................... 2SCHEDULEÐA (DIESEL).................. 2
SCHEDULEÐB (DIESEL).................. 3
UNSCHEDULED INSPECTION.............. 2
GENERAL INFORMATION
MAINTENANCE SCHEDULE
Refer to the 1998 GS Service Manual for Gasoline
Engine and non-engine related Maintenance Sched-
ules.
MAINTENANCE SCHEDULEÐDIESEL ENGINE
The following are engine related Maintenance
items which are unique to Diesel engine-equipped
vehicles. Refer to the 1998 GS Service Manual for
Gasoline Engine and non-engine related Maintenance
Schedules.
The service intervals are based on odometer read-
ings in kilometers. There are two maintenance sched-
ules that show proper service intervals. Use the
schedule that best describes the conditions the vehi-
cle is operated under.Schedule-Alists all the sched-
uled maintenance to be performed under normal
operating conditions.Schedule-Bis the schedule for
vehicles that are operated under one or more of the
following conditions:
²Day and night temperatures are below freezing.
²Stop and go driving.
²Long periods of engine idling.
²Driving in dusty conditions.
²Short trips of less than 5 miles.
²Operation at sustained high speeds during hot
weather above 32ÉC (90ÉF).
²Taxi, police or delivery service.
²Trailer towing.
UNSCHEDULED INSPECTION
At Each Stop for Fuel
²Check engine oil level, add as required.
²Check windshield washer solvent and add if
required.
Once a Month
²Check tire pressure and look for unusual wear
or damage.
²Inspect battery and clean and tighten terminals
as required.²Check fluid levels of coolant reservoir, brake
master cylinder, power steering and transaxle and
add as needed.
²Check all lights and all other electrical items for
correct operation.
²Check rubber seals on each side of the radiator
for proper fit.
At Each Oil Change
²Inspect exhaust system.
²Inspect brake hoses
²Inspect the CV joints and front suspension com-
ponents
²Rotate the tires at each oil change interval
shown on ScheduleÐA (7,500 miles) or every other
interval shown on ScheduleÐ B (6,000 miles).
²Check the coolant level, hoses, and clamps.
²If your mileage is less than 7,500 miles (12 000
km) yearly, replace the engine oil filter at each oil
change.
²Replace engine oil filter.
SCHEDULEÐA (DIESEL)
1 000 KM
²Change engine oil.
²Change engine oil filter.
²Check all fluid levels.
²Check correct torque, intake manifold mounting
nuts.
²Check correct torque, exhaust manifold mount-
ing nuts.
²Check correct torque, turbocharger mounting
nuts.
²Check correct torque, water manifold bolts.
10 000 KM
²Change engine oil.
²Change engine oil filter.
20 000 KM
²Change engine oil.
²Change engine oil filter.
²Replace air filter element.
0 - 2 LUBRICATION AND MAINTENANCENS/GS
Page 301 of 1938

All engines use resistor spark plugs. They have
resistance values ranging from 6,000 to 20,000 ohms
when checked with at least a 1000 volt spark plug
tester.
Do not use an ohm meter to check the resis-
tance of the spark plugs. This will give an inac-
curate reading.
Remove the spark plugs and examine them for
burned electrodes and fouled, cracked or broken por-
celain insulators. Keep plugs arranged in the order
in which they were removed from the engine. An iso-
lated plug displaying an abnormal condition indicates
that a problem exists in the corresponding cylinder.
Replace spark plugs at the intervals recommended in
Group O - Lubrication and Maintenance.
Spark plugs that have low mileage may be cleaned
and reused if not otherwise defective, carbon or oil
fouled. Refer to the Spark Plug Condition section of
this group.
The spark plugs are double platinum and have a
recommended service life of 100,000 miles for normal
driving conditions per schedule A in this manual. The
spark plugs have a recommended service life of
75,000 miles for serve driving conditions per schedule
B in this manual. A thin platinum pad is welded to
both electrode ends as show in (Fig. 3). Extreme care
must be used to prevent spark plug cross threading,
mis-gaping and ceramic insulator damage during
plug removal and installation.
CAUTION: Never attempt to file the electrodes or
use a wire brush for cleaning platinum plugs. This
would damage the platinum pads which would
shorten spark plug life.
Apply a very small amount of anti-seize compound
to the threads when reinstalling the vehicle's original
spark plugs that have been determined good.Do not
apply anti-seize compound to new spark plugs.
NOTE: Anti-seize compound is electrically conduc-
tive and can cause engine misfires if not applied
correctly. It is extremely important that the anti-
seize compound doesn't make contact with the
spark plug electrodes or ceramic insulator.
Never force a gap gauge between the platinum
electrodes or adjust the gap on platinum spark plugs
without reading the 3.3/3.8L Spark Plug Gap Mea-
surement procedures in this section.
Always tighten spark plugs to the specified torque.
Over tightening can cause distortion resulting in a
change in the spark plug gap. Overtightening can
also damage the cylinder head. Tighten spark plugs
to 28 N´m (20 ft. lbs.) torque.
Due to the engine packaging environment for the
3.3/3.8L engines, extreme care should be used wheninstalling the spark plugs to avoid cross threading
problems.
3.3/3.8L SPARK PLUG GAP MEASUREMENT
CAUTION: The Platinum pads can be damaged dur-
ing the measurement of checking the gap if extreme
care is not used.
²USE ONLY A TAPER GAP GAUGE (Fig. 2)
²Never force the gap gauge through the platinum
pads. Only apply enough force until resistance is felt.
²Never use a wire brush or spark plug cleaner
machine to clean platinum spark plugs
²Use an OSHA approved air nozzle when drying
gas fouled spark plugs.
If gap adjustment is required of platinum plug,
bend only the ground electrode. DO NOT TOUCH
the platinum pads. Use only a proper gapping tool
and check with a taper gap gauge.
CAUTION: Cleaning of the platinum plug may dam-
age the platinum tip.
SPARK PLUG CABLE
Spark Plug cables are sometimes referred to as
secondary ignition wires. The wires transfer electri-
cal current from the ignition coil pack, distributor
(3.0L), to individual spark plugs at each cylinder. The
resistive spark plug cables are of nonmetallic con-
struction. The cables provide suppression of radio fre-
quency emissions from the ignition system.
Check the spark plug cable connections for good
contact at the coil, distributor cap towers (3.0L), and
spark plugs. Terminals should be fully seated. The
insulators should be in good condition and should fit
tightly on the coil, distributor (3.0L) and spark plugs.
Spark plug cables with insulators that are cracked or
torn must be replaced.
Fig. 3 Platinum Pads
NSIGNITION SYSTEM 8D - 3
GENERAL INFORMATION (Continued)
Page 1056 of 1938

API SERVICE GRADE CERTIFIED
Use an engine oil that is API Service Grade Certi-
fied. MOPARtprovides engine oils that conforms to
this service grade.
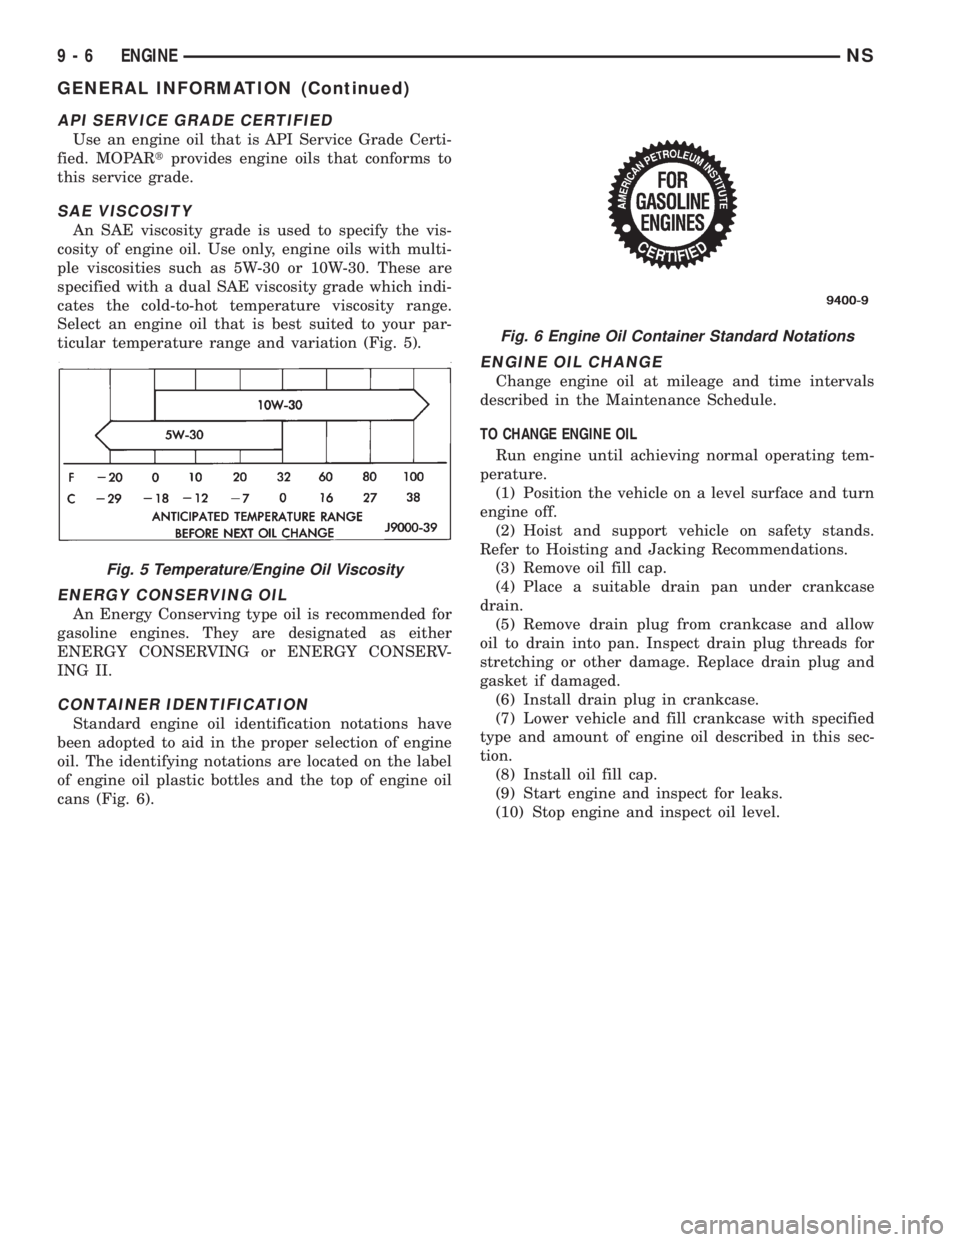
SAE VISCOSITY
An SAE viscosity grade is used to specify the vis-
cosity of engine oil. Use only, engine oils with multi-
ple viscosities such as 5W-30 or 10W-30. These are
specified with a dual SAE viscosity grade which indi-
cates the cold-to-hot temperature viscosity range.
Select an engine oil that is best suited to your par-
ticular temperature range and variation (Fig. 5).
ENERGY CONSERVING OIL
An Energy Conserving type oil is recommended for
gasoline engines. They are designated as either
ENERGY CONSERVING or ENERGY CONSERV-
ING II.
CONTAINER IDENTIFICATION
Standard engine oil identification notations have
been adopted to aid in the proper selection of engine
oil. The identifying notations are located on the label
of engine oil plastic bottles and the top of engine oil
cans (Fig. 6).
ENGINE OIL CHANGE
Change engine oil at mileage and time intervals
described in the Maintenance Schedule.
TO CHANGE ENGINE OIL
Run engine until achieving normal operating tem-
perature.
(1) Position the vehicle on a level surface and turn
engine off.
(2) Hoist and support vehicle on safety stands.
Refer to Hoisting and Jacking Recommendations.
(3) Remove oil fill cap.
(4) Place a suitable drain pan under crankcase
drain.
(5) Remove drain plug from crankcase and allow
oil to drain into pan. Inspect drain plug threads for
stretching or other damage. Replace drain plug and
gasket if damaged.
(6) Install drain plug in crankcase.
(7) Lower vehicle and fill crankcase with specified
type and amount of engine oil described in this sec-
tion.
(8) Install oil fill cap.
(9) Start engine and inspect for leaks.
(10) Stop engine and inspect oil level.
Fig. 5 Temperature/Engine Oil Viscosity
Fig. 6 Engine Oil Container Standard Notations
9 - 6 ENGINENS
GENERAL INFORMATION (Continued)
Page 1295 of 1938

FUEL SYSTEM
CONTENTS
page page
FUEL DELIVERY SYSTEM................... 4
FUEL INJECTION SYSTEM................. 29GENERAL INFORMATION................... 1
GENERAL INFORMATION
INDEX
page page
GENERAL INFORMATION
CRUISING RANGE........................ 3
E-85 GENERAL INFORMATION.............. 2
ETHANOL FUEL (E-85).................... 2
FUEL REQUIREMENTS.................... 1
FUEL REQUIREMENTS.................... 2GASOLINE/OXYGENATE BLENDS............ 2
INTRODUCTION......................... 1
PCM REPLACEMENT..................... 1
REPLACEMENT PARTS.................... 3
STARTING.............................. 2
GENERAL INFORMATION
INTRODUCTION
Throughout this group, references may be made to
a particular vehicle by letter or number designation.
A chart showing the breakdown of these designations
is included in the Introduction Section at the front of
this service manual.
The Evaporation Control System, is also considered
part of the fuel system. The system reduces the emis-
sion of fuel vapor into the atmosphere.
The description and function of the Evaporation
Control System is found in Group 25 of this manual.
PCM REPLACEMENT
USE THE DRB SCAN TOOL TO REPROGRAM
THE NEW PCM WITH THE VEHICLES ORIGI-
NAL IDENTIFICATION NUMBER (VIN) AND
THE VEHICLES ORIGINAL MILEAGE. IF THIS
STEP IS NOT DONE A DIAGNOSTIC TROUBLE
CODE (DTC) MAY BE SET.
FUEL REQUIREMENTS
Your vehicle was designed to meet all emission reg-
ulations and provide excellent fuel economy when
using high quality unleaded gasoline.
Use unleaded gasolines having a minimum posted
octane of 87.
If your vehicle develops occasional light spark
knock (ping) at low engine speeds this is not harm-
ful. However; continued heavy knock at high speeds
can cause damage and should be reported to your
dealer immediately. Engine damage as a result of
heavy knock operation may not be covered by the
new vehicle warranty.
In addition to using unleaded gasoline with the
proper octane rating, those that contain detergents,
corrosion and stability additives are recommended.
Using gasolines that have these additives will help
improve fuel economy, reduce emissions, and main-
tain vehicle performance.
Poor quality gasoline can cause problems such as
hard starting, stalling, and stumble. If you experi-
ence these problems, try another brand of gasoline
before considering service for the vehicle.
NSFUEL SYSTEM 14 - 1