Page 1627 of 1938
41TE TRANSAXLE HYDRAULIC SCHEMATIC
NSTRANSAXLE AND POWER TRANSFER UNIT 21 - 153
SCHEMATICS AND DIAGRAMS (Continued)
Page 1628 of 1938
41TE TRANSAXLE HYDRAULIC SCHEMATIC
21 - 154 TRANSAXLE AND POWER TRANSFER UNITNS
SCHEMATICS AND DIAGRAMS (Continued)
Page 1629 of 1938
41TE TRANSAXLE HYDRAULIC SCHEMATIC
NSTRANSAXLE AND POWER TRANSFER UNIT 21 - 155
SCHEMATICS AND DIAGRAMS (Continued)
Page 1630 of 1938
41TE TRANSAXLE HYDRAULIC SCHEMATIC
21 - 156 TRANSAXLE AND POWER TRANSFER UNITNS
SCHEMATICS AND DIAGRAMS (Continued)
Page 1631 of 1938
41TE TRANSAXLE HYDRAULIC SCHEMATIC
NSTRANSAXLE AND POWER TRANSFER UNIT 21 - 157
SCHEMATICS AND DIAGRAMS (Continued)
Page 1822 of 1938
CAUTION: The refrigerant oil used in a R-134a A/C
system is unique. Use only oils which were
designed to work with R-134a refrigerant. The oil
designated for this vehicle is ND8 PAG (polyalka-
lene glycol).
SERVICING REFRIGERANT OIL LEVEL
(1) Using a refrigerant recovery machine, remove
refrigerant from the A/C system.
(2) Remove refrigerant lines from A/C compressor.
(3) Remove compressor from vehicle.
(4) From suction port on top of compressor, drain
refrigerant oil from compressor.
(5) Add system capacity minus the capacity of
components that have not been replaced through suc-
tion port on compressor. Refer to the Refrigerant Oil
Capacity Chart.
(6) Install compressor, connect refrigerant lines,
evacuate, and charge refrigerant system.
DIAGNOSIS AND TESTING
ACTUATOR CALIBRATION/DIAGNOSTICS AND
COOLDOWN TEST
GENERAL INFORMATION
If the HVAC control module is replaced, the Cali-
bration Diagnostic and Cooldown tests will need to
be performed. Once this group of tests have success-
fully passed, they can be performed individually. The
engine must be running during the test to provide
hot coolant for the heater, A/C compressor operation
and to assure that the actuators are calibrated cor-
rectly. The HVAC control module is capable of trou-
bleshooting the system in approximately 120 seconds.
If a condition is detected, an error code is displayed.
The error code cannot be erased until the condition is
repaired and the diagnostic test is performed. Check
wire before replacing components, refer to Group 8W,
Wiring Diagrams.CAUTION: Do not remove the actuators from the
Heater-A/C unit assembly with power applied.
Removal should only be done with the Ignition OFF.
The actuators have no mechanical stops to limit the
travel. If the actuator rotates and is not connected
to the unit assembly, it will become out of calibra-
tion.
ACTUATOR CALIBRATION
Mode, Blend and Zone (if equipped) door calibra-
tion compensates for mechanical variations in the
actuators, HVAC control module and its linkages. In-
vehicle calibration can be entered from the control's
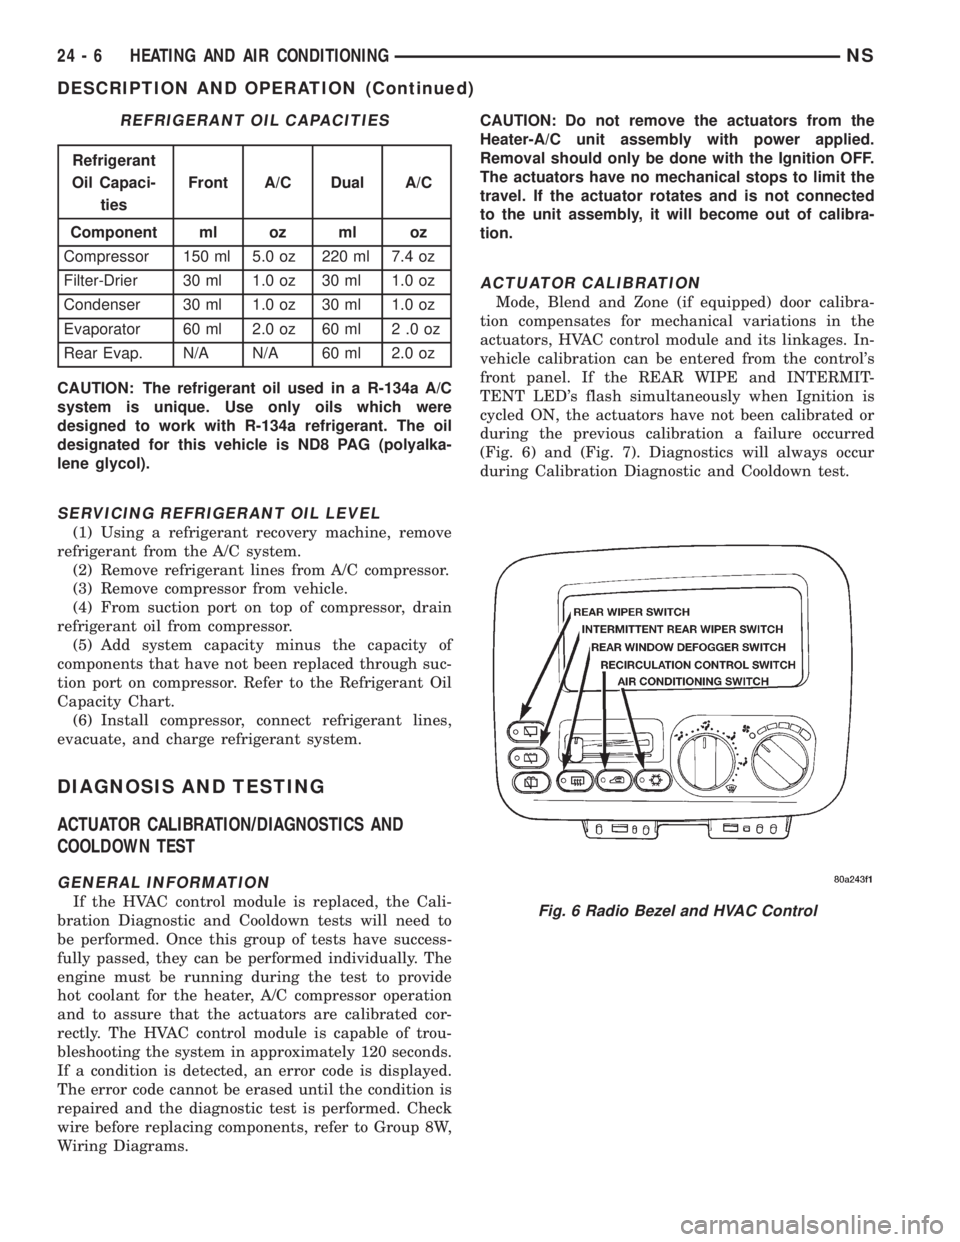
front panel. If the REAR WIPE and INTERMIT-
TENT LED's flash simultaneously when Ignition is
cycled ON, the actuators have not been calibrated or
during the previous calibration a failure occurred
(Fig. 6) and (Fig. 7). Diagnostics will always occur
during Calibration Diagnostic and Cooldown test.
REFRIGERANT OIL CAPACITIES
Refrigerant
Oil Capaci-
tiesFront A/C Dual A/C
Component ml oz ml oz
Compressor 150 ml 5.0 oz 220 ml 7.4 oz
Filter-Drier 30 ml 1.0 oz 30 ml 1.0 oz
Condenser 30 ml 1.0 oz 30 ml 1.0 oz
Evaporator 60 ml 2.0 oz 60 ml 2 .0 oz
Rear Evap. N/A N/A 60 ml 2.0 oz
Fig. 6 Radio Bezel and HVAC Control
24 - 6 HEATING AND AIR CONDITIONINGNS
DESCRIPTION AND OPERATION (Continued)
Page 1825 of 1938
FAIL CODES/LEVEL DISPLAY
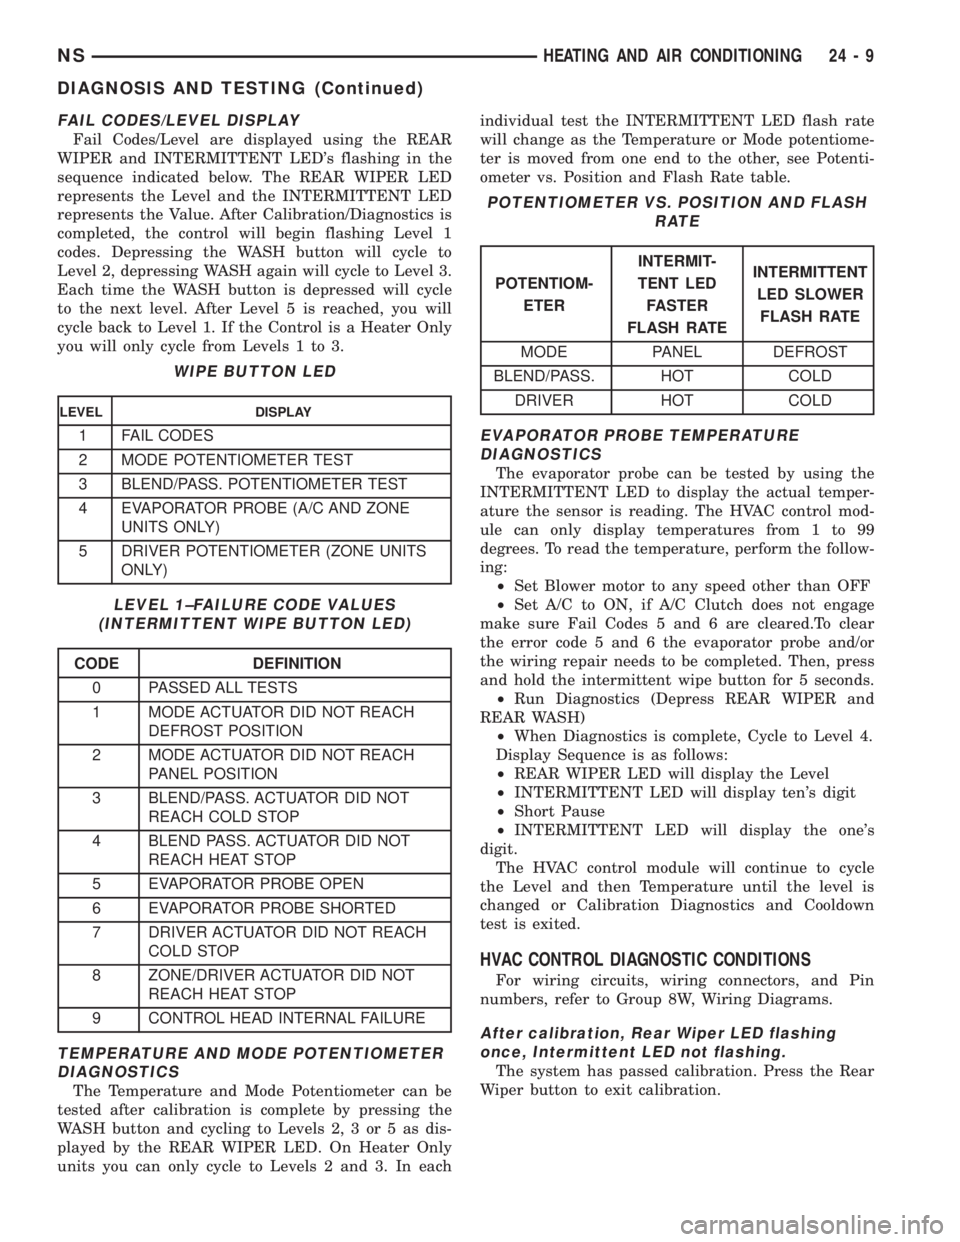
Fail Codes/Level are displayed using the REAR
WIPER and INTERMITTENT LED's flashing in the
sequence indicated below. The REAR WIPER LED
represents the Level and the INTERMITTENT LED
represents the Value. After Calibration/Diagnostics is
completed, the control will begin flashing Level 1
codes. Depressing the WASH button will cycle to
Level 2, depressing WASH again will cycle to Level 3.
Each time the WASH button is depressed will cycle
to the next level. After Level 5 is reached, you will
cycle back to Level 1. If the Control is a Heater Only
you will only cycle from Levels 1 to 3.
TEMPERATURE AND MODE POTENTIOMETER
DIAGNOSTICS
The Temperature and Mode Potentiometer can be
tested after calibration is complete by pressing the
WASH button and cycling to Levels 2, 3 or 5 as dis-
played by the REAR WIPER LED. On Heater Only
units you can only cycle to Levels 2 and 3. In eachindividual test the INTERMITTENT LED flash rate
will change as the Temperature or Mode potentiome-
ter is moved from one end to the other, see Potenti-
ometer vs. Position and Flash Rate table.
EVAPORATOR PROBE TEMPERATURE
DIAGNOSTICS
The evaporator probe can be tested by using the
INTERMITTENT LED to display the actual temper-
ature the sensor is reading. The HVAC control mod-
ule can only display temperatures from 1 to 99
degrees. To read the temperature, perform the follow-
ing:
²Set Blower motor to any speed other than OFF
²Set A/C to ON, if A/C Clutch does not engage
make sure Fail Codes 5 and 6 are cleared.To clear
the error code 5 and 6 the evaporator probe and/or
the wiring repair needs to be completed. Then, press
and hold the intermittent wipe button for 5 seconds.
²Run Diagnostics (Depress REAR WIPER and
REAR WASH)
²When Diagnostics is complete, Cycle to Level 4.
Display Sequence is as follows:
²REAR WIPER LED will display the Level
²INTERMITTENT LED will display ten's digit
²Short Pause
²INTERMITTENT LED will display the one's
digit.
The HVAC control module will continue to cycle
the Level and then Temperature until the level is
changed or Calibration Diagnostics and Cooldown
test is exited.
HVAC CONTROL DIAGNOSTIC CONDITIONS
For wiring circuits, wiring connectors, and Pin
numbers, refer to Group 8W, Wiring Diagrams.
After calibration, Rear Wiper LED flashing
once, Intermittent LED not flashing.
The system has passed calibration. Press the Rear
Wiper button to exit calibration.
WIPE BUTTON LED
LEVEL DISPLAY
1 FAIL CODES
2 MODE POTENTIOMETER TEST
3 BLEND/PASS. POTENTIOMETER TEST
4 EVAPORATOR PROBE (A/C AND ZONE
UNITS ONLY)
5 DRIVER POTENTIOMETER (ZONE UNITS
ONLY)
LEVEL 1±FAILURE CODE VALUES
(INTERMITTENT WIPE BUTTON LED)
CODE DEFINITION
0 PASSED ALL TESTS
1 MODE ACTUATOR DID NOT REACH
DEFROST POSITION
2 MODE ACTUATOR DID NOT REACH
PANEL POSITION
3 BLEND/PASS. ACTUATOR DID NOT
REACH COLD STOP
4 BLEND PASS. ACTUATOR DID NOT
REACH HEAT STOP
5 EVAPORATOR PROBE OPEN
6 EVAPORATOR PROBE SHORTED
7 DRIVER ACTUATOR DID NOT REACH
COLD STOP
8 ZONE/DRIVER ACTUATOR DID NOT
REACH HEAT STOP
9 CONTROL HEAD INTERNAL FAILURE
POTENTIOMETER VS. POSITION AND FLASH
RATE
POTENTIOM-
ETERINTERMIT-
TENT LED
FASTER
FLASH RATEINTERMITTENT
LED SLOWER
FLASH RATE
MODE PANEL DEFROST
BLEND/PASS. HOT COLD
DRIVER HOT COLD
NSHEATING AND AIR CONDITIONING 24 - 9
DIAGNOSIS AND TESTING (Continued)
Page 1829 of 1938
BLOWER MOTOR AND WHEEL ASSEMBLY
VIBRATION AND/OR NOISE DIAGNOSIS
The blower speed switch, in conjunction with the
resistor block, supplies the blower motor with varied
voltage.
CAUTION: Stay clear of the blower motor and resis-
tor block (Hot). Do not operate the blower motor
with the resistor block removed from the heater A/C
housing.
Refer to the Blower Motor Vibration/Noise chart in
this section for diagnosis.
COMPRESSOR NOISE DIAGNOSIS
Excessive noise while the A/C is being used, can be
caused by loose mounts, loose clutch, or high operat-
ing pressure. Verify compressor drive belt condition,
proper refrigerant charge and head pressure before
compressor repair is performed.
If the A/C drive belt slips at initial start-up, it does
not necessarily mean the compressor has failed.
With the close tolerances of a compressor it is pos-
sible to experience a temporary lockup. The longer
the A/C system is inactive, the more likely the condi-
tion to occur.
This condition is the result of normal refrigerant
movement within the A/C system caused by temper-
ature changes. The refrigerant movement may wash
the oil out of the compressor.
COMPRESSOR CLUTCH/COIL
The air conditioning compressor clutch electrical
circuit is controlled by the Powertrain Control Mod-
ule. It is located in the engine compartment outboard
of the battery.If the compressor clutch does not engage verify
refrigerant charge.
If the compressor clutch still does not engage check
for battery voltage at the pressure transducer located
on the liquid line. If voltage is not detected, refer to:
²Group 8W, Wiring diagrams.
²Powertrain Diagnostic Procedures manual for
diagnostic information.
If voltage is detected at the pressure transducer,
connect pressure transducer and check for battery
voltage between the compressor clutch connector ter-
minals.
If voltage is detected, perform A/C Clutch Coil
Tests.
TESTS
(1) Verify battery state of charge. (Test indicator in
battery should be green).
(2) Connect an ampmeter (0-10 ampere scale) in
series with the clutch coil terminal. Use a voltmeter
(0-20 volt scale) with clip leads measuring voltage
across the battery and A/C clutch.
(3) With A/C control in A/C mode and blower at
low speed, start the engine and run at normal idle.
(4) The A/C clutch should engage immediately and
the clutch voltage should be within two volts of the
battery voltage. If the A/C clutch does not engage,
test the fuse.
(5) The A/C clutch coil is acceptable if the current
draw is 2.0 to 3.7 amperes at 11.5-12.5 volts at clutch
coil. This is with the work area temperature at 21ÉC
(70ÉF). If voltage is more than 12.5 volts, add electri-
cal loads by turning on electrical accessories until
voltage reads below 12.5 volts.
(6) If coil current reads zero, the coil is open and
should be replaced. If the ammeter reading is 4
amperes or more, the coil is shorted and should be
replaced. If the coil voltage is not within two volts of
the battery voltage, test clutch coil feed circuit for
excessive voltage drop.
EXPANSION VALVE
NOTE: Special effort must be used to keep all
R-134a system components moisture-free. Moisture
in the oil is very difficult to remove and will cause a
reliability problem with the compressor.
TESTS
NOTE: Expansion valve tests should be performed
after compressor tests.
Review Safety Precautions and Warnings in this
group. The work area and vehicle temperature must
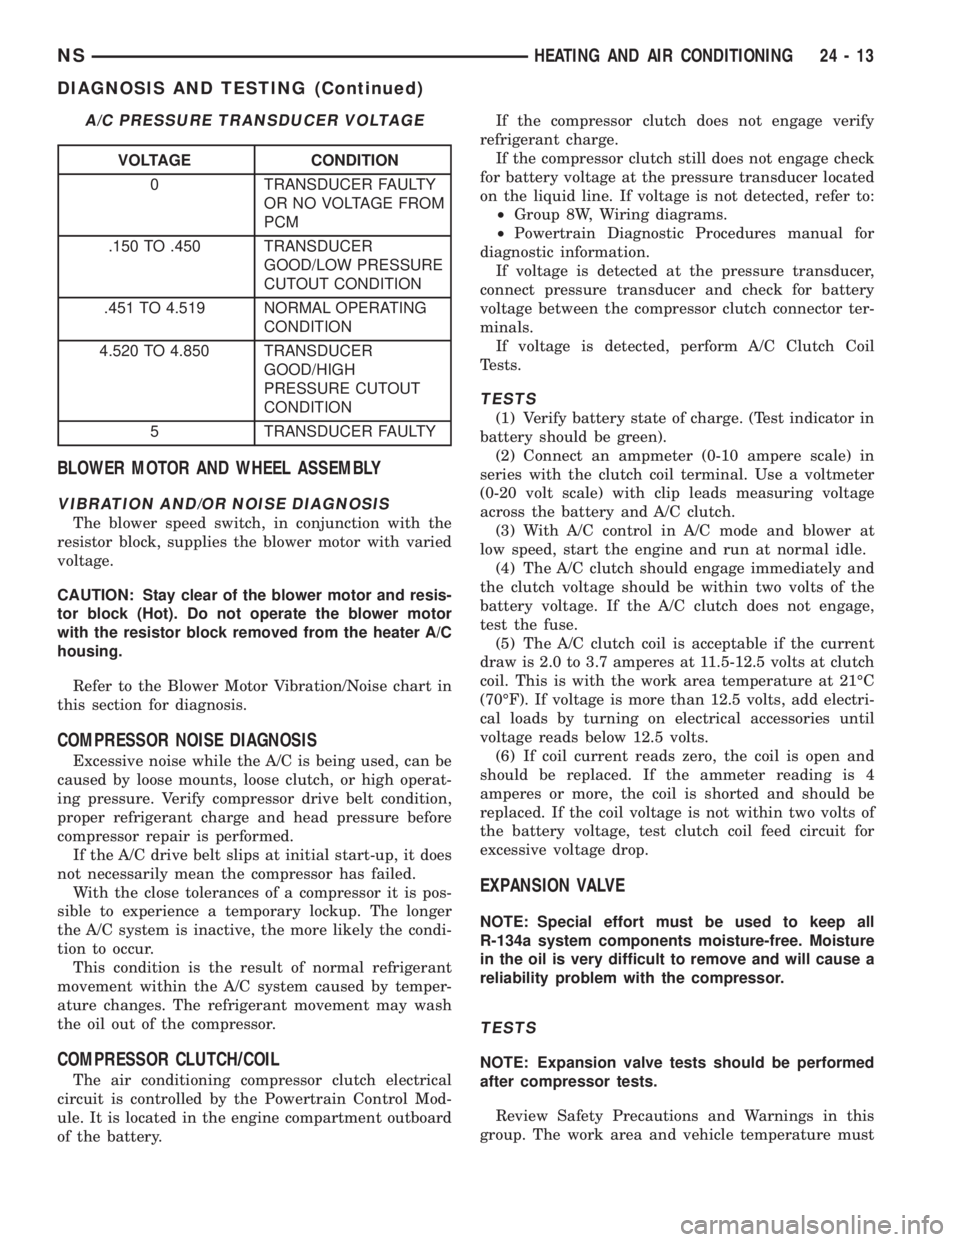
A/C PRESSURE TRANSDUCER VOLTAGE
VOLTAGE CONDITION
0 TRANSDUCER FAULTY
OR NO VOLTAGE FROM
PCM
.150 TO .450 TRANSDUCER
GOOD/LOW PRESSURE
CUTOUT CONDITION
.451 TO 4.519 NORMAL OPERATING
CONDITION
4.520 TO 4.850 TRANSDUCER
GOOD/HIGH
PRESSURE CUTOUT
CONDITION
5 TRANSDUCER FAULTY
NSHEATING AND AIR CONDITIONING 24 - 13
DIAGNOSIS AND TESTING (Continued)


