1996 CHEVROLET TAHOE wheel torque
[x] Cancel search: wheel torquePage 79 of 403
Downloaded from www.Manualslib.com manuals search engine AUTOMATIC OVERDRIVE (@): This position is
for normal dri,ving. If you need more power for passing,
and you’re:
Going less than about 35 mph (56 M), push your
accelerator pedal about halfway down.
accelerator all the way down.
You’ll shift down to the next gear and have more power.
Going about 35 mph (56 M) or more, push the
AUTOMATIC OVERDRIVE
(@) can be used when
towing a trailer. You may want
to shift the transmission
to THIRD (3) or, if necessary, a lower gear selection if
the transmission shifts too often when carrying a heavy
load, driving on steep hills or for off-road driving.
THIRD (3): This position is also used for normal
driving, however, it offers more power and lower fuel
economy than AUTOMATIC OVERDRIVE
(@).
SECOND (2): This position gives you more power but
lower fuel economy. You can use SECOND
(2) on hills.
It can help control your speed as you
go down steep
mountain roads, but then you would also want to use
your brakes off and on. If
you manually select
SECOND (2), the transmission
will drive in second gear. You may use this feature
for reducing torque to the rear wheels when
you are
trying to start your vehicle from a stop on slippery
road surfaces.
FIRST (1): This position gives you even more power
(but lower fuel economy) than SECOND
(2). You can
use it on very steep hills, or in deep snow or mud. If the
selector lever is put in FIRST
(1) while the vehicle is
moving forward, the transmission won’t shift into first
gear until the vehicle is going slowly enough.
NOTICE:
I,
If your rear wheels can’t rotate, don’t try to
drive. This might happen if you were stuck in
very deep sand or
mud or were up against a solid
object. You could damage your transmission.
Also, if you stop when going uphill, don’t hold your vehicle there with only the accelerator pedal. This could overheat and damage the transmission.
Use your brakes or shift into PARK (P) to hold
your vehicle in position on a hill.
2-16
Page 245 of 403
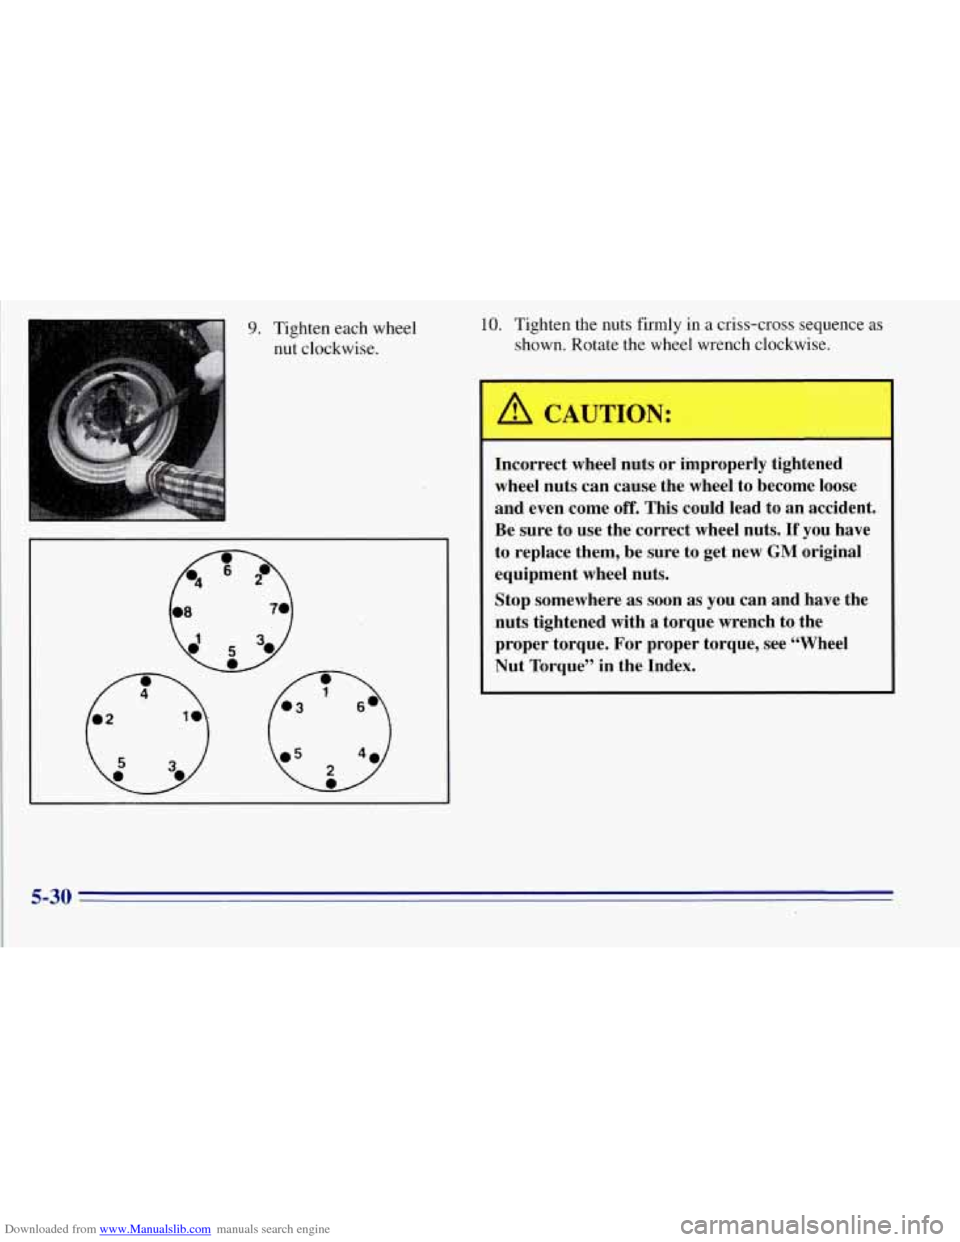
Downloaded from www.Manualslib.com manuals search engine 9. Tighten each wheel nut clockwise. 10. Tighten the nuts firmly in a criss-cross sequence as
shown. Rotate the wheel wrench clockwise.
A, CAUTION:
Incorrect wheel nuts or improperly tightened
wheel nuts can cause the wheel, to become loose
and even come
off. This could lead to an accident.
Be sure to use the correct wheel nuts.
If you have
to replace them, be sure to get new
GM original
equipment wheel nuts.
Stop somewhere
as soon as you can and haye the
nuts tightened with a torque wrench to the
proper torque. For proper torque, see “Wheel
Nut Torque” in the Index.
5-30
Page 246 of 403
Downloaded from www.Manualslib.com manuals search engine NOTICE:
Improperly tightened wheel nuts can lead to
brake pulsation and rotor damage.
To avoid
expensive brake repairs, evenly tighten the wheel
nuts in the proper sequence and to the proper
torque specification.
11. Put the wheel trim back on. For vehicles with
plastic wheel nut caps, tighten the caps until they
are finger tight, then tighten them an additional
one-half turn with the ratchet and wheel wrench.
Storing a Flat or Spare Tire and "001s
1 A CAUTION:
Storing a jack, a tire or other equipment in the
passenger compartment
of the vehicle could
cause injury. In
a sudden stop or collision, loose
equipment could strike someone. Store
all these
in the proper place.
Store the flat tire where the spare tire is stored.
Put the tools into the storage box and close
it tightly.
Fit the storage box
on the bracket with the bolt through
the box. Put the jack onto the box. Be sure the jack is
stored as shown in the following illustrations. Secure the
emergency gloves, if your vehicle has them, to the jack
using the provided strap.
Slide the retainer over the bolt onto the jack and put
the
wing nut on it. Turn the nut clockwise until it is tight
against the retainer.
Replace the jack storage cover, if your vehicle has
one, by simply reversing the removal procedure
described earlier.
5-31
Page 287 of 403
Downloaded from www.Manualslib.com manuals search engine Some driving conditions or climates may cause a brake
squeal when the brakes are first applied or lightly
applied. This does not mean something is wrong with
your brakes.
Free movement
of brake calipers and properly torqued
wheel nuts are necessary
to help prevent brake
pulsation. When tires are rotated, inspect brake calipers
for movement, brake pads for wear, and evenly torque
wheel nuts in the proper sequence to
GM specifications.
Your rear drum brakes don’t have wear indicators, but if
you ever hear a rear brake rubbing noise, have the rear
brake linings inspected. Also, the rear brake drums should
be removed and inspected each time the tires are removed
for rotation or changing. When you have the front brakes
replaced, have the rear brakes inspected, too.
Brake linings should always be replaced as complete
axle sets.
Brake Pedal Travel
See your dealer if the brake pedal does not return to
normal height, or
if there is a rapid increase in pedal
travel. This could be a sign of brake trouble.
Brake Adjustment
Every time you make a brake stop, your disc brakes
adjust for wear. If
your brake pedal goes down farther than normal, your
rear drum brakes may need adjustment. Adjust them by
backing up and firmly applying the brakes a few times.
Replacing Brake System Parts
The braking system on a modern vehicle is complex. Its
many parts have to be of top quality and work well
together if the vehicle is to have really good braking.
Vehicles we design and test have top-quality
GM brake
parts in them, as your vehicle does when it is new. When
you replace parts of your braking system
-- for example,
when your brake linings wear down and you have to
have new ones put in
-- be sure you get new genuine
GM replacement parts. If you don’t, your brakes may
no longer work properly. For example, if someone
puts in brake linings that are wrong for your vehicle,
the balance between your front and rear brakes can
change
-- for the worse. The braking performance
you’ve come to expect can change in many other ways if
someone puts in the wrong replacement brake parts.
Fluid Leak Check
After the vehicle has been parked for a while, inspect the
surface under the vehicle for water, oil, fuel or other fluids\
.
Water dripping from the air conditioning system after
it
has been used is normal. If you notice fuel leaks or fumes,
the causes should
be found and corrected at once.
6-34
Page 299 of 403
Downloaded from www.Manualslib.com manuals search engine After the tires have been rotated, adjust the front and rear inflation pressures as shown on the Certificatioflire label.
Make certain that all. wheel nuts are properly tightened. See “Wheel
Nut Torque” in the Index.
A
/! CAUTION:
Rust or dirt on a wheel, or on the parts to which
it is fastened, can make wheel nuts become
loose
after a time. The wheel could come off and cause
an accident. When you change a wheel, remove
any rust or dirt from places where the wheel
attaches
to the vehicle. In an emergency, you can
use
a cloth or a paper towel to do this; but be
sure to
use a scraper or wire brush later, if you
need to, to get all the rust or dirt
off. (See
“Changing a Flat Tire” in the Index.) When
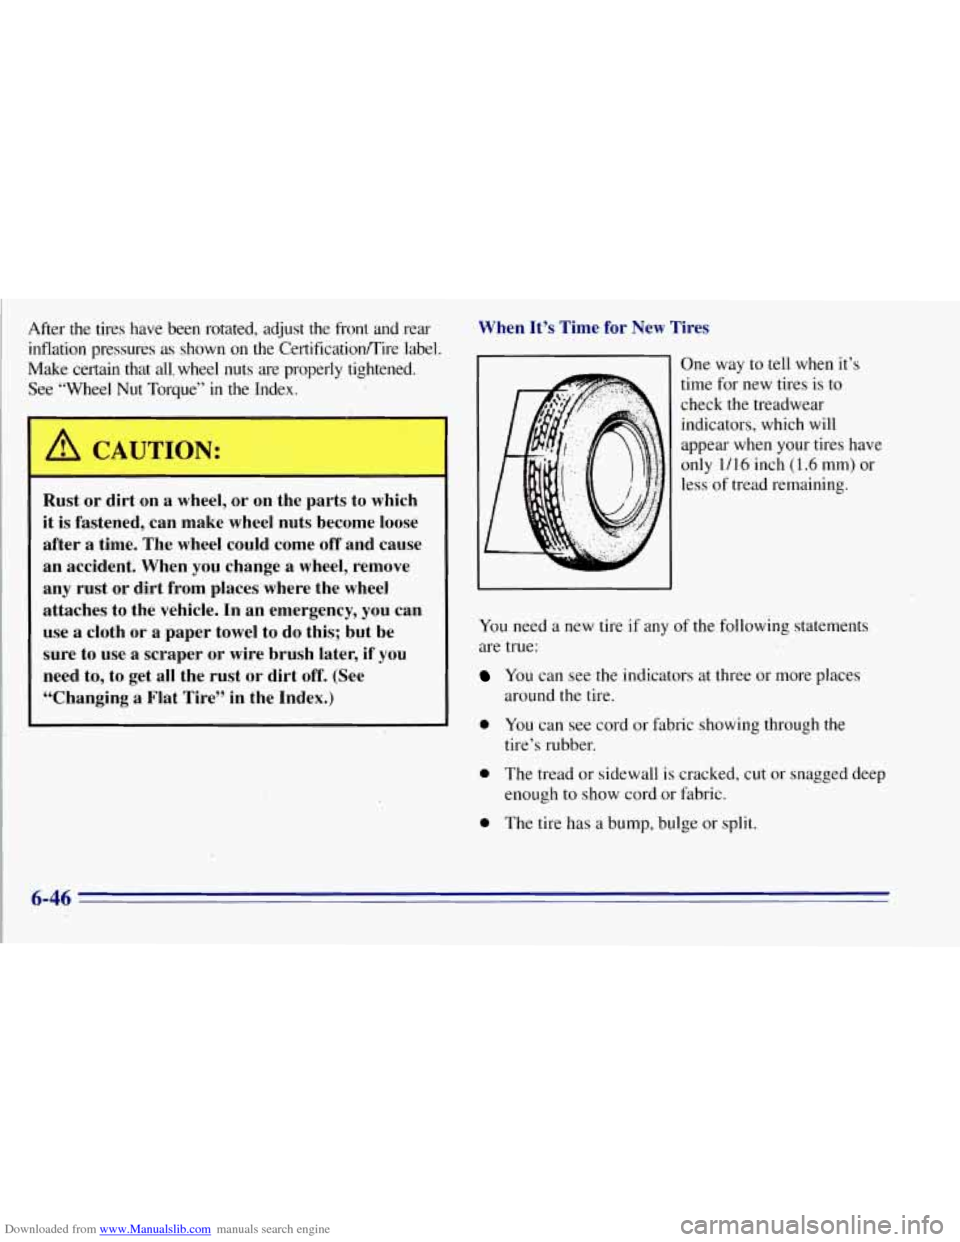
It’s Time for New Tires
You need a new tire if any o
are true: One
way to
tell when it’s
time for new tires is
to
check the treadwear
indicators, which will
appear when your tires have
only
1/16 inch (1.6 mm) or
less of tread remaining.
f rh Ile following statements
You can see the indicators at three or more places
around the tire.
0 You can see cord or fabric showing through the
tire’s rubber.
0 The tread or sidewall is cracked, cut or snagged deep
enough to show cord or fabric.
0 The tire has a bump, bulge or split.
6-46
Page 323 of 403
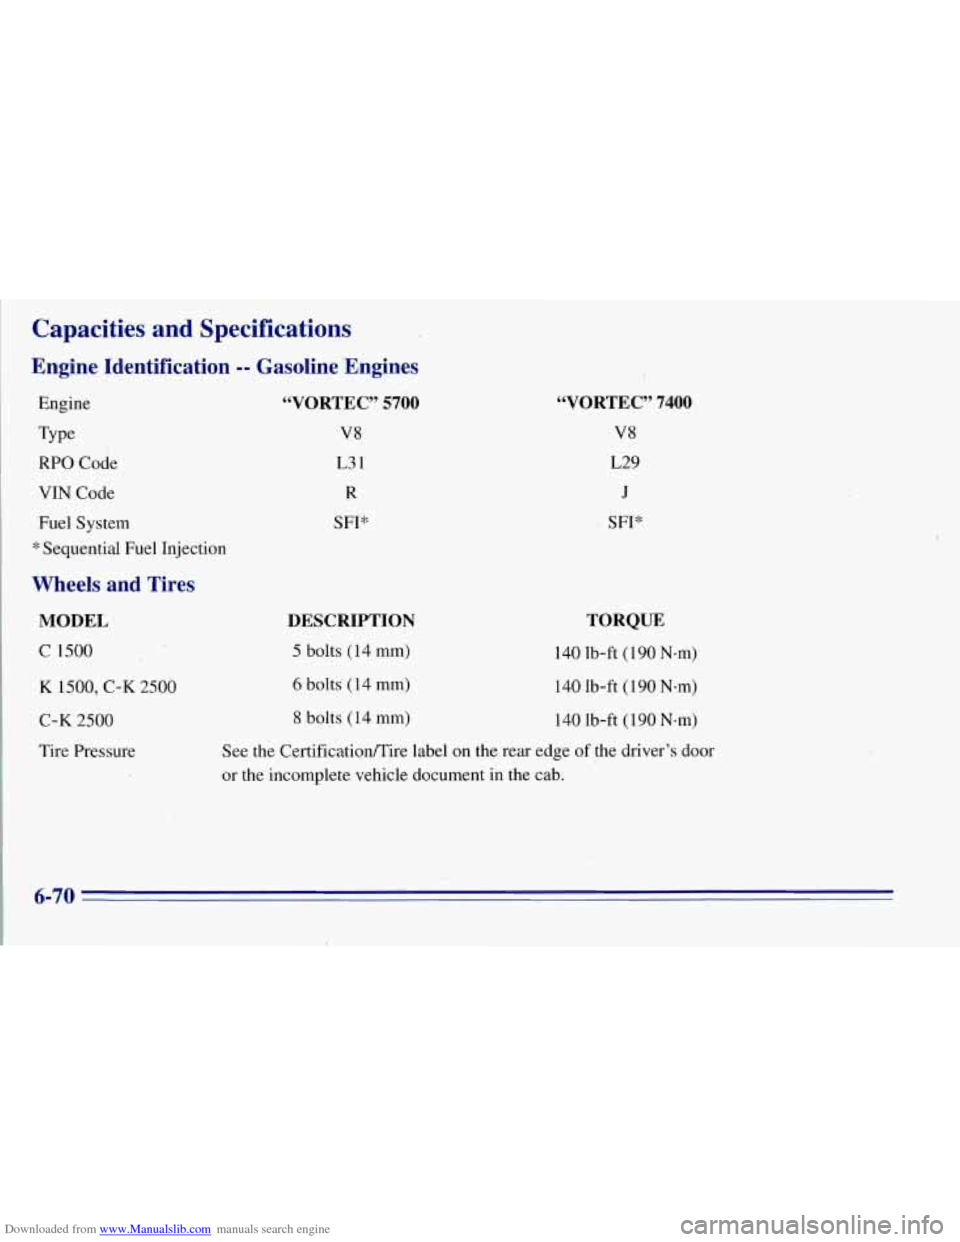
Downloaded from www.Manualslib.com manuals search engine Capacities and Specifications
Engine Identification -- Gasoline ‘Engines
Engine
Type
RPO Code
VIN Code
Fuel System
* Sequential Fuel Injection
Wheels and Tires
MODEL
C 1500
K 1500, C-K 2500
C-K 2500
Tire Pressure
“VORTEC” 5700
V8
L3 1
R
SFI*
“VORTEC” 7400
V8
L29
J
SFI*
DESCRIPTION
TORQUE
5 bolts (14 mm) 140 lb-ft (190 N-m)’
6 bolts (14 mm) 140 lb-ft ( 190 N-m)
8 bolts (14 mm)
140 lb-ft (190 Nem)
See the Certificatioflire label on the rear edge of the driver’s door
or the incomplete vehicle document in the cab.
6-70
Page 399 of 403

Downloaded from www.Manualslib.com manuals search engine Tires .......................................... 6-43
Alignment and Balance
........................ 6-49
BuyingNew
................................. 6-47
Chains
..................................... 6-51
Changing a Flat
.............................. 5-19
Cleaning
..................................... 6-57
Inflation
.................................... 6-44
Inflation Check
............................... 7-42
Inspection and Rotation
........................ 6-45
Loading
...................................... 4-41
Pressure
..................................... 6-44
Temperature
................................. 6-49
Traction
.................................... 6-48
Treadwear
................................... 6-48
Uniform Quality Grading
....................... 6-48
Used Wheel Replacement
...................... 6-50
Wear Indicators
.............................. 6-46
Wheel Replacement
........................... 6-49
When It's Time for New
........................ 6-46
TopStrap
..................................... 1-45
Torque Lock
................................... 2-24
Torque, Wheel
Nut ......................... 5-30, 6-70
Towing From the Front
................................ 5-8
From 'the Rear
................................ 5-8
Trailer
...................................... 4-43
Yourvehicle
.................................. 5-6
Brakes
...................................... 4-49
Driving on Grades
............................. 4-51
Trailer
Drivingwith
................................. 4-49
Engine Cooling When Towing
.............. 4-44. 4-53
Hitches
..................................... 4-48
Maintenance When Towing
...................... 4-53 Parking
on Hills
.............................. 4-52
Safety Chains
................................ 4-48
Tongueweight
............................... 4-47
Total Weight on Tires
.......................... 4-47
Towing
..................................... 4-43
Turn Signals
................................. 4-51
Weight
...................................... 4-45
Wiring Harness
............................... 4-53
Transfer Case
.................................. 6-23
Transfer Case, Electronic
......................... 2-19
Transfer Case, Manual
........................... 2-17
Transmitters, Keyless Entry
........................ 2-4
Transportation, Courtesy
.......................... 8-6
Transmission Fluid, Automatic
.................... 6-18
Trip Odometer
.I .................................. 2-57
TTYUsers
..................................... 8-3
Turn Signal and Lane Change Signals
............... 2-29
Turn Signals When Towing
a Trailer ................ 4-51
Underbody Maintenance
........................ 6-58
Underhood Fusemelay Center
............................ 6-66
ReelLamp .................................. 2-37
Storage Area
.................................. 2-47
Vehicle Control
....................................... 4-5
Damage Warnings
.............................. iv
Identification Number ............................ 6-60
Loading
.................................... 4-41
Storage
..................................... 6-35
Ve. ntilation System
............................... 3-7
9-10
Page 400 of 403
Downloaded from www.Manualslib.com manuals search engine Visors. Sun .................................... 2-53
Voltmeter
...................................... 2-60
warning Devices
............................... 5-2
Warning Lights. Gages and~hdicators
............... 2-58
Washer Fluid. Windshield ........................ 6-30
Washing Your Vehicle ............................. 6-56
Weatherstrips
..... : ............................. 6-55
Wheel Alignment
.................................. 6-49
Nut Torque
............................. 5-30, 6-70
Replacement
................................. 6-49
Used Replacement
............................ 6-50
Window Lock .................................. 2-27
Wrench
................................ 5-22.
5-23 Windows
..................................... 2-27
LockoutSwitch .............................. 2-27
Manual
........................................ 7.
Power ....................................... 2-27
WindshieEd Washer
............................. 2-31
Fluid
.................................. 2-31, 6-30
Fluid Level Check ......................... : ... 7-42
Rear
....................................... 2-32
Windshield Wipers
.............................. 2-30
Blade Replacement
...................... 6-42, 6-71
Rear
....................................... 2-32
Winter Driving
.. I .............................. 4-37
Wiring, Headlamp
.......................... : ... 6-61.
WreckerTowing .................................. 5-6
Wrench, Wheel ............................ 5-22, 5-23
Fuses
...................................... 6-61
9-11