Page 270 of 403
Downloaded from www.Manualslib.com manuals search engine To remove the air filter, unhook the retainer clips and
remove the cover. Lift the filter and the connected duct Install the
new filter by pushing it all the way to the stop
on the duct.
Out Of the air housing. the duct and remove Install the duct and the filter into the air cleaner housing.
the filter by both pulling and twisting the filter away
from the duct. Care should be taken to dislodge as little
dirt
as possible. Install the cover and fasten the two retaining clips.
Make
sure that the duct fits properly into the housing.
Clean the filter sealing surfdce of the duct and the
filter housing. After the air filter
is properly serviced, the
indicator
should be reset. Push the button on top
of the indicator
to reset
it to the green (clean) filter zone.
Refer to the Maintenance Schedule to determine when to
replace the air filter.
See “Scheduled Maintenance Services” in the Index.
6-17
Page 271 of 403
Downloaded from www.Manualslib.com manuals search engine A ,CAUTION:
Operating the engine with the air cleaner off can
cause
you or others to be burned. The air cleaner
not only cleans the air, it stops flame
if the engine
backfires.
If it isn’t there, and the engine
backfires, you could be burned. Don’t drive with
it
off, and be careful working on the engine with
the air cleaner off.
I
NOTICE:
If the air cleaner is off, a backfire can cause a
damaging engine fire. And, dirt can easily get
into your engine, which will damage
it. Always
have the air cleaner in place when you’re driving.
Automatic Transmission Fluid
When to Check and Change
A good time to check your automatic transmission fluid
level
is when the engine oil is changed.
Change both the fluid and filter every
50,000 miles
(83 000 Ism) if the vehicle is mainly driven under one
or,more of these conditions:
0 In heavy city traffic where the outside temperature
regularly reaches
90” F (32 O C) or higher.
0 In hilly or mountainous terrain.
0 When doing frequent trailer towing.
0 Uses such as found in taxi, police or delivery service.
If you do not use your vehicle under any of these
conditions, the fluid and filter do not require changing.
See “Scheduled Maintenance Services” in
the Index.
6-18
Page 272 of 403
Downloaded from www.Manualslib.com manuals search engine How to Check
Because this operation can be a little difficult, you
may choose to have this done at your GM dealer
Service Department.
If you do it yourself, be sure to follow all the instructions
here, or you could get a false reading on the dipstick.
NOTICE:
Too much or too little fluid can damage your
transmission.
Too much can mean that some of
the fluid could come out and fall on hot engine parts or exhaust system parts, starting a fire. Be
sure to get an accurate reading if
you check your
transmission fluid.
Wait at least 30 minutes before checking the
transmission fluid level if you have been driving:
When outside temperatures are above 90°F (320C).
At high speed for quite a while.
In heavy traffic -- especially in hot weather.
While pulling a trailer.
To get the right reading, the fluid should be at normal
operating temperature, which is
180°F to 200°F
(82°C
to 93°C).
Checking Transmission Fluid Hot
Get the vehicle warmed up by driving about 15 miles
(24 km) when outside temperatures are above 50°F
(10°C). If it's colder than 50°F ( lO"C), drive the
vehicle in
DRIVE (D) until the engine temperature gage
moves and then remains steady for
10 minutes. Then
follow the hot check procedures.
6-19
Page 275 of 403
Downloaded from www.Manualslib.com manuals search engine Rear Axle
When to Check and Change Lubricant
Refer to the Maintenance Schedule to determine how
often to check the lubricant and when to change it.
See “Scheduled Maintenance Services”
in the Index.
How to Check Lubricant
If the level is below the bottom of the filler plug hole,
you’ll need to add some lubricant. Add enough lubricant
to raise the level to the bottom
of the filler plug hole.
What to Use
Refer to the Maintenance Schedule to determine what
kind of lubricant to use. See “Recommended Fluids and
Lubricants” in the Index.
Four- Wheel Drive
Most lubricant checks in this section also apply to
four-wheel-drive vehicles. However, they have two
additional systems that need lubrication.
6-22
Page 276 of 403
Downloaded from www.Manualslib.com manuals search engine Transfer Case
When to Check Lubricant
Refer to the Maintenance Schedule to determine how
often to check the lubricant. See “Periodic Maintenance
Inspections” in the Index.
How to Check Lubricant
If the level is below the bottom of the filler plug hole,
you’ll need
to add some lubricant. Add enough lubricant
to raise the level to the bottom
of the filler plug hole.
What to Use
Refer to the Maintenance Schedule to determine what
kind
of lubricant to use. See “Recommended Fluids and
Lubricants” in the Index.
Front Axle
When to Check and Change Lubricant
Refer to the Maintenance Schedule to determine how
often to check the lubricant and when to change it. See
“Scheduled Maintenance Services’’ in
the Index.
6-23
Page 286 of 403
Downloaded from www.Manualslib.com manuals search engine NOTICE:
Using the wrong fluid can badly damage
brake system parts. For example, just a few
drops of mineral-based oil, such as engine
oil, in your brake system can damage brake
system parts
so badly that they’ll have to be
replaced. Don’t let someone put in the
wrong kind of fluid.
If you spill brake fluid on your vehicle’s
painted surfaces, the paint finish can be
damaged. Be careful not to spill brake fluid
on your vehicle.
If you do, wash it off
immediately. See “Appearance Care’’
in the Index.
Brake Wear
Your vehicle has front disc brakes and rear drum brakes.
Disc brake pads have built-in wear indicators that make a
high-pitched warning sound when the brake pads are worn
and new pads are needed. The sound may come and go or
be heard all the time your vehicle is moving (except when
you are pushing on the brake pedal firmly).
-
r, CAUTION: I
The brake wear warning sound means that sooner
or later your brakes won’t work well. That could
lead to an accident. When you hear the brake wear
warning sound, have your vehicle serviced.
I
NOTICE:
Continuing to drive with worn-out brake pads
could result in costly brake repair.
.
6-33
Page 296 of 403
Downloaded from www.Manualslib.com manuals search engine Tires
We don’t make tires. Your new vehicle comes with
high-quality tires made by a leading tire manufacturer.
If you ever have questions about your tire warranty and
where to obtain service, see your
GM Warranty booklet
for details.
A CAUTION:
Poorly maintained and improperly used tires
are dangerous.
0 Overloading your tires can cause
overheating as a result of too much friction.
You could have an air-out and a serious
accident. See “Loading Your Vehicle” in
the Index.
CAUTION: (Continued) CAUTION:
(Continued)
0
0
0
Underinflated tires pose the same danger as
overloaded tires. The resulting accident
could cause serious injury. Check all tires
frequently to maintain the recommended
pressure. Tire pressure should be checked
when your tires are cold.
Overinflated tires are more likely to be
cut, punctured or broken by
a sudden
impact
-- such as when you hit a pothole.
Keep tires at the recommended pressure.
Worn, old tires can cause accidents.
If your
tread is badly worn, or if your tires have
been damaged, replace them.
6-43
Page 298 of 403
Downloaded from www.Manualslib.com manuals search engine When to Check
Check your tires once a month or more. Also, check the
tire pressure of the spare tire.
How to Check
Use a good quality pocket-type gage to check tire
pressure.
You can’t tell.if your tires are properly inflated
simply by looking at them. Radial tires may look
properly inflated even when they’re underinflated.
Be sure to put the valve caps back on the valve
stems. They help prevent leaks by keeping out dirt
and moisture.
Tire Inspection and Rotation
Tires should be inspected every 6,000 to 8,000 miles
(10
000 to 13 000 km) for any signs of unusual wear.
If unusual wear is present, rotate your tires as soon as
possible and check wheel alignment. Also check for
damaged tires or wheels. See “When It’s Time for New
Tires” and “Wheel Replacement” later in this section for
more information.
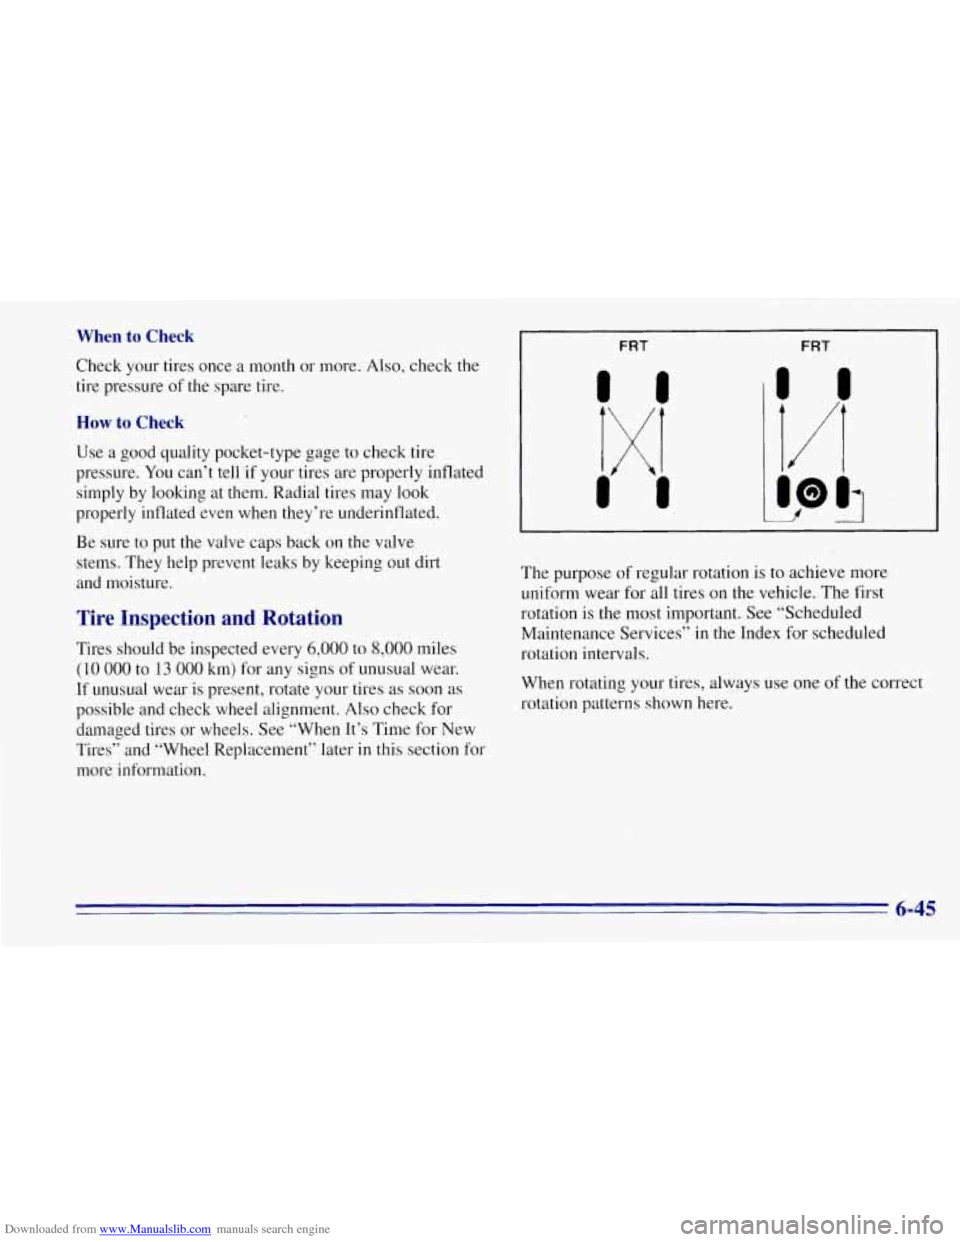
I FRT FRT
The purpose of regular rotation is to achieve more
uniform wear for all tires on the vehicle. The first
rotation
is the most important. See “Scheduled
Maintenance Services” in the Index for scheduled
rotation intervals.
When rotating your tires, always use one
of the correct
rotation patterns shown here.
6-45