1996 CHEVROLET TAHOE clock
[x] Cancel search: clockPage 243 of 403

Downloaded from www.Manualslib.com manuals search engine 4. With UP on the ratchet facing you, raise the vehicle
by rotating the ratchet and wheel wrench clockwise.
Raise the vehicle far mough
off the ground so there
is enough room for ,the spare tire to fit.
5. Remove all the wheel
nuts and take off the
flat tire. Remove any rust
or dirt
from the wheel
bolts,
mounting surfaces and
spare wheel.
&!+ CAUTION:
Rust or dirt on the wheel, or on the parts to
which it is fastened, can make the wheel nuts
become loose after a time. The wheel could come
off and cause an accident. When you change a
wheel, remove any rust or dirt from the places
where the wheel attaches to the vehicle.
In an
emergency, you can use a cloth
or a paper towel
to do this; but be sure to use a scraper or wire
brush later, if you need to, to get all the rust or
dirt off.
5-28
Page 244 of 403
Downloaded from www.Manualslib.com manuals search engine A CAUTION:
- I
Never use oil or grease on studs or nuts. If you
do, the nuts might come loose. Your wheel could
fall
off, causing a serious accident.
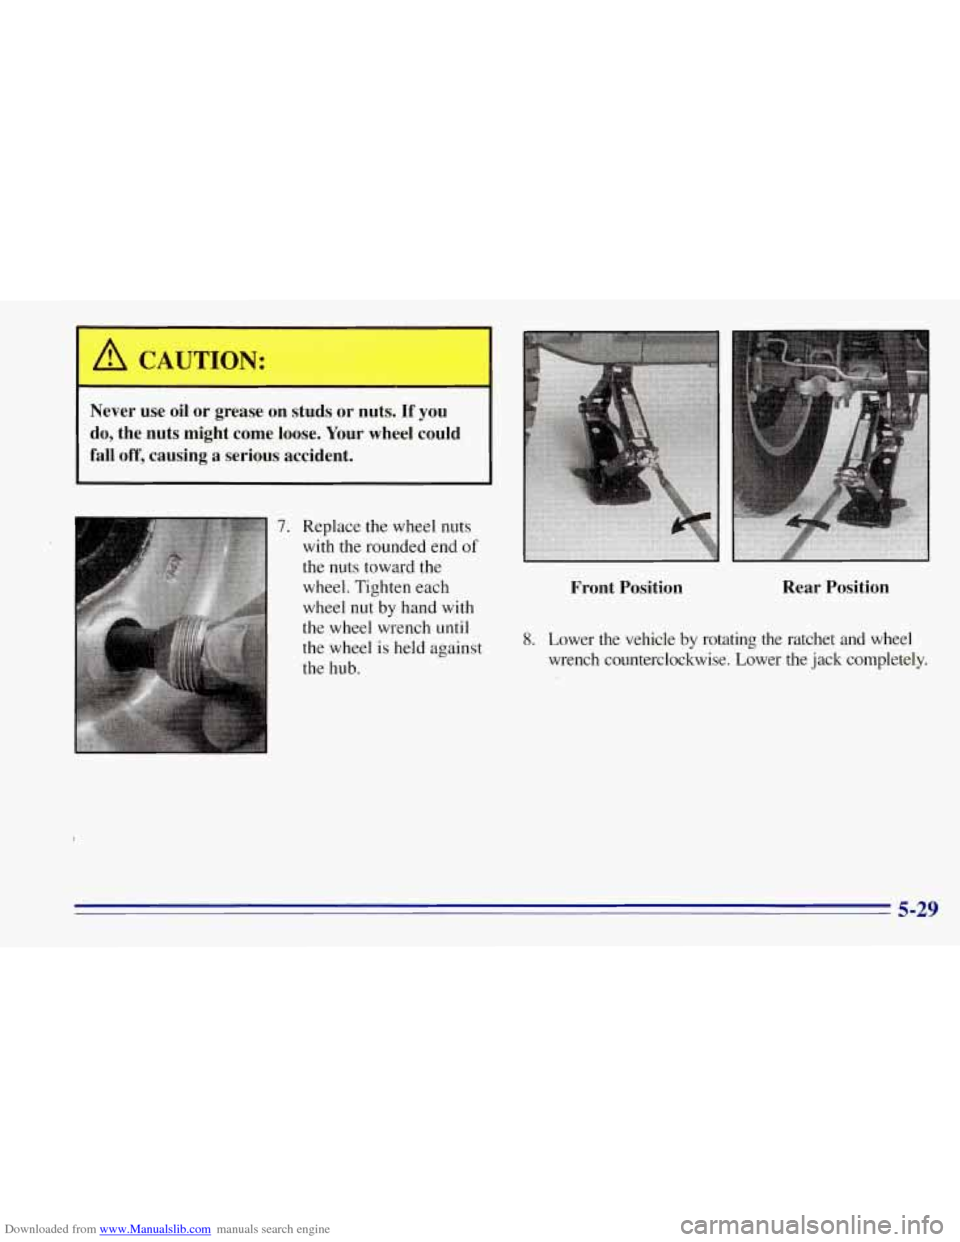
7. Replace the wheel nuts
with the rounded end
of
the nuts toward the
wheel. Tighten each
wheel
nut by hand with
the wheel wrench until
the wheel is held against
the hub.
I
Front Position Rear
Position
8. Lower the vehicle by rotating the ratchet and wheel
wrench counterclockwise. Lower the jack completely.
5-29
Page 245 of 403
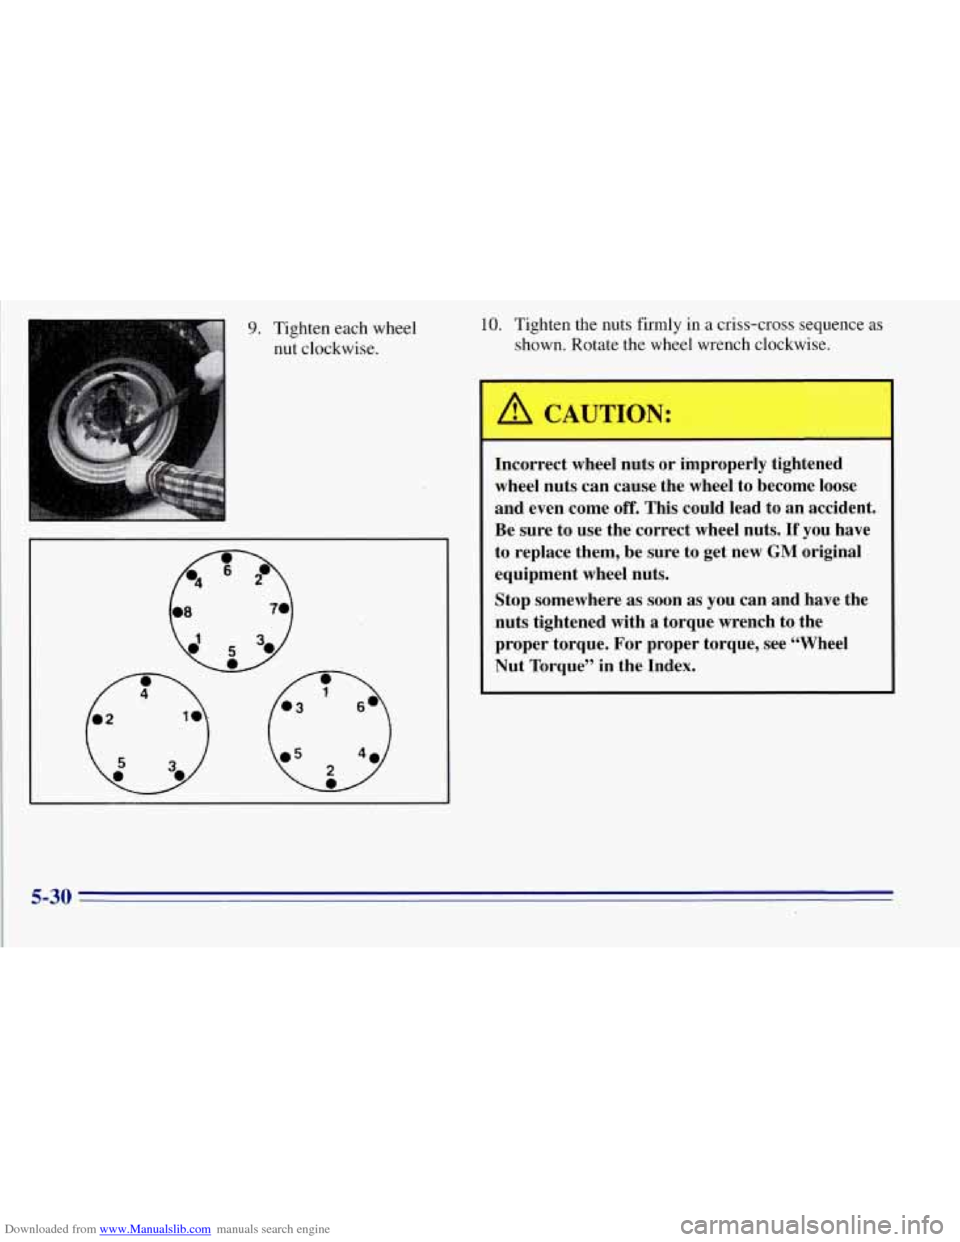
Downloaded from www.Manualslib.com manuals search engine 9. Tighten each wheel nut clockwise. 10. Tighten the nuts firmly in a criss-cross sequence as
shown. Rotate the wheel wrench clockwise.
A, CAUTION:
Incorrect wheel nuts or improperly tightened
wheel nuts can cause the wheel, to become loose
and even come
off. This could lead to an accident.
Be sure to use the correct wheel nuts.
If you have
to replace them, be sure to get new
GM original
equipment wheel nuts.
Stop somewhere
as soon as you can and haye the
nuts tightened with a torque wrench to the
proper torque. For proper torque, see “Wheel
Nut Torque” in the Index.
5-30
Page 246 of 403
Downloaded from www.Manualslib.com manuals search engine NOTICE:
Improperly tightened wheel nuts can lead to
brake pulsation and rotor damage.
To avoid
expensive brake repairs, evenly tighten the wheel
nuts in the proper sequence and to the proper
torque specification.
11. Put the wheel trim back on. For vehicles with
plastic wheel nut caps, tighten the caps until they
are finger tight, then tighten them an additional
one-half turn with the ratchet and wheel wrench.
Storing a Flat or Spare Tire and "001s
1 A CAUTION:
Storing a jack, a tire or other equipment in the
passenger compartment
of the vehicle could
cause injury. In
a sudden stop or collision, loose
equipment could strike someone. Store
all these
in the proper place.
Store the flat tire where the spare tire is stored.
Put the tools into the storage box and close
it tightly.
Fit the storage box
on the bracket with the bolt through
the box. Put the jack onto the box. Be sure the jack is
stored as shown in the following illustrations. Secure the
emergency gloves, if your vehicle has them, to the jack
using the provided strap.
Slide the retainer over the bolt onto the jack and put
the
wing nut on it. Turn the nut clockwise until it is tight
against the retainer.
Replace the jack storage cover, if your vehicle has
one, by simply reversing the removal procedure
described earlier.
5-31
Page 249 of 403
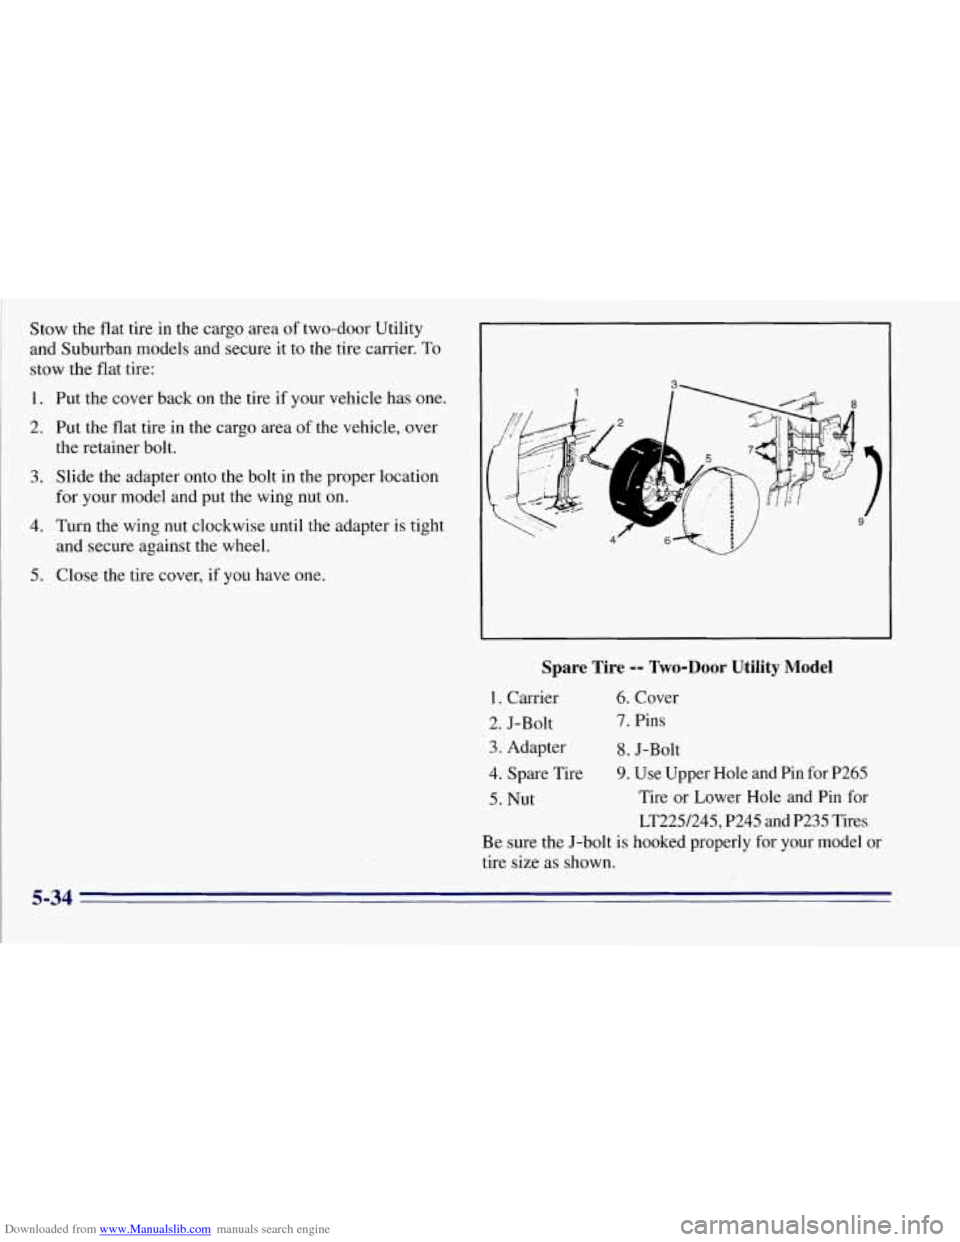
Downloaded from www.Manualslib.com manuals search engine Stow the flat tire in the cargo area of two-door Utility
and Suburban models and secure it to the tire carrier. To
stow the flat tire:
1. Put the cover back on the tire if your vehicle has one.
2. Put the flat tire in the cargo area of the vehicle, over
the retainer bolt.
3. Slide the adapter onto the bolt in the proper location
for your model and put the wing nut on.
4. Turn the wing nut clockwise until the adapter is tight
and secure against the wheel.
5. Close the tire cover, if you have one-
Spare Tire -- Two-Door Utility Model
1. Carrier 6. Cover
2. J-Bolt 7. Pins
3. Adapter 8. J-Bolt
4. Spare Tire 9. Use Upper Hole and Pin for P265
5. Nut Tire or Lower Hole and Pin for
LT225/245, P245 and
P235 Tires
Be sure the J-bolt is hooked properly for your model or
tire size
as shown.
5-34
Page 258 of 403
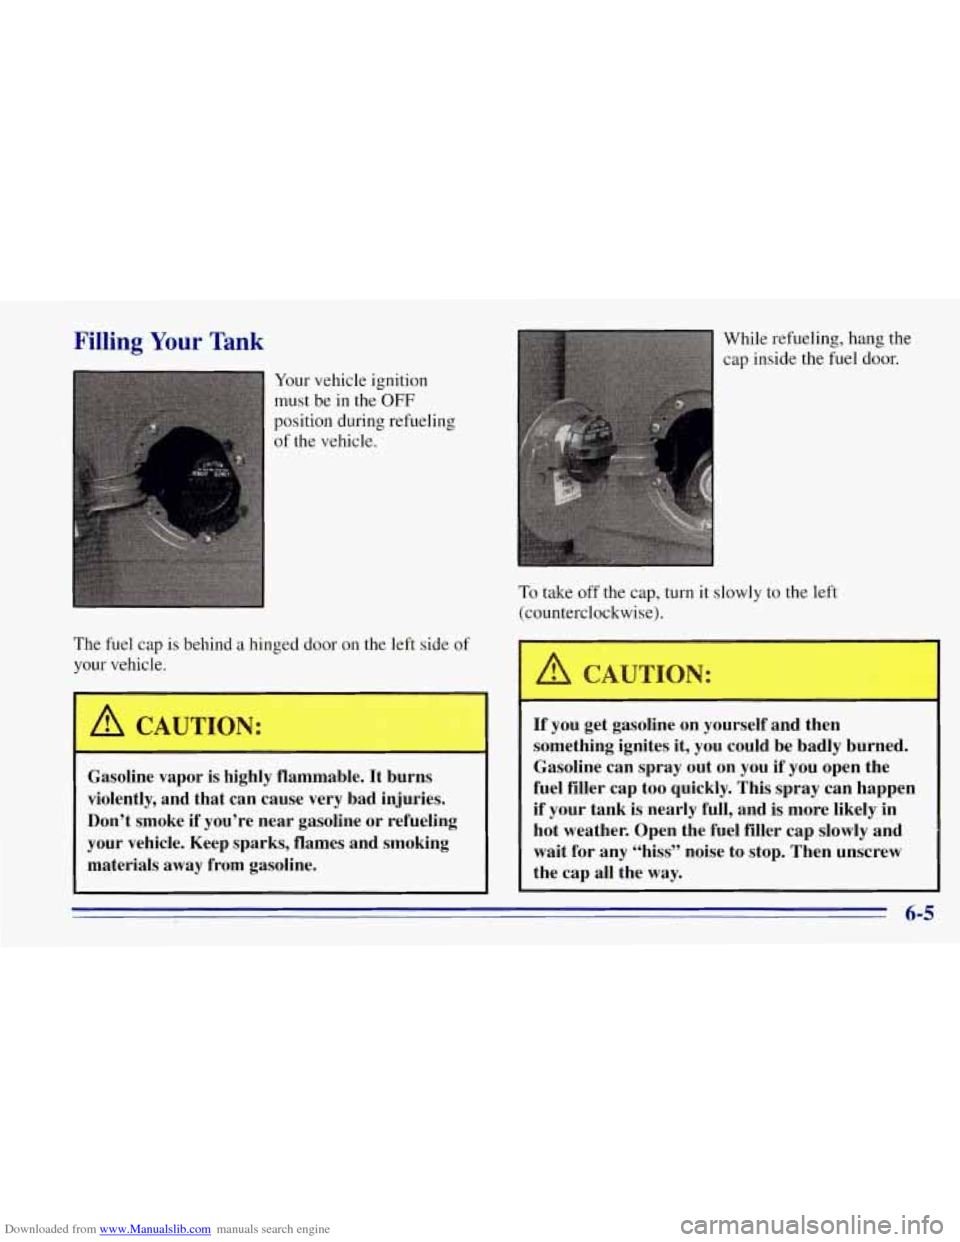
Downloaded from www.Manualslib.com manuals search engine Filling Your Tank
Your vehicle ignition
must be in the
OFF
position during refueling of the vehicle.
The fuel cap is behind
a hinged door on the left side of
your vehicle.
To take off the cap, turn it slowly to the left
(counterclockwise).
I
Gasoline vapor is highly flammable. It burns
violently, and that can cause very bad injuries.
Don’t smoke if you’re near gasoline or refueling
your vehicle. Keep sparks, flames and smoking
materials away from gasoline.
A CAUTION:
If you get gasoline on yourself and then
something ignites it, you could be badly burned.
Gasoline can spray out on you if you open the
fuel filler cap too quickly. This spray can happen
if your tank
is nearly full, and is more likely in
hot weather. Open the fuel filler cap slowly and
wait for any “hiss” noise to stop. Then unscrew
the cap all the
way.
6-5
Page 391 of 403
Downloaded from www.Manualslib.com manuals search engine Brake Adjustment
.................................. 6-34.
Fluid
....................................... 6-31
Master Cylinder .............................. 6-3 1
Parking ...................................... 2-21
PedalTravel
.................................. 6-34
Replacing System Parts
........................ 6-34
System Warning Light
......................... 2-61
Trailer
...................................... 4-49
Transmission Shift Interlock Check
...... : ........ 7-44
Wear
....................................... 6-33
Brakes, Anti-Lock
............................... 4-6
Braking
......................................... 4-5
Braking in Emergencies
........................... 4-8
Break-In, New Vehicle
........................... 2-9
Brightness Control
.............................. 2-38
BTSICheck
................................... 7-44
Bulb Replacement .............................. 6-35
Canadian Roadside Assistance
.................... 8-6
Capacities and
. Specifications ...................... 6-70
Carbon Monoxide
.................... 2.25.4.40, 4.48
Cargo Security Shade
............................ 2-48
Cargo Tie Downs
............................... 2-50
Cassette Deck Service
........................... 7-42
Cassette Tape Player
.. ' ..................... 3- 12. 3- 14
Cassette Tape Player Care
........................ 3-27
Cassette Tape Player Errors
.................. 3- 13. 3. 17
CD Player Theft-Deterrent Feature
................. 3-24
Center High-Mounted Stoplamp Bulb Replacement
.... 6-41
Center Passenger Position
........................ 1-36
CertificationEire Label
.......................... 4-41
Chains. Safety
................................. 4-48 Chains. Tire
.................................... 6-51
Changing a Flat Tire
................ .. ............. 5-19
Charging System Warning Light
................... 2-59
Check Gages Light
.............................. 2-67
Checking Your Restraint Systems
.................. 1-55
Chemical Paint Spotting
.......................... 6-58
Child Restraints
................................ 1-45
Securing in a Rear Outside Seat Position
........... 1-46
.Securing in the Center Seat Position
.............. 1-48
Securing
in the Right Front Seat Position .......... 1-50
Top Strap
.................................... 1-45
WheretoPut
................................ 1-45
Circuit Breakers and Fuses
........................ 6-62
Cleaner.Air
................................... 6-16
Cigarette Lighter
............................... 2-52
Cleaning Aluminum Wheels
............................ 6-57
Fabric
...................................... 6-52
Glass
........................................ 6-55
Inside
of Your Vehicle ......................... 6-52
Instrument Panel
.............................. 6-54
Leather
..................................... 6-54
Outside of Your Vehicle
........................ 6-56
Special Problems
............................. 6-53
Stains
...................................... 6-53
Tires
........................................ 6-57
Vinyl
....................................... 6-54
Wheels
..................................... 6-57
Windshield and Wiper Blades
................... 6-55
Climate Control, Optional
......................... 3-2
Climate Control, Standard
......................... 3-1
Climate Control System
........................... 3-1
Clock, Setting the
................................ 3-10
Comfort Controls
................................ 3-1
9-2