1996 CHEVROLET BLAZER automatic transmission
[x] Cancel search: automatic transmissionPage 122 of 392
Downloaded from www.Manualslib.com manuals search engine Speedometer ar Odometer
Your speedometer lets you see your speed in both miles
per hour (mph) and kilometers per hour (km/h).
Your odometer shows how far your vehicle has been
driven, in either miles (used in the United States)
or
kilometers (used in Canada).
Your odometer
is tamper resistant. It will show silver lines
between the numbers if someone tries to turn it back.
You may wonder what happens if your vehicle needs a
new odometer installed.
If the new one can be set to the
mileage total
of the old odometer, then it must be. But if
it can’t, then it’s set at zero, and a label must be put on
the driver’s door to show the old mileage reading when
the new odometer was installed.
Trip Odometer
The trip odometer can tell you how far your vehicle has
been driven since you last set the trip odometer to zero.
To set
the trip odometer to zero, press the button near
the readout.
Tachometer (Option)
The tachometer displays the engine speed in revolutions
per minute
(rpm).
Each tachometer has a different limit depending on the
powertrain
in your vehicle. The tachometer has three
areas: normal operating range, red warning range and
red danger range.
Normal operating range shows your engine speed during
normal driving conditions. For example, when the
needle points to
2, it means the engine is running at
2,000 revolutions per minute (rpm). The tachometer
needle will vary all
the time that the engine is running.
The red warning range tells you that your engine speed
is reaching its upper limits. Don’t drive very long with
the tachometer in
the red warning range. If you have a
manual transmission, shift to a higher gear as soon as
possible. If
you have an automatic transmission, lift
your
foot off of the accelerator pedal.
The red danger range
tells you that your engine speed is
at its upper limits. You should immediately shift to a
higher gear, or lift your
foot off of the accelerator pedal.
L
NOTICE:
Do not operate the engine with the tachometer in
the red range, or engine damage will occur.
2-64
Page 197 of 392
Downloaded from www.Manualslib.com manuals search engine Run your engine only as long as you must. This saves
fuel. When
you run the engine, make it go a little faster
than just idle. That
is, push the accelerator slightly. This
uses less fuel for the heat that
you get and it keeps the
battery charged. You will need a well-charged battery
to
restart the vehicle, and possibly for signaling later on
with your headlamps. Let the heater run for awhile.
Then, shut the engine off and close the window almost
all
the way to preserve the heat. Start the engine again
and repeat this
only when you feel really uncomfortable
from the cold. But
do it as little as possible. Preserve the
fuel as long as you can. To help keep warm, you can get
out
of the vehicle and do some fairly vigorous exercises
every half hour or
so until help comes.
Recreational Vehicle Towing
(Four-wheel Drive Only)
1. Set the parking brake firmly.
2. Place an automatic transmission in PARK (P) or a
manual transmission
in FIRST (1).
3. Firmly attach the vehicle being towed to the tow
vehicle.
Do not tow the vehicle by the rear bumper
bar. Refer to the hitch manufacturer’s instructions.
4. Place the transfer case shift lever in NEUTRAL (N).
Recreational vehicle towing is not recommended for
vehicles with
the optional electronic shift transfer
case or all-wheel drive because the transfer cases
have
no neutral position.
Shifting the transfer case into NEUTRAL (N) can
cause your vehicle to roll even if the transmission
is in PARK (P), for an automatic transmission,
or if your vehicle is in gear, for a manual
transmission. This is because the transfer case
overrides the transmission.
5. Release the parking brake only after the vehicle
being towed is firmly attached to the tow vehicle.
6. Insert the ignition key into the ignition switch and
turn it
one notch forward of the LOCK position. This
places the key
in the OFF position, which unlocks
the steering column while preventing battery drain.
Unlocking the steering column will allow for proper
movement
of the front wheelshires during towing.
4-43
Page 202 of 392
Downloaded from www.Manualslib.com manuals search engine If you have an automatic transmission, you should
use DRIVE
(D) (or, as you need to, a lower gear)
when towing a trailer. Operating your vehicle
in
DRIVE (D) when towing a trailer will minimize heat
buildup and extend the life of your transmission. If
you have a manual transmission and you are towing
a trailer, it’s better not to use FIFTH (5) gear. Just
drive in FOURTH
(4) gear (or, as you need to, a
lower gear).
Three important considerations have to do with weight:
the weight of the trailer,
the weight of the trailer tongue
0 and the weight on your vehicle’s tires.
Weight of the Trailer
How heavy can a trailer safely be?
It depends on how you plan
to use your rig. For
example, speed, altitude, road grades, outside
temperature and how much your vehicle is used
to pull a
trailer are all important. And, it can also depend on any
special equipment that you have
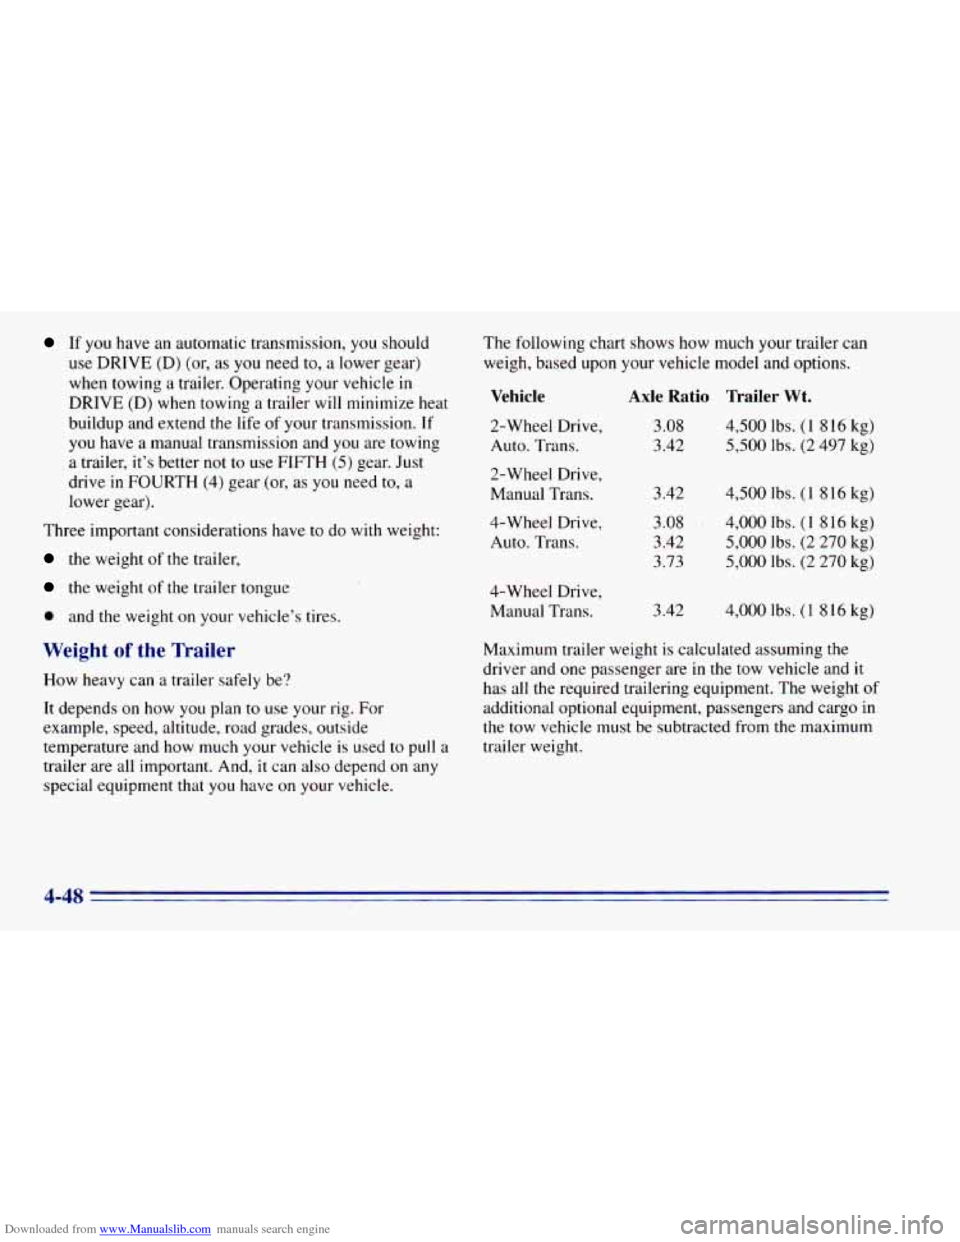
on your vehicle. The
following chart shows how much your trailer can
weigh, based upon your vehicle model and options.
Vehicle
2-Wheel Drive, Auto. Trans.
2-Wheel Drive,
Manual Trans.
4-Wheel Drive, Auto. Trans.
4-Wheel Drive, Manual Trans.
Axle Ratio Trailer Wt.
3.08
3.42
3.42 4,500
lbs. (1 816 kg)
5,500 lbs. (2 497 kg)
4,500 Ibs. (1 8 16 kg)
3.08
. 4,000 Ibs. (1 8 16 kg)
3.42
5,000 lbs. (2 270 kg)
3.73
5,000 lbs. (2 270 kg)
3.42
4,000 lbs. (1 8 16 kg)
Maximum trailer weight
is calculated assuming the
driver and one passenger are in the tow vehicle and it
has all the required trailering equipment. The weight
of
additional optional equipment, passengers and cargo in
the tow vehicle must be subtracted from the maximum
trailer weight.
4-48
Page 208 of 392
Downloaded from www.Manualslib.com manuals search engine On a long uphill grade, shift down and reduce your
speed to around
45 mph (70 kmh) to reduce the
possibility of engine and transmission overheating.
If you have
an automatic transmission, you should use
DRIVE (D) when towing
a trailer. Operating your
vehicle in DRIVE
(D) when towing a.trailer will
minimize heat buildup and extend the life of your
transmission. Or, if
you have a manual transmission,
it’s better not to use FIFTH
(5) gear, just drive in
FOURTH (4) gear (or, as you need to, a lower gear).
When towing at high altitude
on steep uphill grades,
consider the following: Engine coolant will boil at a
lower temperature than at normal altitudes. If you turn
your engine off immediately after towing at high altitude
on steep uphill grades, your vehicle may show signs
similar to engine overheating.
To avoid this, let the
engine run while parked (preferably on level ground)
with the automatic transmission in PARK
(P) (or the
manual transmission
out of gear and the parking brake
applied) for a few minutes before turning the engine off.
If
you do get the overheat warning, see “Engine
Overheating” in the Index.
Parking on Hills
You really should not park your vehicle, with a trailer
attached,
on a hill. If something goes wrong, your rig
could start to move. People can be injured, and both
your vehicle and the trailer can be damaged.
But
if you ever have to park your rig on a hill, here’s
how to
do it:
1.
2.
3.
4.
5.
6.
Apply your regular brakes, but don’t shift into
PARK
(P) yet, or into gear for a manual
transmission. Then turn your wheels into the
curb
if facing downhill or into traffic if facing uphill.
Have someone place chocks under the trailer wheels.
When the wheel chocks are
in place, release the
regular brakes
until the chocks absorb the load.
Reapply the regular brakes.
Then apply your
parking brake, and then shift into PARK (P), or
REVERSE
(R) for a manual transmission.
If
you have a four-wheel-drive vehicle with a
manual transfer case shift lever, be sure the transfer
case is
in a drive gear -- not in NEUTRAL (N).
Release the regular brakes.
4-54
Page 210 of 392
Downloaded from www.Manualslib.com manuals search engine Maintenance When Trailer Towing
Your vehicle will need service more often when you’re
pulling
a trailer. See the Maintenance Schedule for more
on this. Things that are especially important in trailer
operation are automatic transmission fluid (don’t
overfill), engine oil, axle lubricant, belt, cooling system
and brake adjustment. Each of these is covered
in this
manual, and the Index will help you find them quickly.
If you’re trailering, it’s a good idea to review these
sections before you start your trip.
Check periodically to see that all hitch nuts and bolts
are tight.
Trailer Wiring Harness
The light duty trailer wiring is a six-wire harness
assembly. The heavy duty trailer wiring is an eight-wire
harness assembly. The harnesses are stored under
the
vehicle, along the passenger-side frame crossmember on
two-door vehicles or on the driver’s side corner frame
crossmember
on four-door vehicles. The heavy duty
trailer wiring has a 30-amp feed wire with an inline fuse
located by the junction block. See “Fuses and Circuit
Breakers” in
the Index. Both harnesses have no
connector and should be wired
by a qualified electrical technician. The technician can
use the following color code chart when connecting the
wiring harness
to your trailer.
0
0
0
0
0
0
0
0
DARK BLUE: Use for electric trailer brakes or
auxiliary wiring.
RED: Use for battery charging; it connects to the
starter solenoid (eight-wire harness
only).
LIGHT GREEN: Back-up lamps (eight-wire
harness only).
BROWN: Taillamps and parking lamps.
YELLOW Left stoplamp and turn signal.
DARK GREEN: Right stoplamp and turn signal.
WHITE (Heavy Gage): Ground wire.
WHITE (Light Gage): Auxiliary stoplamp.
Securely attach the harness
to the trailer, then tape or
strap it to your vehicle’s frame rail. Be sure you leave
it loose enough
so the wiring doesn’t bend or break,
but
not so loose that it drags on the ground. Store the
harness in its original place. Wrap the harness together
and
tie it neatly so it won’t be damaged.
4-56
Page 214 of 392
Downloaded from www.Manualslib.com manuals search engine When the hazard warning flashers are on, your turn
signals won’t work. The flashers will stop if
you step
on the brake.
Other Warning Devices
If you carry reflective triangles, you can set one up
at the side of the road about 300 feet (100 m) behind
your vehicle.
Jump Starting
If your battery has run down, you may want to use
another vehicle and
some jumper cables to start your
vehicle.
But please use the following steps to do it safely.
NOTICE:
Ignoring these steps could result in costly damage
to your vehicle that wouldn’t be covered by
your warranty.
Do not try to start your vehicle by pushing or
pulling it. This could damage your vehicle, even
if
you have a manual transmission. And if you have
an automatic transmission, it won’t start that
way.
I
Batteries can hurt you. They can be
dangerous because:
They contain acid that can burn you.
They contain gas that can explode or ignite.
They contain enough electricity to burn you.
If you don’t follow these steps exactly, some or
all
of these things can hurt you.
1. Check the other vehicle. It must have a 12-volt
battery with
a negative ground system.
I NOTICE:
If the other system isn’t a 12-volt system with a
negative ground, both vehicles can be damaged.
5-2
Page 215 of 392
Downloaded from www.Manualslib.com manuals search engine 2. Get the vehicles close enough so the jumper cables
can reach, but be sure the vehicles aren’t touching
each other.
If they are, it could cause a ground
connection
you don’t want. You wouldn’t be able to
start your vehicle, and the bad grounding could
damage the electrical systems.
You could be injured if the vehicles roll. Set the
parking brake firmly on each vehicle. Put an
automatic transmission
in PARK (P) or a manual
transmission in NEUTRAL (N). If
you have a
four-wheel-drive vehicle with a manual transfer
case shift lever, be sure the transfer case is
not in
NEUTRAL (N).
3. Turn off the ignition on both vehicles. Unplug
unnecessary accessories plugged
into the cigarette
lighter, or accessory power outlets,
if you have this
option. Turn
off all lamps that aren’t needed as well
as radios. This will avoid sparks and help save both
batteries.
In addition, it could save your radio!
NOTICE:
If you leave your radio on, it could be badly
damaged. The repair wouldn’t be covered by
your warranty.
I A CAUTION:
If your vehicle has air conditioning, the auxiliary
electric fan under the hood can
start up even
when the engine is not running and can injure
you. Keep hands, clothing and tools away from
any underhood electric fan.
5-3
Page 224 of 392
Downloaded from www.Manualslib.com manuals search engine If No Steam Is Coming From Your Engine
If you get the overheat warning but see or hear no
steam, the problem may not be too serious. Sometimes
the engine can get a little too hot when you:
Climb a long hill on a hot day.
Stop after high-speed driving.
Idle for long periods in traffic.
Tow a trailer. See “Driving on Grades” in the Index.
If
you get the overheat warning with no sign of steam,
try this for a minute or
so:
1. Turn off your air conditioner.
2. Turn on your heater to full hot at the highest fan
speed and open the window as necessary.
3. If you’re in a traffic jam, shift to NEUTRAL (N);
otherwise, shift to the highest gear while
driving
-- AUTOMATIC OVERDRIVE (@)
or DRIVE (D) for automatic transmissions. If
you no longer have the overheat warning, you
can drive.
Just to be safe, drive slower for about
10 minutes. If the warning doesn’t come back on,
you can drive normally.
If
the warning continues, pull over, stop, and park your
vehicle right away.
If there’s still
no sign of steam, push the accelerator
until the engine speed is about twice as fast as normal
idle speed. Bring
the engine speed back to normal
idle speed after two or three minutes. Now see if the
warning stops. But then, if you still have the warning,
turn ofthe engine and get everyone out of the vehicle
until it cools down.
You may decide not to
lift the hood but to get service
help right away.
5-12