1996 CHEVROLET ASTRO wheel
[x] Cancel search: wheelPage 226 of 372

NOTICE:
Improperly tightened wheel nuts can lead to
brake pulsation and rotor damage.
To avoid
expensive brake repairs, evenly tighten the wheel
nuts in the proper sequence and to the proper
torque specification.
13. Remove the wheel blocks.
I NOTICE:
Wheel covers won't fit on your compact spare. If
you try to put a wheel cover on your compact
spare, you could damage the cover or the spare. Storing
a jack, a tire or other equipment in the
passenger compartment
of the vehicle could
cause injury. In a sudden stop or collision, loose
equipment could strike someone. Store all these
in the proper place.
5-34
Page 227 of 372

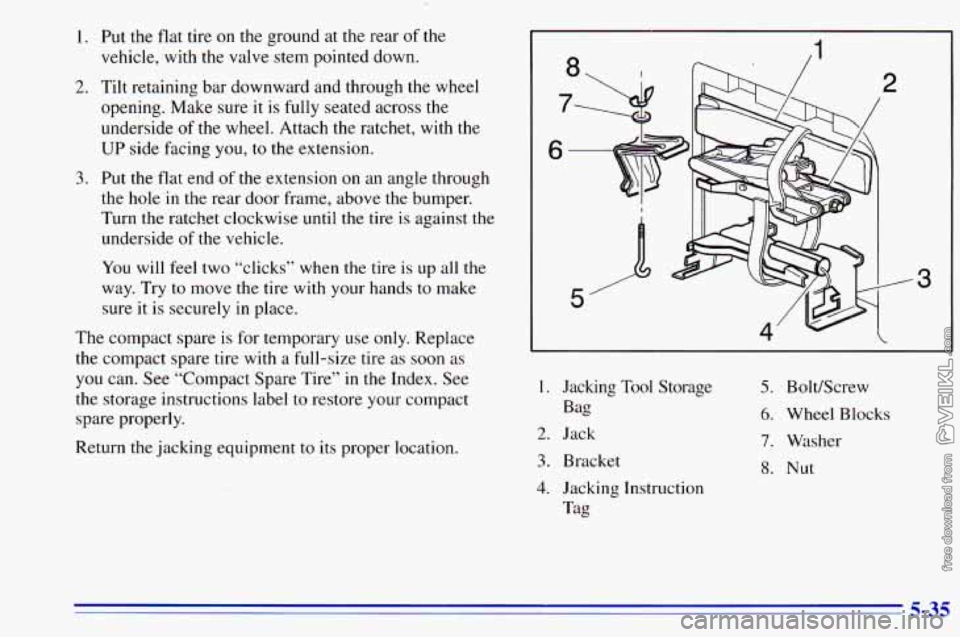
1.
2.
3.
Put the flat tire on the ground at the rear of the
vehicle, with the valve stem pointed down.
Tilt retaining bar downward and through the wheel
opening. Make sure it is fully seated across the
underside of the wheel. Attach the ratchet, with the
UP side facing you, to the extension.
Put the
flat end of the extension on an angle through
the hole in the rear door frame, above the bumper.
Turn the ratchet clockwise until the tire is against the
underside
of the vehicle.
You will
feel two “clicks” when the tire is up all the
way. Try to move the tire with your hands to make
sure it is securely in place.
The compact spare is for temporary use only. Replace
the compact spare tire with a full-size tire
as soon as
you can. See “Compact Spare Tire” in the Index. See
the storage instructions label to restore your compact
spare properly.
Return the jacking equipment
to its proper location.
I 4
3
I. Jacking Tool Storage
Bag
2. Jack
3. Bracket
4. Jacking Instruction
Tag
5. BoltKcrew
6. Wheel Blocks
7, Washer
8. Nut
5-35
Page 228 of 372

Compact Spare Tire
Although the compact spare tire was fully inflated when
your vehicle was new, it can lose air after a time. Check
the inflation pressure regularly. It should be
60 psi
(420 Wa).
After installing the compact spare on your vehicle, you
should stop as soon as possible and make sure your
spare tire
is correctly inflated. The compact spare is
made to perform well at posted speed limits for
distances up to
3,000 miles (5 000 km), so you can
fini.sh your trip and have your full-size tire repaired or
replaced where you want. Of course, it’s best to replace
your spare with a full-size tire as soon as you can. Your
spare will last longer and be in good shape in case
you
need it again.
NOTICE:
I
When the compact spare is installed, don’t take
your vehicle through an automatic car wash with
guide rails. The compact spare can get caught on
the rails. That can damage the tire and wheel,
and maybe other parts
of your vehicle.
Don’t use
your compact spare on other vehicles.
And don’t mix your compact spare tire or wheel with
other wheels or tires. They won’t fit. Keep your spare
tire and its wheel together.
NOTICE:
Tire chains won’t fit your compact spare. Using
them can damage your vehicle and can damage
the chains too. Don’t use tire chains on’your
compact spare.
5-36
Page 229 of 372

If You’re Stuck: In Sand, Mud, Ice
or Snow
What you don’t want to do when your vehicle is stuck is
to spin your wheels too fast. The method known as
“rocking” can help
you get out when you’re stuck, but
you must use caution.
A CAUTION:’
I
If you let your tires spin at high speed, they can
explode, and you or others could be injured.
And, the transmission or other parts of the
vehicle can overheat. That could cause an engine
compartment fire or other damage. When you’re
stuck, spin the wheels
as little as possible. Don’t
~ spin the wheels above 35 mph (55 km/h) as shown
~ on the speedometer.
I
NOTICE:
Spinning your wheels can destroy parts of your
vehicle
as well as the tires. If you spin the wheels
too fast while shifting your transmission back
and forth, you can destroy your transmission.
For information about using tire chains
on your vehicle,
see “Tire Chains” in
the Index.
Rocking your vehicle to get it out:
First, turn your steering wheel left and right. That will
clear the area around your front wheels. Then shift back
and forth between REVERSE
(R) and a forward gear,
spinning the wheels as little as possible. Release the
accelerator pedal while you shift, and press lightly
on
the accelerator pedal when the transmission is in gear. If
that doesn’t get
you out after a few tries, you may need
to be towed out. If you do need to be towed out, see
“Towing Your Vehicle’’’ in the Index.
5-37
Page 253 of 372

3.
4.
Check both sides of the dipstick, and read the lower
level. The fluid level must be
in the COLD area for a
cold check or
in the HOT area or cross-hatched area
for a hot check.
If the fluid
level is in the acceptable range, push the
dipstick back in all the way; then flip the handle
down to lock the dipstick in place.
How to Add Fluid
Refer to the Maintenance Schedule to determine what
kind
of transmission fluid to use. See “Recommended
Fluids and Lubricants” in the Index.
Add fluid only after checking the transmission fluid
HOT. (A COLD check is used only as a reference.)
If the fluid level is low, add only enough of the proper fluid
to bring the level up
to the HOT area for a hot
check. It doesn’t take much fluid, generally less than a
pint
(0.5 L). Don ’r ove$iZl. We recommend you use only
fluid labeled DEXRON@-111, because fluid with that
label is made especially for your automatic transmission.
Damage caused by fluid other than DEXRON-TI1 is not
covered by your new vehicle warranty.
a After adding fluid, recheck the fluid level as
described under “How
to Check.”
When the correct fluid level is obtained, push the
dipstick back
in all the way; then flip the handle
down to lock the dipstick
in place.
All- Wheel Drive
If you have an all-wheel-drive vehicle, be sure to perform
the lubricant checks described
in this section. However,
they have two additional systems that need lubrication.
Transfer Case
When to Check Lubricant
Refer to the Maintenance Schedule to determine how
often to check the lubricant. See “Periodic Maintenance
Inspections’’
in the Index.
6-23
Page 264 of 372

Using the wrong fluid can badly damage
brake system parts. For example, just
a few
drops of mineral-based oil, such as engine
oil, in your brake system can damage brake
system parts
so badly that they’ll have to be
replaced. Don’t let someone put in the
wrong kind of fluid.
If you spill brake fluid on your vehicle’s
painted surfaces, the paint finish can be
damaged. Be careful not to spill brake fluid
on your vehicle.
If you do, wash it off
immediately. See “Appearance Care” in
the Index.
I A CAUTION:
The brake wear warning sound means that
sooner or later your brakes won’t work well.
That could lead to an accident. When you hear
the brake wear warning sound, have your vehicle serviced.
NOTICE:
Continuing to drive with worn-out brake pads
could result
in costly brake repair.
Brake Wear
Your vehicle has front disc brakes and rear drum brakes.
Disc brake pads have built-in wear indicators that make
a high-pitched warning sound when the brake pads are
worn and new pads are needed.
The sound may come and
go or be heard all the time your vehicle
is moving (except
when you are pushing
on the brake pedal firmly). Some driving conditions or climates may cause a brake
squeal when the brakes are first applied or lightly applied.
This does not mean something
is wrong with your brakes.
Free movement
of brake calipers and properly torqued
wheel nuts are necessary to help prevent brake
pulsation. When tires are rotated, inspect brake calipers
for movement, brake pads for wear, and evenly torque
wheel nuts
in the proper sequence to GM specifications.
6-34
Page 274 of 372

Tire Inspection and Rotation
Tires should be inspected every 6,000 to 8,000 miles
(10 000 to 13 000 km) for any signs of unusual wear.
If unusual wear is present, rotate your tires as soon as
possible and check wheel alignment. Also check for
damaged tires or wheels. See “When It’s Time for New
Tires” and “Wheel Replacement” later in this section for
more information.
The purpose of regular rotation
is to achieve more
uniform wear for all tires on the vehicle. The first
rotation is the most important. See “Scheduled
Maintenance Services” in the Index for scheduled
rotation intervals. When
rotating your tires, always use the correct rotation
pattern shown here.
Don’t include the compact spare tire in your tire rotation. \
After the tires have been rotated, adjust the front and
rear inflation pressures as shown on the
CertificatiodTire label. Make certain that all wheel nuts
are properly tightened. See “Wheel
Nut Torque” in
the Index.
’ A CAUTIO1
Rust or dirt on a wheel, or on the parts to which
it
is fastened, can make wheel nuts become loose
after a time. The wheel could come
off and cause
an accident. When you change a wheel, remove
any rust or dirt from places where the wheel
attaches to the vehicle. In an emergency, you can
use a cloth or a paper towel to do this; but be
sure to use a scraper or wire brush later,
if you
need to, to get all the rust or dirt
off. (See
“Changing
a Flat Tire” in the Index.)
Page 276 of 372

I
ng tires could cause you to lose control while
driving. If you mix tires of different sizes or types
(radial and bias-belted tires), the vehicle may not
handle properly, and you could have
a crash.
Using tires of different sizes may also cause
damage to your vehicle. Be sure to use the same
size and type tires on all wheels.
It’s all right to drive with your compact spare,
though. It was developed
for use on your vehicle.
Uniform Tire Quality Grading
The following information relates to the system
developed by
the United States National Highway
Traffic Safety Administration, which grades tires by
treadwear, traction and temperature performance. (This
applies
only to vehicles sold in the United States.) The
grades are molded on the sidewalls of most passenger
car tires. The Uniform Tire Quality Grading system does not apply to
deep tread, winter-type snow tires,
space-saver or temporary use spare tires, tires with
nominal rim diameters
of 10 to 12 inches (25 to 30 cm),
or to some limited-production tires.
While
the tires available on General Motors passenger
cars and light trucks may vary with respect to
these
grades, they must also conform to Federal safety
requirements and additional General Motors Tire
Performance Criteria (TPC) standards.
Treadwear
The treadwear grade is a comparative rating based on
the wear rate of the tire when tested under controlled
conditions on
a specified government test course. For
example, a tire graded
150 would wear one and a half
(1 1/2) times as well on the government course as a tire
graded
100. The relative performance of tires depends
upon the actual conditions of their use, however, and may depart significantly from the norm due to variations
in driving habits, service practices and differences Jn
road characteristics and climate.
6-46
d