1995 PONTIAC BONNEVILLE manual radio set
[x] Cancel search: manual radio setPage 134 of 338
The radio portion of these sound systems operates the
same
as the two previously explained.
Compact Disc Player (Option):
You may use full size or the smaller 8 cm (3.2 in.)
compact
discs.
No adaptor is required for the smaller compact discs.
With the radio on, insert a disc with the label side up.
The CD symbol will appear in the lower left corner of
the display. Wait a few seconds and the disc should
begin
to play.
If E and a number appears on the display at any time, an
error has occurred. See “Cassette Tape and CD Errors”
later in this section.
Compact Disc Player Control Features:
CDRLAY:
If you have a disc loaded and the radio is
playing, press CDPLAY
to play your disc. The disc will
begin playing from the track where
it last stopped. To
return to the radio while a disc is playing, press MM.
The disc will remain safely inside the radio for future
listening.
RECALL: Press RECALL to see which track is
playing. Press it again (within five seconds) to display
how long your selection has been playing.
PREV: While playing a compact disc, press PREV
(previous) or
SEEK to go to the beginning of the current
track
(if more than eight seconds have played). Press it
again or hold it down to go to the previous tracks. The
display will show the track number.
NEXT: While playing a compact disc, press NEXT or
SEEK to go to the next track. Press it again or hold it
down to continue advancing through the tracks.
RDM: Press the RDM (random) button to cause the CD
player to play the tracks on the disc in random order.
RDM will be displayed in the lower right corner of the
display during random operation. Press RDM again to
turn
off the random feature.
REV: Press and hold REV (reverse) to rapidly reverse
the disc. The radio display will show the time into the
track during fast reverse operation.
FWD: Press and hold FWD (forward) to rapidly
advance the disc. The radio display will show the time
into the track during fast reverse operation.
EJECT: Press EJECT to remove the disc. The radio will
play after the disc
is ejected. EJECT will operate while
the ignition is
off.
3-13
ProCarManuals.com
Page 135 of 338
Radio THEFTLOCK TM Feature
You may have the THEFTLOCK feature which is
designed to discourage theft of
your radio. It works by
using a secret code to disable all radio functions
whenever the battery power
is removed.
The
THEFTLOCK feature for the radio may be used or
ignored. If ignored, the system plays normally and the
radio is not protected by the feature.
If THEFTLOCK
is activated, the THEFTLOCK light
will flash when the ignition is turned
off; your radio will
not operate if stolen.
When
THEFTLOCK is activated, the radio will display
LOC to indicate a locked condition anytime the battery
power is removed. If your radio loses power for any
reason, you must unlock it with the secret code before it
will operate.
To set the secret code, the following instructions explain
how
to enter your secret code and activate the
THEFTLOCK system. It is recommended that you read
through all nine steps before starting the procedure:
1. For your secret code, write down any number from
000 to 1999 and keep it in a safe place separate from
the vehicle.
2. Turn the ignition to the ACCESSORY or the RUN
3. Turn the radio off.
position.
NOTE: If you allow more than
15 seconds to elapse
between any steps, the radio automatically reverts to
time and
you must start the procedure over at step 4.
4. Press the 1 and 4 buttons together. Hold them down
the secret code number which you have written
down.
5. Press the MIN button and “000” will appear on the
6. Press the MIN button again to make the last two
until “---” shows on the display. Next you will use
display.
digits agree with your code.
7. Press the HR button to make the first one or two
digits agree with your
code.
8. After you have confirmed that the code matches the
one you wrote down, press
AM/FM. The display will
show “rEP”
to indicate that you need to repeat steps
5-7 to confirm your secret code.
SEC, indicating that your radio is secure.
9. Press AM/FM and this time the display will show
3-14
ProCarManuals.com
Page 136 of 338
The THEFTLOCK indicator light located below the
TUNE knob will flash when the ignition is off.
Anytime THEFTLOCK is activated and the battery
power is removed, the radio will display
LOC.
When unlocking THEFTLOCK after a power loss, enter
your secret code as follows. Pause no more than
15
seconds between steps.
1. LOC will appear when the ignition is on.
2. Press MIN and “000” will appear on the display.
3. Press the MIN button again to make the last two
digits appear
on the display.
digits agree with your code.
matches the secret code
you have written down,
press AM/”.
SEC will appear in the display
indicating that the radio is now operable and secure.
If the code entered to unlock THEITLOCK is incorrect,
the radio will remain locked. After eight unsuccessful
attempts to unlock the radio, the display will show
“InOP” (inoperative).
At this point you will need to keep the ignition on for
one hour before you may attempt to enter another code.
4. Press the HR button to make the first one or two
5. After you have confirmed that the code in the display After
three more unsuccessful attempts to unlock the
radio, the display will
show “InOF‘” (inoperative).
If you forget your code or cannot unlock the radio,
contact your Pontiac dealer for assistance.
To disable THEFTLOCK, follow these steps:
1.
2.
3.
4.
5.
6.
7.
Turn the ignition to the ACCESSORY or RUN
position.
Turn the radio
off.
Press the 1 and 4 buttons together. Hold them down
until
SEC shows in the display.
Press MIN and
“000” will appear on the display.
Press the MIN button again to make the last two
digits agree with your code.
Press the
HR button to make the first one or two
digits agree with your code.
After
you have confirmed that the code on the
display matches the secret code you previously set,
press the A” button. The display will show
“---” indicating that the radio is unsecured.
If the code entered is incorrect, SEC will appear in the
display. The radio will remain secured until the correct
code is entered.
3-15
ProCarManuals.com
Page 137 of 338
Cassette Tape and CD Errors
If “E” and a number appears in the radio display, an
error has occurred and the cassette or compact disc
cannot play temporarily.
If the error occurred while trying to play a cassette tape,
the following conditions may have caused the error:
The cassette tape is tight and the cassette player
cannot
turn the hubs of the cassette tape. “E10” may
be displayed.
Hold the cassette with the open end
down and try turning the right hub
counter-clockwise
with a pencil. Flip the tiq% dmr
and repeat. If the hubs do not turn easily, your
cassette tape may be damaged and should not be
used
in the cassette player. Try a new tape to make
sure that your cassette player is working properly.
The cassette tape is broken. “El 1” may be displayed.
Check to see if your tape is broken.
Try a new
cassette tape.
If the error occurred while trying to play a CD in the
radio or in the
CD changer, the following conditions
may have caused the error:
The road is too rough. The disc should play when the
road is smoother.
0 The disc is dirty, scratched, wet or upside down.
The air is very humid. If so, wait about an hour and
try again.
If any error oc’curs repeatedly or if an error cannot be
corrected, please contact your dealer.
If your radio
displays an error number, write it down and provide it to
your dealer when reporting the problem.
3-16
ProCarManuals.com
Page 138 of 338
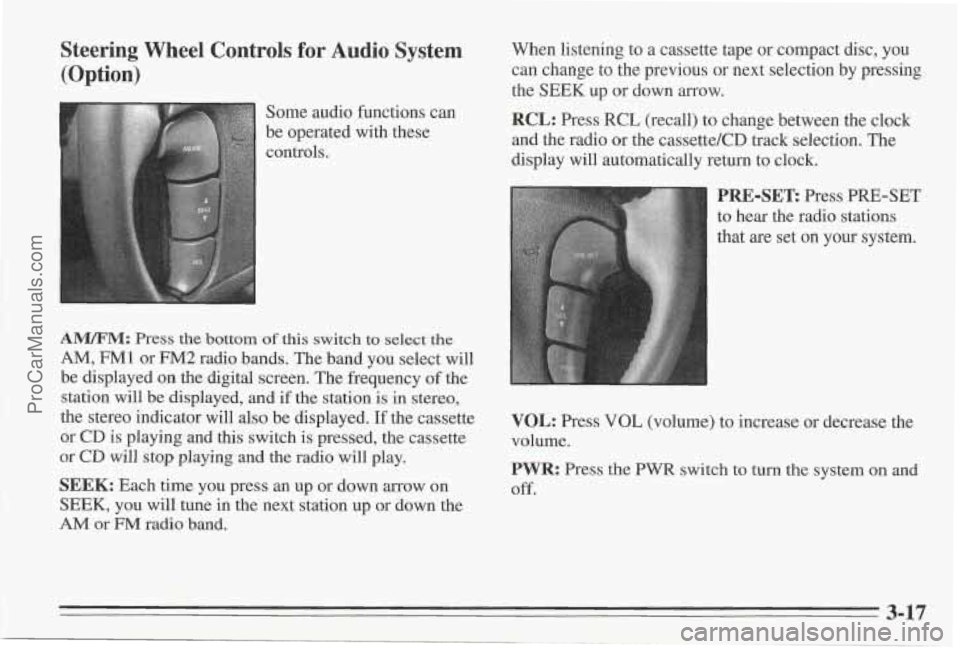
Steering Wheel Controls for Audio System (Option)
Some audio functions can
be operated with these
controls,
A"M: Press the bottom of this switch to select the
AM, FM1 or FM2 radio bands. The band you select will
be displayed on the digital screen. The frequency
of the
station will be displayed, and if the station is
in stereo,
the stereo indicator will also be displayed.
If the cassette
or
CD is playing and this switch is pressed, the cassette
or CD will stop playing and the radio will play.
SEEK: Each time you press an up or down arrow on
SEEK, you will tune in the next station up or down the
AM or FM radio band. When listening to
a cassette tape or compact disc, you
can change to the previous or next selection by pressing
the
SEEK up or down arrow.
RCL: Press RCL (recall) to change between the clock
and the radio or the cassette/CD track selection. The
display will automatically return to clock.
'RE-SET: Press PRE-SET
o hear the radio stations
hat
are set on your system.
VOL: Press VOL (volume) to increase or decrease the
volume.
PWR: Press the PWR switch to turn the system on and
Off.
3-17
ProCarManuals.com
Page 139 of 338
Understanding Radio Reception
FM Stereo
FM Stereo will give you the best sound, but FM signals
will reach only about
10 to 40 miles (16 to 65 km). Tall
buildings or
hills can interfere with FM signals, causing
the sound to
come and go.
AM
The range for most AM stations is greater than for Fpv3[,
especially at night. The longer range, however, can
cause stations to interfere with each other.
AM can also
pick up noise from things like storms and power lines.
To lower this noise,
try reducing the treble level.
AM Stereo
Your Delco@ system may be able to receive C-Qum@
stereo broadcasts. Many AM stations around the country
use C-Quam
to produce stereo, though some do not.
C-Quam@
is a registered trademark of Motorola, Inc. If
your Delco system can get C-Quam signals, your stereo
indicator light will come on when you are receiving it.
Be aware that hearing damage from loud noise is almost
undetectable until it
is too late. Your hearing can adapt
to higher volumes of sound. Sound that seems normal
can be loud and harmful to your hearing.
Take
precautions by adjusting the volume control on your
radio to a safe sound level before your hearing adapts to
it.
To help avoid hearing loss or damage:
0 Adjust the volume control to the lowest setting.
Increase volume slowly until you hear comfortably
and clearly.
NOTICE:
Before you add any sound equipment to your
vehicle -- like a tape player, CB radio, mobile
telephone or two-way radio -- be sure you can
add what you want.
If you can, it's very
important
to do it properly. Added sound
equipment may interfere with the operation
of
your vehicle's engine, Delco radio or other
systems, and even damage them. And, your
vehicle's systems may interfere with the
operation of sound equipment that has been
added improperly.
So, before adding sound equipment, check with
your dealer and be
sure to check Federal rules
covering mobile radio and telephone units.
3-18
ProCarManuals.com
Page 140 of 338
Cassette Tape Player Care
A tape player that is not cleaned regularly can cause
reduced sound quality, ruined cassettes, or a damaged
mechanism. Cassette tapes that are not stored in their
plastic cases away from contaminants, direct sunlight,
and extreme heat may not operate properly or may cause
premature failure
of the tape player.
Cassettes are subject to wear and the sound quality may
degrade over time. Always make sure that the cassette
tape is in good condition and that the tape player
is clean
before you have your tape player serviced.
Your tape player should be cleaned each month or after
every
50 hours of use to provide optimum performance.
Your mdio may display Cln to remind you that you have
used your tape player for 50 hours without re-setting the
tape clean timer.
If you notice a reduction in sound
quality, regardless
of when the tape player was last
cleaned, try playing a different cassette tape to see
if the
tape or tape player is at fault. If the second cassette tape
results in no improvement
in sound quality, try cleanine
the tape player. Proper
tape player cleaning should be done with a
scrubbing-action, non-abrasive cleaning cassette. This
is
a wet-type cleaning system that uses a cleaning
cassette with pads which scrub the tape head as the hubs
of the cleaner cassette turn.
If you use this type of
cleaner, the radio may display an error and eject
the
cartridge. This is normal and is the result of an added
feature in the tape player that detects broken tapes. If an
error message is displayed while cleaning, you
will need
to insert the cleaning cassette at least three times to
thoroughly clean the tape player.
You may prefer to use a non-scrubbing action, wet-type
cleaner. This type of cleaner uses
a cassette with a fabric
belt which cleans the tape head. This type
of cleaning
cassette will not cause an error, but it may not clean the
tape player as thoroughly as the scrubbing type cleaner.
Cleaning cassettes are available in most stores that sell
audio products or from your General Motors dealer.
Follow the instructions provided with the cleaning
cassette.
Please note that cassette tape adapter kits for portable
CD players will not work in your cassette player. These
adapters will cause the radio to display an error and the
adapter cassette will be ejected.
3-19
ProCarManuals.com
Page 182 of 338
To Jump Start Your Pontiac
1. Check the other vehicle. It must have a 12-volt
battery with a negative ground system.
NOTICE:
If the other system isn’t a 12-volt system with a
negative ground, both vehicles can be damaged.
3. Turn off the ignition on both vehicles. Turn off all
lamps that aren’t needed, and radios. This will avoid
sparks and help save both batteries. And it could
save your radio!
NOTICE:
If you leave your radio on, it could be badly
damaged. The repairs wouldn’t be covered
by
your warranty.
2. Get the vehicles close enough so the jumper cables
can reach, but be sure the vehicles aren’t touching
each other.
If they are, it could cause a ground
connection
you don’t want. You wouldn’t be able to
start your Pontiac, and the bad grounding could
4. Open the hoods and locate the batteries.
the
damage the
electrical systems.
You could
be injured if the vehicles roll. Set
parking brake firmly on each vehicle. Put an
automatic transaxle
in PARK (P) or a manua
transaxle in
NEUTRAL (N).
1
5-3
ProCarManuals.com