1995 OLDSMOBILE SILHOUETTE buttons
[x] Cancel search: buttonsPage 124 of 390
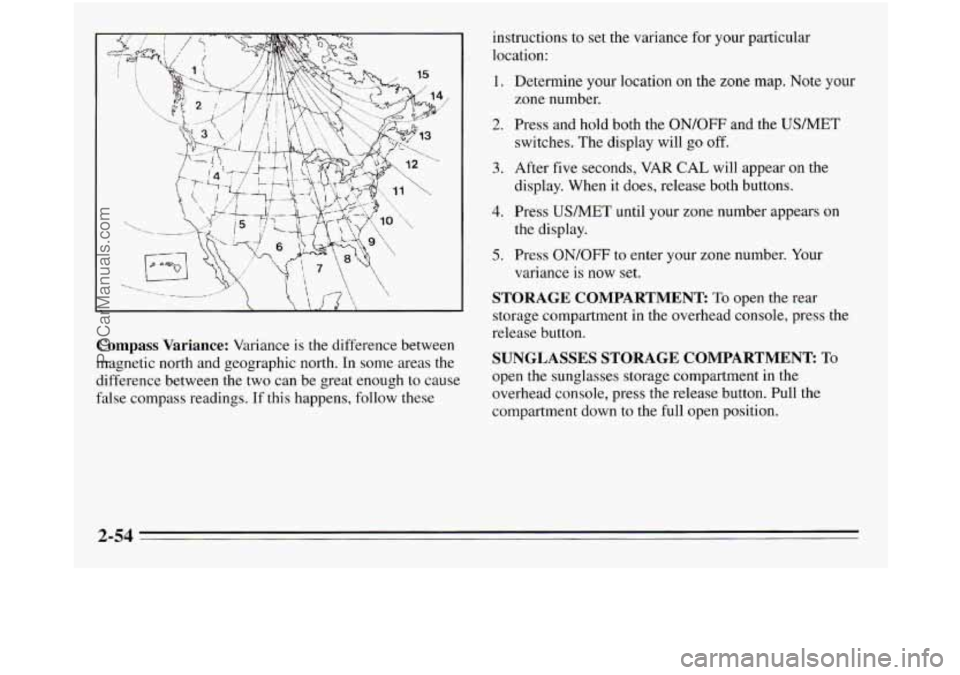
Compass Variance: Variance is the difference between
magnetic north and geographic north. In some areas
the
difference between the two can be great enough to cause
false compass readings. If this happens, follow these instructions
to set the variance
for your particular
location:
1. Determine your location on the zone map. Note your
2. Press and hold both the ON/OFF and the USMET
zone number.
switches. The display will go off.
3. After five seconds, VAR CAL will appear on the
4. Press USMET until your zone number appears on
5. Press ON/OFF to enter your zone number. Your
STORAGE COMPARTMENT: To open the rear
storage compartment in the overhead console, press the
release button.
SUNGLASSES STORAGE COMPARTMENT: To
open the sunglasses storage compartment in the
overhead console, press the release button. Pull the
compartment down to the full open position.
display.
When it does, release both buttons.
the display. variance is now set.
ProCarManuals.com
Page 166 of 390
Audio Systems
The following pages describe the audio systems
available for your Oldsmobile, and how
to get the best
performance from them. Please read about the
system in
your vehicle.
Setting the Clock
For radios with SEEK A
1. With the radio on or off, press SET. The SET
indicator will appear on the digital display for
five
seconds. You must begin to set the clock to the
correct hour and minute during those
five seconds.
2. Press and hold the down SEEK arrow until the
correct hour appears on the display.
3. Press and hold the up SEEK arrow until the correct
minute appears
on the display. For radios
with SEEK and
SCAN buttons:
1. With the radio on or off, press SET. The SET
indicator will appear on the digital display for five
seconds.
You must begin to set the clock to the
correct hour and minute during those five seconds.
2. Press and hold SEEK until the correct hour appears
on the display.
3. Press and hold SCAN until the correct minute
appears on the display.
For radios
with 4 SEEK and SCAN:
1. With the radio on or off, press SET. The SET
indicator will appear on the digital display for five
seconds. You must begin to set the clock to
the
correct hour and minute during those five seconds.
2. Press and hold SCAN until the correct hour appears
on the display.
3. Press and hold the left or right SEEK arrow until the
correct minute appears on
the display.
3-8
ProCarManuals.com
Page 167 of 390
AM%FM Stereo Radio
I
XJ f AMFM Q
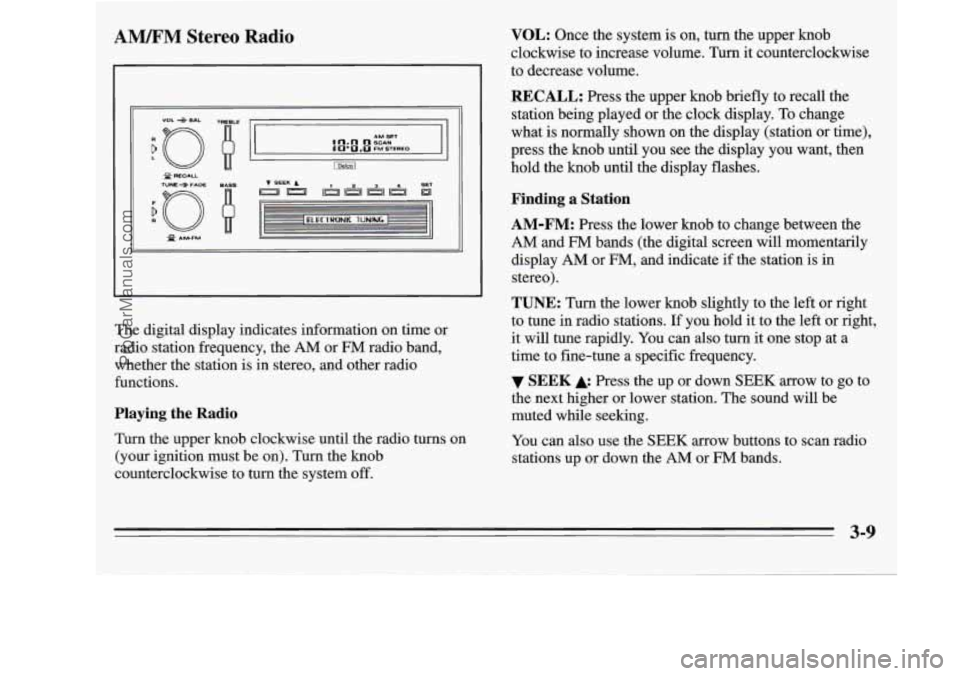
The digital display indicates information on time or
radio station frequency, the
AM or FM radio band,
whether the station is in stereo, and other radio
functions.
Playing the Radio
Turn the upper knob clockwise until the radio turns on
(your ignition must be
on). Turn the knob
counterclockwise to turn the system off.
VOL: Once the system is on, turn the upper knob
clockwise to increase volume. Turn it counterclockwise
to decrease volume.
RECALL: Press the upper knob briefly to recall the
station being played or the clock display. To change
what
is normally shown on the display (station or time),
press the knob until you see the display you want, then
hold the knob until the display flashes.
Finding a Station
AM-FM:
Press the lower knob to change between the
AM and FM bands (the digital screen will momentarily
display
AM or FM, and indicate if the station is in
stereo).
TUNE: Turn the lower knob slightly to the left or right
to tune in radio stations. If you hold it to the left or right,
it will tune rapidly. You can also turn it one stop at a
time to fine-tune a specific frequency.
the next higher or lower station. The sound will be
muted while seeking.
You can also use the
SEEK arrow buttons to scan radio
stations up or down the
AM or FM bands.
SEEK Press the up or down SEEK arrow to go to
3-9
ProCarManuals.com
Page 168 of 390
To scan stations up the band, press and hold the up
arrow button, then press the down arrow button, then
release both buttons. The radio will go to the next
station and pause there for a few seconds. It will
continue to scan until you press either SEEK arrow
button.
To scan stations down the band, press and hold the down
arrow button, then press the up arrow button, then
release both buttons. The radio will go to the next
station and pause there for a few seconds. It will
continue to scan until you press either SEEK arrow
button.
To Preset Radio Stations
1. Tune in the desired station.
2. Press SET. The word SET will appear on the digital
screen for five seconds.
3. While SET is displayed, press one of the four
pushbuttons.
4. Repeat steps 1-3 for each of four AM and four FM
stations. Up
to three additional stations on each band may be
preset
by “pairing” pushbuttons:
1. Tune in the desired station.
2. Press SET, and within five seconds press any two
adjacent pushbuttons at the same time.
pushbuttons are pressed at the same time.
3. The station can be tuned in when the same two
Setting the Tone
BASS:
Slide this lever up to increase bass, or down to
decrease it.
TREBLE: Slide this lever up to increase treble, or
down to decrease it. If a station
is weak or noisy, reduce
the treble.
Adjusting the Speakers
BAL: The control ring behind the upper knob adjusts
the lefthght speaker balance.
FADE: The control ring behind the lower knob adjusts
the frondrear speaker balance.
3-10
ProCarManuals.com
Page 171 of 390
To Preset Radio Stations
The five pushbuttons under the cassette entry door can
be used
to preset up to 10 radio stations (five AM and
five
FM stations). The buttons have other uses when you
are playing a tape (see “To Play
a Cassette Tape” later in
this section).
1. Tune
in the digital display to the station you want.
2. Press SET. The SET indicator will appear on the
digital screen for five seconds.
3. While the SET indicator is displayed, press one of
4. Repeat steps 1-3 for each of five AM and five FM
the five pushbuttons.
stations.
Setting the Tone
BASS: This switch adjusts the bass level up or down.
The bottom of the digital screen will display the level
you have selected. For
a normal listening level preset at
the factory, press the center
of the switch.
TREB: This switch adjusts the treble level up or down.
The bottom of the digital screen will display
the level
you have selected. For a normal listening level preset at
the factory, press the center of the switch.
Adjusting the Speakers
BALANCE:
Turn the control ring behind the upper
knob slightly to the left or right to adjust the leftlright
speaker balance.
FADE: Turn the control ring behind the lower knob
slightly to the left or right
to adjust the fronthear
speaker balance.
To Play a Cassette Tape
Press PWR to turn the radio on. The radio will play until
a cassette is pushed into the cassette entry door (the tape
side goes in first). Do not use tapes that are longer than
90 minutes (45 minutes on each side).
This audio system has automatic
00 DOLBY B NR@ to
reduce background noise on Dolby encoded tapes.
Dolby@ Noise Reduction is manufactured under license
from Dolby Laboratories Licensing Corporation.
Dolby@ and the
00 symbol are trademarks of Dolby
Laboratories Licensing Corporation.
PROG: Press this button to change the side of the tape
being played. When the end of
a tape is reached, the
other side will
then play.
3-13
ProCarManuals.com
Page 173 of 390
RCL: When the ignition is off, press to display the
clock. When the radio is
on, press to change between the
clock and the radio station frequency displayed on the
digital screen.
Finding a Station
AM FM: Press to select either the AM or FM radio
band. The band
you select will be displayed on the
digital screen. The frequency
of the station will be
displayed, and if the station is in stereo, the
ST (Stereo)
indicator will also be displayed.
Your radio has AMAX. With an AMAX-certified
receiver, your radio can produce quality AM sound
comparable to FM stereo. AMAX reduces noise without
reducing the high frequencies you need for the best
sound. In addition to improved sound quality, AMAX
includes more stations
on the AM band. You don’t have
to do anything to your Delco@/GM radio because
AMAX is automatic.
TUNE: Press the top of the switch to tune in radio
stations higher
on the AM or FM band. Press the bottom
to tune in stations lower on the band.
SEEK: Press SEEK to tune in and stop on the next
station
on the AM or FM radio band.
SCAN: When you press SCAN, the radio will go to the
next station and pause there for a few seconds. SCAN
will display
on the digital screen. Press SCAN again to
stop on a station.
To Preset Radio Stations
The five pushbuttons in the lower right corner can be
used to preset up to
10 radio stations (five AM and five
FM stations). These buttons have other uses when
you
are playing a compact disc (see “To Play a Compact
Disc” later in this section).
1. Tune in the digital display to the station you want.
2. Press SET. The SET indicator will appear on the
digital screen for
five seconds.
3. While the SET indicator is displayed, press one of
the five pushbuttons.
4. Repeat steps 1-3 for each of five AM and five FM
stations.
3-15
ProCarManuals.com
Page 174 of 390
Setting the Tone
BASS: This switch adjusts the bass level up or down.
The bottom of the digital screen will display the level
you have selected. For a normal listening level preset at
the factory, press the center of the switch.
TREB: This switch adjusts the treble level up or down.
The bottom
of the digital screen will display the level
you have selected. For a normal listening level preset at
the factory, press
the center of the switch.
Adjusting the Speakers
BAL:
This four-way control adjusts the lefthight and
fronthear speaker balance to your individual taste.
When you change either adjustment, the bottom of the
digital screen will display the point of balance you have
selected. For the normal setting preset at the factory,
press the
left and right or front and rear buttons at the
same time.
To Play a Compact Disc
Don’t use mini-discs that are called singles. They won’t
eject. Use only full-size compact discs.
1. Press POWER to turn the radio on.
2. Insert a disc part-way into the slot, with the label
side
up. The player will pull it in. In a few seconds,
the disc should play.
If the disc comes back out:
0 The disc may be upside down.
0 The disc may be dirty, scratched or wet.
There may be too much moisture in the air (wait
The player may be too hot, or the road may be too
rough for the disc to play. If the word HOT appears
on the display, the player is too hot. Press
RCL to
remove HOT from the display. As soon as things get
back to normal, the disc should play.
about one
hour and try again).
While a disc
is playing, the CD indicator is displayed on
the digital screen, as is the clock.
Many of the controls for the radio also have functions
for the compact disc player, as explained here.
3-16
ProCarManuals.com
Page 176 of 390
To Set the Anti-Theft System
1. Write down any six-digit number and keep it in a
safe place.
2. Turn the ignition to the ACCESSORY or RUN
position.
3. Press the POWER button to turn the radio off.
4. Press the PREV and FF buttons together. Hold them
down until
“---” shows on the display (at least five
seconds). You are ready to enter your secret code.
NOTE: If you allow more than
15 seconds to elapse
between any steps, the radio automatically reverts to
time and you must start the procedure over at step
4.
5. Press SET and “000” will appear on the display.
6. Press and hold SEEK until the first digit of your
code appears.
7. Press and hold SCAN until the second and third
digits
of your code appear.
8. Press the AM FM button and “000” will appear
again. Now you are ready to enter the last three
digits of your code.
9. Repeat steps 6 and 7 for the last three digits of your
code.
10. Press the AM FM button and “rEP’ will appear.
11. Repeat steps
6- 10. This time SEC will appear,
indicating that the radio
is secure. If “---” appears,
the steps were
not successful and you must repeat
the entire procedure.
3-18
ProCarManuals.com