1995 Oldsmobile Cutlass Supreme fuel cap
[x] Cancel search: fuel capPage 103 of 340
Warning Lights, Gages and Indicators
This part describes the warning lights and,gages that
may be
on your vehicle. The pictures will help you
locate them.
Warning lights and gages can signal that something
is
wrong before it becomFs serious enough to cause an
expensive repair or replacement. Paying attention to
your warning.lights and gages could also save you or
others from injury.
Warning lights come on when there may be or is a
problem with one of your vehicle’s functions.
As you
will see in the details on the next few pages, some
warning lights come on briefly when you start the
engine just to let you know they’re working.
If you are
‘familiar with this section, you should not be alarmed
when this happens.
Gages can indicate when there may be or is a problem
with one-of your vehicle’s functions. Often gages and
warning lights work together to let you know when
there’s a problem with your vehicle.
When one
of the warning lights comes on and stays on
when you are driving, or when one of the gages shows
there may be a problem, check the section that
tells you
what to do about
it. Please follow this manual’s advice.
Waiting to do repairs can be costly
-- and even dangerous.
So please
get to know your warning lights
and gages. They’re
a big help.
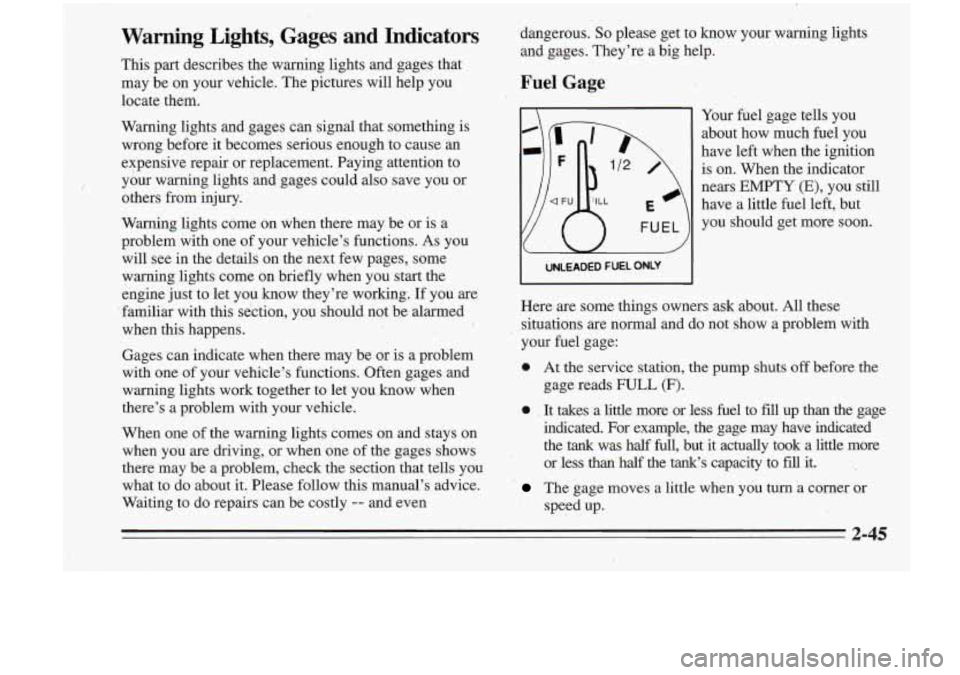
Fuel Gage
Your fuel gage tells you
about how much fuel
YOU
have left when the ignition
is on. When the indicator
nears
EMPTY (E), you still
have
a little fuel left, but
you should get more soon.
UNLEADED FUEL ONLY I
I
Here are some things owners ask about. All these
situations are normal and do not show a problem with
your fuel gage:
0 At the service station, the pump shuts off before the
gage reads
FULL (F).
0 . It takes a little more or less fuel to fill up than the gage
indicated. For example, the gage may have indicated
the
tank was half full, but it actually took a little more
or less
than half the tank‘s capacity to fill it.
The gage moves a little when you turn a corner or
speed up.
2-45
Page 119 of 340
Air Conditioning
On very hot days, open the windows long enough to let
hot inside air escape. This reduces the time the
compressor has to run, which should help fuel economy.
For quick cool-down on very hot days, use
MAX with
the temperature knob all the way in the blue area. If this
setting is used. for long periods of time, the air in your
vehicle may become too dry.
For normal cooling on hot days, use
VENT with the
temperature knob
in the blue area and the NC'button
pushed
in. The system will bring in outside air and cool it.
On cool but sunny days, the sun may warm your upper
body, but your lower body may not be warm enough.
You can use BI-LEVEL with the,terhperature
knob in
the middle and the
A/C button pushed in. The system
will bring
in outside air and direct it to your upper body,
while sending slightly warmed
air to your lower body.
You may notice this temperature difference more at
. '
some times than others.
J
Heating
On cold days use FLOOR with the temperature knob all
the way
in the red area. The system will bring in outside
air, heat it and send it to the floor ducts.
If your vehicle has an engine coolant heatkr, you can use
it to help your system provide warm air faster when it's
cold outside
(0" F (-1 8 O C) or lower). An engine coolant-
heater
warms the coolant your engine and heating
system use to provide heat. See "Engine Coolant
Heater" in the Index.
Ventilation
For mild outside temperatures when little heating or
cooling is needed, use
VENT to direct outside air through
your vehicle. Your vehicle also has the flow-through
ventilation system described later in this section.
Defogging and Defrosting Windows
Your system' has two settings for clearing the front and
side windows. To defrost the windows'quickly, use
DEFROST with the temperature knob all the way in the
red area. To warrn passengers while keeping the
windows' clean, use
QEFOG.
3-3
Page 122 of 340

Automatic Control
For the most efficient operation, you ,should.set the
system temperature and press the knob. The system will
select the best fan speed and air flow, settings to keep
you comfortable. The air conditioning compressor will
run
if the outside temperature is above 40°F (4.5 ” C).
YOU may notice
a delay of three to four minutes before
the fan comes on.
Manual Control
If you prefer to manually control the heating, cooling
and ventilation
in your vehicle, push UPPER, BI-LEV,
LOWER, DEFOG or
DEE AUTO will go off the
display. Set the system to the temperature and fan
speed you want. The system will try to maintain the
temperature you set using the mode you select. The
following suggestions will help the system run more
efficiently in manual mode.
Air Conditioning
On very hot days, open the windows long enough to
let hot inside
air escape. This reduces the time the
compressor has to run, which should help fuel economy.
For quick cool-down on very hot days, use RECIRC. If
this setting is used for long periods
of time, the air in
your vehicle may become too dry. For normal cooling on hot days, use UPPER with the
A/C button pushed
in. The system will.bring in outside
air and cool it.
On
cool but .sunny days, the sun may warm your upper ,
body, but your lower body may not be warm enough. You
can use BI-LEV with the A/C’ button pushed in.’
The system will bring in outside air and direct it to your
upper body, while sending slightly warmed air to your
lower body. You may notice this temperature difference
more at some times than.others.
Heating
On cold days use LOWER. The system will bring in
outside air, heat it and send it to the floor ducts.
If your vehicle has an engine coolant heater, you, can use
it to help your system provide warm air faster when it’s
cold outside
(0°F (-18°C) or lower). An engine coolant
heater warms the‘coolant your engine and heating
system use to provide heat. See “Engine Coolant
Heater” in the Index.
Ventilation
For mild outside temperatures when little heating or
cooling is needed, use-UPPER to direct outside air through
your vehicle.
Your vehicle also has the flow-through
ventilation system described later in
this section.
3-6
-
Page 164 of 340
( @ TIRE-LOADING
OCCUPANTS VE’HICLE CAP., WT.
INFORMATION
FRT. CTR.
RR. TOTAL LBS. KG~
I
MAX. LOADING-& GVWR SAME AS VEHICLE
CAPACITY WEIGHT
.XXX’. COLD TIRE
TIRE
SIZE SPEED PRESSURE RTG
PSI/KPa
I
IF TIRES ARE HOT, ADD 4PSI/28KPa
SEE OWNER’S MANUAL FOR ADDITIONAL
INFORMATION
4-26
MFD BY GENERAL MOTORS CORP
THIS VEHICLE CONFORMS TO ALL APPLI-
CABLE U.S. FEDERAL MOTOR VEHICLE
’ SAFETY, BUMPER, AND THEFT PREVENTION
STANDARDS
IN EFFECT ON.THE DATE OF
MANUFACTURE SHOWN ABOVE.
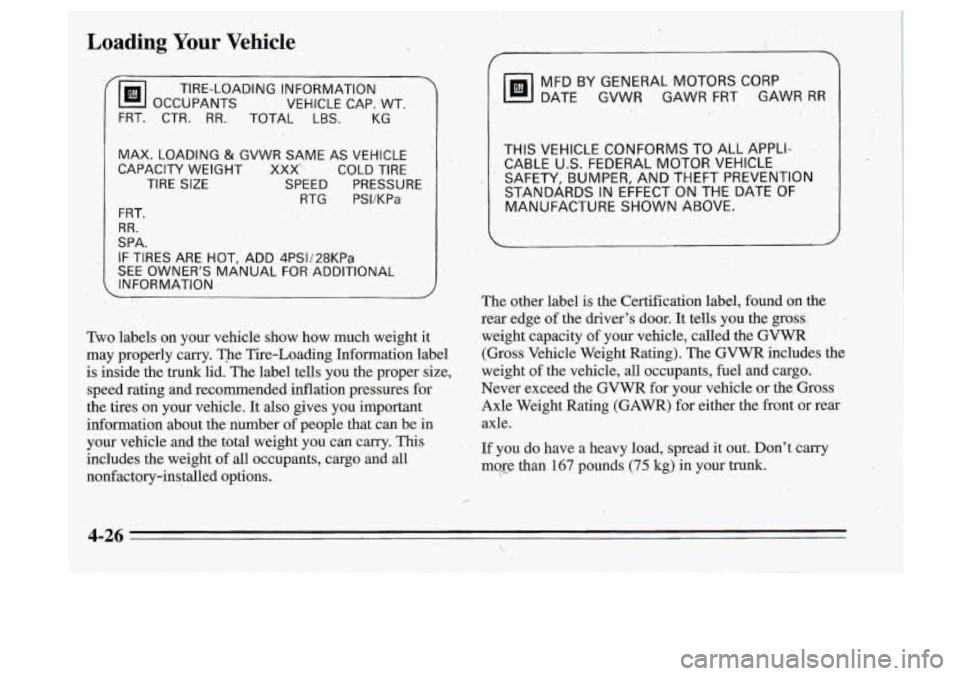
Two labelspn your vehicle show how much weight it
may properly carry. The Tire-Loading Information label
is inside the trunk lid. The label tells you the proper size,
speed rating and recommended inflation pressures for
the tires
on your vehicle. It also gives you important
information about the number‘of people that can be
in
your vehicle and .the total weight you can carry. This
includes the weight of all occupants, cargo and all
--
nonfactory-installed options. The
other 1abel.is the Certification label, found on the
rear edge of the driver’s door.
It tells you the gross.’
weight capacity of your vehicle, called the
GVWR . .
(Gross Vehicle Weight Rating). The GVWR includes the
weight
of the vehicle, all occupants, fuel and cargo.
Never exceed the
GVWR for your vehicle or the Gross
Axle Weight Rating (GAWR) for either the front or re*
axle.
If you do have a heavy load, spread it out. Don’t carry
mop than 167 pounds (75 kg) in your trunk.
Page 210 of 340
Be careful not to spill gasoline. Clean gasoline from
painted surfaces as soon as possible. See “Cleaning the
Outside
of Your Oldsmobile” in the. Index.
I
~ NOTICE:
t.
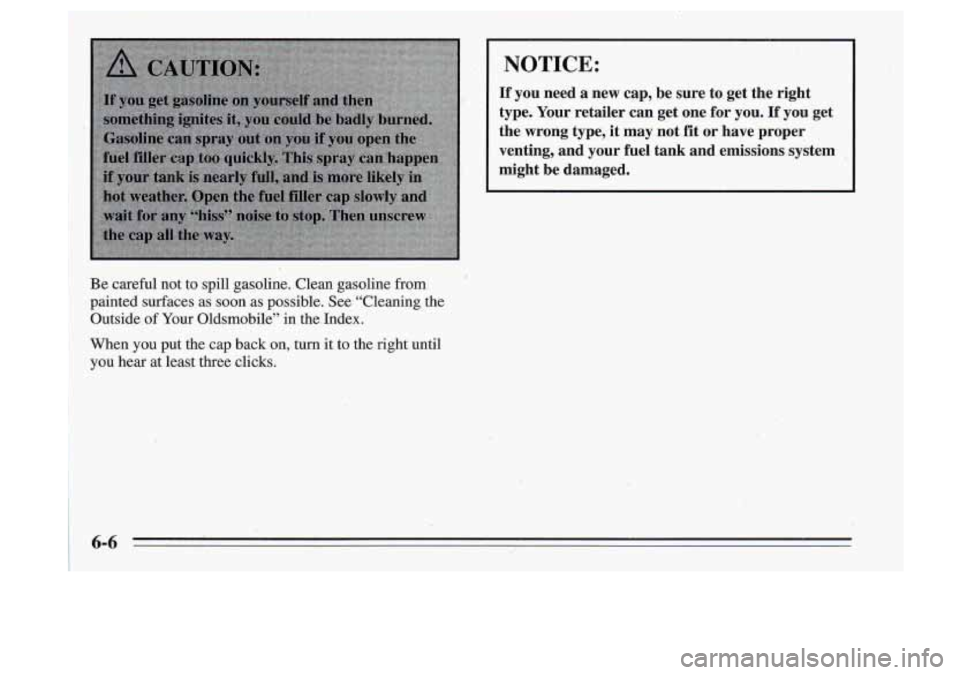
If you need a new cap, be sure to get the right
type. Your retailer can get one for
you. If you get
the
wrong type, it may not fit or have proper
venting, and your fuel tank and emissions system
might be damaged.
When you put the cap back on, turn it to the right until
you hear at least three clicks.
Page 214 of 340
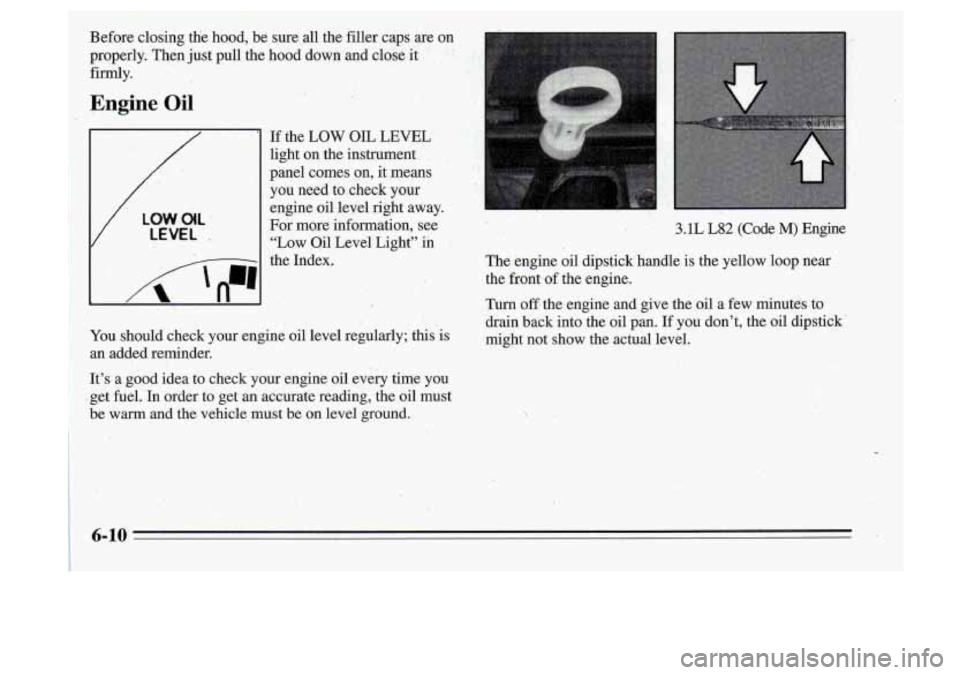
Before closing the hood, be sure all the filler caps are on
properly. Then just pull the hood down and close it
firmly.
Engine Oil .. , ‘I: ~. ’. .I
LOW OIL
LEVEL
If the LOW OIL LEVEL
light on the instrument
panel co-mes on, it means
you need to check your
engine oil level right away.
For more information, see “Low Oil Level Light” in
the Index.
You should check your engine oil level regularly; this is
an added reminder.
It’s a
good idea to check your engine oil every time you
get
fuel. In order to get an accurate reading, the oil must
be warm
and the vehicle must be on level ground.
c
,3.1L.L82 (Code M) Engine
The engine
oil dipstick handle is the yellow loop near
the front of the engine.
Turn. off, the engine and give the oil a few minutes to
drain back into the oil pan. If you don’t, the oil dipstick ’
might not show the actual level.
Page 274 of 340
,i
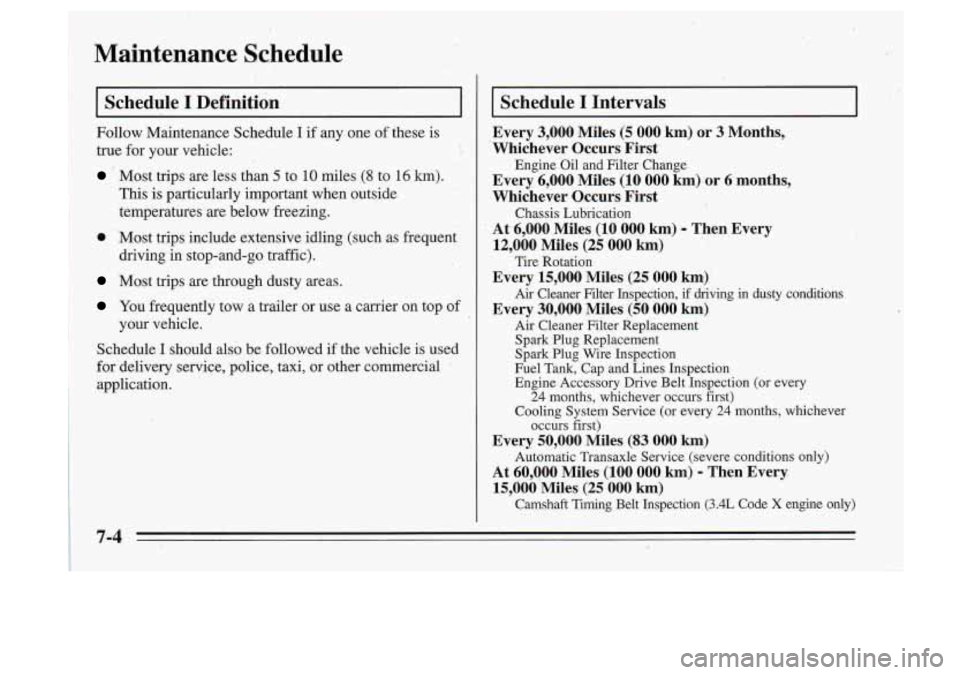
Maintenance Schedule
Schedule I Definition
Follow Maintenance Schedule I if any one of these is
true for your vehicle:
' Most tripsare less than 5 to 10 miles (8 to 16 km).
This 'is particularly important when outside
temperatures are below freezing.
0 'Most trips include extensive idling (such as frequent
driving in stop-and-go traffic).
Most trips are through dusty areas.
You frequently tow a trailer or use a carrier on top of
Schedule
I should also be followed if the vehicle is used
for delivery service, police, taxi, or other commercial
application. your vehicle.
I Schedule I Intervals
Every 3,000 Miles (5 000 b) or 3 Months,
'Whichever Occurs First
Every
6,000 Miles (10 000 km) or 6 months,
Whichever Occurs First
Chassis Lubrication
At-6,000 Miles (10 000 km) - Then Every
12,000 Miles (25 000 km)
Every 15,000 Miles (25 000 km).
Every 30,000 Miles (50 000 km),
Engine Oil and Filter Change
I
Tire Rotation
Air Cleaner Filter Inspection, if driving in dusty conditic
Air Cleaner Filter Replacement Spark Plug Replacement
Spark Plug Wire Inspection
Fuel Tank, Cap and Lines Inspection
Engine Accessory Drive Belt Inspection (or every 24 months, whichever occurs
first)
ms
Cooling System Service (or every
24 months, whichever
occurs first)
Every 50,000 Miles (83 000 km)
At 60,000 Miles (100 000 km) - Then Every.
15,600 Miles (25 000 km)
Autdmatic Transaxle Service (severe conditions only)
Camshaft Timing Belt Inspection (3.4L Code
X engine only)
7-4
!
Page 275 of 340
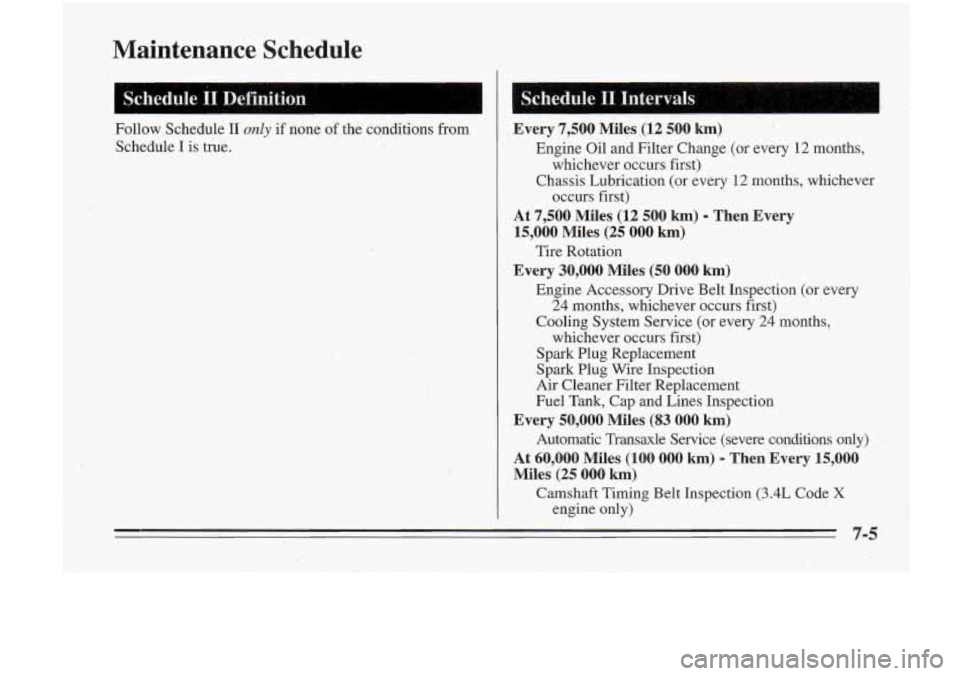
Maintenance Schedule
Schedule II~Definition
Follow Schedule II only if none of the conditions from
Schedule
I is true.
I
1:; S.chedule 11. Intervals (1, a 1 k I ,
Every 7,500 Miles,(l2 500 km)
Engine Oil and Filter Change (or every 12 months,
Chassis Lubrication (or every
12 months, whichever
whichever occurs
first)
occurs first)
At 7,500 Miles (12 500 km) - Then Every
15,000 Miles (25 000 km)
Every 30,000 Miles (50 000 km)
Tire Rotation
Engine Accessory Drive Belt Inspection (or every
24 months, whichever bccurs first)
Cooling System Service (or every
24 months,
whichever occurs first)
Spark Plug Replacement
Spark Plug Wire Inspection
Air Cleaner Filter Replacement
Fuel Tank, Cap and Lines Inspection
Automatic Transaxle Service (severe conditions only)
Every 50,000 Miles (83 000 km)
At 60,000 Miles (100 000 km) - Then Every 15,000
Miles (25 000 km)
Camshaft Timing Bel& Inspection (3.4L Code X
engine only)
7-5