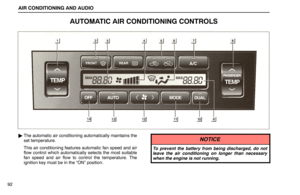
Page 25 of 34

AIR CONDITIONING AND AUDIO
11 5 Push this button on the lower side to skip backward. Push the
button until “REW” and the number you want to skip appear on
the display.
�If you set “REW 1”, the player will rewind to the beginning
of the current program.
�When counting the number of programs you want to rewind,
remember to count the current program as well. For
example, if you want to rewind to a song that is two before
the song you are listening to, push this button until “REW 3”
appears on the display.
When the beginning of the tape is reached, the player
automatically resumes normal play.
There must be at least 5 seconds of blank space between
programs for this feature to work correctly.
“RPT”, “SKIP” or “Automatic program selection”
features: These features may not work well with some spoken
word, live or classical recordings.
�Type B
Push the “��|” button to skip forward. “FF” and the number
will appear on the display. Push the button until the number you
want to skip appears on the display. After that, the player will
automatically skip forward.
When the end of the tape is reached, the player automatically
reverses sides and resumes normal play.
Push the “|��” button to skip backward. Push the button until
“REW” and the number you want to skip appear on the display.
�If you set “REW 1”, the player will rewind to the beginning
of the current program.
�When counting the number of programs you want to rewind,
remember to count the current program as well. For
example, if you want to rewind to a song that is two before
the song you are listening to, push this button until “REW 3”
appears on the display.
Page 26 of 34
AIR CONDITIONING AND AUDIO
11 6When the beginning of the tape is reached, the player
automatically resumes normal play.
There must be at least 5 seconds of blank space between
programs for this feature to work correctly.
“RPT”, “SKIP” or “Automatic program selection”
features: These features may not work well with some spoken
word, Iive or classical recordings.
Compact disc player operation
The compact disc player is an optional accessory that your
vehicle is pre−wired to accept. Although your audio system
has a CD button, your vehicle may or may not be equipped with
a CD player. Please contact your dealer for additional details
if you would like to have the optional CD player installed.
(a) Inserting compact discs
1. Push the lock release button and open the cover.
Page 27 of 34
AIR CONDITIONING AND AUDIO
11 7
2. Push this button to eject the magazine.
3. Pull out the tray while pushing the lock release button.
4. Put a disc on the tray with its label face down and push
the tray back into the magazine.
If the label faces up, the disc cannot be played. In this case,
“Err” and the disc number appears on the display.
5. Insert the magazine into the player as indicated by the
arrow head on the magazine and close the cover.
Page 28 of 34

AIR CONDITIONING AND AUDIO
11 8When the magazine is set completely, the system will be in a
“Load” cycle for approximately 20 seconds while the system
searches for discs in the magazine. Upon completion of this
cycle, the CD unit will be ready to play. If the “CD” button is
pushed during the “Load” cycle, “LOAD” appears on the
display until the system has completed the load cycle, after
which the system will begin normal play.
CAUTION
To reduce the chance of injury in case of an accident or
a sudden stop, always keep the cover closed while
driving.
(b) Playing a compact disc
Push the “CD” button if the magazine is already loaded in
the player.
“CD” appears on the display.
The discs set in the magazine are played continuously, starting
with disc number 1. The disc number of the disc currently being
played, the track number and the time from the beginning of the
program appear on the display.
When play of one disc ends, the first track of the following disc
starts. When play of the final disc ends, play of the first disc
starts again.
The player will skip any empty disc trays.
Page 29 of 34
AIR CONDITIONING AND AUDIO
11 9 (c) Selecting a desired disc
Push the “DISC” button to select the disc number.
Push the button and hold it until the desired disc number
appears on the display. When you release the button, the
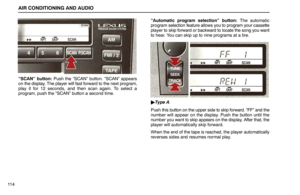
player will start playing the selected disc from the first track.(d) Searching for a desired trackPush the “SCAN” button briefly.
“SCAN” will appear on the display. The compact disc player
will play the next track for 10 seconds, then scan again. To
select a track, push the “SCAN” button a second time. If the
player reaches the end of the disc, it will continue scanning
at track 1.
After all the tracks are scanned in one pass, normal play
resumes.
Page 30 of 34
 Searching for a desired disc
Push the “SCAN” button until you hear a beep.
With “D.SCAN” on the display, the program at the beginning of
each disc will be pla")
AIR CONDITIONING AND AUDIO
120(e) Searching for a desired disc
Push the “SCAN” button until you hear a beep.
With “D.SCAN” on the display, the program at the beginning of
each disc will be played for 10 seconds. To continue listening
to the program of your choice, push the “SCAN” button a
second time.
After all the discs in the magazine are scanned in one pass, the
scan function is cancelled.(f) Selecting a desired track“TRACK” button: Use for direct access to a desired track.
Push either side of the “TRACK” button and hold it until the
desired track number appears on the display. As you release
the button, the player will start playing the selected track from
the beginning.
“Fast forward” button.
Push the “��” button and hold it to fast forward the disc. When
you release the button, the compact disc player will resume
playing from that position.
“Reverse” button.
Push the “��” button and hold it to reverse the disc. When you
release the button, the compact disc player will resume
playing.
Page 31 of 34
 Other compact disc player functions
“RPT” button: Use it for automatic repeat of the track you are
currently listening to.
Push the button while the track is pla")
AIR CONDITIONING AND AUDIO
121 (g) Other compact disc player functions
“RPT” button: Use it for automatic repeat of the track you are
currently listening to.
Push the button while the track is playing. When the track is
finished, the player will automatically go back to the beginning
of the track and play the track again. To cancel it, push the
button once again.
“RAND” button: Use it for automatic track selection and play
by the system.
When the button is pushed, the system selects a track in the
discs which are set and plays it. To cancel it, push the button
once again.
When a track is skipped or the system is inoperative, push the
button to reset.(h) If the player malfunctions
If “WAIT” appears on the display, audio signals of the disc
cannot be read or the system has trouble. Push the “CD” button
once again.
If the player does not operate, check that the disc surface is not
soiled or damaged. If the disc is O.K., the following two causes
are possible.
�Condensation may have occurred on the internal
mechanism of the automatic changer. Open the cover to let
the air circulate.
�The temperature of the player’s internal mechanism is
raised because of high external temperature. Remove the
magazine from the player to cool it.
If the player still does not operate, take it to your Lexus dealer.
Car audio system operating hints
Radio reception
Usually, the problem with radio reception does not mean there
is a problem with your radio − it is just the normal result of
conditions outside the vehicle.
For example, nearby buildings and terrain can interfere with
FM reception. Power lines or telephone wires can interfere with
AM signals. And of course, radio signals have a limited range,
and the farther you are from a station, the weaker its signal will
be. In addition, reception conditions change constantly as your
vehicle moves.
Page 32 of 34

AIR CONDITIONING AND AUDIO
122Here are some common reception problems that probably do
not indicate a problem with your radio:
FM
Fading and drifting stations − Generally, the effective range
of FM is about 40 km (25 miles). Once outside this range, you
may notice fading and drifting, which increase with the
distance from the radio transmitter. They are often
accompanied by distortion.
Multi−path − FM signals are reflective, making it possible for
two signals to reach your antenna at the same time. If this
happens, the signals will cancel each other out, causing a
momentary flutter or loss of reception.
Static and fluttering − These occur when signals are blocked
by buildings, trees, or other large objects. Increasing the bass
level may reduce static and fluttering.
Station swapping − If the FM signal you are listening to is
interrupted or weakened, and there is another strong station
nearby on the FM band, your radio may tune in the second
station until the original signal can be picked up again.
AM
Fading − AM broadcasts are reflected by the upper
atmosphere − especially at night. These reflected signals can
interfere with those received directly from the radio station,
causing the radio station to sound alternately strong and weak.
Station interference − When a reflected signal and a signal
received directly from a radio station are very nearly the same
frequency, they can interfere with each other, making it difficult
to hear the broadcast.Static − AM is easily affected by external sources of electrical
noise, such as high tension power lines, lightening, or electrical
motors. This results in static.
Caring for your cassette player and tapes
For high performance from your cassette player and tapes:
Clean the tape head and other parts regularly.
�A dirty tape head or tape path can decrease sound quality
and tangle your cassette tapes. The easiest way to clean
them is by using a cleaning tape.
Use high−quality cassettes:
�Low−quality cassette tapes can cause many problems,
including poor sound, inconsistent playing speed, and
constant auto−reversing. They can also get stuck or tangled
in the cassette player.
�Do not use a cassette if it has been damaged or tangled or
if its label is peeling off.
�Do not leave a cassette in the player if you are not listening
to it, especially if it is hot outside.
�Store cassettes in their cases and out of direct sunlight.
�Avoid using cassettes with a total playing time longer than
100 minutes (50 minutes per side). The tape used in these
cassette is thin and could get stuck or tangled in the
cassette player.


 Selecting a desired disc
Push the “DISC” button to select the disc number.
Push the button and hold it until the desired disc number
appears on the display. Whe")